最近在Windows10上的项目需要使用到ansible API调用,参考 本末大神 推荐ansible API用官网封装的ansible-runner开发比较友好,ansible-runner是ansible官方团队维护的项目,不用担心项目落后
本人使用的Python版本是3.7,pycharm也是在Windows10上,习惯了win10暂时不想用Ubuntu虚拟机,于是在WSL中安装了Ubuntu18和python3.7,再安装ansible和ansible-runner。
注:pycharm2018.3后已经支持使用WSL中的python解释器
WSL支持python3自带的venv模块创建虚拟环境
自行在Windows10下安装WSL
切换apt源
sudo cp /etc/apt/sources.list /etc/apt/sources.list.ori
# 编辑 /etc/apt/sources.list ,以下为编辑完内容
deb https://mirrors.tuna.tsinghua.edu.cn/ubuntu/ bionic main restricted universe multiverse
deb https://mirrors.tuna.tsinghua.edu.cn/ubuntu/ bionic-updates main restricted universe multiverse
deb https://mirrors.tuna.tsinghua.edu.cn/ubuntu/ bionic-backports main restricted universe multiverse
deb https://mirrors.tuna.tsinghua.edu.cn/ubuntu/ bionic-security main restricted universe multiverse

sudo apt update
安装ansible
apt安装
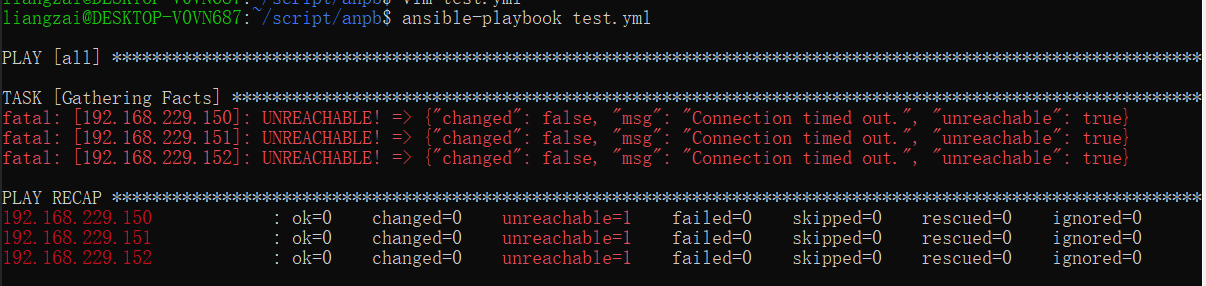
先用apt安装,此时ansible安装在python2.7下,然后再卸载用pip安装,直接用pip安装,安装后不能使用(ssh可以连接ansible不能ping通),尝试多种方法还是如此,原因不明,后来测试先用apt安装卸载之后,用pip安装在python3.7之下可以使用,如果不想这么麻烦可以试试直接用pip安装,如果不可用再按照此方法,实际上在别的电脑是可以直接用Python3.7直接安装使用的,可能是WSL的稳定性问题,刚好我遇到了这种情况。
sudo add-apt-repository ppa:ansible/ansible-2.8
sudo apt-get update
sudo apt install ansible
# 删除仓库
sudo add-apt-repository -r ppa:ansible/ansible-2.8
# 测试使用完毕之后卸载
sudo apt remove ansible
WSL下Ubuntu18安装Python3.7
# 安装python依赖
sudo apt-get install build-essential checkinstall
sudo apt-get install zlib1g-dev libbz2-dev libssl-dev libncurses5-dev libsqlite3-dev libreadline-dev tk-dev libgdbm-dev libdb-dev libpcap-dev xz-utils libexpat1-dev liblzma-dev libffi-dev libc6-dev
wget -c https://www.python.org/ftp/python/3.7.0/Python-3.7.0.tar.xz
tar --no-same-owner -Jxf Python-3.7.0.tar.xz
mkdir -p /usr/local/python3
cd ./Python-3.7.0
sudo ./configure --prefix=/usr/local/python3/ --enable-optimizations
sudo make
sudo make install
sudo ln -s /usr/local/python3/bin/python3 /usr/bin/python
sudo ln -s /usr/local/python3/bin/pip3 /usr/bin/pip
# 编辑添加 /etc/profile 以下内容
# python3 env
export PATH=$PATH:/usr/local/python3/bin/
export PATH

sudo source /etc/profile
修改pip源
mkdir ~/.pip
cat > ~/.pip/pip.conf <<EOF
[global]
# 清华镜像源
index-url = https://pypi.tuna.tsinghua.edu.cn/simple
EOF
pip安装在python3.7下
sudo pip install ansible==2.8.7
sudo mkdir /etc/ansible
cd /etc/ansible
wget https://raw.githubusercontent.com/ansible/ansible/devel/examples/ansible.cfg
wget https://raw.githubusercontent.com/ansible/ansible/devel/examples/hosts
sudo mkdir roles
pip安装ansible-runner
安装ansible-runner最新版1.4.4
sudo pip install ansible-runner==1.4.4
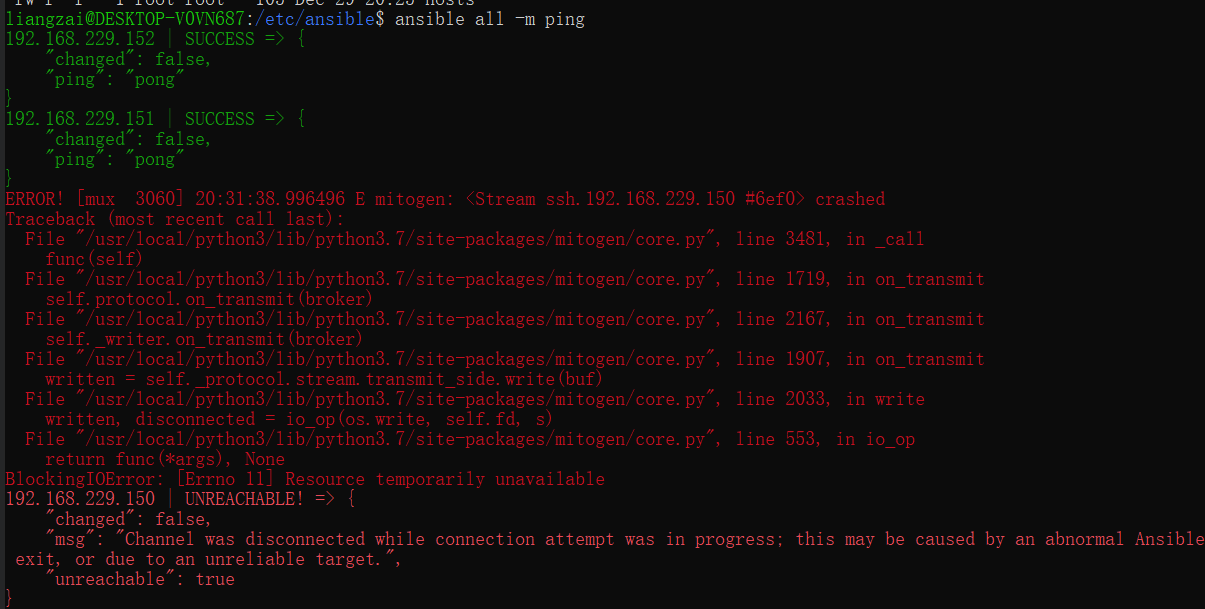
mitogen插件安装,注意,经测试ping,在WSL下ping失败率很高,不建议使用
mitogen是可以极大提高ansible执行速度的插件,但最新mitogen不支持ansible2.9.x
# 参考 https://habr.com/en/post/453446/
pip3 install mitogen
# 修改配置文件 /etc/ansible/ansible.cfg
[defaults]
strategy = mitogen_linear
strategy_plugins = /usr/local/python3/lib/python3.7/site-packages/ansible_mitogen/plugins/strategy
优化配置
gathering = smart
fact_caching = jsonfile
fact_caching_connection = /tmp/facts_cache
ssh_args = -C -o ControlMaster=auto -o ControlPersist=3600s
control_path = /tmp/ansible-ssh-%%h-%%p-%%r
pipelining = True
sftp_batch_mode = True
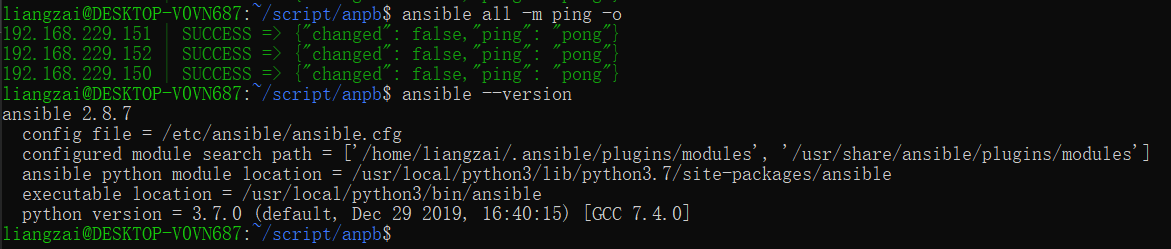
优化ansible配置和配置hosts之后,测试连接和查看版本
最后放几张WSL下Ubuntu18使用ansible报错截图
这些报错是因为先用pip3.7安装,安装之后一直ping不通,其中原因至今还没想明白,先用apt安装就可以使用

mitogen插件报错