reudom
Automated testing framework based on requests and unittest interface.
基于 Unittest 和 Requests 的 接口自动化测试框架
介绍
基于Unittest/Requests的接口自动化测试库
- 提供脚手架,快速生成接口自动化测试项目。
- 自动生成HTML测试报告。
- 支持用例参数化。
- 支持用例失败重跑
- 对原生Requests库API无损
目录架构
myreudom/
├── test_case/
│   ├── test_sample.py
├── reports/
└── run.py
test_dir/目录实现用例编写。reports/目录存放生成的测试报告。run.py文件运行测试用例。
安装教程
> pip install reudom
If you want to keep up with the latest version, you can install with github repository url:
> pip install -U git+https://github.com/SeldomQA/reudom.git@master
创建项目
>reudom --project myreudom
运行项目:
> reudom -r run.py
Python 3.7.1

                     _
                    | |
  _ __ ___ _   _  __| | ___  _ __ ___
 | '__/ _ | | | |/ _` |/ _ | '_ ` _
 | | |  __| |_| | (_| | (_) | | | | | |
 |_|  ___|\__,_|\__,_|___/|_| |_| |_|
 --------------------------------------
                            @itest.info

generated html file:/Users/work/reports/2019_12_22_14_51_57_result.html
.1
查看报告
你可以到 myreudom
eports 目录查看测试报告。
reports文件夹可以不用自己去创建,它会在你执行run.py时自动创建此文件夹

Simple demo
请查看 demo/test_sample.py 文件
import reudom


class test(reudom.TestCase):
    def setUp(self):
        self.url = 'http://www.baidu.com'

    def test01(self):
        rep = reudom.request('get', url=self.url, headers=self.headers())
        result = rep.json()
        self.assertEqual(result['status'], '200')


if __name__ == '__main__':
    reudom.main("test_sample.py")
说明:
- 创建测试类必须继承
reudom.TestCase。 - 测试用例文件命名必须以
test开头。 - reudom引入了
post、get、head、patch、put、delete、options等方法。
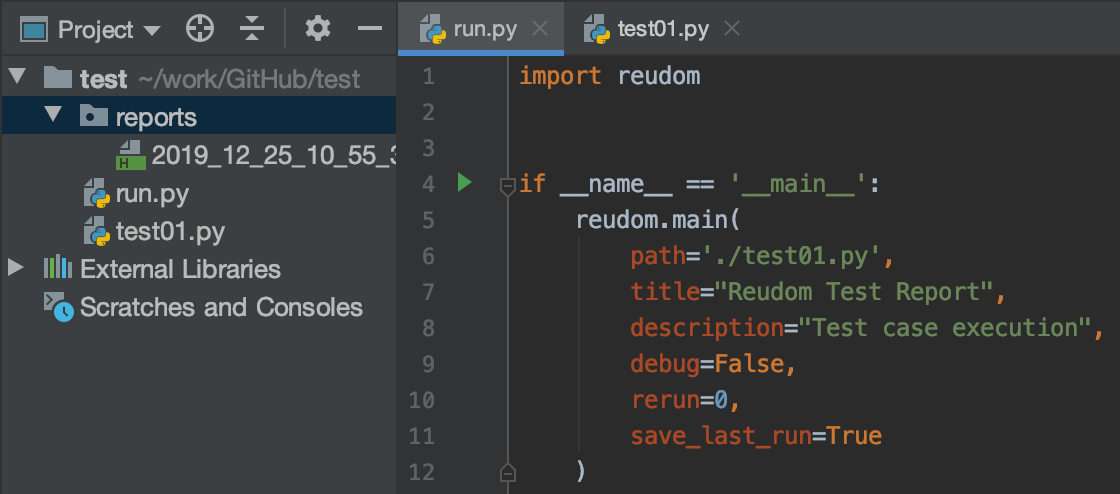
main() 方法
import reudom

# ...

if __name__ == '__main__':

    seldom.main(
              path="./",
              title="接口自动化测试用例",
              description="详细测试结果:",
              debug=False,
              rerun=0,
              save_last_run=False,
    )
说明:
- path : 指定测试目录或文件。
- title : 指定测试报告标题。
- description : 指定测试报告描述。
- debug : debug模式,设置为True不生成测试HTML测试,默认为
False。 - rerun : 设置失败重新运行次数,默认为
0。 - save_last_run : 设置只保存最后一次的结果,默认为
False。
Run the test
import reudom

reudom.main(path="./")  # 当前目录下的所有测试文件
reudom.main(path="./test_dir/")  # 指定目录下的所有测试文件
reudom.main(path="./test_dir/test_sample.py")  # 指定目录下的测试文件
reudom.main(path="test_sample.py")  # 指定当前目录下的测试文件
说明:
- 如果指定的目录,测试文件必须以
test开头。 - 如果要运行子目录下的文件,必须在子目录下加
__init__.py文件。
跳过用例
import reudom


class YouTest(reudom.TestCase):

    @reudom.skip("跳过这条用例的执行")
    def test_case(self):
        """a simple test case """
        #...
在PyCharm里使用
- 当你使用PyCharm编译器或其他Python编译器时,您只需要使用
pip install reudom安装后在你项目的文件夹内创建.py文件里import reudom就可以了 - 如果你需要正式的运行起来,只需在项目跟目录里创建
run.py里使用上面的main方法取运行就可以啦;运行时会自动的在run.py的同级目录生成reports文件夹生成的 测试报告 就在里面!
AES加密
- 现在很多项目都使用 AES 对接口进行加密传输处理,所以我也对 reudom 库进行了支持
- AES最常见的3种方案_AES-128、AES-192和AES-256,但目前仅对 AES-128 方案进行了分装,后面去会把剩下两种加进去
- 您只需在你的.py工程里引入
import reudom, - 然后使用:
reudom.aesCrypt(
                    key='16位',
                    model='加密模式',
                    iv='CBC模式需要它',
                    encode_='默认GBK')
                    .aesEncrypt('传入需要加密的明文')
key传入长度必须是:16、24、32位model可选择:ECB、CBC、CFB、PGP、OFB、CTR、OPENPGP 这七种模式iv使用 CBC 时需要传入的与 key 同样的长度encode_默认使用了 GBK 编码text传入需要加密的 明文
import reudom

reudom.aesCrypt(key='1234567890123456', model='CBC', iv='1234567890123456', encode_='GBK').aesEncrypt(text='123')


控制台:
/usr/bin/python3 /Users/yuanbaolei/work/GitHub/reudom/CryptoAESAES/Cipher/aesEncrypt.py
15tT+y0b+lJq2HIKUjsvvg==

Process finished with exit code 0