http:https://git.coding.net/Boxer_/homework.git
ssh:git@git.coding.net:Boxer_/homework.git
小组名称:新蜂
组长:武志远
组成员:宫成荣 李峤 杜月
项目名称:Java俄罗斯方块
站会时间:10.10(10.9休息一天)
总任务:
1,数据库显示模块。
2,本地记录模块,
3,俄罗斯方块主模块
4,按钮窗口模块
5,下一个窗口模块
6,等级窗口模块,
7,分数窗口模块。
8,版权信息模块。
每日任务:
1,设计画面窗口布局。
2,实现窗口的布局(主要是完成绘画层类的封装)
已完成任务:1,2.
未完成任务:2.
遇到问题:null。
详细记录:
1,设计画面布局:
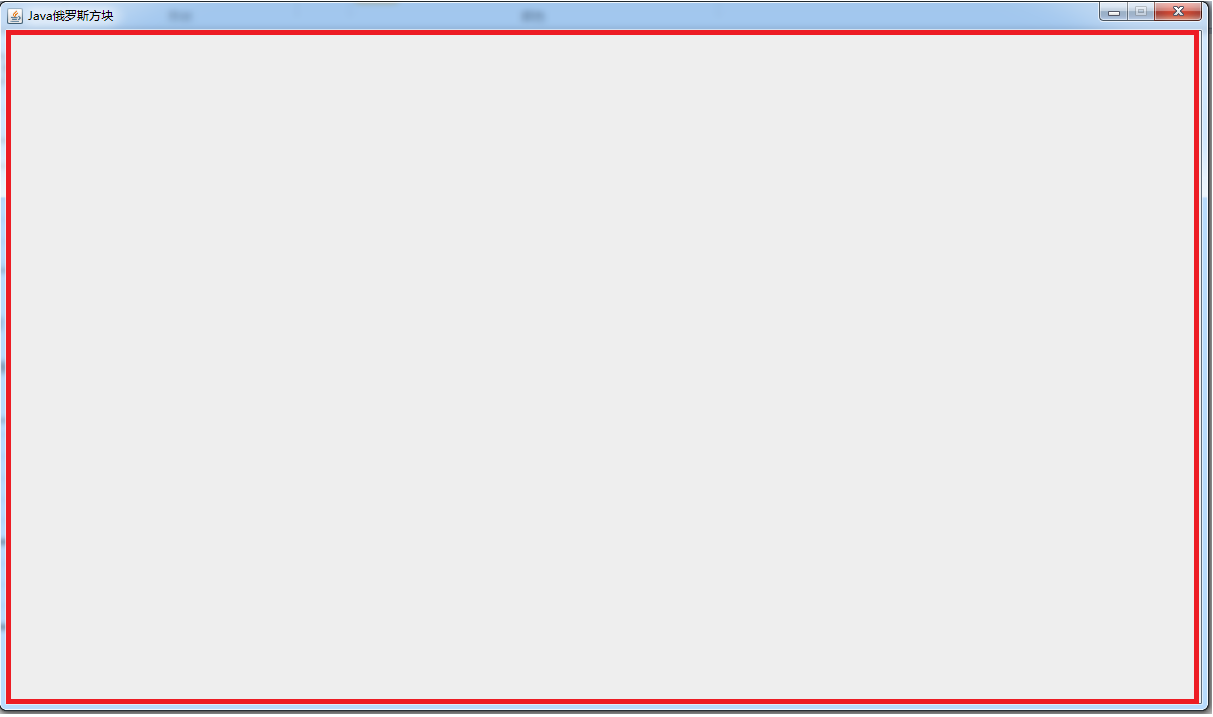
this.setSize(1200,700);
1)使用setsize设置窗口大小为(1200,700);
2)实际出去边框大小,里面实际尺寸是1162x654,如图下红色部分所示;

3)设计小方块为32x32像素,每个窗口的边框是7像素,综合几个因素,经过小组成员反复设计讨论,得到了设计图。

2,设计布局的实现,如果一个个画窗口太麻烦了, 一点都不面向对象,我们要写lay类,然后lay类中包含一个creatwindow方法,只要用参数构造lay类的对象,然后调用对象的creatwindow方法,就可以画出窗口,可以这很面向对象。
详细代码如下(就不分段解读了,程序里的注释多,一样的,阅读体验更佳):
 1 package ui;
 2
 3 import java.awt.Graphics;
 4 import java.awt.Image;
 5
 6 import javax.swing.ImageIcon;
 7
 8 public class Lay {
 9     /**
10      * 定义边框的大小,边框大小取决于素材,虽然实际边框是素材拉伸,但边框长度二者宽度是一样的
11      */
12     private static final int SIZE = 7;
13
14     //实例化img,即图片,把我们准备好的素材放进去
15     private static    Image WINDOW_IMG = new ImageIcon("graphics/window/Window.png").getImage();
16
17
18     /**
19      * 得到素材的宽和高
20      */
21
22     private static int WINDOW_W = WINDOW_IMG.getWidth(null);
23
24     private static int WINDOW_H = WINDOW_IMG.getHeight(null);
25
26     /**
27      * 窗口左上角x坐标(即我们画的窗口与主窗口位置关系,y也是一样的)
28      */
29     private int x;
30     /**
31      * 窗口左上角y坐标
32      */
33     private int y;
34     /**
35      * 窗口宽度
36      */
37     private int w;
38     /**
39      * 窗口高度
40      */
41     private int h;
42
43     //lay的构造函数仅需四个参数,左上角的坐标x,y,生成窗口的宽度长度w,h。
44     public Lay(int x, int y, int w,int h)
45     {
46         this.x = x;
47         this.y = y;
48         this.h = h;
49         this.w = w;
50     }
51     /**
52      * 绘制窗口
53      */
54     public void createWindow(Graphics g)
55     {
56
57         //左上
58         g.drawImage(WINDOW_IMG, x, y, x+SIZE, y+SIZE, 0, 0, SIZE, SIZE, null);
59         //中上
60         g.drawImage(WINDOW_IMG, x+SIZE, y, x+w-SIZE, y+SIZE, SIZE, 0, WINDOW_W - SIZE, SIZE, null);
61         //右上
62         g.drawImage(WINDOW_IMG, x+w-SIZE, y, x+w, y+SIZE, WINDOW_W-SIZE, 0, WINDOW_W, SIZE, null);
63         //左中
64         g.drawImage(WINDOW_IMG, x, y+SIZE, x+SIZE, y+h-SIZE, 0, SIZE, SIZE, WINDOW_H-SIZE,null );
65         //右中
66         g.drawImage(WINDOW_IMG, w+x-SIZE, y+SIZE, x+w, h+y-SIZE, WINDOW_W-SIZE, SIZE, WINDOW_W,WINDOW_H-SIZE , null);
67         //左下
68         g.drawImage(WINDOW_IMG, x, y+h-SIZE, x+SIZE, y+h, 0, WINDOW_H-SIZE, SIZE, WINDOW_H, null);
69         //下中
70         g.drawImage(WINDOW_IMG, x+SIZE, y+h-SIZE, x+w-SIZE, y+h, SIZE, WINDOW_H-SIZE, WINDOW_W-SIZE, WINDOW_H, null);
71         //右下
72         g.drawImage(WINDOW_IMG, x+w-SIZE, y+h-SIZE, x+w, y+h, WINDOW_W-SIZE, WINDOW_H-SIZE, WINDOW_W, WINDOW_H, null);
73         //中
74         g.drawImage(WINDOW_IMG, x+SIZE, y+SIZE, x+w-SIZE, y+h-SIZE, SIZE, SIZE, WINDOW_W-SIZE, WINDOW_H-SIZE, null);
75     }
76
77 }
若想生成窗口,实例化,调用对象函数就可以了,下面是七个窗口对象。然后调用了七个画边框方法。
package ui;
import java.awt.Graphics;
import java.awt.Image;

import javax.swing.ImageIcon;
import javax.swing.JPanel;
public class PanelGame extends JPanel{

    private Lay lay1 = new Lay(40, 32,334, 279);
    private Lay lay2 = new Lay(40, 343,334, 279);
    private Lay lay3 = new Lay(414, 32,334, 590);
    private Lay lay4 = new Lay(788, 32,334, 124);
    private Lay lay5 = new Lay(788, 188,176, 148);
    private Lay lay6 = new Lay(964, 188,158, 148);
    private Lay lay7 = new Lay(788, 368,334, 200);
    //private Lay lay8 = new Lay(128, 32,320, 576);
    @Override
    public void paintComponent(Graphics g)
    {

    lay1.createWindow(g);
    lay2.createWindow(g);
    lay3.createWindow(g);
    lay4.createWindow(g);
    lay5.createWindow(g);
    lay6.createWindow(g);
    lay7.createWindow(g);
    //lay8.createWindow(g);

    }

}
以下就是现阶段效果(虽然有点丑,那是因为素材不精美):

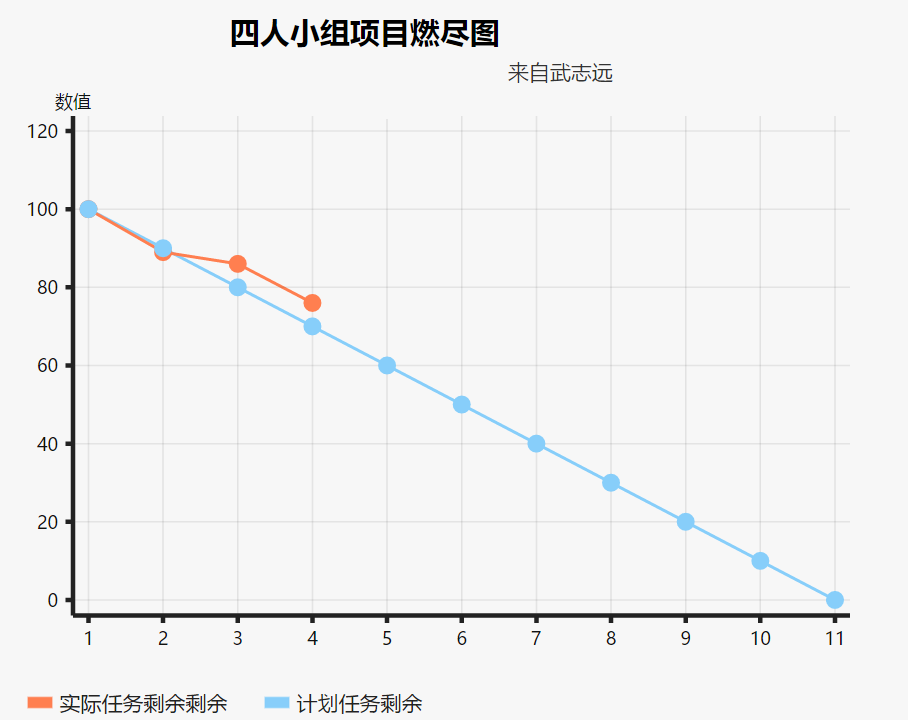
燃尽图:

还是改成只画一个燃尽图了,因为原先那个小燃尽图个人认为其实没必要,因为时间跨度太短。