最近做了一个使用 C# 写了一个发送邮件的 windows 服务,在这里记录一下。
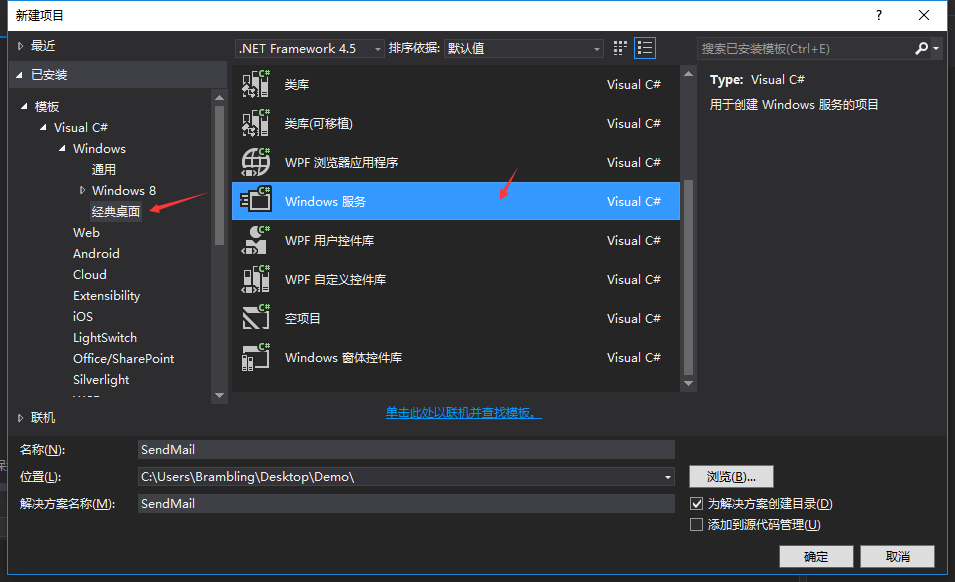
首先使用 Visual Studio 2015 创建一个 windows 服务项目。
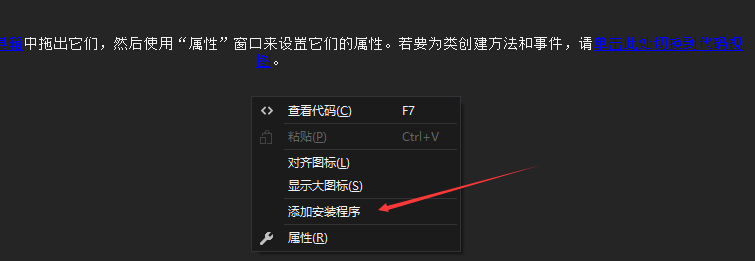
然后在设计器上面右击添加安装程序。如下图。
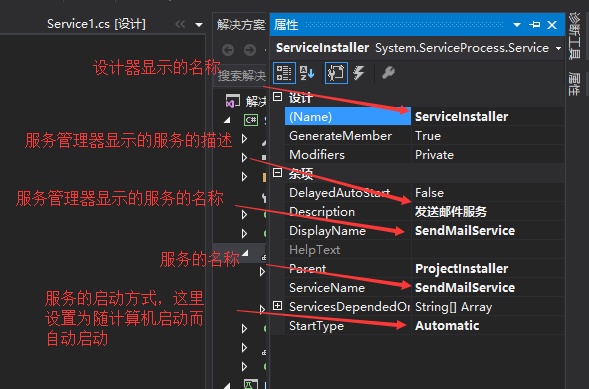
安装好后,选择安装程序设计界面,选择服务和安装程序右击选择属性修改一些属性值。


PS:如果不给服务添加安装程序,后面是没法把服务安装至 windows 系统里的。
在数据库创建一个表,用于存储需要发送的邮件信息。
create table MainInfo
(
    MainInfoID    int  not null identity(1,1) primary key,
    Mail_To  nvarchar(64) not null,    -- 收件人邮箱
    Title nvarchar(128) not null,    -- 邮件标题
    Content nvarchar(max)  null, -- 邮件内容
    Mode int not null default(0), -- 发送方式,0为默认发送,1为抄送,2为密送
    SendState int not null default(0), -- 发送状态,0为未发送,1为发送成功,2为发送失败
    IsTimer int not null default(0), -- 0为即时发送,1为定时发送
    SendTime nvarchar(64) null,        -- 定时发送的时间
    AttAchFileUrl nvarchar(max) null,    -- 添加附件的地址
    AttAchFileName nvarchar(128) null,  -- 附件名称
    IsServerUrl int null default(0)    -- 附件地址是否为服务器地址
)
下面开始贴出代码:
SqlHelper.cs,访问数据库类。


using System;
using System.Collections.Generic;
using System.Configuration;
using System.Data;
using System.Data.SqlClient;
using System.IO;
using System.Linq;
using System.Text;
using System.Threading.Tasks;

namespace SendMail
{
    public class Conn
    {
        public static string StrConn
        {
            get
            {
                //读取文本文件(txt)
                //return Conn.getValue(@"C:UsersBramblingDesktopDemoSendMailSendMailDB_ConfigDB_Config.txt", "StrConn");

                //读取配置文件
                //return ConfigurationManager.ConnectionStrings["StrConn"].ToString();
                //return ConfigurationManager.AppSettings["Conn"].ToString();

                //直接返回数据库连接字符串
                return "Data Source=.;Initial Catalog=Test;User ID=sa;Pwd=xxxxxx;Enlist=true;Pooling=true;Max Pool Size=300;Min Pool Size=0;Connection Lifetime=300;packet size=1000";
            }
        }

        public static SqlConnection SqlConn
        {
            get
            {
                return new SqlConnection(StrConn);
            }
        }

        private static string getValue(string path, string name)
        {
            string[] str = File.ReadAllLines(path);
            for (int i = 0; i < str.Length; i++)
            {
                if (str[i].StartsWith(name))
                {
                    return str[i].Replace(name + "=", "");
                }
            }
            return "";
        }
    }


    public class SqlHelper
    {
        public DataSet GetDataSet(string sql)
        {
            DataSet ds = new DataSet();
            SqlConnection conn = Conn.SqlConn;
            try
            {
                conn.Open();
                SqlDataAdapter sda = new SqlDataAdapter(sql, conn);
                sda.Fill(ds);
            }
            catch (Exception)
            {
            }
            finally
            {
                conn.Close();
            }
            return ds;
        }

        public DataTable GetDataTable(string sql)
        {
            DataSet ds = new DataSet();
            DataTable dt = new DataTable();
            SqlConnection conn = Conn.SqlConn;
            try
            {
                conn.Open();
                SqlDataAdapter sda = new SqlDataAdapter(sql, conn);
                sda.Fill(ds);
                if (ds != null && ds.Tables.Count > 0)
                {
                    dt = ds.Tables[0];
                }
            }
            catch (Exception)
            {
            }
            finally
            {
                conn.Close();
            }
            return dt;
        }

        public bool ExecSql(string sql)
        {
            int num = 0;
            SqlConnection conn = Conn.SqlConn;
            try
            {
                conn.Open();
                SqlCommand cmd = new SqlCommand(sql, conn);
                num = cmd.ExecuteNonQuery();
            }
            catch (Exception)
            {
            }
            finally
            {
                conn.Close();
            }
            return num > 0;
        }
    }
}
这里我尝试了读取配置文件的数据库连接串,但是好像 windows 服务读取不到配置文件。还有个办法就是读取一个文本文件(txt)。
文本文件(txt)的连接串写法:
StrConn=Data Source=.;Initial Catalog=Test;User ID=sa;Pwd=xxxxxx;Enlist=true;
Pooling=true;Max Pool Size=300;Min Pool Size=0;Connection Lifetime=300;packet size=1000
Mail.cs,发送邮件类。
using System;
using System.Collections.Generic;
using System.Data;
using System.IO;
using System.Linq;
using System.Net;
using System.Net.Mail;
using System.Text;
using System.Threading.Tasks;

namespace SendMail
{
    public class Mail
    {
        SqlHelper sqlhelper = new SqlHelper();

        public void SendMail()
        {
            MailMessage mailmsg = null;
            NetworkCredential credential = null;
            SmtpClient client = null;

            string sql = " select top 1 * from MainInfo where SendState='0' and (IsTimer='0' or (IsTimer='1' and SendTime is not null and Convert(datetime,SendTime)<=getdate())) order by IsTimer,SendTime ";
            DataTable dt = sqlhelper.GetDataTable(sql);
            if (dt != null && dt.Rows.Count > 0)
            {
                string Id = dt.Rows[0]["MainInfoID"].ToString();

                try
                {
                    //创建一个身份凭证,即发送邮件的用户名和密码
                    credential = new NetworkCredential("980095349@qq.com", "xxxxxx");

                    //发送邮件的实例,服务器和端口
                    client = new SmtpClient("smtp.qq.com", 25);
                    //发送邮件的方式,通过网络发送
                    client.DeliveryMethod = SmtpDeliveryMethod.Network;
                    //是否启用 SSL
                    client.EnableSsl = true;
                    //指定发送邮件的身份凭证
                    client.Credentials = credential;

                    //发送的邮件信息
                    mailmsg = new MailMessage();

                    // 指定发件人邮箱和显示的发件人名称
                    mailmsg.From = new MailAddress("980095349@qq.com", "午夜游魂");

                    // 指定收件人邮箱
                    MailAddress mailto = new MailAddress(dt.Rows[0]["Mail_To"].ToString());
                    if (dt.Rows[0]["Mode"].ToString() == "1")
                    {
                        mailmsg.CC.Add(mailto);     // 抄送
                    }
                    else if (dt.Rows[0]["Mode"].ToString() == "2")
                    {
                        mailmsg.Bcc.Add(mailto);    // 密送
                    }
                    else
                    {
                        mailmsg.To.Add(mailto);     // 默认发送
                    }

                    //邮件主题
                    mailmsg.Subject = dt.Rows[0]["Title"].ToString();
                    mailmsg.SubjectEncoding = Encoding.UTF8;

                    //邮件内容
                    mailmsg.Body = dt.Rows[0]["Content"].ToString();
                    mailmsg.BodyEncoding = Encoding.UTF8;

                    //添加附件
                    string url = dt.Rows[0]["AttAchFileUrl"].ToString();    // 附件地址
                    string name = dt.Rows[0]["AttAchFileName"].ToString();   // 附件名称
                    if (dt.Rows[0]["IsServerUrl"].ToString() == "1")    // 判断附件地址是否为服务器地址
                    {
                        if (!string.IsNullOrEmpty(url) && !string.IsNullOrEmpty(name))
                        {
                            // 从指定的服务器附件地址加载附件,并转换为 IO 流 添加到邮件附件中
                            HttpWebRequest request = (HttpWebRequest)WebRequest.Create(url);
                            HttpWebResponse response = (HttpWebResponse)request.GetResponse();
                            Stream stream = response.GetResponseStream();

                            mailmsg.Attachments.Add(new Attachment(stream, name));
                        }
                    }
                    else
                    {
                        if (!string.IsNullOrEmpty(url))
                        {
                            mailmsg.Attachments.Add(new Attachment(@url));   // 本地路径可直接加载
                        }
                    }

                    client.Send(mailmsg);   // 发送邮件
                    UpdateState(Id, "1");   // 发送成功修改发送状态为 1
                }
                catch (Exception ex)
                {
                    UpdateState(Id, "2");   // 发送失败修改发送状态为 2
                }
            }
        }

        public bool UpdateState(string Id, string state)
        {
            string SendTime = DateTime.Now.ToString("yyyy-MM-dd HH:mm:ss");

            string sql = " update MainInfo set SendState='" + state + "',SendTime='" + SendTime + "' where MainInfoID='" + Id + "' ";
            bool b = sqlhelper.ExecSql(sql);
            return b;
        }
    }
}
在这里我把发送邮件的用户、密码、服务器、端口等都是写死的。实际使用中可以考虑单独建立一张发送邮件的配置表,和邮件信息表关联起来。
SendMailMain.cs,设置定时器类。
using System;
using System.Collections.Generic;
using System.Linq;
using System.Text;
using System.Threading.Tasks;
using System.Timers;

namespace SendMail
{
    public class SendMailMain
    {
        // 设置定时器
        private System.Timers.Timer t = null;


        public void Init()
        {
            try
            {
                if (t == null)
                {
                    t = new System.Timers.Timer();
                    t.Elapsed += new ElapsedEventHandler(SendMail);     // 绑定事件
                    t.Interval = 5000;      // 指定执行的间隔时间
                    t.Enabled = true;   // 是否启用执行 System.Timers.Timer.Elapsed 事件
                    t.AutoReset = true;     // 设置为 true 表示一直执行,false 为只执行一次
                }
            }
            catch
            {
                t.Stop();
                t.Dispose();
            }
        }

        private void SendMail(object sender, ElapsedEventArgs args)
        {
            try
            {
                ((System.Timers.Timer)sender).Enabled = false;  //单线程管控
                Mail mail = new Mail();
                mail.SendMail();
            }
            catch (Exception)
            {
                throw;
            }
            finally
            {
                ((System.Timers.Timer)sender).Enabled = true;  //单线程管控
            }
        }
    }
}
Service1.cs,服务开始类。
using System;
using System.Collections.Generic;
using System.ComponentModel;
using System.Data;
using System.Diagnostics;
using System.Linq;
using System.ServiceProcess;
using System.Text;
using System.Threading.Tasks;

namespace SendMail
{
    public partial class Service1 : ServiceBase
    {
        public Service1()
        {
            InitializeComponent();

            // 启用 暂停和恢复服务功能
            //base.CanPauseAndContinue = true;
        }

        // 服务开始执行方法
        protected override void OnStart(string[] args)
        {
            SendMailMain sm = new SendMailMain();
            sm.Init();
        }

        // 服务停止执行方法
        protected override void OnStop()
        {
        }

        // 计算机关闭执行方法
        protected override void OnShutdown()
        {
        }

        // 恢复服务执行方法
        protected override void OnContinue()
        {
        }

        // 暂停服务执行方法
        protected override void OnPause()
        {
        }

    }
}
上面就是完全的代码了,下面先创建一个测试单元,测试一下发送邮件。
首先在数据库插入一条要发送的邮件信息的数据:
insert into MainInfo(Mail_To,Title,Content,AttAchFileUrl,AttAchFileName,IsServerUrl)
  values('1171588826@qq.com','测试邮件','测试邮件,请勿回复!',
  'https://timgsa.baidu.com/timg?image&quality=80&size=b9999_10000&sec=1494357502809&di=66d6a7909bfe54624a16e02caefb9838&imgtype=0&src=http%3A%2F%2F5.66825.com%2Fdownload%2Fpic%2F000%2F330%2F7599586ba2ba3bed5d76ea182883fca6.jpg',
  '孙悟空.jpg','1')
然后直接使用测试单元调用发送邮件的方法:
using System;
using Microsoft.VisualStudio.TestTools.UnitTesting;
using SendMail;
using System.IO;

namespace UnitTest
{
    [TestClass]
    public class UnitTest1
    {
        [TestMethod]
        public void TestMethod1()
        {
            Mail mail = new Mail();
            mail.SendMail();
        }
    }
}
发送成功了。

下面开始安装 windows 服务。
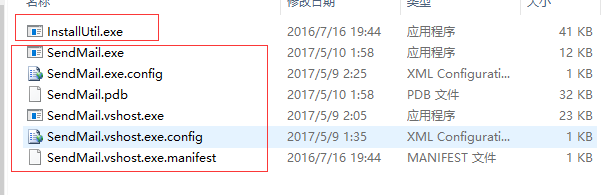
首先找到路径 C:WindowsMicrosoft.NETFrameworkv4.0.30319 或者路径 C:WindowsMicrosoft.NETFrameworkv2.0.50727 下面的 InstallUtil.exe,具体是哪一个下面的,根据版本而定。

然后新建一个文件夹,把刚刚找到的 InstallUtil.exe 文件和 bin Debug 或者 Release 文件夹下编译好的文件全部复制到该文件夹下。
然后以管理员身份运行 cmd,输入如下图命令安装 windows 服务。
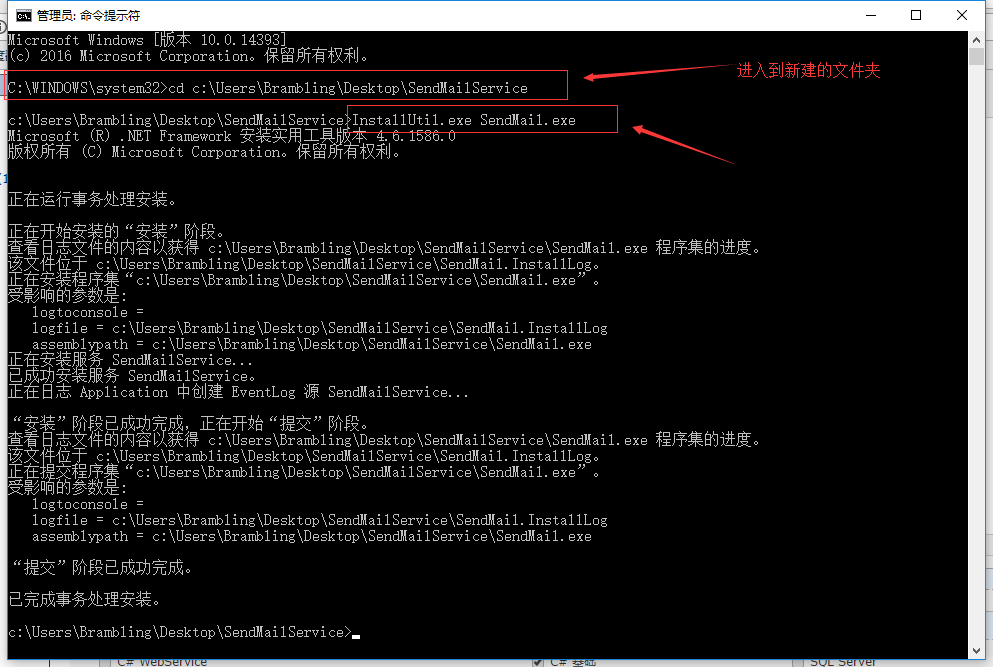
使用 InstallUtil.exe SendMail.exe /u 命令卸载安装的服务。
或者使用下面这种简单的方法。
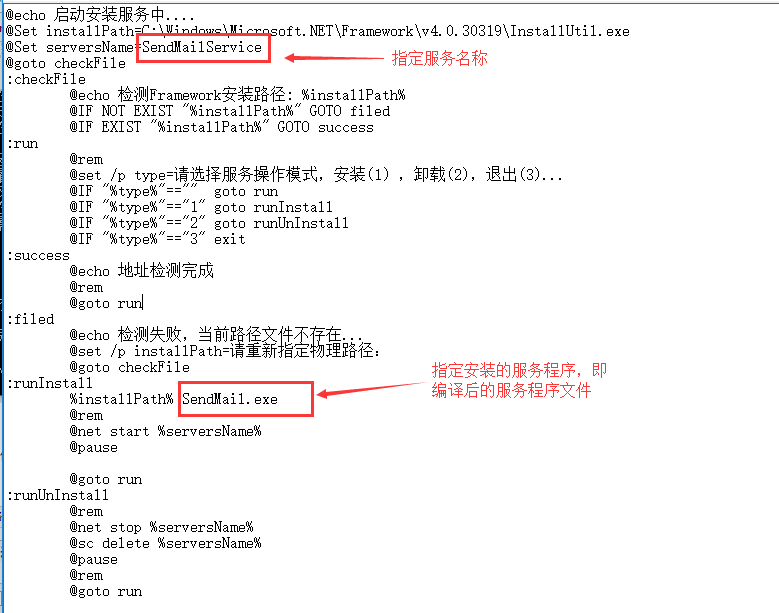
附上代码:
@echo 启动安装服务中....
@Set installPath=C:WindowsMicrosoft.NETFrameworkv4.0.30319InstallUtil.exe
@Set serversName=SendMailService
@goto checkFile
:checkFile
    @echo 检测Framework安装路径: %installPath%
    @IF NOT EXIST "%installPath%" GOTO filed
    @IF EXIST "%installPath%" GOTO success
:run
    @rem
    @set /p type=请选择服务操作模式,安装(1),卸载(2),退出(3)...
    @IF "%type%"==""  goto run
    @IF "%type%"=="1" goto runInstall
    @IF "%type%"=="2" goto runUnInstall
    @IF "%type%"=="3" exit
:success
    @echo 地址检测完成
    @rem
    @goto run
:filed
    @echo 检测失败,当前路径文件不存在...
    @set /p installPath=请重新指定物理路径:
    @goto checkFile
:runInstall
    %installPath% SendMail.exe
    @rem
    @net start %serversName%
    @pause

    @goto run
:runUnInstall
    @rem
    @net stop %serversName%
    @sc delete %serversName%
    @pause
    @rem
    @goto run
把上面这一段代码复制到新建的文本文件(txt)中,然后把后缀改为 bat,然后把它和 bin Debug 或者 Release 文件夹下编译好的文件放到同一个文件夹下。然后执行这个后缀为 bat 的文件,根据提示的步骤就可以很简单的安装和卸载服务了。
启动服务命令: net start SendMailService(服务的名称)
停止服务命令: net stop SendMailService(服务的名称)
PS:如果安装的服务的文件进行了修改,但是路径没有变化的话是不需要重新注册服务的,直接停止服务,然后用新的文件覆盖原来的文件即可,如果路径发生变化,应该先卸载这个服务,然后重新安装这个服务。
最后一步,因为这个服务依赖于 sql server ,所以需要把服务设置为延迟启动。
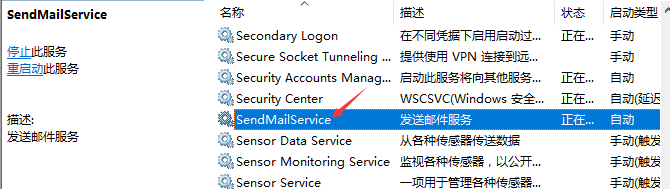
选中服务右击,选择属性。把启动类型设置为:自动(延迟启动)。

这样一个使用 windows 服务发送邮件的功能就完成了。现在可以把服务开启,然后向数据库插入一条邮件信息的数据,试试看效果。