概要
在我使用了半年多 WPF 后,是时候写点关于 WPF 基础方面的东西了。我发表了一系列针对具体问题的文章。现在是到了让大家明白为什么说WPF是一款在界面开发上带来革命的产品了。
本文针对初级-中级程序员,所以我尽量给出一些基础的示例。
WPF 介绍
就像名字表示的那样(WPF:Windows Presentation Foundation 直译为 Windows 图像基础),WPF是在 .NET Framework 3.0 引进的一个新框架,包含了很多可以更快速和方便地编写程序的类库。它使用了 Direct3D 技术来呈现界面。由于充分利用了机器硬件的优势,所以界面更加平滑。如果只能使用传统的 GDI 技术,就不能使用如此多的高级图形特性,所以 Windows Form 经常是效率低下的。另外: Windows Form 使用了操作系统原生的组件来创建程序,这样极大地限制了开发人员的自定义能力。 WPF 组件实际上是画在屏幕上的,所以在有必要的时候可以非常方便地进行自定义。
WPF 特性
WPF 带来了非常多的高级特性,下面我们来看一些:
设备独立的像素控制(DPI)
WPF 引入了对程序的 DPI 设置。对一个窗口来说,计算屏幕上的每一英寸能容纳多少像素是非常重要的。这个通常依赖操作系统和硬件支持。任何用户都可以很容易地修改这些设置,这样导致了程序看起来非常丑陋。 Windows Form 程序使用 DPI 来控制程序的像素,每个控件都可以改变它的尺寸和外观。
WPF 独立于 DPI 的设置。下面我们来看一个示例:
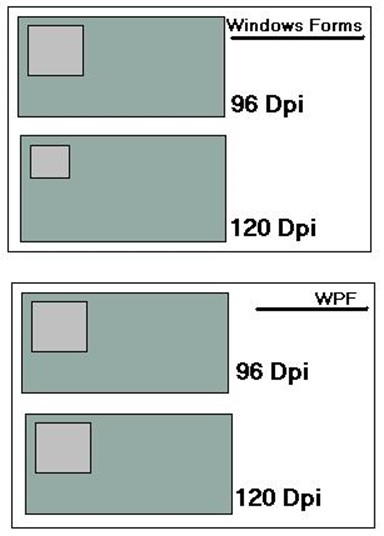
假设你画了一个上图中那样的盒子,1英寸长,屏幕设置为 96DPI 。现在如果屏幕设置为 120DPI ,盒子将看起来变小了。这是因为 Windows Form 程序依赖 DPI 设置。
WPF 使用了基于密度的方法,意思就是如果像素密度修改了,元素也会自动调整,这就是 DIP (依赖设备)。如上图中看到的那样,如果 DPI 变高,盒子将使用更多的像素来保持同样的大小。
内置的对图形和动画的支持
WPF 程序使用 DirectX 进行渲染,这是一种主要用来支持图形显示和动画能力的技术。一些独立的类库用来进行图形和动画处理。画出来的图形都是矢量的并且面向对象的。意思就是:如果在 WPF 中画一个矩形,可以很容易地从程序中通过持有的引用把这个矩形给移除掉。在传统的 Windows 程序中,一旦你画了一个矩形,你就不能再单独选中这个矩形了。 WPF 使用的方式与传统的方式有非常大的差异。我们将在文章的后面更详细地讨论图形和动画。
重新定义了风格和控件模板
除了图形和动画功能, WPF 带来了极其灵活的风格和模板定义。如果你了解 CSS 技术,你应该知道样式是一个规定组件如何呈现的定义集合。如果是传统的 Windows Form 程序,风格设置被紧紧地绑定在每一个组件上,你必须要为每一个控件单独定义颜色,风格等。当使用 WPF ,风格文件是完全独立于 UI 组件的,一旦你定义了一种风格,你很简单地就可以把它用在元素上。
我们经常使用多个基本的控件来构成组件。 WPF 引入了一种新的模板机制可以让我们用来重新定义组件。举个例子,你定义了一个有一个矩形框和一个标题的复选框 。使用 WPF 的模板,你可以重新定义将单选框放入到复选框中,这样就是圆形的选择按钮而不是矩形的。非常有意思。我们将在后文单独使用一节来讲解风格和模板。
每个控件都是基于资源的
另外一个重要的特性是: WPF 是基于资源的。在传统的 Windows Form 程序中,定义风格是非常复杂的。如果你有 1000 个按钮,你想让每一个按钮都是金色的,你不得不创建 1000 个 Color 对象并应用到每一个按钮上,这样将导致很大的资源消耗。
在 WPF 中,可以存储每一个风格,控件,动画甚至对象为资源。这些资源只有在程序启动的时候会初始化一遍,然后就可以使用到组件上。你可以把这些资源维护到一个单独的叫做资源字典的文件中,这样整个程序都可以使用。所以 WPF 程序可以很好的应用主题。
新的属性系统和绑定功能
下面我必须得介绍一下 WPF 引入的新的属性系统。每个 WPF 的元素都定义了大量的依赖属性。这些依赖属性相比传统的属性有非常强的能力。当我定义我自己的新的属性的时候,我可以很容易地注册这个属性到任何我想注册的对象上。这样就可以添加到同一个观察者。因为每个元素都是派生自 DependencyObject ,所以每个元素包含了 Dependency Observer 。一旦你注册了一个属性作为依赖属性,在观察者上就会创建一个空间并且保存属性的值。我们将在本系列文章的后面更加详细地讨论这个问题。
什么是XAML?
根据定义, XAML 是一种基于 XML 的标记语言,用于声明和设置类的属性。换一种说法就是: XAML 是一种被 WPF , Silverlight 或其他程序使用的可以自己定义类的语言。所以,在你的程序中,你可以声明变量,定义类的属性并直接使用它们。 XAML 转化器将在呈现程序的时候自动转换它们并且帮你创建对象。
XAML 一般用于定义 UI 界面的布局,包括元素和静态的视觉方面。我们无法直接使用 XAML 定义程序流。虽然 XAML 有非常强大的能力,但是它仍然不是一门程序语言而只是用于定义程序的 UI 界面。XAML使用其他程序语言比如 C# , VB.NET 等来处理背后的逻辑。
ExpressionBuilder 是最好的生成XAML的工具。
WPF 体系结构
对每种新技术来说,对其体系结构的清楚了解都是至关重要的。在开始创建你的应用前,你至少应该对一些概念有所了解。如果你不想详细了解 WPF ,请跳过这一小节。前文中已经说过了, WPF 实际上就是一组建立架构的类库。这些类库可以分为以下几类:
- 管理层( Managed Layer )
- 非管理层( UnManaged Layer )
- 内核API( Core API )
管理层( Managed Layer): WPF 的管理层由多个类库构成。这些类库构成了 WPF 架构,与底层的非管理层的 API 进行通信来呈现应用的内容。这些组成的类库是:
- PresentationFramework.dll:创建上层的元素:如面板,控件,窗口,风格等
- PresentationCore.dll:提供基础类型比如 UIElement ,PresentationFramework.dll中的所有形状和控件也从这个程序集中的基类派生
- WindowsBase.dll:这里提供更加基础的超出WPF程序环境的元素例如 Dispatcher 类型, Dependency 类型。我将在稍后讨论这个。
- Unmanaged Layer (milcore.dll):WPF 的非管理层就是所谓的 milcore 或者是媒体集成类库核心。他将基本的 WPF 高层的对象如面板,按钮,动画等翻译为 Direct3D 所需要的纹理。这是 WPF 的主要呈现引擎。
- WindowsCodecs.dll:这是另外一个支持 WPF 应用呈现的底层 API 。 WindowsCodecs.dll 包括了大量的编码/解码器来把图片编码和解码为矢量图形。
- Direct3D:这是呈现 WPF 图形的底层 API。
- Username2:这是每个程序所用的主要核心 API 。用于管理内核和进程隔离。
- GDI & Device Drivers: GDI 和 Device Drivers 专用于需要访问底层API的操作系统。
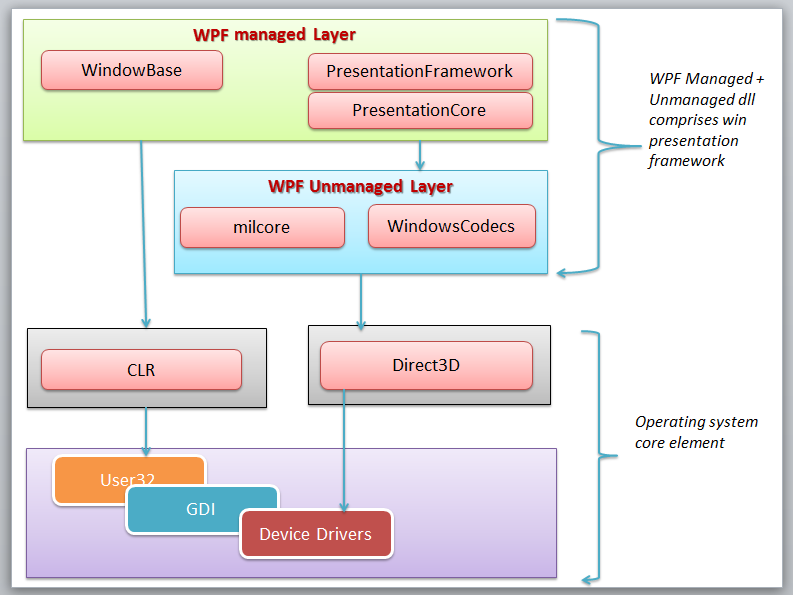
上图中你可以看到刚才我讲的不同的元素如何互相通信。
在继续前你应该了解的事
下面是一些在你开始编写 WPF 程序前必须了解的一些事。
什么是调度员和线程关联?
当 WPF 程序启动时,它实际上自动创建了两个线程。一个是呈现线程,对程序员来说是不可见的,所以你不能直接在程序中操作呈现线程。另外一个是调度线程,始终持有所有的 UI 元素。换句话说,你可以认为 Dispatcher实际上就是把所有UI元素绑定到WPF程序中的UI线程。相反的,WPF要求所有的UI元素应该绑定到 Dispatcher 线程,这就叫做线程关联。所以,你不能改变其他线程在 Dispatcher 线程上创建的元素,因此它遵循同样的基于 Win32 的 API 。这样它允许你能够把任何 WPF 组件转换为基础 API 的窗口句柄来进行内部操作。了解更多
Dispatcher 是一个持有线程管理的类。它实际上是一个所有元素都关连的有限消息循环。每一个 UIElement 都是派生自 DispatcherObject —— 定义了一个指向 UI 线程的 Dispatcher 属性。这样从其他的任何线程,如果你想调用或访问UI组件,你应该调用 Dispatcher 线程。 DispatcherObject 有两个主要的指责,检查和验证线程是否调用了这个对象。
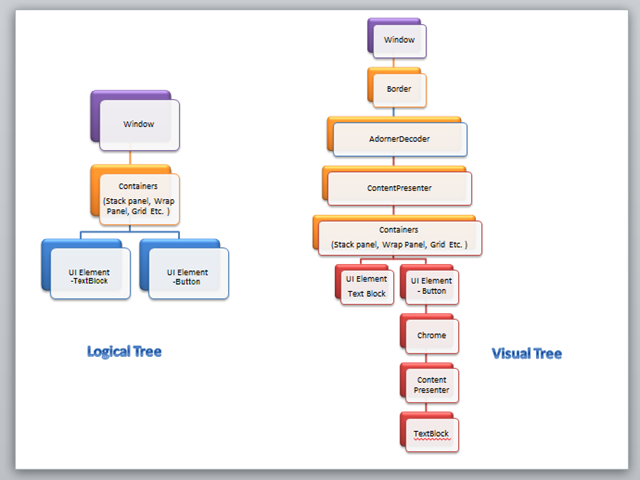
什么是可视化树和逻辑树?
每个编程风格都包含了一些包含整个程序的逻辑树。逻辑树包含了 XAML 中列出的所有元素。他们只是包含你在 XAML 中声明的组件。
可视化树是另外一个方面,包含你装扮每个独立元素的部分。你一般不需要直接处理虚拟树,但是你应该知道每个控件是怎么组成的,这样就能更容易地创建自定义模板。

我个人通常喜欢在使用可视化树前先看一遍。 ExpressionBuilder 是一个让你生成实际控件的工具。
为什么使用路由事件(RoutedEvent)?
路由事件对 C# 语言来说是一个新东西,但是对有 Javascript 或者 web 技术背景的人来说,可能已经在浏览器中见过了。事实上,这里有两种路由事件。一个是从可视化树上的元素上冒泡,另外一个是通过可视化树元素中的隧道传播。另外还有一种直接的路由事件,既不是冒泡,也不是隧道。
当一个被注册的路由事件被触发,它会在可视化树上通过冒泡或隧道一个接一个地通知所有注册了路由事件的方法。
为了区分它们, WPF 使用 Preview*** 这样的风格命名隧道事件,使用只有 *** 来命名冒泡事件。举个例子: IsPreviewMouseDown 事件通过隧道传播整个可视化树,而 MouseDown 事件使用冒泡的方式。意思就是: 发生 Mounse Down 事件时,监听 IsPreviewMouseDown 事件的,最外层的元素最先被调用,监听 MouseDown 事件的,最里面的元素最先被调用。
为什么使用依赖对象?
每个 WPF 控件都派生自 DependencyObject 。依赖对象是 WPF 新引入的支持依赖属性的属性系统。每个对象都是从 DependecyObject 继承的,这样每个对象都可以使用 WPF 内置的很多特性:比如 EventTriggers , PropertyBindings 和 Animations 等。
每个 DependencyObject 都有一个观察者 Observer 或者列表 List 并且声明了3个方法: ClearValue , SetValue和 GetValue 用来添加,编辑或移除这些属性。这样依赖属性只在你使用 SetValue 设置值的时候才创建,从而节约了资源。我们将在这个系列的其他文章中详细讨论依赖属性。
WPF中的硬件加速和图形呈现
另外一件你需要知道的事是 WPF 中图形是如何呈现的。事实上 WPF 的渲染会通过判断系统支持多少硬件加速来自动调整。图形渲染检测合适的层级输出相应的渲染。对硬件渲染,下面是一些非常有影响的方面:
- Video RAM:这个决定了程序用来呈现输出可以使用的缓冲区大小。
- Pixel Shader:这是一个用来计算每个像素影响的图形工具。
- Vertex Shader:这个是用来对输出进行数学计算的图形处理工具。他们用于对3D环境添加特殊的效果。
- MultiTexture Blending:这是一种允许你把多个纹理添加到统一个对象上的特殊方式。
现在WPF呈现引擎确定了对当前应用适合使用的呈现层级,并且自动使用。
- TIER 0:没有硬件加速,所有的都是通过软件来实现。任何版本的 DirectX 9 及更低的版本支持这种输出方式。
- TIER 1:部分硬件支持,部分软件支持。如果你使用 Directx9 或更高的版本,你可能使用这一层级。
- TIER 2:全硬件加速。 Directx9 及以上可以渲染这种输出。
对象层次
WPF 控件中有非常多的对象。我们在图中一个一个地讨论。(图中抽象类使用椭圆形而具体类使用矩形)
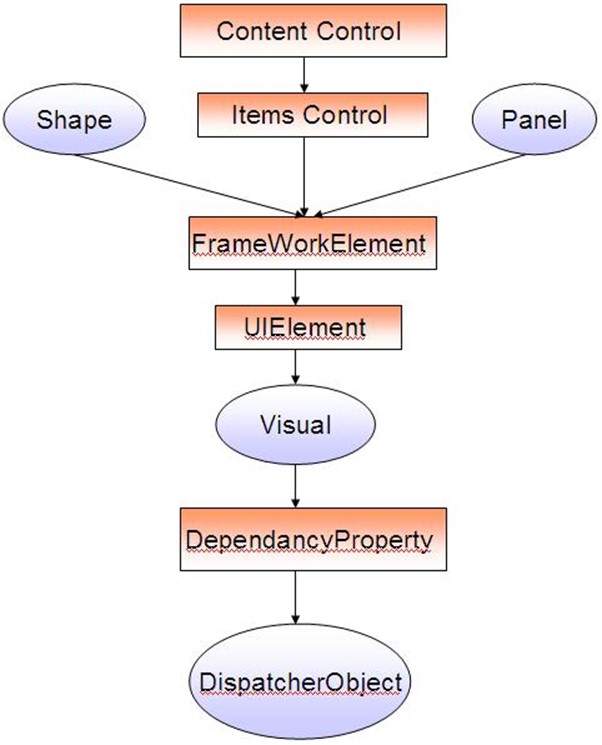
- DispatcherObject:所有可以利用UI线程的 WPF 控件的母亲
- DependencyObject:创建对 Dependency 属性的观察者
- Visual:连接管理库和媒体集成核心库
- UIElement:给 WPF 特性如布局,输入,事件等添加支持
- FrameworkElement: UIElement 的实现
- Shape:所有基本图形的基类
- Control:和用户交互的 UI 元素。他们可以使用模板化来改变外观。
- ContentControl:所有只有单独内容的控件的基类
- ItemsControl:所有内容是集合的类的基类
- Panel:所有可以容难一个或多个控件的面板的基类。
创建你的第一个 WPF 应用
现在终于可以创建你的一个WPF应用了。首先,让我们打开 Visual Studio 2008 或 2010 。下面这个例子,我使用的是 Visual Studio 2008 。创建一个新的项目。你将能看到一个新的窗口。它的 XAML 像下面这样:
<Window
                                x:Class="FirstWindowsApplication.Window1"
                            xmlns="http://schemas.microsoft.com/winfx/2006/xaml/presentation"
                            xmlns:x="http://schemas.microsoft.com/winfx/2006/xaml"
                            x:Name="Window1"
                            Title="Window1"
                                            Height="300"
                                                            Width="300">
                            <Grid>
                            </Grid>
</Window>
这段代码创建了一个空白的窗口。 Height/Width 分别代表了窗口的高宽。 Title 表示窗口的标题栏显示的文字。每个 XAML 中的元素可以使用 x:Name 属性来命名。这将用于在你的 XAML 中引用窗口对象。 x:Class 属性代表了当前窗口应该跟哪个类关联。就像我之前说的那样,光有 XAML 是不够的,所以你还应该使用 C# 或者 VB.NET 来定义程序逻辑。
Grid 是程序的主要布局。 Grid 可以有多个子元素。所以我们来放入一些控件吧。
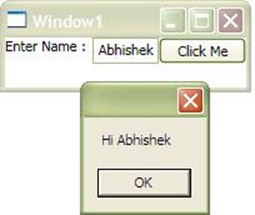
<Grid>
  <Grid.RowDefinitions>
    <RowDefinition Height="Auto" />
  </Grid.RowDefinitions>
  <Grid.ColumnDefinitions>
    <ColumnDefinition MinWidth="50" />
    <ColumnDefinition Width="Auto" />
    <ColumnDefinition Width="*" />
  </Grid.ColumnDefinitions>
  <TextBlock Text="Enter Name :" Grid.Row="0" Grid.Column="0" />
  <TextBox x:Name="txtName" Grid.Row="0" Grid.Column="1" MinWidth="50" />
  <Button Content="Click Me" Grid.Row="0" Grid.Column="2" Click="Button_Click" />
</Grid>
在上面的代码中,我使用了 RowDefination 和 ColumnDefination ,这样就可以把 Grid 切割为多个区域并把你的控件放入你想放的区域。每一个 RowDefinition 和 ColumnDefination 你都可以单独定义 Height 和 Width。在这里,我使用了 50 , Auto 和 * 作为宽度。 Auto 表示在定义控件的时候自动调整大小。 * 表示他可以占用剩下的空间。这样,你将发现按钮拉伸占用了它找到的所有空间。在后台代码中,我放了一个 MessageBox 来显示 TextBox 中的内容:
private void Button_Click(object sender, RoutedEventArgs e)
{
 MessageBox.Show(string.Format("Hi {0}", this.txtName.Text));
}
这样,你就可以看到你的名字被显示出来了。很有趣吧。:)
如果你花了一点时间注意观察 XAML ,你可能想知道我怎么可以在其他控件中定义 Grid 的属性。比如我在每一个控件中定义了 Grid.Row = 0 。这是由于使用了依赖属性。这是WPF引入的一个新的特性。我们将在后面详细讨论。
结语
这是 WPF 系列文章的第一部分。包括了对 WPF 应用的初步讨论。在后面的文章中。我将深入讨论 WPF 程序的其他方面,你可以怎样使用 WPF 控件,创建解决方案的指导。
WPF Tutorial : Beginning
The article will guide you through the basics of WPF programing with in-depth knowledge about the architecture and the working principles of WPF programs. The article finally creates a sample "Hello World" application to step you into a new foundation.
-
Introduction
After working for more than 6 months in WPF, it is time to start writing on the basics of WPF. I have already put up a few articles on this topic, which basically deal with some specific problems. Now it is time to go beyond that, and to let you understand how / why WPF came to us as a revolution to UI development.
Windows Presentation Foundation

As the name says all, WPF is actually a new framework introduced with .NET framework 3.0 which actually puts forward a new set of classes and assemblies which allow us to write programs more efficiently and flexibly. It uses Direct3D rendering which employs graphics cards to render the output on the screen. Thus the drawing in the form will be smooth and also there is a chance to utilize the hardware capabilities installed in your machine. In case of traditional GDI forms application, it is not possible to use advanced graphics capabilities and hence Windows Forms application will always be inefficient in comparison to WPF. Another important thing that I must address in this regard, GDI Windows forms application uses Operating system controls to build its application. Thus it is basically very hard to customize them in your own application. WPF controls are actually drawn over the screen, and hence you can customize controls totally and modify their behavior when required.
Features of WPF
WPF comes with lots of advantages. Let me introduce a few of its features:
-
Device Independent Pixel (DPI)
WPF introduces Device Independent DPI Settings for the applications built with it. For a window, it is very important to calculate how many Dots Per inch(DPI) the screen could draw. This is generally dependent on the hardware device and operating system in which the application runs and also how the DPI settings is applied on the Device. Any user can easily customize these settings and hence make the application look horrible. Windows forms application uses pixel based approach so with changing DPI settings, each control will change its size and look.
WPF addresses this issue and makes it independent of DPI settings of the computer. Let's look at how it is possible:

Let's say you have drawn a box, just like the one in the figure, which is 1 inch long in 96 dpi screen. Now if you see the same application in 120 dpi settings, the box will appear smaller. This is because the things that we see on the screen are totally dependent on dpi settings.
In case of WPF, this is modified to density based approach. That means when the density of pixel is modified, the elements will adjust them accordingly and hence the pixel of WPF application is Device Independent Pixel. As you can see in the figure, the size of the control remains the same in case of WPF application and it takes more pixels in case of 120 DPI application to adjust the size properly.
-
Built-In Support for Graphics and Animation :
WPF applications as being rendered within DirectX environment, it has major support of graphics and animation capabilities. A separate set of classes are there which specifically deal with animation effects and graphics. The graphics that you draw over the screen is also Vector based and are object oriented. That means, when you draw a rectangle in WPF application, you can easily remove that from the screen as rectangle is actually an object which you always have a hold on. In a traditional Windows based application, once you draw a rectangle, you can't select that individually. Thus programming approach in case of WPF is completely different and more sophisticated than traditional graphics approach. We will discuss graphics and animation in more detail in a later section of the article.
-
Redefine Styles and Control Templates
In addition to graphics and animation capabilities, WPF also comes with a huge flexibility to define the styles and ControlTemplates. Style based technique as you might come across with CSS is a set of definitions which defines how the controls will look like when it is rendered on the screen. In case of traditional windows applications, styles are tightly coupled with each control, so that you need to define color, style, etc. for each individual control to make it look different. In case of WPF, Styles are completely separated from the UIElement. Once you define a style, you can change the look and feel of any control by just putting the style on the element.
Most of the UIElements that we generally deal with are actually made using more than one individual elements. WPF introduces a new concept of Templates, which you might use to redefine the whole control itself. Say for instance, you have a CheckBox, which has a Rectangle in it and a ContentPresenter (one where the caption of the TextBox appears). Thus you can redefine your checkbox and put a ToggleButton inside it, so that the check will appear on the ToggleButton rather than on the Rectangle. This is very interesting. We will look into more detail on Styles and ControlTemplates in later section of the article.
-
Resource based Approach for every control
Another important feature of WPF is Resource based approach. In case of traditional windows applications, defining styles is very hectic. So if you have 1000 buttons, and you want to apply Color to each Buttons to Gold, you need to create 1000 objects of Color and assign each to one individual elements. Thus it makes it very resource hungry.
In WPF, you can store styles, controls, animations, and even any object as resource. Thus each resource will be declared once when the form loads itself, and you may associate them to the controls. You can maintain a full hierarchy of styles in a separate file called ResourceDictionary, from which styles for the whole application will be applied. Thus WPF application could be themed very easily.
-
New Property System & Binding Capabilities
In the next step, I must introduce the new property system introduced with WPF. Every element of WPF defines a large number of dependency properties. The dependency properties have strong capabilities than the normal properties. Thus when I define our new property, we can easily register my own property to any object I wish to. It will add up to the same observer that is associated to every object. As every element is derived from DependencyObject in its object hierarchy, each of them contains the Dependency Observer. Once you register a variable as Dependency property, it will create a room on the observer associated with that control and set the value there. We will discuss this in more detail in later sections of the series.
What is XAML?
According to the definition, XAML is an XML based declarative markup language for specifying and setting the characteristics of classes. In other words, XAML is a language used by WPF, Silverlight or any other application which can declare classes by itself. So, you can declare a variable, define the properties of any class and directly use it in your application. The XAML parser will automatically parse and create the actual object while it renders the application.
XAML is generally used to define layout of UI, its elements and objects for static and visual aspect. We cannot define flow of a program using XAML. So even though there are large capabilities of XAML, it is actually not a programming language, rather it is used to design UI of the application. Thus XAML employs other programming languages like C#, VB.NET, etc. to define the logic in code behind.
ExpressionBuilder is the best tool to generate XAML.
WPF Architecture
For every new technology, it is very essential to have a clear idea about its architecture. So before beginning your application, you must grab a few concepts. If you would not like to know WPF in detail, please skip this section. As mentioned earlier, WPF is actually a set of assemblies that build up the entire framework. These assemblies can be categorized as:
- Managed Layer
- UnManaged Layer
-
Core API
Managed Layer: Managed layer of WPF is built using a number of assemblies. These assemblies build up the WPF framework, communicate with lower level unmanaged API to render its content. The few assemblies that comprise the WPF framework are:
-
- PresentationFramework.dll: Creates the top level elements like layout panels, controls, windows, styles, etc.
- PresentationCore.dll: It holds base types such as UIElement, Visual from which all shapes and controls are Derived in PresentationFramework.dll.
-
WindowsBase.dll: They hold even more basic elements which are capable of being used outside the WPF environment like Dispatcher object, Dependency Objects. I will discuss each of them later.
Unmanaged Layer (milcore.dll): The unmanaged layer of WPF is called milcore or Media Integration Library Core. It basically translates the WPF higher level objects like layout panels, buttons, animation, etc. into textures that Direct3D expects. It is the main rendering engine of WPF.
WindowsCodecs.dll: This is another low level API which is used for imaging support in WPF applications. WindowsCodecs.dll comprises a number of codecs which encode / decode images into vector graphics that would be rendered into WPF screen.
Direct3D: It is the low level API in which the graphics of WPF is rendered.
User32: It is the primary core API which every program uses. It actually manages memory and process separation.
GDI & Device Drivers: GDI and Device Drivers are specific to the operating system which is also used from the application to access low level APIs.

In the above figure, you can see how different framework elements communicate between one another that I have just discussed.
Few Things to Know Before You Proceed
There are quite a few things that you must know before starting with WPF applications.
What is Meant by Dispatcher & Thread Affinity?
When WPF application starts, it actually creates two threads automatically. One is Rendering Thread, which is hidden from the programmer, so you cannot use the rendering thread directly from your program; while the other is Dispatcher Thread, which actually holds all the UI elements. So in other words, you might say Dispatcher is actually the UI thread which ties all the elements created within the WPF application. Conversely, WPF requires all the UI elements to be tied with Dispatcher thread, this is called Thread Affinity. Thus you cannot change any element created on Dispatcher thread from any other threads, thus it follows the same Win32 based APIs. Thus it allows you to inter-operate any WPF component into HWND based API. For more, read this. [^]
Dispatcher is a class that handles thread affinity. It is actually a prioritized message loop through which all elements are channeled through. Every UIElement is derived from DispatcherObject which defines a property called Dispatcher which points to the UI thread. Thus from any other thread, if you want to invoke or access UI component, you need to Invoke using Dispatcher thread. DispatcherObject actually has two chief duties, to check and verify if the thread has access to the object.
What is Visual Tree and Logical Tree?
Every programming style contains some sort of LogicalTree which comprises the Overall Program. The LogicalTree comprises the elements as they are listed in XAML. Thus they will only include the controls that you have declared in you XAML.
VisualTree on the other hand, comprises the parts that make up the individual controls. You do not generally need to deal with VisualTree directly, but you should know how each control is comprised of, so it would be easier to build custom templates using this.
I personally always like to see the VisualTree before using it. ExpressionBuilder is the one tool that allows you to generate the actual control.
Why RoutedEvent?
RoutedEvent is very new to the C# language, but for those who are coming from JavaScript/web tech, you would have found it in your browser. Actually there are two types of RoutedEvent. One which Bubbles through the Visual tree elements and another which Tunnels through the visual tree elements. There is also Direct RoutedEvent which does not Bubble or Tunnel.
When a Routed event which is registered, is invoked, it Bubbles / Tunnels through the Visual Elements and calls all the Registered RoutedEventHandlers associated within the Visual Tree one by one.
To discriminate between the two, WPF demarcated events with Preview*** as the events which are Tunneled and just *** for the events that Bubbles. For instance, IsPreviewMouseDown is the event that tunnels through the Visual Child elements while MouseDown Bubbles. Thus Mouse Down of the Outermost element is called first in case of IsPreviewMouseDown while Mouse Down for the innermost element will be called first in case of MouseDown event.
Why DependencyObject is Used?
Every WPF control is derived from DependencyObject. DependencyObject is a class that supports DependencyProperty, a property system that is newly built in WPF. Every object is derived from DependencyObject and hence it can associate itself in various inbuilt features of WPF like EventTriggers, PropertyBindings, Animations, etc.
Every DependencyObject actually has an Observer or a List and declares 3 methods called ClearValue, SetValue and GetValue which are used to add/edit/remove those properties. Thus the DependencyProperty will only create itself when you use SetValue to store something. Thus, it is resource saving as well. We will look at DependencyProperty in detail in other articles of the series.
What about Hardware Acceleration and Graphics Rendering Tiers in WPF?
Another important thing that you should know is how the WPF graphics is rendered. Actually WPF rendering automatically detects how much hardware acceleration is supported by the current system and adjusts itself accordingly. The graphics rendering detects the appropriate tier for rendering the output accordingly.
For hardware rendering, few things that have most of the impact are:
- Video RAM: This determines the size and number of buffers that the application might use to render its output.
- Pixel Shader: It is a graphics utility which calculates effects on per pixel basis.
- Vertex Shader: It is a graphics processing utility that performs mathematical calculations on Vertex of the output. They are used to add special effects to objects in 3D environment.
-
MultiTexture Blending: This is a special function that allows you to apply two or more textures on the same object in 3D.
Now the rendering engine of WPF determines which tier is appropriate for the current application and applies the rendering tiers accordingly.
- TIER 0: No graphics hardware acceleration takes place, rather everything is rendered using Software. Any version of DirectX 9 or less is capable of rendering this output.
- TIER 1: Partial hardware and software rendering. You might use Directx9 or greater to use this tier.
-
TIER 2: Full hardware acceleration. Directx9 or above can render this output.
To know more about it, refer here [^] .
Object Hierarchy
There are quite a few objects in any WPF control. Let's discuss one by one as in the figure. (The abstract class is marked in ellipse while concrete class in Rectangles) :

- DispatcherObject: Mother of all WPF controls which takes care of UI thread
- DependencyObject: Builds the Observer for Dependency Properties
- Visual: Links between managed libraries and milcore
- UIElement: Adds supports for WPF features like layout, input, events, etc.
- FrameworkElement: Implementation of UIElement
- Shape: Base class of all the Basic Shapes
- Control: The UI elements that interact with the user. They can be Templated to change look.
- ContentControl: Baseclass of all controls that have single content
- ItemsControl: Baseclass for all controls that show a collection
-
Panel: Baseclass of all panels which show one or more controls within it
Building Your First WPF Application

Now the time has come to build your first WPF Application. To do this, let's open Visual Studio 2008 / 2010. For this example, I used Visual Studio 2008. Create a new Project. You will see a new window. The XAML will look like:
<Window x:Class="FirstWindowsApplication.Window1"
xmlns="http://schemas.microsoft.com/winfx/2006/xaml/presentation"
xmlns:x="http://schemas.microsoft.com/winfx/2006/xaml"
x:Name="Window1"
Title="Window1" Height="300" Width="300">
<Grid>
</Grid>
</Window>
Here the blank window is produced. Height / Width represents the Size of the Window. Title determines the text which is displayed in the TitleBar of the window. Every control in XAML could be named with x:Nameattribute. This will be used to reference the Window object in your XAML. x:Class attribute represents the class which should be associated with current Window. As I already told you, that XAML is not self sufficient, so to define logic you need a class in C# or VB.NET.
Grid is the primary layout for WPF application. Grid can take multiple Child elements. So let us put some controls into the grid.
<Grid>
<Grid.RowDefinitions>
<RowDefinition Height="Auto" />
</Grid.RowDefinitions>
<Grid.ColumnDefinitions>
<ColumnDefinition MinWidth="50" />
<ColumnDefinition Width="Auto" />
<ColumnDefinition Width="*" />
</Grid.ColumnDefinitions>
<TextBlock Text="Enter Name :" Grid.Row="0" Grid.Column="0" />
<TextBox x:Name="txtName" Grid.Row="0" Grid.Column="1" MinWidth="50"/>
<Button Content="Click Me" Grid.Row="0" Grid.Column="2" Click="Button_Click"/>
</Grid>
You can see that I have defined RowDefination and ColumnDefination. This allows you to divide the grid into cells so that you can place your control exactly where you want to. For each RowDefination and ColumnDefination, you can use Height and Width of it. You can see I have used 50, Auto, and * as width. Auto represents the size which we would define for the control during control definition. * indicates the rest of the space which it can take. Thus, you can see the button is spread the rest of the area of the column it finds.
Now in the Behind, I put a Messagebox to show the content of TextBox.
private void Button_Click(object sender, RoutedEventArgs e)
{
MessageBox.Show(string.Format("Hi {0}", this.txtName.Text));
}
Therefore you can see your name will be prompted to you. Isn't it funny. :)
If you have noticed the XAML minutely, you might wonder how I can define the property of Grid within other controls. Like I defined Grid.Row=0 in each of the control. This is actually possible due to the use of Dependency properties. It's a new feature introduced with WPF. We will discuss in detail later on.
Conclusion
This is the first part of the series of WPF. This comprises the initial discussion of the WPF application. In the next articles, I would delve more into other aspects of WPF programs and how you can work with WPF controls and guide you to build a solution. Hope you like reading this post.