1.下载 FFmpeg 源码
git clone https://git.ffmpeg.org/ffmpeg.git
这一步可能会花比较长的时间
2.编译 FFmpeg for Android
2.1.修改 FFmpeg 的 configure
由于FFMPEG默认编译出来的动态库文件名的版本号在.so之后(例如“libavcodec.so.5.100.1”),但是android平台不能识别这样文件名,所以我们需要修改FFMPEG生成的动态库的文件名。
打开 configure 文件,找到:
SLIBNAME_WITH_MAJOR='$(SLIBNAME).$(LIBMAJOR)'
LIB_INSTALL_EXTRA_CMD='$$(RANLIB)"$(LIBDIR)/$(LIBNAME)"'
SLIB_INSTALL_NAME='$(SLIBNAME_WITH_VERSION)'
SLIB_INSTALL_LINKS='$(SLIBNAME_WITH_MAJOR)$(SLIBNAME)'
修改为
SLIBNAME_WITH_MAJOR='$(SLIBPREF)$(FULLNAME)-$(LIBMAJOR)$(SLIBSUF)'
LIB_INSTALL_EXTRA_CMD='$$(RANLIB)"$(LIBDIR)/$(LIBNAME)"'
SLIB_INSTALL_NAME='$(SLIBNAME_WITH_MAJOR)'
SLIB_INSTALL_LINKS='$(SLIBNAME)'
2.2.编写 Android 编译脚本
#!/bin/sh
NDK=/home/cent/Android/Sdk/ndk-bundle
SYSROOT=$NDK/platforms/android-19/arch-arm
TOOLCHAIN=$NDK/toolchains/arm-linux-androideabi-4.9/prebuilt/linux-x86_64
build_android()
{
    ./configure
    --prefix=$PREFIX
    --enable-shared
    --disable-static
    --disable-doc
    --disable-ffmpeg
    --disable-ffplay
    --disable-ffprobe
    --disable-ffserver
    --disable-avdevice
    --disable-doc
    --disable-symver
    --cross-prefix=$TOOLCHAIN/bin/arm-linux-androideabi-
    --target-os=linux
    --arch=arm
    --enable-cross-compile
    --sysroot=$SYSROOT
    --extra-cflags="-Os -fpic $ADDI_CFLAGS"
    --extra-ldflags="$ADDI_LDFLAGS"
    $ADDITIONAL_CONFIGURE_FLAG
    make clean
    make
    make install
}
CPU=arm
PREFIX=$(pwd)/android/$CPU
ADDI_CFLAGS="-marm"
build_android
2.3.编译
执行上面的脚本编译出我们需要的动态库
./build_android.sh
进入android/$CPU目录可以看到生成的动态库和我们需要的头文件
.
└── arm
    ├── include
    │   ├── libavcodec
    │   ├── libavfilter
    │   ├── libavformat
    │   ├── libavutil
    │   ├── libswresample
    │   └── libswscale
    └── lib
        ├── libavcodec-57.so
        ├── libavcodec.so -> libavcodec-57.so
        ├── libavfilter-6.so
        ├── libavfilter.so -> libavfilter-6.so
        ├── libavformat-57.so
        ├── libavformat.so -> libavformat-57.so
        ├── libavutil-55.so
        ├── libavutil.so -> libavutil-55.so
        ├── libswresample-2.so
        ├── libswresample.so -> libswresample-2.so
        ├── libswscale-4.so
        ├── libswscale.so -> libswscale-4.so
        └── pkgconfig
3.将上一步生成的头文件和库文件导入到Android Studio工程中
首先新建一个工程,并且勾选 Include C++ Support 即可得到一个基于CMake的模板工程。目录结构如下所示
.
├── app
│   ├── app.iml
│   ├── build
│   │   ├── generated
│   │   │   ├── res
│   │   │   └── source
│   │   ├── intermediates
│   │   │   ├── blame
│   │   │   ├── incremental
│   │   │   ├── manifest
│   │   │   ├── manifests
│   │   │   ├── res
│   │   │   ├── rs
│   │   │   └── symbols
│   │   └── outputs
│   │       └── logs
│   ├── build.gradle
│   ├── CMakeLists.txt
│   ├── CMakeLists.txt~
│   ├── libs
│   │   ├── armeabi
│   │   │   ├── libavcodec-57.so
│   │   │   ├── libavfilter-6.so
│   │   │   ├── libavformat-57.so
│   │   │   ├── libavutil-55.so
│   │   │   ├── libswresample-2.so
│   │   │   └── libswscale-4.so
│   │   └── include
│   │       ├── libavcodec
│   │       ├── libavfilter
│   │       ├── libavformat
│   │       ├── libavutil
│   │       ├── libswresample
│   │       └── libswscale
│   ├── proguard-rules.pro
│   └── src
│       ├── androidTest
│       │   └── java
│       ├── main
│       │   ├── AndroidManifest.xml
│       │   ├── cpp
│       │   ├── java
│       │   └── res
│       └── test
│           └── java
├── build
│   ├── android-profile
│   │   └── profile-2017-03-31-23-04-31-347.rawproto
│   └── generated
│       └── mockable-android-25.jar
├── build.gradle
├── FFMPEGTest.iml
├── gradle
│   └── wrapper
│       ├── gradle-wrapper.jar
│       └── gradle-wrapper.properties
├── gradle.properties
├── gradlew
├── gradlew.bat
├── local.properties
└── settings.gradle
然后将上面编译FFMPEG生成的头文件和动态库拷贝到app/libs目录下,拷贝完后的目录结构如下所示
├── app
│   ├── libs
│   │   ├── armeabi
│   │   │   ├── libavcodec-57.so
│   │   │   ├── libavfilter-6.so
│   │   │   ├── libavformat-57.so
│   │   │   ├── libavutil-55.so
│   │   │   ├── libswresample-2.so
│   │   │   └── libswscale-4.so
│   │   └── include
│   │       ├── libavcodec
│   │       ├── libavfilter
│   │       ├── libavformat
│   │       ├── libavutil
│   │       ├── libswresample
│   │       └── libswscale
│   ├── proguard-rules.pro
│   └── src
这样还没完,我当时就是这样直接去编译,然后就踩了一个大坑,APP启动之后一直crash,原因就是没有找到我们在java文件里load的动态库。为什么呢?原因是在编译的时候,我们根本没有将我们的动态库打包到APP中,我们还需要修改app/build.gradle将我们放在libs目录下的动态库打包到APP中去
apply plugin: 'com.android.application'

android {
    compileSdkVersion 25
    buildToolsVersion "25.0.2"
    defaultConfig {
        applicationId "com.example.cent.ffmpegtest"
        minSdkVersion 15
        targetSdkVersion 25
        versionCode 1
        versionName "1.0"
        testInstrumentationRunner "android.support.test.runner.AndroidJUnitRunner"
        sourceSets {
            main {
                jniLibs.srcDirs = ['libs']
            }
        }
        externalNativeBuild {
            cmake {
                cppFlags "-frtti -fexceptions"
            }
            ndk{
                abiFilters "armeabi"
            }
        }
    }
    buildTypes {
        release {
            minifyEnabled false
            proguardFiles getDefaultProguardFile('proguard-android.txt'), 'proguard-rules.pro'
        }
    }

    externalNativeBuild {
        cmake {
            path "CMakeLists.txt"
        }
    }
}


dependencies {
    compile fileTree(dir: 'libs', include: ['*.jar'])
    androidTestCompile('com.android.support.test.espresso:espresso-core:2.2.2', {
        exclude group: 'com.android.support', module: 'support-annotations'
    })
    compile 'com.android.support.constraint:constraint-layout:1.0.1'
    testCompile 'junit:junit:4.12'
}
紧接着我们还要指定abiFilters,因为AndroidStudio默认会编译所有架构的动态库,但是在本次例子中,我们实际上只拷贝了
├── libs
│   │   ├── armeabi
架构(目录名)的动态库,所以我们需要指定一个abiFilters来过滤一下,否则会出现编译错误。
 externalNativeBuild {
            cmake {
                cppFlags "-frtti -fexceptions"
            }
            ndk{
                abiFilters "armeabi"
            }
        }
    }
紧接着就是来编写我们的CMakeLists.txt文件来编译我们的动态库和native源文件了
cmake_minimum_required(VERSION 3.4.1)

find_library( log-lib
              log )

set(distribution_DIR ../../../../libs)

add_library( native-lib
             SHARED
             src/main/cpp/native-lib.cpp )

add_library( avcodec-57
             SHARED
             IMPORTED)
set_target_properties( avcodec-57
                       PROPERTIES IMPORTED_LOCATION
                       ${distribution_DIR}/armeabi/libavcodec-57.so)

add_library( avfilter-6
             SHARED
             IMPORTED)
set_target_properties( avfilter-6
                       PROPERTIES IMPORTED_LOCATION
                       ${distribution_DIR}/armeabi/libavfilter-6.so)

add_library( avformat-57
             SHARED
             IMPORTED)
set_target_properties( avformat-57
                       PROPERTIES IMPORTED_LOCATION
                       ${distribution_DIR}/armeabi/libavformat-57.so)

add_library( avutil-55
             SHARED
             IMPORTED)
set_target_properties( avutil-55
                       PROPERTIES IMPORTED_LOCATION
                       ${distribution_DIR}/armeabi/libavutil-55.so)

add_library( swresample-2
             SHARED
             IMPORTED)
set_target_properties( swresample-2
                       PROPERTIES IMPORTED_LOCATION
                       ${distribution_DIR}/armeabi/libswresample-2.so)

add_library( swscale-4
             SHARED
             IMPORTED)
set_target_properties( swscale-4
                       PROPERTIES IMPORTED_LOCATION
                       ${distribution_DIR}/armeabi/libswscale-4.so)

include_directories(libs/include)

target_link_libraries( native-lib
                       avcodec-57
                       avfilter-6
                       avformat-57
                       avutil-55
                       swresample-2
                       swscale-4
                       ${log-lib} )
这样基本上就大功告成了。
4.使用FFMPEG
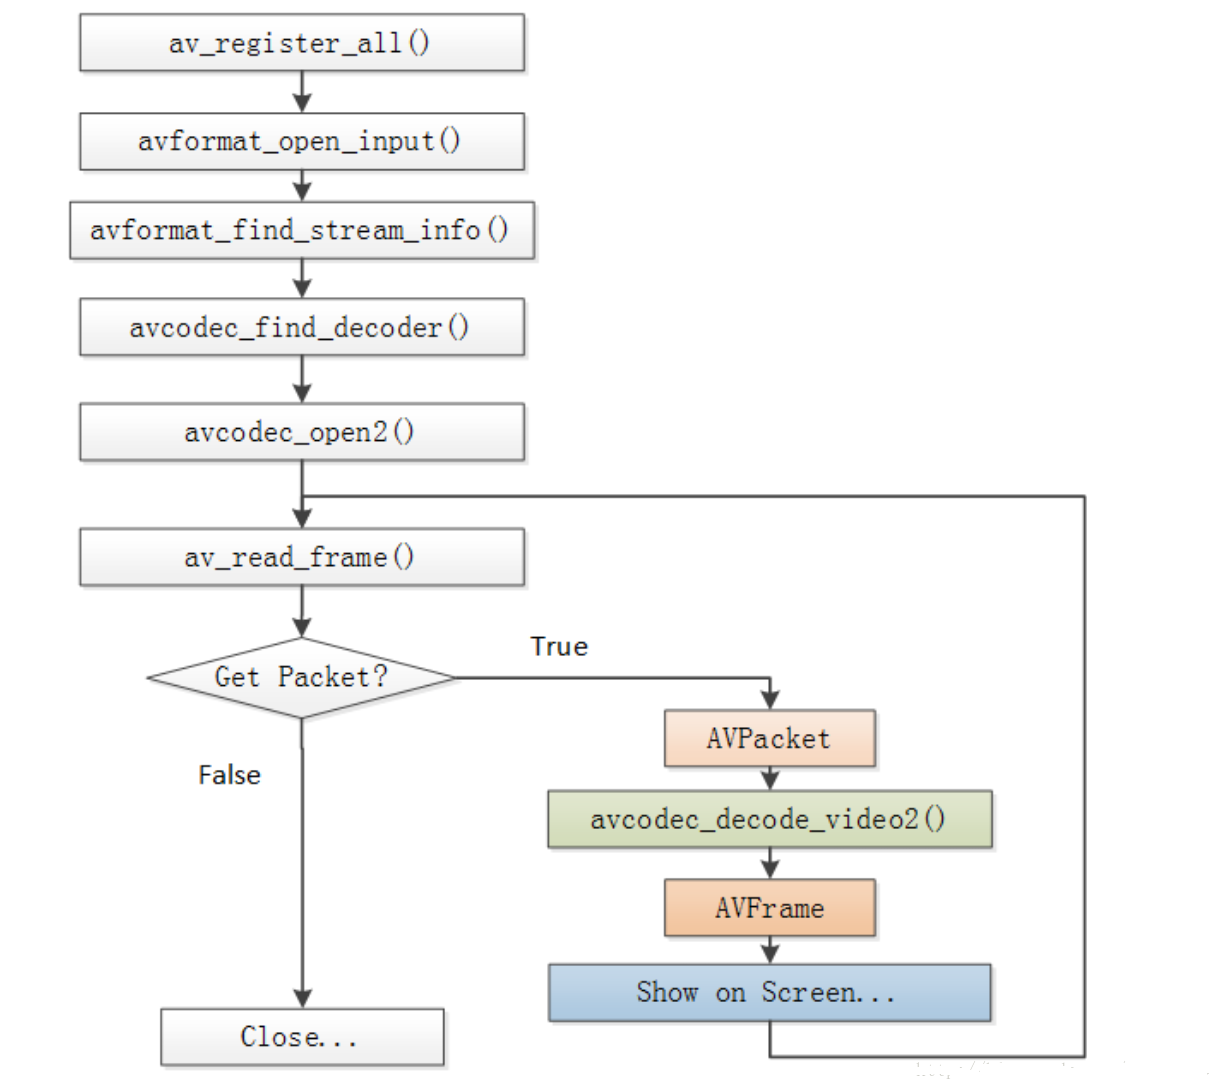
下面我们将通过一个小例子来看一下怎样使用FFMPEG。使用FFMPEG进行视频解码(音频和视频很相似)的一般流程如下图所示

首先需要在JAVA文件中加载我们需要的动态库
//MainActivity.java
public class MainActivity extends Activity {

    // Used to load the 'native-lib' library on application startup.
    static {
        System.loadLibrary("native-lib");
        System.loadLibrary("avcodec-57");
        System.loadLibrary("avfilter-6");
        System.loadLibrary("avformat-57");
        System.loadLibrary("avutil-55");
        System.loadLibrary("swresample-2");
        System.loadLibrary("swscale-4");
    }

    @Override
    protected void onCreate(Bundle savedInstanceState) {
        super.onCreate(savedInstanceState);
        setContentView(R.layout.activity_main);

        // Example of a call to a native method
        TextView tv = (TextView) findViewById(R.id.sample_text);
        tv.setText(stringFromJNI());

        String input = new File(Environment.getExternalStorageDirectory(),"input.mp4").getAbsolutePath();
        String output = new File(Environment.getExternalStorageDirectory(),"output_yuv420p.yuv").getAbsolutePath();
        decode(input, output);
    }

    /**
     * A native method that is implemented by the 'native-lib' native library,
     * which is packaged with this application.
     */
    public native String stringFromJNI();
    public native static void decode(String input,String output);
}
然后在native代码中实现主要逻辑
//native-lib.cpp
#include <jni.h>
#include <string>
#include <android/log.h>

extern "C" {
    //编码
    #include "libavcodec/avcodec.h"
    //封装格式处理
    #include "libavformat/avformat.h"
    //像素处理
    #include "libswscale/swscale.h"
}

#define FFLOGI(FORMAT,...) __android_log_print(ANDROID_LOG_INFO,"ffmpeg",FORMAT,##__VA_ARGS__);
#define FFLOGE(FORMAT,...) __android_log_print(ANDROID_LOG_ERROR,"ffmpeg",FORMAT,##__VA_ARGS__);


extern "C"
JNIEXPORT jstring JNICALL
Java_com_example_cent_ffmpegtest_MainActivity_stringFromJNI(
        JNIEnv *env,
        jobject /* this */) {
    std::string hello = "Hello from C++";
    return env->NewStringUTF(hello.c_str());
}

extern "C"
JNIEXPORT void JNICALL
Java_com_example_cent_ffmpegtest_MainActivity_decode(JNIEnv *env, jclass type, jstring input_,
                                                     jstring output_) {
    //获取输入输出文件名
    const char *input = env->GetStringUTFChars(input_, 0);
    const char *output = env->GetStringUTFChars(output_, 0);

    //1.注册所有组件
    av_register_all();

    //封装格式上下文,统领全局的结构体,保存了视频文件封装格式的相关信息
    AVFormatContext *pFormatCtx = avformat_alloc_context();

    //2.打开输入视频文件
    if (avformat_open_input(&pFormatCtx, input, NULL, NULL) != 0)
    {
        FFLOGE("%s","无法打开输入视频文件");
        return;
    }

    //3.获取视频文件信息
    if (avformat_find_stream_info(pFormatCtx,NULL) < 0)
    {
        FFLOGE("%s","无法获取视频文件信息");
        return;
    }

    //获取视频流的索引位置
    //遍历所有类型的流(音频流、视频流、字幕流),找到视频流
    int v_stream_idx = -1;
    int i = 0;
    //number of streams
    for (; i < pFormatCtx->nb_streams; i++)
    {
        //流的类型
        if (pFormatCtx->streams[i]->codec->codec_type == AVMEDIA_TYPE_VIDEO)
        {
            v_stream_idx = i;
            break;
        }
    }

    if (v_stream_idx == -1)
    {
        FFLOGE("%s","找不到视频流
");
        return;
    }

    //只有知道视频的编码方式,才能够根据编码方式去找到解码器
    //获取视频流中的编解码上下文
    AVCodecContext *pCodecCtx = pFormatCtx->streams[v_stream_idx]->codec;
    //4.根据编解码上下文中的编码id查找对应的解码
    AVCodec *pCodec = avcodec_find_decoder(pCodecCtx->codec_id);
    if (pCodec == NULL)
    {
        FFLOGE("%s","找不到解码器
");
        return;
    }

    //5.打开解码器
    if (avcodec_open2(pCodecCtx,pCodec,NULL)<0)
    {
        FFLOGE("%s","解码器无法打开
");
        return;
    }

    //输出视频信息
    FFLOGI("视频的文件格式:%s",pFormatCtx->iformat->name);
    FFLOGI("视频时长:%d", (pFormatCtx->duration)/1000000);
    FFLOGI("视频的宽高:%d,%d",pCodecCtx->width,pCodecCtx->height);
    FFLOGI("解码器的名称:%s",pCodec->name);

    //准备读取
    //AVPacket用于存储一帧一帧的压缩数据(H264)
    //缓冲区,开辟空间
    AVPacket *packet = (AVPacket*)av_malloc(sizeof(AVPacket));

    //AVFrame用于存储解码后的像素数据(YUV)
    //内存分配
    AVFrame *pFrame = av_frame_alloc();
    //YUV420
    AVFrame *pFrameYUV = av_frame_alloc();
    //只有指定了AVFrame的像素格式、画面大小才能真正分配内存
    //缓冲区分配内存
    uint8_t *out_buffer = (uint8_t *)av_malloc(avpicture_get_size(AV_PIX_FMT_YUV420P, pCodecCtx->width, pCodecCtx->height));
    //初始化缓冲区
    avpicture_fill((AVPicture *)pFrameYUV, out_buffer, AV_PIX_FMT_YUV420P, pCodecCtx->width, pCodecCtx->height);

    //用于转码(缩放)的参数,转之前的宽高,转之后的宽高,格式等
    struct SwsContext *sws_ctx = sws_getContext(pCodecCtx->width,pCodecCtx->height,pCodecCtx->pix_fmt,
                                                pCodecCtx->width, pCodecCtx->height, AV_PIX_FMT_YUV420P,
                                                SWS_BICUBIC, NULL, NULL, NULL);
    int got_picture, ret;

    FILE *fp_yuv = fopen(output, "wb+");

    int frame_count = 0;

    //6.一帧一帧的读取压缩数据
    while (av_read_frame(pFormatCtx, packet) >= 0)
    {
        //只要视频压缩数据(根据流的索引位置判断)
        if (packet->stream_index == v_stream_idx)
        {
            //7.解码一帧视频压缩数据,得到视频像素数据
            ret = avcodec_decode_video2(pCodecCtx, pFrame, &got_picture, packet);
            if (ret < 0)
            {
                FFLOGE("%s","解码错误");
                return;
            }

            //为0说明解码完成,非0正在解码
            if (got_picture)
            {
                //AVFrame转为像素格式YUV420,宽高
                //2 6输入、输出数据
                //3 7输入、输出画面一行的数据的大小 AVFrame 转换是一行一行转换的
                //4 输入数据第一列要转码的位置 从0开始
                //5 输入画面的高度
                sws_scale(sws_ctx, pFrame->data, pFrame->linesize, 0, pCodecCtx->height,
                          pFrameYUV->data, pFrameYUV->linesize);

                //输出到YUV文件
                //AVFrame像素帧写入文件
                //data解码后的图像像素数据(音频采样数据)
                //Y 亮度 UV 色度(压缩了) 人对亮度更加敏感
                //U V 个数是Y的1/4
                int y_size = pCodecCtx->width * pCodecCtx->height;
                fwrite(pFrameYUV->data[0], 1, y_size, fp_yuv);
                fwrite(pFrameYUV->data[1], 1, y_size / 4, fp_yuv);
                fwrite(pFrameYUV->data[2], 1, y_size / 4, fp_yuv);

                frame_count++;
                FFLOGI("解码第%d帧",frame_count);
            }
        }

        //释放资源
        av_free_packet(packet);
    }

    fclose(fp_yuv);

    av_frame_free(&pFrame);

    avcodec_close(pCodecCtx);

    avformat_free_context(pFormatCtx);

    env->ReleaseStringUTFChars(input_, input);
    env->ReleaseStringUTFChars(output_, output);
}
记得在Manifest文件中添加需要的权限
<uses-permission android:name="android.permission.READ_EXTERNAL_STORAGE"/>
<uses-permission android:name="android.permission.WRITE_EXTERNAL_STORAGE"/>
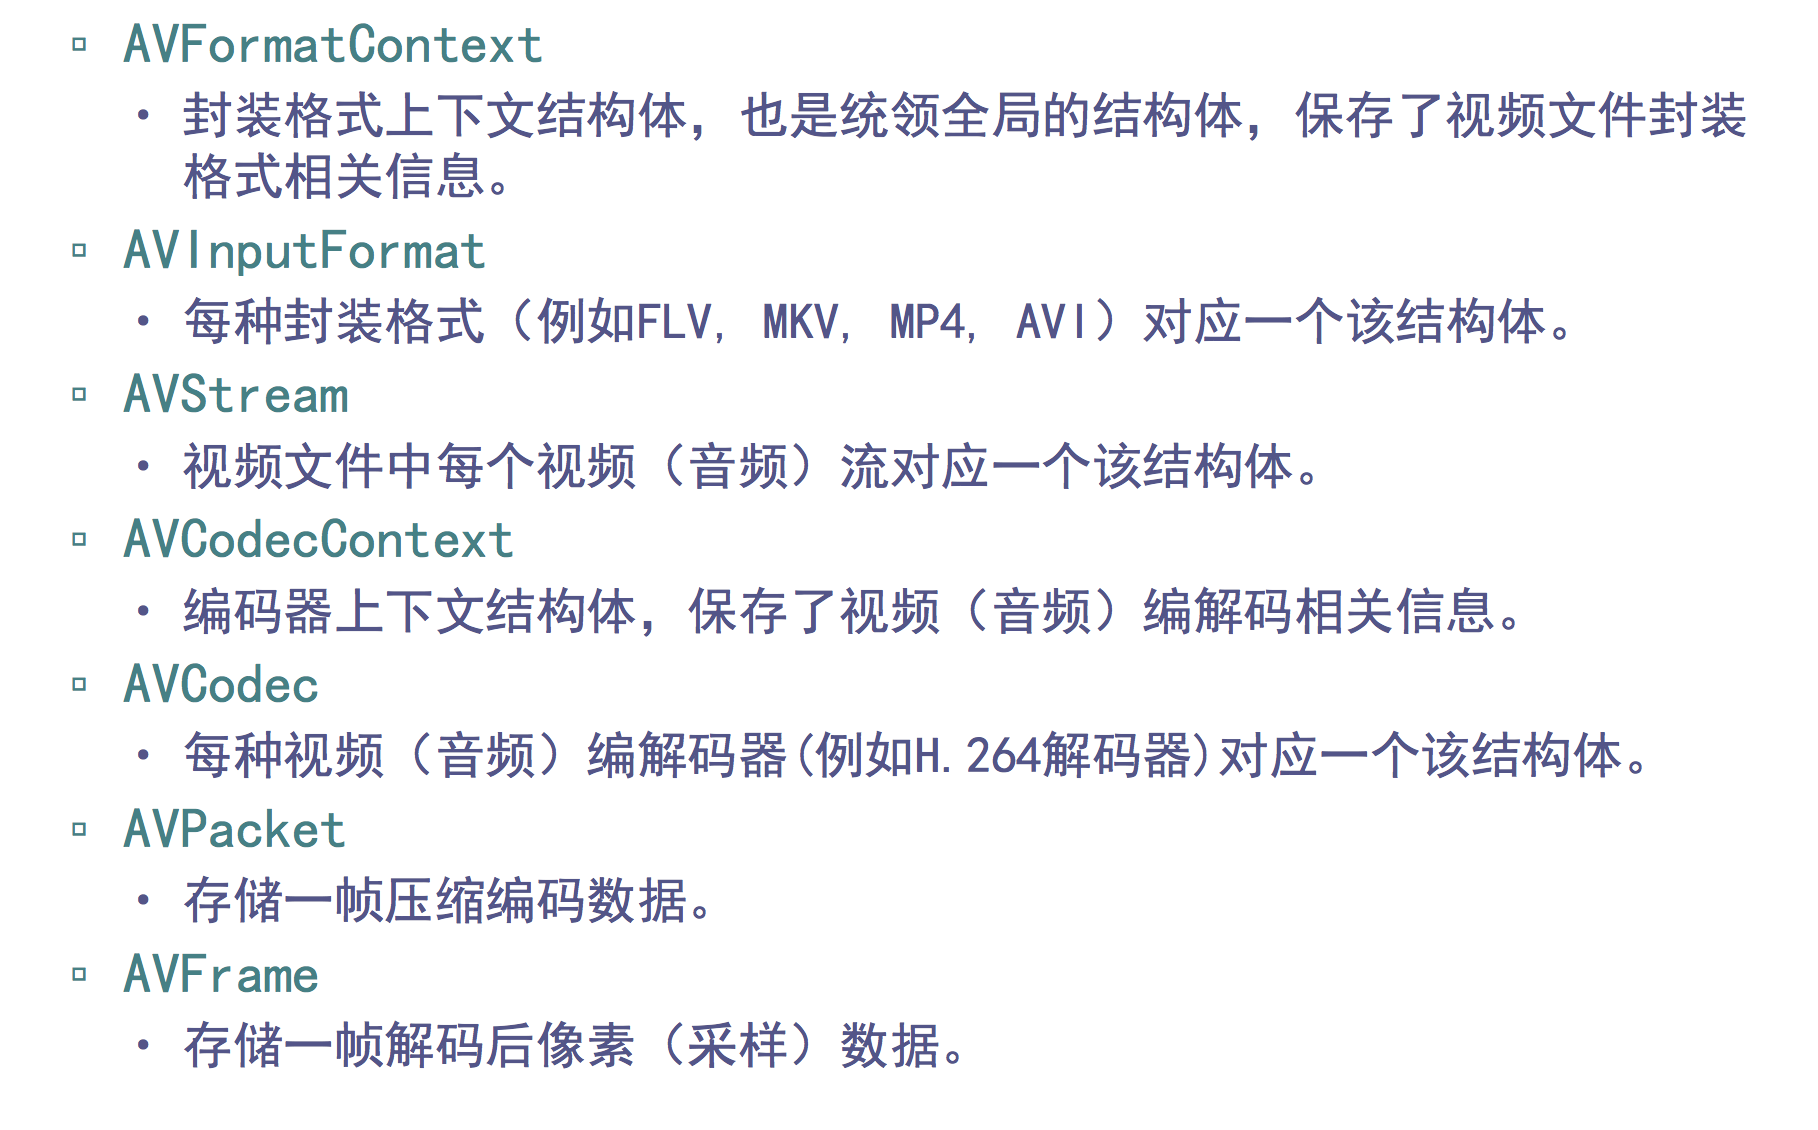
最后简单了解一下FFMPEG中使用的几个主要数据结构的作用
