iOS支持4种主要的后台处理:应用程序挂起、本地通知、任务特定的后台处理和完成长时间运行的后台任务。
iOS4.0以后的设备都已经支持多任务了,如果项目要在更早版本的系统中运行,可以通过下面代码检测设备是否支持多任务:
UIDevice *device = [UIDevice currentDevice];
BOOL backgroundSupported = NO;
if([device respondsToSelector:@selector(isMultitaskingSupported)])
{
    backgroundSupported = device.multitaskingSupported;
}
先来看一下如何禁用后台处理:
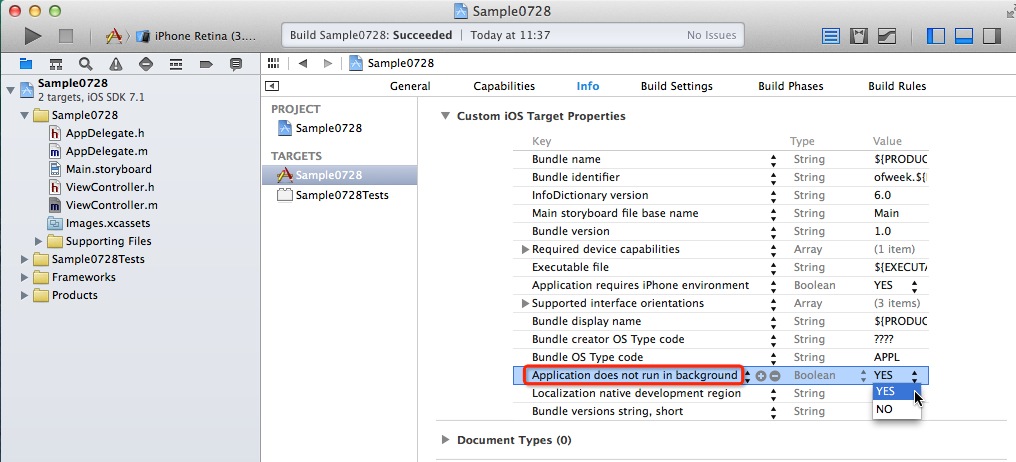
如图所示,在info选项卡的Custom iOS Target Properties属性列表里添加一个新行:”Application does not run in background”,并将值设为YES即可禁用后台处理。
挂起
应用程序挂起时,它将暂停执行代码,但保留当前状态。用户返回到应用程序时,它看起来像是一直在运行。实际上,所有的任务都停止了,以免应用程序占用设备的资源。
在应用程序挂起时,除执行清理工作外,还需要负责从挂起状态恢复,并更新在挂起期间将发生变化的应用程序内容(时间/日期等)。
任何应用程序都默认支持后台挂起。为支持后台挂起,只需利用开发工具创建iOS4.0以上的项目即可。
可以创建一个计时器程序,当计数为10时,按home键退出程序,这样你过一段时间再返回程序,发现会从10开始继续计数,而不是挂起时仍然在继续计数。
本地通知
下面的代码演示了本地通知的使用,一旦生效,即使程序并没有运行,也会按设定的触发通知。
[[UIApplication sharedApplication] cancelAllLocalNotifications];

UILocalNotification *localNotif = [[UILocalNotification alloc] init];
localNotif.applicationIconBadgeNumber = 1;
localNotif.fireDate = [NSDate dateWithTimeIntervalSinceNow:5];
localNotif.timeZone = [NSTimeZone defaultTimeZone];
localNotif.repeatInterval = NSMinuteCalendarUnit;
localNotif.soundName = @"msg.wav";
localNotif.alertBody = @"This is a notice!";

[[UIApplication sharedApplication] scheduleLocalNotification:localNotif];
UILocalNotification *localNotif = [[UILocalNotification alloc] init];
这行代码取消了应用程序以前可能调度了的所有通知,以提供干净的平台。
UILocalNotification类的各属性释义:
applicationIconBadgeNumber — 触发通知时显示在应用程序图标中的徽章计数。
fireDate — 一个NSDate对象,指定通知将在未来的什么时间触发。
timeZone — 用于调度通知的时区。几乎总是设置为本地时区,即[NSTimeZone defaultTimeZone]。
repeatInterval — 重复触发通知的频率。可选择的值可能有NSDayCalendarUnit(每天)、NSHourCalendarUnit(每小时)、和NSMinuteCalendarUnit(每分钟)等。
soundName — 一个字符串(NSString),包含通知触发时将播放的声音源。
alertBody — 一个字符串,包含要向用户显示的文本消息。
[[UIApplication sharedApplication] scheduleLocalNotification:localNotif];
开始调度通知
任务特定的后台处理
这种情况有一个很典型的应用,就是后台音乐播放:我们在程序里播放一首歌曲,当按下Home键或屏幕进入待机,我们仍然希望音乐继续播放。
首先建立简单代码:
#import "ViewController.h"

@interface ViewController ()
@property (nonatomic,strong) AVAudioPlayer *audioPlayer;
@end

@implementation ViewController

- (void)viewDidLoad
{
    [super viewDidLoad];

    //播放音频之前先要设置AVAudioSession模式,设为AVAudioSessionCategoryPlayback即可。模式意义及其他模式请参考文档。
    AVAudioSession *session = [AVAudioSession sharedInstance];
    [session setActive:YES error:nil];
    [session setCategory:AVAudioSessionCategoryPlayback error:nil];

    NSString *strSoundFile = [[NSBundle mainBundle] pathForResource:@“mymusic1” ofType:@"mp3"];

    self.audioPlayer = [[AVAudioPlayer alloc] initWithContentsOfURL:[NSURL fileURLWithPath:strSoundFile] error:nil];
    self.audioPlayer.delegate = self;
    [self.audioPlayer play];
}

- (void)audioPlayerDidFinishPlaying:(AVAudioPlayer *)player successfully:(BOOL)flag
{
    NSLog(@"播放结束");
}

- (void)didReceiveMemoryWarning
{
    [super didReceiveMemoryWarning];
    // Dispose of any resources that can be recreated.
}
@end
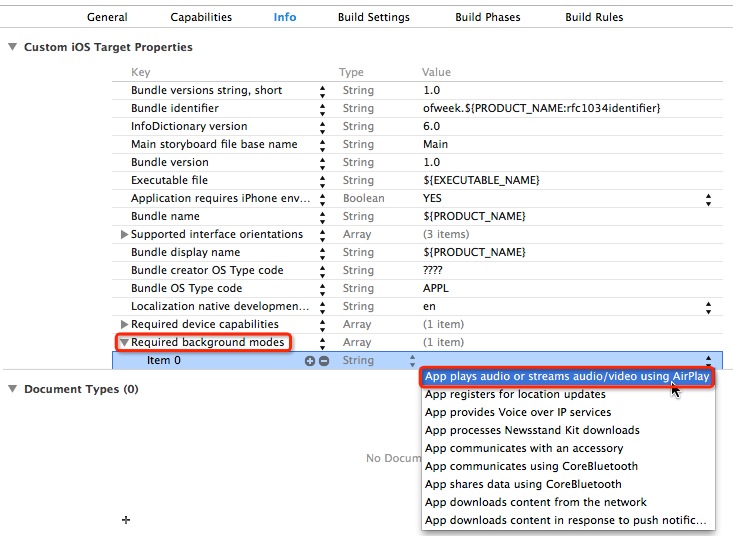
然后需要选择项目的顶级编组,并单击目标—项目名,展开Custom iOS Target Properties选项卡,在属性列表里添加一行名为”Required background modes”的Key,然后展开这个键,在其中添加一个新值:”App plays audio or streams audio/video using AirPlay”。
修改保存后,再次运行程序,并按下home键返回,将发现音乐会继续在后台播放。另一个比较典型的应用就是定位服务,需要添加”App registers for location updates”。
完成长时间运行的后台任务
对于每项要启用后台完成的任务,都需要有自己的UIBackgroundTaskIdentifier。初始化方式如下:
UIBackgroundTaskIdentifier counterTask = [[UIApplication sharedApplication]
                                         beginBackgroundTaskWithExpirationHandler:^{
                                                //超时后的处理
                                                NSLog(@"超时");
                                         }];
完成初始化的同时也正式开启了后台处理,要停止后台处理,可以做如下操作:
[[UIApplication sharedApplication] endBackgroundTask:self.counterTask];
每个程序的后台处理时间是有限的,一般只有几分钟;通过UIApplication的backgroundTimeRemaining属性可以查询后台处理剩余时间:
NSTimeInterval timeInterval = [[UIApplication sharedApplication] backgroundTimeRemaining];

int hour = (int)(timeInterval/3600);
int minute = (int)(timeInterval - hour*3600)/60;
int second = timeInterval - hour*3600 - minute*60;

NSLog(@"%@",[NSString stringWithFormat:@"%d时%d分%d秒", hour, minute,second]);
下面创建了一个不停计数的程序,运行后尝试退出程序(不是结束程序),过一段时间后返回程序,发现计数还在后台进行,而不是像之前挂起那样暂停计数:
#import "ViewController.h"

@interface ViewController ()
@property (nonatomic) UIBackgroundTaskIdentifier counterTask;
@property (strong, nonatomic) IBOutlet UILabel *lblNum;
@property (nonatomic) int count;
@property (nonatomic,weak) NSTimer *myTimer;
@end

@implementation ViewController

- (void)viewDidLoad
{
    [super viewDidLoad];

    self.counterTask = [[UIApplication sharedApplication]
                                             beginBackgroundTaskWithExpirationHandler:^{
                                                    //超时后的处理
                                                    NSLog(@"超时");
                                             }];

    self.myTimer = [NSTimer scheduledTimerWithTimeInterval:1 target:self selector:@selector(countUp) userInfo:nil repeats:YES];
}

- (void)countUp
{
    if(self.count==600)
    {
        [self.myTimer invalidate];
        [self setMyTimer:nil];
        [[UIApplication sharedApplication] endBackgroundTask:self.counterTask];
    }
    else
    {
        self.count++;
        self.lblNum.text = [[NSString alloc] initWithFormat:@"%d",self.count];
    }
}

- (void)didReceiveMemoryWarning
{
    [super didReceiveMemoryWarning];
    // Dispose of any resources that can be recreated.
}

@end