(1)maven构建web项目
pom.xml


<project xmlns="http://maven.apache.org/POM/4.0.0" xmlns:xsi="http://www.w3.org/2001/XMLSchema-instance"
    xsi:schemaLocation="http://maven.apache.org/POM/4.0.0 http://maven.apache.org/maven-v4_0_0.xsd">
    <modelVersion>4.0.0</modelVersion>
    <groupId>cn.demo</groupId>
    <artifactId>jenkins_webdemo</artifactId>
    <packaging>war</packaging>
    <version>0.0.1-SNAPSHOT</version>
    <name>jenkins_webdemo Maven Webapp</name>
    <url>http://maven.apache.org</url>
    <build>
        <finalName>jenkins_webdemo</finalName>
        <plugins>
            <plugin>
                <inherited>true</inherited>
                <groupId>org.apache.maven.plugins</groupId>
                <artifactId>maven-compiler-plugin</artifactId>
                <version>3.5.1</version>
                <configuration>
                    <source>${compiler.source}</source>
                    <target>${compiler.target}</target>
                    <encoding>${project.build.sourceEncoding}</encoding>
                    <compilerArguments>
                        <extdirs>${project.basedir}/src/main/webapp/WEB-INF/lib</extdirs>
                    </compilerArguments>
                </configuration>
            </plugin>
            <!-- 源码打包
            <plugin>
                <inherited>true</inherited>
                <groupId>org.apache.maven.plugins</groupId>
                <artifactId>maven-source-plugin</artifactId>
                <version>3.0.1</version>
                <executions>
                    <execution>
                        <id>attach-sources</id>
                        <goals>
                            <goal>jar</goal>
                        </goals>
                    </execution>
                </executions>
            </plugin>
            -->
        </plugins>
    </build>
    <properties>
        <project.build.sourceEncoding>UTF-8</project.build.sourceEncoding>
        <compiler.source>1.7</compiler.source>
        <compiler.target>1.7</compiler.target>

        <!-- servlet/jsp/EL (2.4/2.0/?)(2.5/2.1/2.1),(3.0/2.2/2.2),(3.1/2.3/3.0) -->
        <servlet.version>3.1.0</servlet.version>
        <jsp.version>2.3.1</jsp.version>
        <jstl.version>1.2</jstl.version>
        <junit.version>4.12</junit.version>
    </properties>
    <dependencies>
        <dependency>
            <groupId>junit</groupId>
            <artifactId>junit</artifactId>
            <version>${junit.version}</version>
            <scope>test</scope>
        </dependency>
        <dependency>
            <groupId>javax.servlet</groupId>
            <artifactId>javax.servlet-api</artifactId>
            <version>${servlet.version}</version>
            <scope>provided</scope>
        </dependency>
        <dependency>
            <groupId>javax.servlet.jsp</groupId>
            <artifactId>javax.servlet.jsp-api</artifactId>
            <version>${jsp.version}</version>
            <scope>provided</scope>
        </dependency>
        <dependency>
            <groupId>javax.servlet</groupId>
            <artifactId>jstl</artifactId>
            <version>${jstl.version}</version>
        </dependency>
    </dependencies>
</project>
(2)在jenkins上的配新建项目
(3)jenkins上下载插件 Deploy to container Plugin (系统管理 --》 管理插件 --》 可选插件)
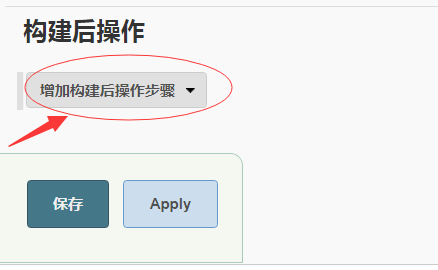
(4)开始配置项目,其他的都和以往的配置一样,在构建后操作中选择 增加构建后操作步骤中的 Deploy war/ear to a container
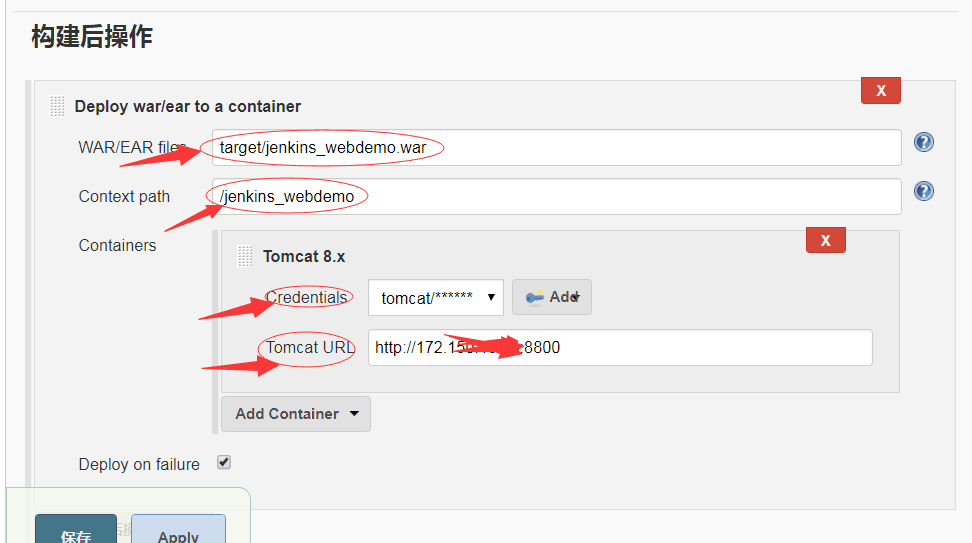
(5)开始配置tomcat
WAR/EAR files :是项目的war包位置,这里都是配置为 target/项目名.war
Context path:访问项目的路径
Credentails :这里是Tomcat用户,如果没有配置的要到tomcat 的conf/tomcat-users.xml 文件中配置
在conf目录下,tomcat-user.xml文件中增加以下配置:
<role rolename="admin"/>
<role rolename="manager"/>
<role rolename="manager-gui"/>
<role rolename="manager-script"/>
<user username="tomcat" password="tomcat" roles="admin,manager,manager-gui,manager-script"/>
然后再点击右侧的add 将用户添加进去 ,只需要添加 用户名 和 密码就可以了
Tomcat URL: 这里写访问Tomcat的路径 http://主机ip:端口号 例如:http://127.0.0.1:8080 Tomcat默认的端口号为8080,但是我的端口号和jenkins冲突了,所以改成了8800
到这里就可以发布了,构建成功后
使用 Tomcat URL + Context path 访问 就可以了
例如:http://172.123.23.12:8800/jenkins_webdemo