配置好了,自己感觉是比较简单的,就是有一点点繁琐,加油吧。
由于保密,无法拿出项目,故写了一个小demo,记录一下,适用于大型项目:
项目中需要自定义切换中/英文(国际化),基于vue.js,结合vue-i18n,ElementUI,以下是使用方法。
ElementUI国际化链接: http://element-cn.eleme.io/#/...
vue-i18n:https://github.com/kazupon/vu...
安装: npm install vue-i18n
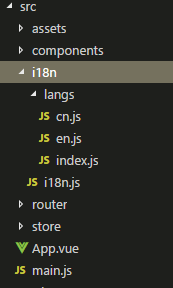
目录结构如下图:

//i18n.js

import Vue from 'vue'
import VueI18n from 'vue-i18n'
import messages from './langs'
Vue.use(VueI18n)
//从localStorage中拿到用户的语言选择,如果没有,那默认中文。
const i18n = new VueI18n({
    locale: localStorage.lang || 'cn',
    messages,
})

export default i18n
//langs/index.js

import en from './en';
import cn from './cn';
export default {
    en: en,
    cn: cn
}
//en.js
const en = {
    message: {
        'hello': 'hello, world',
    }
}

export default en;
//cn.js
const cn = {
    message: {
        'hello': '你好,世界',
    }
}

export default cn;
//main.js添加下面代码
import i18n from './i18n/i18n';
window.app = new Vue({
  el: '#app',
  router,
  store,
  i18n,
  template: '<App/>',
  components: { App }
})
接下来是在页面中使用、切换语言。
//html:
<p>{{$t('message.hello')}}</p> // hello, world
//js切换语言
data() {
    return {
        lang: 'en'
    }
},
methods: {
    switchLang()  {
        this.$i18n.locale = this.lang
    }
}
vue.js+vue-i18n+elementUI国际化
更改的地方不多,如下
//i18n.js

import Vue from 'vue'
import locale from 'element-ui/lib/locale';
import VueI18n from 'vue-i18n'
import messages from './langs'
Vue.use(VueI18n)
//从localStorage中拿到用户的语言选择,如果没有,那默认中文。
const i18n = new VueI18n({
    locale: localStorage.lang || 'cn',
    messages,
})
locale.i18n((key, value) => i18n.t(key, value)) //为了实现element插件的多语言切换

export default i18n
$t()绑定方式
举栗:
一:<p>{{$t('message.hello')}}</p>
二::label="$t('cr.productCMO')"
三::rules="[{ required: true, message:$t('cr.textbox'), trigger: 'blur' }]"
四:Hae.alert(this.$t('cr.pushFailed'))
五:<h5>{{$t('cr.twarehouse')}}</h5>
六:<el-select v-model="value8" clearable @change="handleSelect" :placeholder="$t('cr.selectVersion')">
v-text、v-html中: <p v-text="$t('message.hello')"></p>
data中: label: this.$t('message.hello')
  <el-form-item :label="$t('cr.productCMO')" prop="SignUser.ProductCMO" :rules="[{ required: true, message:$t('cr.textbox'), trigger: 'blur' }]">
                <el-autocomplete popper-class="my-autocomplete" v-model="versionReleaseInfo.ParaData.SignUser.ProductCMO" :fetch-suggestions="querySearch" :placeholder="$t('cr.query')" @select="handleSelect0" clearable>
                  <i class="el-icon-search el-input__icon" slot="suffix">
                  </i>
                  <table slot-scope="props">
                    <tr>
                      <td style="200px">{{ props.item.person_notes_cn }}</td>
                      <td style="80px">{{ props.item.last_name }}</td>
                      <td style=" 140px ">{{ props.item.dept }}</td>
                    </tr>
                  </table>
                </el-autocomplete>
                <!-- <el-input v-model="versionReleaseInfo.ParaData.SignUser.ProductCMO" clearable></el-input> -->
              </el-form-item>
书山有路勤为径,学海无涯苦作舟。
我在模仿,参照,如有侵权,请联系本人删除。