1. 传统IO-面向流
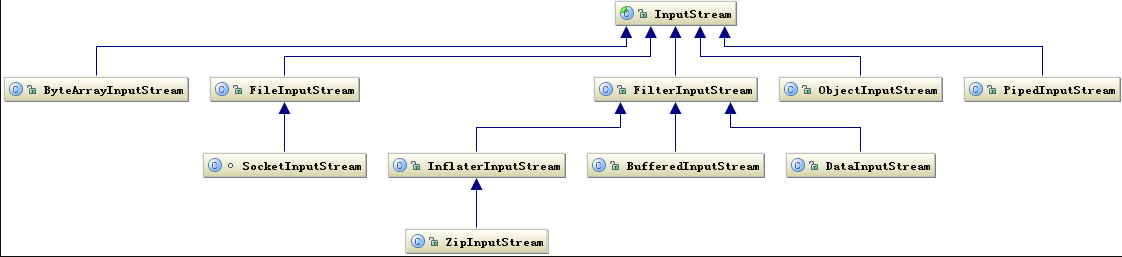
1.1 基于字节的IO接口 In/OutputStream

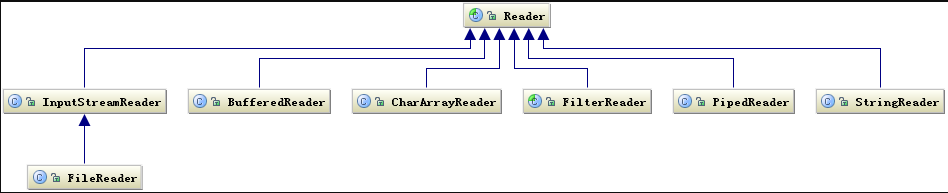
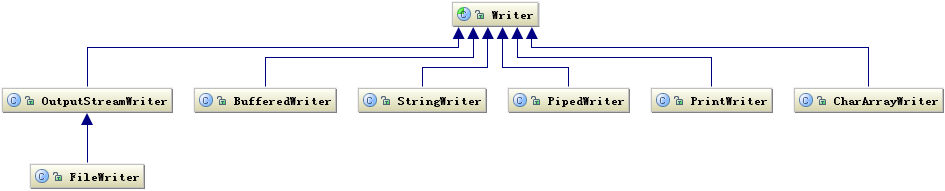
1.2 基于字符的IO接口 Reader/Writer
Reader提供抽象方法: int read(char cbuf[], int off, int len)
Writer提供 int write(char cbuf[], int off, int len)
1.3 Java字符编码
1)内置部分字符集: StandardCharsets.UTF_8
2)只有当从外部引入byte[]或向外部输出byte[]时才需要指定编码。如socket、file操作等!

//编码转换,字符省略时默认'utf-8'
    new String(ss.getBytes("UTF-8"), StandardCharsets.UTF_8);

	Charset charset = Charset.forName(StandardCharsets.UTF_8);
	ByteBuffer byteBuffer = charset.encode(string);
	CharBuffer charBuffer = charset.decode(byteBuffer);
//当前运行时的字符集
    Charset.defaultCharset().displayName();
//是否支持字符集
    Charset.isSupported("gbk");
//当前支持的所有字符集
    Set<String> charsetNames = Charset.availableCharsets().keySet();
2 NIO-面向缓冲
2.0 Files 文件操作
	Files.exists()		//文件是否存在
	Files.createDirectory()				//创建[多级]目录
	Files.createDirectories(newPath);
	Files.copy()	//可覆盖
	Files.move()
	Files.delete()
	Files.readAttributes(path, "*") //获取文件属性
	Files.isDirectory()				//文件类型,是否文件夹

	path.getParent().toString()		//文件所在目录
	path.toString()					//文件全路径
	path.toFile().getName()			//获取文件名

    List<String> lines = Files.readAllLines(path, StandardCharsets.UTF_8);	//读文件
    byte[] bytes = Files.readAllBytes(path);  	//读文件
    Files.lines(path, StandardCharsets.UTF_8).forEach((line) -> {	//读文件
        System.out.println(line);
    });

	//写文件
	try(BufferedWriter writer = Files.newBufferedWriter(path, StandardCharsets.UTF_8, StandardOpenOption.WRITE)){
	   writer.write("Hello World!");
	}

//二进制读写文件
InputStream in = new FileInputStream("myfile//a.txt");//("myfile//a.txt",true)
x[i] = (char)in.read();

OutputStream out = new FileOutputStream("b.txt");
out.write(bytes, 0, bytes.length);
	//递归遍历文件
	Files.walkFileTree();
    public static void main(String[] args) throws IOException
    {
        Path path = Paths.get("F:/project/C10/20160704-");
        Files.walkFileTree(path, new findPropertyVisitor());
    }
    private static class findPropertyVisitor extends SimpleFileVisitor<Path>{
        @Override
        public FileVisitResult visitFile(Path file, BasicFileAttributes attributes){
            if(file.toString().endsWith(".properties")){
                System.out.println(file.getFileName());
            }
            return FileVisitResult.CONTINUE;	//其它选项
        }
    }
2.1 Path 位置/路径
注:1)Path可独立存在,只有在读取或写入时才会异常
        2) 去掉./..-->path.normalize() ,快捷方式的真实地址:path.toRealPath()
Path listing = Paths.get("C:/Users/z00316474/Desktop");
2.2 Channel: data<->Buffer<->Channel
FileChannel
DatagramChannel
SocketChannel
ServerSocketChannel
2.2.1 FileChannel 文件通道
a). 连接到文件的通道。可以通过文件通道读写文件,总是运行在阻塞模式下。
b). 无法直接打开一个FileChannel,需要通过使用一个InputStream、OutputStream或RandomAccessFile来获取一个FileChannel实例

    FileChannel.tranferTo()            //从源channel获取数据到当前channel ,数据直接在内核空间移动,减少系统调用切换
    FileChannel.tranferTo()            //从当前channel数据传输到其它channel
FileChannel.map				将文件按照一定大小映射为内存区域,适合对大文件的只读性操
 RandomAccessFile aFile = new RandomAccessFile("data/nio-data.txt", "rw");
FileChannel inChannel = aFile.getChannel();
ByteBuffer buf = ByteBuffer.allocate(48);

int bytesRead = inChannel.read(buf);	//读文件
//因为无法保证write()方法一次能向FileChannel写入多少字节,因此需要重复调用write()方法
channel.write(buf);		//写文件
channel.close();		//关闭

channel.position(pos +123);	//设置文件指针的位置
channle.size()			//文件大小
channel.truncate(1024);	//截取文件前1024字节,后面将被删除
channel.force(true);	//强制写文件到磁盘
2.2.2 SocketChannel -TCP Client
SocketChannel socketChannel = SocketChannel.open();		//打开
socketChannel.connect(new InetSocketAddress("http://jenkov.com", 80));

socketChannel.close();	//关闭

ByteBuffer buf = ByteBuffer.allocate(48);	//读数据
int bytesRead = socketChannel.read(buf);

while(buf.hasRemaining()) {		//写入数据
	channel.write(buf);
}
2.2.3 ServerSocketChannel - TCP Server
ServerSocketChannel serverSocketChannel = ServerSocketChannel.open();
serverSocketChannel.socket().bind(new InetSocketAddress(9999));
while(true){
	SocketChannel socketChannel = serverSocketChannel.accept();
}
2.2.4 DatagramChannel UDP
DatagramChannel channel = DatagramChannel.open();
channel.socket().bind(new InetSocketAddress(9999));
ByteBuffer buf = ByteBuffer.allocate(48);
buf.clear();
channel.receive(buf);
int bytesSent = channel.send(buf, new InetSocketAddress("jenkov.com", 80));
2.3 Buffer缓冲区,data<->Buffer<->Channel
本质上是一块可以写入数据,然后可以从中读取数据的内存,以下3个重要属性:
	capacity	缓冲区数组的总长度
	position	下一个可读写的位置
	limit	不可操作的下一个元素的位置,写-还能写多少数据,读-==capacity
	mark	用于记录当前 position 的前一个位置或者默认是 0
//类型
ByteBuffer ;MappedByteBuffer; CharBuffer;DoubleBuffer; FloatBuffer; IntBuffer; LongBuffer;ShortBuffer;

    //使用步骤
    将数据写入到 Buffer 中.
    调用 Buffer.flip()方法, 将 NIO Buffer 转换为读模式.
    从 Buffer 中读取数据
    调用 Buffer.clear() 或 Buffer.compact()方法, 将 Buffer 转换为写模式
RandomAccessFile aFile = new RandomAccessFile("data/nio-data.txt", "rw");
FileChannel inChannel = aFile.getChannel();

ByteBuffer buf = ByteBuffer.allocate(48);	//分配空间
int bytesRead = inChannel.read(buf); //读数据到buffe中
while (bytesRead != -1) {
  buf.flip();  //flip方法将Buffer从写模式切换到读模式。调用flip()方法会将position设回0,并将limit设置成之前position的值
  while(buf.hasRemaining()){
      System.out.print((char) buf.get()); // 从buffer中取数据
  }
  buf.clear(); //position将被设回0,limit被设置成 capacity的值。数据未清除,只是标记从哪里开始写数据
  bytesRead = inChannel.read(buf);
}
mark()与reset()方法		mark()标记Buffer中的一个特定position。之后调用Buffer.reset()方法恢复到这个position。
equals()  只比较剩余元素,同时满足以下条件则true
	a).有相同的类型(byte、char、int等)。
	b).Buffer中剩余的byte、char等的个数相等。
	c).Buffer中所有剩余的byte、char等都相同
compareTo()	比较两个Buffer的剩余元素(byte、char等), 如果满足下列条件,则认为一个Buffer“小于”另一个Buffer
	a).第一个不相等的元素小于另一个Buffer中对应的元素 。
	b).所有元素都相等,但第一个Buffer比另一个先耗尽(第一个Buffer的元素个数比另一个少)
2.4 Selector-阻塞多个channel直到事件触发
a). 一个单独的线程可以管理多个channel,从而管理多个网络连接。
b). 向Selector注册Channel,然后调用它的select()方法

//创建
Selector selector = Selector.open();

//注册,与Selector一起使用时,Channel必须处于非阻塞模式下,返回SelectionKey对象(包含Channel、selector、ready集合、interest集合)
channel.configureBlocking(false);
SelectionKey key = channel.register(selector, Selectionkey.OP_READ);	//其它可选:OP_WRITE-写事件,OP_CONNECT,OP_ACCEPT

//监控,一旦调用将阻塞直到有注册事件触发
selector.select();	//返回值表示自上次调用select()方法后有多少通道变成就绪状态

//获取触发的selectionKey对象
Set selectedKeys = selector.selectedKeys();

//触发的事件,事件类型判断
int readySet = selectionKey.readyOps();
selectionKey.isAcceptable();
selectionKey.isConnectable();
selectionKey.isReadable();
selectionKey.isWritable();

//关闭,关闭该Selector,且使注册到该Selector上的所有SelectionKey实例无效,通道本身并不会关闭
selector.close()
//实例代码
Selector selector = Selector.open();
channel.configureBlocking(false);
SelectionKey key = channel.register(selector, SelectionKey.OP_READ);
while(true) {
  int readyChannels = selector.select();
  if(readyChannels == 0) continue;
  Set selectedKeys = selector.selectedKeys();
  Iterator keyIterator = selectedKeys.iterator();
  while(keyIterator.hasNext()) {
    SelectionKey key = keyIterator.next();
    if(key.isAcceptable()) {
        // a connection was accepted by a ServerSocketChannel.
    } else if (key.isConnectable()) {
        // a connection was established with a remote server.
    } else if (key.isReadable()) {
        // a channel is ready for reading
    } else if (key.isWritable()) {
        // a channel is ready for writing
    }
    keyIterator.remove();
  }
}
try-with-resource 资源自动关闭
实现了Closeable接口的类
	1)try后面()中打开的资源会在{}代码执行完成/异常后自动关闭
    2) 可结合catch、finally使用,在资源关闭后执行
try (
  java.util.zip.ZipFile zf = new java.util.zip.ZipFile(zipFileName);
  java.io.BufferedWriter writer = java.nio.file.Files.newBufferedWriter(outputFilePath, charset)
) {}