IDEA+Gradle搭建Spring Boot项目
1. 环境准备:
- Jdk1.8+
- Intellij IDEA
- gradle
2. 创建项目
IDEA > File > New > Module(Project)…


完成后,项目的目录下只有两个文件:build.gradle和settings.gradle,接下来我们需要做一些配置.
3. 配置
build.gradle文件,自动生成的内容为:
plugins {
    id 'java'
}

group 'com.ryze'
version '1.0-SNAPSHOT'

sourceCompatibility = 1.8

repositories {
    mavenCentral()
}

dependencies {
    testCompile group: 'junit', name: 'junit', version: '4.12'
}
修改后:
// buildscript必须在顶部,注意位置
buildscript {
    repositories {
        // 优先使用国内源
        maven { url 'https://maven.aliyun.com/repository/public' }
        mavenCentral()
    }
    dependencies {
        // 让spring-boot支持gradle
        classpath("org.springframework.boot:spring-boot-gradle-plugin:2.1.1.RELEASE")
    }
}

plugins {
    id 'java'
    id 'org.springframework.boot' version '2.1.1.RELEASE'
}

apply plugin: 'java'
apply plugin: 'idea'
// 使用spring boot
apply plugin: "org.springframework.boot"
// 使用spring boot的自动依赖管理
apply plugin: 'io.spring.dependency-management'

group 'com.ryze'
version '1.0-SNAPSHOT'

sourceCompatibility = 1.8
targetCompatibility = 1.8

repositories {
    // 使用国内的源
    maven { url 'https://maven.aliyun.com/repository/public' }
    mavenCentral()
}

dependencies {
    compile 'org.springframework.boot:spring-boot-starter-web'
    testCompile 'org.springframework.boot:spring-boot-starter-test'
    compile group: 'io.netty', name: 'netty-all', version: '4.1.15.Final'
    testCompile group: 'junit', name: 'junit', version: '4.12'

}
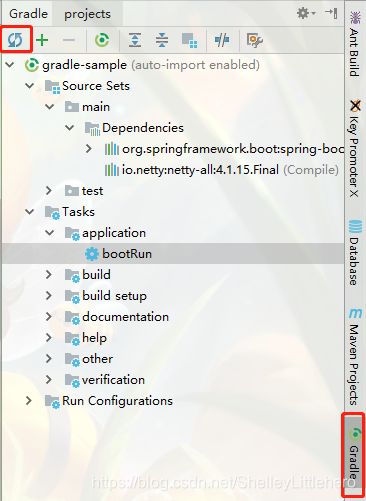
点击刷新,进行自动下载:

4. 测试类编写
1.在项目中新建目录 src/main/java(这是java默认可以识别的目录)
2.点选新建的 java 目录,右键选择 New > Package 新建一个包,包名:com.ryze
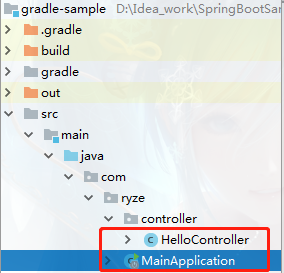
3.新建Springboot启动类和测试Controller类:

代码为:
MainApplication :
@SpringBootApplication
public class MainApplication {
    public static void main(String[] args){
        SpringApplication.run(MainApplication.class,args);
    }
}
HelloController :
@RestController
public class HelloController {
    @GetMapping("/")
    @ResponseBody
    public String hello(){
        return "hello gradle!";
    }
}
5. 运行
使用springboot方式启动,或者使用Gradle的命令bootrun启动.浏览器输入http://localhost:8080,可以看到输出.

UPDTAE:
异常Gradle 5 IntelJ java.lang.AbstractMethodError :
https://www.jianshu.com/p/f9951d5506fc
更多学习:
https://www.awaimai.com/2621.html 参考
https://www.cnblogs.com/davenkin/p/gradle-learning-1.html
https://gradle.org/ 官网