介绍
CButton是一个用VB.NET编写的简单的自定义按钮控件。对不起,我一开始没有意识到“C”前缀是语言特有的东西。它是自定义按钮的缩写。我不会再让这种事发生了。对于普通的Microsoft按钮来说,这是一个很好的选择。
对于3.4以上版本的现有用户来说,这是一个重要的提示。
在3.5版本中,不再需要DesignerRectTracker类,需要一些设计人员清理使用旧控件而将使用新控件的现有项目。(详情见下文)
以下是主要功能的列表:
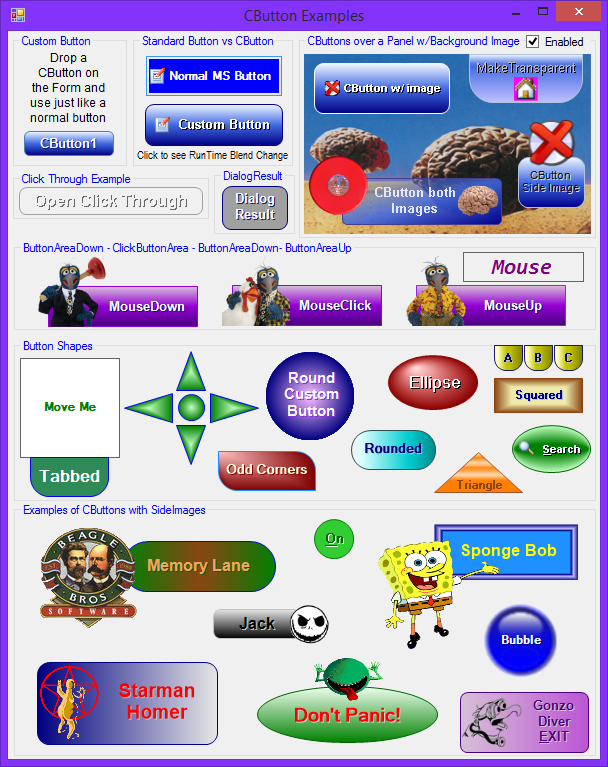
- 改变按钮的形状,调整圆角矩形实体和多颜色填充文本阴影和边缘可调翻转和点击颜色变化与模拟点击移动正常按钮图像和/或附加侧面图像
在1.2版本中,我添加了uitypeeditor和controldesigner来改进设计时的编辑功能。有关详细解释,请参见UITypeEditorsDemo[^]。这使我能够将一些属性组合成一个单一的属性,或者改进其他属性。
例如:
- ButtonColorA, ButtonColorB和ButtonColorC被合并到ColorFillBlend中,允许无限的颜色混合,而不是被限制在只有三种颜色
- 将ButtonColorCenterPoint和ButtonColorCenterPtOffset合并为FocalPoints
- 角半径成为一个可扩展的属性角,允许每个角单独调整

背景
这是另一个需要(好吧,让我们诚实地说,一个普通的按钮将工作,所以我想)一个更好的外观和视觉上通用的按钮的例子。现在已经有很多很棒的按钮控件了,但并不是我想要的所有功能。基本上,我创建了我想要的属性,然后接管OnPaint以我想要的方式绘制它。
控制属性
以下是主要属性的列表:
- 形状 这个按钮是什么形状的(矩形、椭圆、三角形)
- ColorFillBlend 渐变混合填充中使用的颜色
- BorderColor, BorderShow 用不同的颜色显示边框
- FillType 使用什么颜色渐变类型(实体、线性或路径)
- FocalPoints 路径渐变类型填充的中心点和FocusScales
- 角落 每个角弧的半径
- DimFactorHover, DimFactorClick 在鼠标翻转和单击期间调整按钮颜色的数字
- TextShadow, TextShadowShow 显示或不显示文本的阴影和颜色
- TextMargin 将文本从按钮的内边缘推远
- TextSmoothingMode 设置图形对象的TextRenderingHint使文本看起来更好
- SideImage 添加一个可以放置在按钮表面外部的额外图像
- 填充 从控件的边缘偏移按钮区域的边缘
使用的代码
一旦你按照你想要的方式设计了CButton,就没有任何复杂的代码了。就像使用普通按钮一样使用它。
因为点击控件上的任何地方都会触发Click事件,所以我添加了两个新事件;版本1.1中的ClickButtonArea事件只在鼠标点击控件的按钮部分时触发,版本2.0中的SideImageClicked事件。
    'Add a new Click event for only when the ButtonArea or SideImage is Clicked
    Public Event ClickButtonArea(ByVal Sender As Object, _
        ByVal e As System.Windows.Forms.MouseEventArgs)
    Public Event SideImageClicked(ByVal Sender As Object, _
        ByVal e As System.Windows.Forms.MouseEventArgs)


Private Sub CButton_MouseUp(ByVal sender As Object, _
    ByVal e As System.Windows.Forms.MouseEventArgs) Handles Me.MouseUp
    If MouseDrawState = eMouseDrawState.Down _
        Then RaiseEvent ClickButtonArea(Me, New EventArgs)
    MouseDrawState = eMouseDrawState.Up
    Me.Invalidate(ButtonArea)
End Sub
的兴趣点
控件只是一个将各部分按正确位置分层的过程。有四个主要领域需要跟踪。控件区、按钮区、文本区和图像区。按钮区域通过控件填充值从控件区域减少。文本区域从按钮区域缩小到文本边距值和图像区域。图像区域基于图像大小。项目将根据其布局选项放置到这些区域中。
Protected Overrides Sub _
		OnPaint(ByVal e As System.Windows.Forms.PaintEventArgs)
		e.Graphics.SmoothingMode = SmoothingMode.AntiAlias
		e.Graphics.TextRenderingHint = _TextSmoothingMode
		'Gray the Text and Border Colors if Disabled
		Dim bColor, tColor, tsColor As Color
		If Enabled Then
			bColor = _BorderColor
			tColor = ForeColor
			tsColor = _TextShadow
		Else
			bColor = GrayTheColor(_BorderColor)
			tColor = GrayTheColor(ForeColor)
			tsColor = GrayTheColor(_TextShadow)
		End If

		Using MyPen As New Pen(bColor)
			MyPen.Alignment = PenAlignment.Inset

			'Shrink the Area so the Border draws correctly, _
			'then trim off the Padding to get the button surface area
			ButtonArea = AdjustRect(New RectangleF(0, 0, _
				Size.Width - 1, Size.Height - 1), Padding)

			'Create the ButtonArea Path
			Using gp As GraphicsPath = GetPath()

				If BackgroundImage Is Nothing Then

					'Color the ButtonArea with the right Brush
					Select Case FillType
						Case eFillType.Solid
							Using br As Brush = New SolidBrush(GetFill)
								e.Graphics.FillPath(br, gp)
							End Using

						Case eFillType.GradientPath
							Using br As PathGradientBrush = _
                                                                          New PathGradientBrush(gp)
								Dim cb As New ColorBlend
								cb.Colors = GetFillBlend()
								cb.Positions = ColorFillBlend.iPoint

								br.FocusScales = _
                                                                     FocalPoints.FocusScales
								br.CenterPoint = New PointF( _
									Padding.Left + _
                                                                        ButtonArea.Width * _
                                                                        FocalPoints.CenterPoint.X, _
									Padding.Top + _
                                                                        ButtonArea.Height * _
                                                                        FocalPoints.CenterPoint.Y)
								br.InterpolationColors = cb

								e.Graphics.FillPath(br, gp)
							End Using

						Case eFillType.GradientLinear
							Using br As LinearGradientBrush = _
                                                                New LinearGradientBrush( _
							  ButtonArea, Color.White, Color.White, _
                                                                FillTypeLinear)
								Dim cb As New ColorBlend
								cb.Colors = GetFillBlend()
								cb.Positions = ColorFillBlend.iPoint
								'MsgBox(cb.Colors.Length & _
                                                                cb.Positions.Length)
								br.InterpolationColors = cb

								e.Graphics.FillPath(br, gp)
							End Using

					End Select
				End If

				If MyBase.Focused AndAlso ShowFocus = eFocus.Dot Then
					Using focusPen As Pen = New Pen(Brushes.Black, 1) _
                                             With {.DashStyle = DashStyle.Dot}
						e.Graphics.DrawPath(focusPen, GetPath(-1, -1))
					End Using
				End If

				If BorderShow Then
					e.Graphics.DrawPath(MyPen, gp)
				End If

			End Using

			Dim ipt As PointF = ImageLocation(GetStringFormat(SideImageAlign), _
				Size, SideImageSize)

			rectSideImage = New Rectangle(CInt(ipt.X), CInt(ipt.Y), _
				SideImageSize.Width, SideImageSize.Height)

			'Put the SideImage behind the Text
			If SideImageBehindText AndAlso SideImage IsNot Nothing Then
				If Enabled Then
					e.Graphics.SmoothingMode = SmoothingMode.None
					e.Graphics.DrawImage(SideImage, ipt.X, ipt.Y, _
						SideImageSize.Width, SideImageSize.Height)
				Else
					ControlPaint.DrawImageDisabled(e.Graphics, _
					New Bitmap(SideImage, SideImageSize.Width, _
					SideImageSize.Height), _
					CInt(ipt.X), CInt(ipt.Y), BackColor)
				End If
			End If

			'Layout the Text and Image on the button surface
			SetImageAndText(e.Graphics)

			If Not Image Is Nothing Then
				If Enabled Then
					e.Graphics.DrawImage(Image, Imagept.X, Imagept.Y, _
						ImageSize.Width, ImageSize.Height)
				Else
					ControlPaint.DrawImageDisabled(e.Graphics, _
						New Bitmap(Image, ImageSize.Width, ImageSize.Height), _
						CInt(Imagept.X), CInt(Imagept.Y), BackColor)
				End If
			End If

			'Draw the Text and Shadow
			If TextShadowShow Then
				TextArea.Offset(1, 1)
				e.Graphics.DrawString(Text, Font, _
					New SolidBrush(tsColor), TextArea, GetStringFormat(TextAlign))
				TextArea.Offset(-1, -1)
			End If
			e.Graphics.DrawString(Text, Font, _
				New SolidBrush(tColor), TextArea, GetStringFormat(TextAlign))

			'Put the SideImage in front of the Text
			If Not SideImageBehindText AndAlso Not SideImage Is Nothing Then
				If Enabled Then
					e.Graphics.SmoothingMode = SmoothingMode.None
					e.Graphics.DrawImage(SideImage, ipt.X, ipt.Y, _
						SideImageSize.Width, SideImageSize.Height)
				Else
					ControlPaint.DrawImageDisabled(e.Graphics, _
					New Bitmap(SideImage, _
					SideImageSize.Width, SideImageSize.Height), _
					CInt(ipt.X), CInt(ipt.Y), BackColor)
				End If
			End If

		End Using
    End Sub
当控件被禁用时,我使用了两种方法来使颜色变灰:

要使一种颜色变成灰色,我使用了这个函数:
Function GrayTheColor(ByVal GrayColor As Color) As Color
   Dim gray As Integer = _
    CInt(GrayColor.R * 0.3 + GrayColor.G * 0.59 + GrayColor.B * 0.11)
   Return Color.FromArgb(GrayColor.A, gray, gray, gray)
End Function
为了灰度图像,我最初使用这个函数:
Private Function EnableDisableImage(ByVal img As Image) As Bitmap
    If Me.Enabled Then Return img
    Dim bm As Bitmap = New Bitmap(img.Width, img.Height)
    Dim g As Graphics = Graphics.FromImage(bm)
    Dim cm As ColorMatrix = New ColorMatrix(New Single()() _
         {New Single() {0.5, 0.5, 0.5, 0, 0}, _
        New Single() {0.5, 0.5, 0.5, 0, 0}, _
        New Single() {0.5, 0.5, 0.5, 0, 0}, _
        New Single() {0, 0, 0, 1, 0}, _
        New Single() {0, 0, 0, 0, 1}})

    Dim ia As ImageAttributes = New ImageAttributes()
    ia.SetColorMatrix(cm)
    g.DrawImage(img, New Rectangle(0, 0, img.Width, img.Height), 0, 0, _
        img.Width, img.Height, GraphicsUnit.Pixel, ia)
    g.Dispose()
    Return bm

End Function
在2.0版本中,我切换到ControlPaint功能,因为我觉得图像看起来更好看。
ControlPaint.DrawImageDisabled(e.Graphics, Me.Image, _
    CInt(Imagept.X), CInt(Imagept.Y), Me.BackColor)
角、填充边距和FocalPoint装饰器
在3.5版本中,控件设计器增加了装饰和符号。有关WinForms的装饰器符号行为和控件设计器的解释,请转到这个链接。
角、按钮区域(Padding)、文本边距和焦点都可以在PropertyGrid中编辑。这可能有点乏味和不直观。通过使用装饰器和符号,可以在控件上用鼠标直接编辑这些属性。
ChooseAdorner
选择控件将在控件的右上角显示三个按钮。

角落装饰器
单击(C)orner按钮可显示五个角形符号。前后移动四个角符号以分别调整每个角。移动中心符号,将所有四个角调整为相同的值。

FocalPoints装饰器
单击(F)ocalPoints按钮,得到中心和FocalScale符号,就像旧版本一样。这只在FillType为GradientPath时有效。一个小的正方形和圆形选择将出现在控件上。拖动圆形以移动中心点,拖动方形以移动FocusScales。按住Shift键并点击图标将中心重置到按钮的中间,或者将FocusScale重置为0。

填充边缘装饰器
点击(P)添加调整ButtonArea (Padding属性)和TextMargin属性。虚线将标记边缘的位置。拖动每一边来调整。如果两个边距直接重叠,则先选择填充。按住Shift键,迫使文本边距进行选择。
.
3.5+版本的重要升级说明
这个控件已经存在很长时间了,并且基于下载和评论,相当多的人在使用它。装饰器的升级使得不再需要使用DesignerRectTracker类。如果您在一个项目中使用3.5版本,您使用的是以前的版本,在以前的版本中,您会得到一堆错误,无论您使用的是旧的CButton。

这非常繁琐,但是您需要删除所有这些有错误的行,以删除窗体设计器中对旧跟踪器的所有引用。
如果有人知道一种方法来清理这些更容易或散装,我很想知道。
到目前为止,我发现最快的方法是打开一个窗体设计器窗口,然后搜索DesignerRectTracker (Ctrl-F)。然后按F3来查找,按Ctrl-L来获取代码行。在我掌握了节奏之后,节奏很快。
为ColorFillBlend TypeConverter
在2.0版本中,用于ColorFillBlend的TypeConverter可以将blend的字符串表示转换为cBlendItems,以允许更精确的调整,并轻松地将一个cButton的blend复制到另一个cButton。

历史
- 版本1.0 - 2008年5月
- 版本1.1—2008年7月 更新了“可点击区域”,并增加了一个ClickButtonArea事件
- 版本1.2 - 2008年9月 更新属性,使用uitypeeditor和ControlDesigner添加了三角形按钮
- 版本1.3 - 2008年9月 按钮区域单击Fix。当鼠标移动时,按钮没有点击
- 版本1.4 - 2008年10月 启用/禁用添加特性
- 版本1.5 - 2008年12月 修正了当propertygrid中的子属性发生变化时FocalPoints和Corners属性会立即刷新控件。移除FocalPoints Modal UITypeEditor,并在设计界面上添加直接调整点的功能
- 版本1.6 - 2009年1月 在NfErNo的建议的基础上增加了助记键。
- 版本1.7 - 2009年4月 增加了通过点击非按钮区域的SendMessage
- 版本1.8 - 2009年11月 根据getholdofphil的建议增加了关键事件,修正了焦点问题
- 版本1.9 - 2010年7月 切换禁用图像例程ControlPaint方法添加TextSmoothingMode属性添加SideImageClicked事件改变ClickButtonArea事件为MouseEventArgs传递鼠标按钮更容易
- 版本2.0 - 2011年12月 为PerformClick和dialogresult添加了IButtonControl接口。为cBlendItem类型添加了BlendItemsConverter
- 版本2.0 - 2013年1月 添加了Visual Studio 2012版本
- 3.4版本- 2015年3月 添加ShowFocus财产
- 3.5版本- 2015年4月 删除ControlDesigner装饰覆盖,并添加了真正的装饰和符号(在替换现有项目中的3.4或更早版本之前,请参阅上面的重要说明)。增加了ButtonAreaUp和ButtonAreaDown
- 3.6版本2015年5月 固定侧边图像点击后,鼠标向上/向下打破它
本文转载于:http://www.diyabc.com/frontweb/news13979.html