import logging
logging.debug("")
logging.info("")
logginf.warning("")
logging.error("")
logging.critical("")# 默认的级别为warning
# level总共分5个级别:debug < info< warning< error< critical
## 设置日志级别,日志格式,输出位置
import logging

logging.basicConfig(
    level=logging.DEBUG,
    filename = "logger.log",
    filemode = "w",
    format = "%(asctime)s %(lineno)d %(message)s %(filename)s"
)
logging.debug('debug message')
logging.info('info message')
logging.warning('warning message')
logging.error('error message')
logging.critical('critical message')


# 在输出文件logging.log中 当日志级别设置为debug时,输出大于等于debug的日志信息
2018-12-18 22:46:05,141 16 debug message 日志模块.py
2018-12-18 22:46:05,190 17 info message 日志模块.py
2018-12-18 22:46:05,190 18 warning message 日志模块.py
2018-12-18 22:46:05,190 19 error message 日志模块.py
2018-12-18 22:46:05,190 20 critical message 日志模块.py


# 当日志的级别设置为 warning 输出大于等于Warning的日志信息
2018-12-18 22:50:55,063 12 warning message 日志模块.py
2018-12-18 22:50:55,063 13 error message 日志模块.py
2018-12-18 22:50:55,063 14 critical message 日志模块.py
##
filename # 指定日志的文件ming
filemode # 和file函数的意义相同,指定日志的打开模式,"w","a"
datefmt # 指定日期的时间格式
level # 设置日志的级别
format # 指定输出的格式和内容
%(name)s # 日志的名字
%(levelno)s # 数字形式的日志级别
%(levelname)s # 文本形式的日志级别
%(pathname)s # 调用日志输出函数的模块的完整路径名,可能没有
%(filename)s # 调用日志输出函数的模块的文件名
%(module)s # 调用日志输出函数的模块名
%(funcName)s # 调用日志输出函数的函数名
%(lineno)d # 调用日志输出函数的语句所在的代码行
%(created)f # 当前时间,用UNIX标准的表示时间的浮 点数表示
%(relativeCreated)d # 输出日志信息时的,自Logger创建以 来的毫秒数
%(asctime)s # 字符串形式的当前时间。默认格式是 “2003-07-08 16:49:45,896”。逗号后面的是毫秒
%(thread)d # 线程ID。可能没有
%(threadName)s # 线程名。可能没有
%(process)d # 进程ID。可能没有
%(message)s # 用户输出的消息
## logger对象
logger = logging.getLogger()    # 创建logger对象

fh = loggign.FileHandler("test.log")    # 可向文件中发送内容
ch = logging.StreamHandler()            # 可向控制台输送内容
fm = logging.Formatter("%(asctime)s %(lineno)d %(message)s %(filename)s")    # 格式

fh.setFormat(fm)    # 给输出到文件的设置格式
ch.setFormat(fm)    # 给输出到控制台的设置格式

logger.addHandler(fh)    # 给logger
logger.addHandler(ch)    # 给logger

logger.setLevel("DEBUG") # 可对logger设置级别

logger.debug("hello")
logger.info("hello")
logger.waring("hello")
logger.error("hello")
logger.critical("hello")
## 日志补充
import logging
logger1 = logging.getlogger("mylogger")
logger1.setLevel(logging.DEBUG)

logger2 = logging.getlogger("mylogger")
logger2.setLevel(logging.INFO)

# 注实际上logger1与logger2指向同一个对象,指向mylogger
设置级别时,将logger1设为DEBUG,将logger2设为INFO,实际上两个都为INFO,个输出4条日志
.
.
.
logger1.debug("hello")
logger1.info("hello")
logger1.waring("hello")
logger1.error("hello")
logger1.critical("hello")

logger2.debug("hello")
logger2.info("hello")
logger2.waring("hello")
logger2.error("hello")
logger2.critical("hello")
# 在自动化的测试过程中,为了提高脚本的可读性和降低维护成本,通常将一些通用的信息写入配置文件中,将重复使用的方法写成公共模块进行封装,要使用时可直接调用即可
# 利用configparser模块读取和写入配置文件
# 常见的配置文件
[DEFAULT]
brightness = 100
language = Chinese
typewriting = sougou

[User]
username = henry123
passworld = 123456

[topsecret.server.com]
host port = 10000
forwardx11 = on
# 如何在Python利用configparser写入该配置文件(生成上方的配置文件)
import configparser

config = configparser.ConfigParser()
# 实例化出一个对象config,相当于有了一个空字典confug = {}

config["DEFAULT"] = {
    "Brightness":"100",
    "Language":"Chinese",
    "Typewriting":"sougou"
}
# DEFAULT为键,{}为值,在{}设置多组键值对(上方有三组)


config["User"] = {}     # 一个键值对对应一个空字典
config["User"]["Uusename"] = "henry123"     # 一个键值对
config["User"]["passworld"] = "123456"

config["topsecret.server.com"] = {}
topspecret = config["topsecret.server.com"]
topspecret["Host Port"] = "10000"
topspecret["ForwardX11"] = "on"

# 将对象写到文件 test.ini 中
with open("test.ini","w") as configfile:
    config.write(configfile)
# 对配置文件进行增删改查
# 查
import configparser

config = configparser.ConfigParser()
config.read("test.ini")

#1 # 打印除DEFAULT外的块名
print(config.sections())    # ['User', 'topsecret.server.com']
#2 查看是否在文件中
print("User" in config)         # True
print("helloworld" in config)   # False
# 3
print(config["User"]["Username"])   # 输出 henry123
# 4 遍历块中的内容
# 注:遍历任何信息 defauld中的键都会出现,
# 若不想遍历,则不利用[DEFAULT]命名
# 将大家共享,大家都得使用的信息可放入default中
for key in config["User"]:
    print(key)
# 输出
username
passworld
brightness
language
typewriting
# 5
# 与上方的利用for循环遍历类似
# 但options将结果放到列表中
print(config.options("User"))
['username', 'passworld', 'brightness', 'language', 'typewriting']
# 6
# 键值对形式
print(config.items("User"))
[('brightness', '100'), ('language', 'Chinese'), ('typewriting', 'sougou'), ('username', 'henry123'), ('passworld', '123456')]
# 7
print(config.get("User","Username"))    #输出henry1123
# 增
import configparser
config = configparser.ConfigParser()
config.read("test.ini")

config.add_section("new_module")
config.set("new_module","aaa","bbb")
config.set("new_module","ccc","ddd")
config.set("new_module","eee","fff")

config.write(open("test.ini","w+"))

# 新增后的配置文件
[DEFAULT]
brightness = 100
language = Chinese
typewriting = sougou

[User]
username = henry123
passworld = 123456

[topsecret.server.com]
host port = 10000
forwardx11 = on

[new_module]
aaa = bbb
ccc = ddd
eee = fff
# 删
import configparser
config = configparser.ConfigParser()
config.read("test.ini")

config.remove_section("User")               # 删除块
config.remove_option("new_module","aaa")    # 删除指定元素

config.write(open("test.ini","w"))
# 常用的方法
config.read(filename) # 读取文件内容
config.sections() # 得到所有的section,并且以列表形式返回
config.options(section) # 得到section下所有的option(以列表方式返回)
config.items(option) # 得到该section所有的键值对(以字典方式返回)
config.get(section,option) # 得到section中option的值,返回string类型
config.getint(section,option) # 得到section中option的值,返回int类型
config.write(filename) # 将configparser对象写入.ini类型的文件
config.add_section() # 添加一个新的section
config.add_set(section,option,value) # 对section中的option信息进行写入
config.remove_section(section) # 删除文件中的某个sectionconfig.remove_option(section,option) # 删除文件中某个section下的某个option
Python的hashlib提供常见的摘要算法,用于加密相关的操作,主要提供了 SHA1, SHA224, SHA256, SHA384, SHA512 ,MD5 算法
摘要算法:摘要算法又称为哈希算法,利用一个函数,将任意长的数据转换为一个固定长度的字符串,例如利用摘要算法将一篇文章的转成摘要,当有人修改该文章时,则再次产生的摘要就会不同于原文产生的摘要
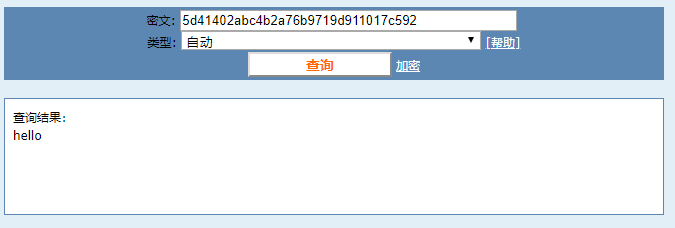
import hashlib

obj = hashlib.md5()
obj.update("hello".encode("UTF-8"))
print(obj.hexdigest())

# 产生的摘要 5d41402abc4b2a76b9719d911017c592
MD5为最常见的摘要算法,速度快,生成固定128bit字节,通常用一个32位的16进制表示,摘要算法越安全,则算法的时间越慢,产生的摘要的长度就更长
加密算法不能通过反解得到原有的数据,但也存在一定的缺陷,当有一个巨大的数据库存放着大量的数据,这些数据为(原数据和产生对应的摘要),可以通过撞库反解,所以有必要在算法加密时加入自定义的key来加密
# 反解密
# 利用key进行加密
import hashlib

obj = hashlib.md5("hahaha".encode("UTF-8"))    # 加入key进行加密
obj.update("root".encode("UTF-8"))
print(obj.hexdigest())

# 产生的摘要算法为 bda1987964951ba663abe1028c2957d5
#
import hashlib

obj = hashlib.md5()
obj.update("admin".encode("utf-8"))
print(obj.hexdigest())

obj.update("root".encode("utf-8"))
print(obj.hexdigest())  # 打印的结果为adminroot结果

#
# admin:21232f297a57a5a743894a0e4a801fc3
# adminroot:4b3626865dc6d5cfe1c60b855e68634a
# 摘要算法的用处
在用户登录网站时,会让用户输入用户名和密码,网站的后台会将用户的数据存储到用户数据库中
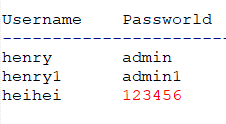
但如果数据库泄露,数据可能就会被不法分子利用,如果以明文的方式存储可见不行
# 摘要算法在该地方就有用武之地

当用户输入用户名跟密码时,将用户名和密码转成摘要,然后与数据库中的用户数据摘要进行比较