# 如何对CentOS进行联网
1:以root管理的身份登录系统
2:进入文件中
[root@localhost ~]# cd /
[root@localhost /]# ls /etc/sysconfig/network-scripts
ifcfg-ens33  ifdown-isdn      ifup          ifup-plip      ifup-tunnel
ifcfg-lo     ifdown-post      ifup-aliases  ifup-plusb     ifup-wireless
ifdown       ifdown-ppp       ifup-bnep     ifup-post      init.ipv6-global
ifdown-bnep  ifdown-routes    ifup-eth      ifup-ppp       network-functions
ifdown-eth   ifdown-sit       ifup-ib       ifup-routes    network-functions-ipv6
ifdown-ib    ifdown-Team      ifup-ippp     ifup-sit
ifdown-ippp  ifdown-TeamPort  ifup-ipv6     ifup-Team
ifdown-ipv6  ifdown-tunnel    ifup-isdn     ifup-TeamPort
[root@localhost /]# vim /etc/sysconfig/network-scripts/ifcfg-ens33
3:进入文件中修改内容
# 修改下方两个参数的内容
# BOOTPROTO=dhcp
# ONBOOT=yes
TYPE=Ethernet
PROXY_METHOD=none
BROWSER_ONLY=no
BOOTPROTO=dhcp
DEFROUTE=yes
IPV4_FAILURE_FATAL=no
IPV6INIT=yes
IPV6_AUTOCONF=yes
IPV6_DEFROUTE=yes
IPV6_FAILURE_FATAL=no
IPV6_ADDR_GEN_MODE=stable-privacy
NAME=ens33
UUID=e0a357cb-fbf1-4a22-ad8e-86ede6a9f5f7
DEVICE=ens33
ONBOOT=yes
4:输入以下内容
[root@localhost /]# service network restart
Restarting network (via systemctl):
5:可尝试ping百度
t@localhost /]# ^C
[root@localhost /]# pint www.baidu.com
6:退出ping,ctrl + c
# ssh
什么是ssh:SSH为Secure Shell的缩写,由 IETF 的网络小组(Network Working Group)所制定;SSH 为建立在应用层基础上的安全协议。SSH 是目前较可靠,专为远程登录会话和其他网络服务提供安全性的协议。利用 SSH 协议可以有效防止远程管理过程中的信息泄露问题。
ssh的功能:传统的网络服务程序,如:ftp、pop和telnet在本质上都是不安全的,因为它们在网络上用明文传送口令和数据,别有用心的人非常容易就可以截获这些口令和数据。而且,这些服务程序的安全验证方式也是有其弱点的, 就是很容易受到“中间人”(man-in-the-middle)这种方式的攻击。所谓“中间人”的攻击方式, 就是“中间人”冒充真正的服务器接收你传给服务器的数据,然后再冒充你把数据传给真正的服务器。服务器和你之间的数据传送被“中间人”一转手做了手脚之后,就会出现很严重的问题。通过使用SSH,你可以把所有传输的数据进行加密,这样"中间人"这种攻击方式就不可能实现了,而且也能够防止DNS欺骗和IP欺骗。使用SSH,还有一个额外的好处就是传输的数据是经过压缩的,所以可以加快传输的速度。SSH有很多功能,它既可以代替Telnet,又可以为FTP、PoP、甚至为PPP提供一个安全的"通道"
(以上内容来自百度百科)
# 在每个linux服务器中都有ssh客户端软件和ssh服务端软件
[root@localhost 桌面]# rpm -qa |grep openssh
openssh-askpass-5.3p1-117.el6.x86_64
openssh-5.3p1-117.el6.x86_64
openssh-clients-5.3p1-117.el6.x86_64    # 客户端软件
openssh-server-5.3p1-117.el6.x86_64     # 服务端软件
# 在上方提到,ssh最常见的用途就是用来进行远程登录,在进行远程的登录时我们得先获得服务端 ip 地址
利用 ifconfig来获得ip地址
[root@localhost ~]# ifconfig
eth0      Link encap:Ethernet  HWaddr 00:0C:29:81:15:02
          inet addr:192.168.37.135  Bcast:192.168.37.255  Mask:255.255.255.0
          inet6 addr: fe80::20c:29ff:fe81:1502/64 Scope:Link
          UP BROADCAST RUNNING MULTICAST  MTU:1500  Metric:1
          RX packets:13 errors:0 dropped:0 overruns:0 frame:0
          TX packets:13 errors:0 dropped:0 overruns:0 carrier:0
          collisions:0 txqueuelen:1000
          RX bytes:1775 (1.7 KiB)  TX bytes:1569 (1.5 KiB)

lo        Link encap:Local Loopback
          inet addr:127.0.0.1  Mask:255.0.0.0
          inet6 addr: ::1/128 Scope:Host
          UP LOOPBACK RUNNING  MTU:65536  Metric:1
          RX packets:16 errors:0 dropped:0 overruns:0 frame:0
          TX packets:16 errors:0 dropped:0 overruns:0 carrier:0
          collisions:0 txqueuelen:0
          RX bytes:960 (960.0 b)  TX bytes:960 (960.0 b)
# 可以利用常用的远程管理工具xshell来进行远程管理
注:xshell安装方法


https://blog.csdn.net/pingqiwei/article/details/78502144
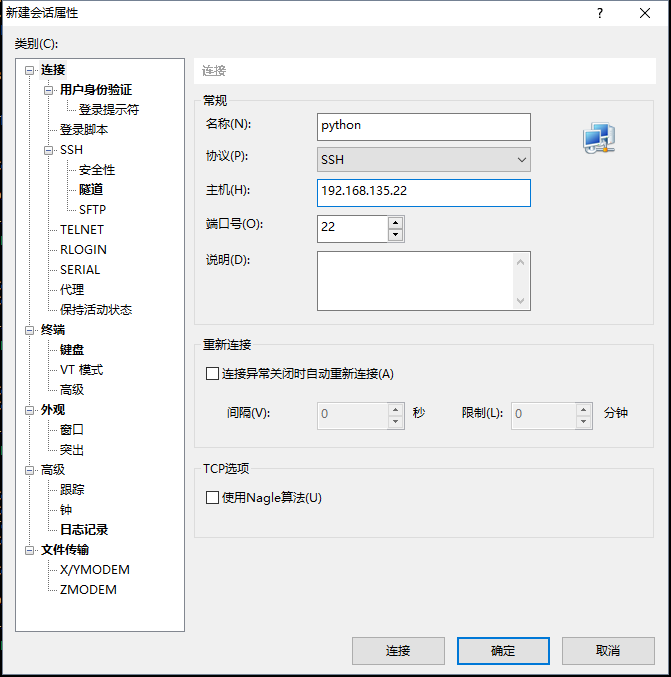
# 远程链接
1)输入ip地址
[D:~]$ ssh 192.168.37.135
# ssh配置文件
[root@localhost 桌面]#  vim /etc/ssh/sshd_config
文件中的#Port 22        # 为端口号
# 怎么解决ssh连接比较慢
在vim /etc/ssh/sshd_config打开的文件中找到 UseDNS no 除去注释 将值改为no,表示连接时不进行dns解析
# 添加一个连接快捷方式
1:文件->新建
# 部署服务的步骤
1:准备环境
1)关闭防火墙
# 查看防火墙状态:
[root@centos6 ~]# service iptables status
iptables:未运行防火墙。

# 开启防火墙:
[root@centos6 ~]# service iptables start

# 关闭防火墙:
[root@centos6 ~]# service iptables stop
2)关闭selinux:SELINUX=disabled
# 打开配置文件
[root@localhost 桌面]# vim /etc/selinux/config

# 修改以下内容
# This file controls the state of SELinux on the system.
# SELINUX= can take one of these three values:
#     enforcing - SELinux security policy is enforced.
#     permissive - SELinux prints warnings instead of enforcing.
#     disabled - No SELinux policy is loaded.
SELINUX=disabled    //修改该行
# SELINUXTYPE= can take one of these two values:
#     targeted - Targeted processes are protected,
#     mls - Multi Level Security protection.
SELINUXTYPE=targeted
3)配置ip地址
# 查看是否配置ip
[root@localhost ~]# ifconfig
...
2:安装软件包
[root@localhost ~]# yum install httpd -y
3:修改配置文件
# 打开配置文件
[root@localhost ~]# vim /etc/httpd/conf/httpd.conf

Listen 80        # 监听80端口
DocumentRoot "/var/www/html"
# 文档根目录所在的位置,网站根目录(当chrome浏览器向服务器发起请求,该网站就会到自己的DocumentRoot "/var/www/html"根目录下找到该文件)

    # 在根目录下添加一个测试文件
    [root@localhost ~]# cd /var/www/html/
    [root@localhost html]# ls
    [root@localhost html]# touch a.txt
    [root@localhost html]# echo "hello world"
    hello world
    [root@localhost html]# echo "hello world" > a.txt
4:重启服务
[root@localhost html]# service httpd restart
5:测试
# 可在浏览器中输入 https://www.doaoao.com/ 但不能进行访问,因为DNS服务器不能将其解析成ip地址(本机中的服务器不知道将该域名翻译成什么ip地址)
# 正确的访问方式:浏览器中输入:http://192.168.37.135:80/a.txt 访问"/var/www/html"根目录下得文件
# 注
当在浏览器输入网址时,若不写文件,默认访问的是index.html,默认网站访问文件 http://192.168.37.135/ 默认访问的是index.html
[root@localhost html]# pwd
/var/www/html
[root@localhost html]# echo '默认页面' > index.html
[root@localhost html]# ls
a.txt  index.html
# 修改主机名称
# 查看主机名称
[root@localhost html]# hostname
localhost.localdomain

# 修改主机名称
[root@localhost html]# hostname www.doaoao.com


# 修改文件中的解析路径
[root@localhost html]# vim /etc/hosts
[root@localhost html]# cat /etc/hosts
127.0.0.1   localhost localhost.localdomain localhost4 localhost4.localdomain4
::1         localhost localhost.localdomain localhost6 localhost6.localdomain6
192.168.37.135 www.doaoao.com
[root@localhost html]# service httpd restart
停止 httpd:                                               [确定]
正在启动 httpd:                                           [确定]
[root@localhost html]# hostname
www.doaoao.com
samba是一个网络服务器,用于Linux和windows之间共享文件
1:准备环境
1)关闭防火墙
2)关闭selinux
3)配置ip地址
2:安装软件包
[root@www ~]# yum install samba -y
3:修改配置文件
[root@www ~]# vim /etc/samba/smb.conf

    配置文件中的内容:
    Scurity can be set to user, share(deprecated) or server(deprecated)
        security = share            # 改成共享模式
        passdb backend = tdbsam

    user :用户访问samba时需要密码
    share:用户访问samba时不需要密码(共享模式)
4:重启服务
[root@www ~]# service smb restart
5:测试
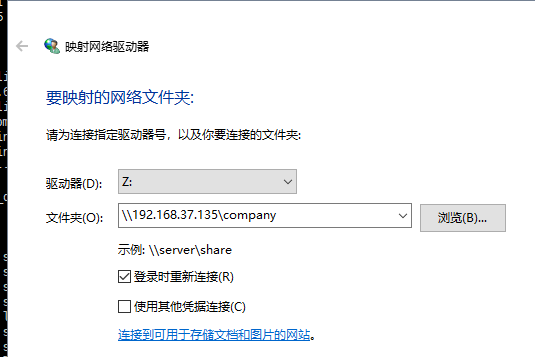
1)打开计算机->映射网络驱动器
2)输入对应的ip地址
\192.168.37.137company
\serviceshare # server:ip地址 share:path指向的目录名称3)当出现问题时(报错)
控制面板->程序->程序和功能->启用或关闭Windows功能->(图片映射网络出现错误)
4)在windows上可以增加删除文件
[root@www ~]# ll -d /company
drwxr-xr-x 2 root root 4096 1月  24 19:52 /company
[root@www ~]# chmod o+w /company/            # 让windows具有操作文件的权限
当在配置文件中设置printable = yes 不能正常访问文件(不显示)

# 共享文件夹的定义
#============================ Share Definitions ==============================

[homes]
        comment = Home Directories
        browseable = no
        writable = yes
;       valid users = %S
;       valid users = MYDOMAIN\%S

[printers]
        comment = All Printers
        path = /var/spool/samba
        browseable = no
        guest ok = no
        writable = no
        printable = yes
# 添加一个samba用户
# 添加一个samba用户
[root@www company]# useradd doaoao
useradd:用户“doaoao”已存在
[root@www company]# smbpasswd -a doaoao
New SMB password:
Retype new SMB password:
Added user doaoao.
[root@www company]#
# 网络映射
\192.168.37.135doaoao    # 直接加上用户名
# 补查看系统日志 tail -f /var/log/messages
[root@www company]# tail -f /var/log/messages
Jan 24 21:03:21 localhost ntpd[2325]: 0.0.0.0 0613 03 spike_detect +0.267876 s
Jan 24 21:04:34 localhost dhclient[3165]: DHCPREQUEST on eth0 to 192.168.37.254 port 67 (xid=0x465eb448)
Jan 24 21:04:34 localhost dhclient[3165]: DHCPACK from 192.168.37.254 (xid=0x465eb448)
Jan 24 21:04:34 localhost NetworkManager[1997]: <info> (eth0): DHCPv4 state changed renew -> renew
Jan 24 21:04:34 localhost NetworkManager[1997]: <info>   address 192.168.37.135
Jan 24 21:04:34 localhost NetworkManager[1997]: <info>   prefix 24 (255.255.255.0)
Jan 24 21:04:34 localhost NetworkManager[1997]: <info>   gateway 192.168.37.2
Jan 24 21:04:34 localhost NetworkManager[1997]: <info>   nameserver '192.168.37.2'
Jan 24 21:04:34 localhost NetworkManager[1997]: <info>   domain name 'localdomain'
Jan 24 21:04:34 localhost dhclient[3165]: bound to 192.168.37.135 -- renewal in 818 seconds.