Netty是基于NIO的框架,完善了NIO的一些缺陷,因此可以用Netty替代NIO
Netty实现通信步骤:
1、创建两个NIO线程组,一个专门用于网络事件处理(接受客户端的连接),另一个则进行网络通信读写。
2、创建一个ServerBootstrap对象,配置Netty的一系列参数,例如接受传出数据的缓存大小等等。
3、创建一个实际处理数据的类ChannelInitializer,进行初始化的准备工作,比如设置接受传出数据的字符集、格式、以及实际处理数据的接口。
4、绑定端口、执行同步阻塞方法等待服务器端启动即可。
基于上一章的例子,现在用Netty写一个服务端,替代上一章中NIO写的服务端
服务端代码
1、公共部分
基本长的差不多
package com.zit;

import io.netty.bootstrap.ServerBootstrap;
import io.netty.channel.ChannelFuture;
import io.netty.channel.ChannelInitializer;
import io.netty.channel.ChannelOption;
import io.netty.channel.EventLoopGroup;
import io.netty.channel.nio.NioEventLoopGroup;
import io.netty.channel.socket.SocketChannel;
import io.netty.channel.socket.nio.NioServerSocketChannel;

public class NettyServer {

    private int port;

    public NettyServer(int port) {
        this.port = port;
    }

    public void run() {
        /***
         * NioEventLoopGroup 是用来处理I/O操作的多线程事件循环器,
         * Netty提供了许多不同的EventLoopGroup的实现用来处理不同传输协议。 在这个例子中我们实现了一个服务端的应用,
         * 因此会有2个NioEventLoopGroup会被使用。 第一个经常被叫做‘boss’,用来接收进来的连接。
         * 第二个经常被叫做‘worker’,用来处理已经被接收的连接, 一旦‘boss’接收到连接,就会把连接信息注册到‘worker’上。
         * 如何知道多少个线程已经被使用,如何映射到已经创建的Channels上都需要依赖于EventLoopGroup的实现,
         * 并且可以通过构造函数来配置他们的关系。
         */
        EventLoopGroup bossGroup = new NioEventLoopGroup();
        EventLoopGroup workerGroup = new NioEventLoopGroup();
        System.out.println("准备运行端口:" + port);

            /**
             * ServerBootstrap 是一个启动NIO服务的辅助启动类 你可以在这个服务中直接使用Channel
             */
        try {
            ServerBootstrap b = new ServerBootstrap();
            b.group(bossGroup, workerGroup)
            //指定使用NioServerSocketChannel产生一个Channel用来接收连接
            .channel(NioServerSocketChannel.class)
                /***
                 * 这里的事件处理类经常会被用来处理一个最近的已经接收的Channel。 ChannelInitializer是一个特殊的处理类,
                 * 他的目的是帮助使用者配置一个新的Channel。
                 * 也许你想通过增加一些处理类比如NettyServerHandler来配置一个新的Channel
                 * 或者其对应的ChannelPipeline来实现你的网络程序。 当你的程序变的复杂时,可能你会增加更多的处理类到pipline上,
                 * 然后提取这些匿名类到最顶层的类上。
                 */
            .childHandler(new ChannelInitializer<SocketChannel>() {
                public void initChannel(SocketChannel ch) throws Exception {
                    //ChannelPipeline用于存放管理ChannelHandel
                    //ChannelHandler用于处理请求响应的业务逻辑相关代码
                    ch.pipeline().addLast(new ServerHandle());
                }
            })
            .option(ChannelOption.SO_BACKLOG, 128)
            .childOption(ChannelOption.SO_KEEPALIVE, true);

            ChannelFuture f = b.bind(port).sync();

            f.channel().closeFuture().sync();
        } catch (InterruptedException e) {
            e.printStackTrace();
        } finally {
            workerGroup.shutdownGracefully();
            bossGroup.shutdownGracefully();
        }

    }

    public static void main(String[] args) {
        //端口
        int port  = 8888;

        new NettyServer(port).run();
    }

}
2、处理部分
在这里更改处理数据的逻辑即可
package com.zit;

import io.netty.buffer.ByteBuf;
import io.netty.buffer.Unpooled;
import io.netty.channel.ChannelHandlerContext;
import io.netty.channel.ChannelInboundHandlerAdapter;
import io.netty.util.ReferenceCountUtil;

public class ServerHandle extends ChannelInboundHandlerAdapter  {

    @Override
    public void channelRead(ChannelHandlerContext ctx, Object msg) throws Exception{

        try {
            ByteBuf in = (ByteBuf) msg;
            byte[] req = new byte[in.readableBytes()];
            in.readBytes(req);
            String body = new String(req,"utf-8");
            System.out.println("Server :" + body );
            String response = "返回给客户端的响应:" + body ;
            ctx.writeAndFlush(Unpooled.copiedBuffer(response.getBytes()));

        } finally {
            /**
             * ByteBuf是一个引用计数对象,这个对象必须显示地调用release()方法来释放。
             * 请记住处理器的职责是释放所有传递到处理器的引用计数对象。
             */
            // 抛弃收到的数据
            ReferenceCountUtil.release(msg);
        }

    }

    @Override
    public void exceptionCaught(ChannelHandlerContext ctx, Throwable cause) throws Exception {
        /**
         * exceptionCaught() 事件处理方法是当出现 Throwable 对象才会被调用,即当 Netty 由于 IO
         * 错误或者处理器在处理事件时抛出的异常时。在大部分情况下,捕获的异常应该被记录下来 并且把关联的 channel
         * 给关闭掉。然而这个方法的处理方式会在遇到不同异常的情况下有不 同的实现,比如你可能想在关闭连接之前发送一个错误码的响应消息。
         */
        // 出现异常就关闭
        cause.printStackTrace();
        ctx.close();
    }
}
客户端代码:
和上一章的一模一样,是为了证明Netty可以替代NIO完成服务端的处理
package com.zit;

import java.io.IOException;
import java.net.InetSocketAddress;
import java.nio.ByteBuffer;
import java.nio.channels.SelectionKey;
import java.nio.channels.Selector;
import java.nio.channels.SocketChannel;
import java.util.Iterator;
import java.util.Set;

public class NIOClient {

     /*标识数字*/
    private static int flag = 0;
    /*缓冲区大小*/
    private static int BLOCK = 4096;
    /*接受数据缓冲区*/
    private static ByteBuffer sendbuffer = ByteBuffer.allocate(BLOCK);
    /*发送数据缓冲区*/
    private static ByteBuffer receivebuffer = ByteBuffer.allocate(BLOCK);
    /*服务器端地址*/
    private final static InetSocketAddress SERVER_ADDRESS = new InetSocketAddress("127.0.0.1", 8888);

    public static void main(String[] args) throws IOException {
        // TODO Auto-generated method stub
        // 打开socket通道
        SocketChannel socketChannel = SocketChannel.open();
        // 设置为非阻塞方式
        socketChannel.configureBlocking(false);
        // 打开选择器
        Selector selector = Selector.open();
        // 注册连接服务端socket动作
        socketChannel.register(selector, SelectionKey.OP_CONNECT);
        // 连接
        socketChannel.connect(SERVER_ADDRESS);
        // 分配缓冲区大小内存

        Set<SelectionKey> selectionKeys;
        Iterator<SelectionKey> iterator;
        SelectionKey selectionKey;
        SocketChannel client;
        String receiveText;
        String sendText;
        int count=0;

        while (true) {
            //选择一组键,其相应的通道已为 I/O 操作准备就绪。
            //此方法执行处于阻塞模式的选择操作。
            selector.select();
            //返回此选择器的已选择键集。
            selectionKeys = selector.selectedKeys();
            //System.out.println(selectionKeys.size());
            iterator = selectionKeys.iterator();
            while (iterator.hasNext()) {
                selectionKey = iterator.next();
                if (selectionKey.isConnectable()) {
                    System.out.println("client connect");
                    client = (SocketChannel) selectionKey.channel();
                    // 判断此通道上是否正在进行连接操作。
                    // 完成套接字通道的连接过程。
                    if (client.isConnectionPending()) {
                        client.finishConnect();
                        System.out.println("完成连接!");
                        sendbuffer.clear();
                        sendbuffer.put("Hello,Server".getBytes());
                        sendbuffer.flip();
                        client.write(sendbuffer);
                    }
                    client.register(selector, SelectionKey.OP_READ);
                } else if (selectionKey.isReadable()) {
                    client = (SocketChannel) selectionKey.channel();
                    //将缓冲区清空以备下次读取
                    receivebuffer.clear();
                    //读取服务器发送来的数据到缓冲区中
                    count=client.read(receivebuffer);
                    if(count>0){
                        receiveText = new String( receivebuffer.array(),0,count);
                        System.out.println("客户端接受服务器端数据--:"+receiveText);
                        client.register(selector, SelectionKey.OP_WRITE);
                    }

                } else if (selectionKey.isWritable()) {
                    sendbuffer.clear();
                    client = (SocketChannel) selectionKey.channel();
                    sendText = "message from client--" + (flag++);
                    sendbuffer.put(sendText.getBytes());
                     //将缓冲区各标志复位,因为向里面put了数据标志被改变要想从中读取数据发向服务器,就要复位
                    sendbuffer.flip();
                    client.write(sendbuffer);
                    System.out.println("客户端向服务器端发送数据--:"+sendText);
                    client.register(selector, SelectionKey.OP_READ);
                }
            }
            selectionKeys.clear();
        }
    }


}
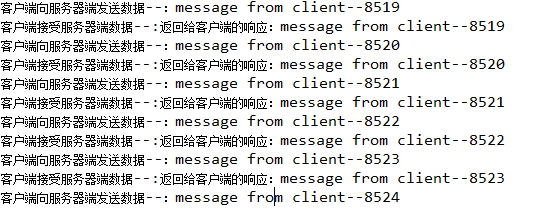
运行效果:
