完整版:https://quqi.gblhgk.com/s/184718/ykolFXd1LYL9mzQE
我按一个个模块来记录学习过程,比如“主角干什么”“星星干什么”,按大概的分析去完成功能,最后需要新增什么的话再用“添油加醋”的方法也不迟。
作为初学者官方添油加醋式的的教学十分必要,延续这种盲人摸象的编程十分没必要。
本篇是主角模块:
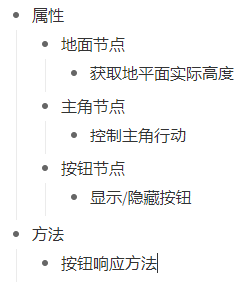
先记录想法:

代码:
  1 // Player.js
  2
  3 cc.Class({
  4   extends: cc.Component,
  5
  6   properties: {
  7     jumpDuration: 0,
  8     squashDuration: 0,
  9     jumpHeight: 0,
 10     maxMoveSpeed: 0,
 11     accel: 0,
 12     jumpAudio: {
 13       default: null,
 14       type: cc.AudioClip
 15     }
 16   },
 17
 18   onLoad() {
 19     // enabled: Boolean, 是否每帧执行该组件的 update 方法
 20     this.enabled = false;
 21     // 算上一半身体以完全不穿帮
 22     this.borderLeft = (-this.node.parent.width / 2) + (this.node.width / 2);
 23     this.borderRight = (this.node.parent.width / 2) - (this.node.width / 2);
 24     this.registerInputControl();
 25   },
 26
 27   start() {
 28     // 加速度方向开关
 29     this.accLeft = false;
 30     this.accRight = false;
 31     // 移动即X坐标变动
 32     this.xSpeed = 0;
 33   },
 34
 35   /**
 36    * @param {cc.Vec2} pos X为0(原点),y为地平面实际高度的起始坐标,由上层脚本传递
 37    */
 38   startMove(pos) {
 39     this.enabled = true;
 40     this.node.setPosition(pos);
 41     this.runJumpAction();
 42   },
 43
 44   stopMove() {
 45     this.enabled = false;
 46     this.node.stopAllActions();
 47     // 本游戏没有销毁场景操作,重置速度让重新开始的主角静止,否则重新开始的主角带着旧数值自己动。
 48     this.xSpeed = 0;
 49   },
 50
 51   runJumpAction() {
 52     let t = cc.tween;
 53     // 'position' 把 x 算进去,虽然x是0,主角移动(x变化时)会出问题
 54     let jumpUp = t().by( this.jumpDuration, { y: this.jumpHeight }, { easing: 'cubicOut' });
 55     let jumpDown = t().by( this.jumpDuration, { y: -this.jumpHeight }, { easing: 'cubicIn' });
 56     // scale 是整体缩放(x、y一起缓动),scaleX/scaleY 独立控制
 57     let squash = t().to( this.squashDuration, { scaleX: 1.1, scaleY: 0.8 }, { easing: 'smooth' });
 58     let stretch = t().to( this.squashDuration, { scaleX: 0.9, scaleY: 1.2 }, { easing: 'smooth' });
 59     let squashBack = t().to( this.squashDuration, { scaleX: 1, scaleY: 1 }, { easing: 'smooth' });
 60
 61     let callAudio = t().call(() => { cc.audioEngine.playEffect(this.jumpAudio, false); });
 62
 63     return t(this.node).repeatForever(
 64       t().sequence(squash, stretch, jumpUp, squashBack, jumpDown, callAudio)
 65     ).start();
 66   },
 67
 68   registerInputControl() {
 69     const KEY_EVENT = cc.SystemEvent.EventType;
 70     cc.systemEvent.on(KEY_EVENT.KEY_DOWN, this.onKeyDown, this);
 71     cc.systemEvent.on(KEY_EVENT.KEY_UP, this.onKeyUp, this);
 72
 73     const TOUCH_EVENT = cc.Node.EventType;
 74     // Warning: event should register on Canvas node! 遗漏 .parent 会出错
 75     this.node.parent.on(TOUCH_EVENT.TOUCH_START, this.onTouch, this);
 76     this.node.parent.on(TOUCH_EVENT.TOUCH_END, this.offTouch, this);
 77   },
 78
 79   onKeyDown(event) {
 80     this._switchKeycode(event.keyCode, true);
 81   },
 82
 83   onKeyUp(event) {
 84     this._switchKeycode(event.keyCode, false);
 85   },
 86
 87   /**
 88    * @param {Enumerator} keyCode 按键的枚举值
 89    * @param {Boolean} condition 条件是按下还是松开
 90    */
 91   _switchKeycode(keyCode, condition) {
 92     const KEY = cc.macro.KEY;
 93
 94     switch (keyCode) {
 95       case KEY.a:
 96         if (condition === true) {
 97           this.accLeft = true;
 98         } else if (condition === false) {
 99           this.accLeft = false;
100         } else {
101           cc.log('傻屌没传布尔值!');
102         }
103         break;
104       case KEY.d:
105         if (condition === true) {
106           this.accRight = true;
107         } else if (condition === false) {
108           this.accRight = false;
109         } else {
110           cc.log('傻屌没传布尔值!');
111         }
112         break;
113       default:
114         break;
115     }
116   },
117
118   onTouch(event) {
119     let touchLocation = event.getLocation();
120     // touchLocation是Vec2,忘记.x会出错
121     if (touchLocation.x <= cc.winSize.width / 2) {
122       this.accLeft = true;
123     } else {
124       this.accRight = true;
125     }
126     // es6完成版说这一步是“不要捕捉事件”,还不懂
127     return true;
128   },
129
130   offTouch(event) {
131     [this.accLeft, this.accRight] = [false, false];
132   },
133
134   /** 向上层模块传递自身坐标 */
135   getCenterPos() {
136     // 锚点是(0.5, 0),故加高度的一半为中心
137     return cc.v2(this.node.x, this.node.y + this.node.height / 2);
138   },
139
140   update(dt) {
141     // 速度刷新模块,根据加速度方向
142     if (this.accLeft) {
143       this.xSpeed -= this.accel * dt;
144     } else if (this.accRight) {
145       this.xSpeed += this.accel * dt;
146     }
147
148     // 限制极速
149     if (Math.abs(this.xSpeed) > this.maxMoveSpeed) {
150       this.xSpeed = this.maxMoveSpeed * this.xSpeed / Math.abs(this.xSpeed);
151     }
152
153     let nodeX = this.node.x;
154     nodeX += this.xSpeed * dt;
155
156     // 屏幕限制模块
157     if (nodeX < this.borderLeft) {
158       nodeX = this.borderLeft;
159       /**
160        * 撞墙是强制坐标不动,但速度刷新模块一直在跑
161        * 不清零则反向运动时xSpeed会先减去“根据之前加速开关刷新着的数值”
162        * 表现是撞墙后反向运动时,主角像“吸”在边界一段时间
163        */
164       this.xSpeed = 0;
165     } else if (nodeX > this.borderRight) {
166       nodeX = this.borderRight;
167       this.xSpeed = 0;
168     }
169
170     this.node.x = nodeX;
171   },
172 });
插曲1:本打算主角运动的同时注册监听,在 startMove(pos)里调 registerInputControl(),是我不理解监听机制,虽没影响游戏运行,控制台报了重复注册监听警告:

插曲2:不理解cc.Tween时,改变主角高度用了“position”:
插曲3:限制屏幕模块如果不归零速度参数:

测试本模块还需要在主脚本里做点事:

代码:
 1 // Game.js
 2
 3 const Player = require('Player');
 4
 5 cc.Class({
 6   extends: cc.Component,
 7
 8   properties: {
 9     // 获取地平面实际高度
10     ground: cc.Node,
11     // 改变按钮节点坐标以显示/隐藏
12     btnNode: cc.Node,
13     // 控制主角行动
14     player: {
15       default: null,
16       type: Player
17     }
18   },
19
20   onLoad () {
21     this.enabled = false;
22     this.groundY = this.ground.y + this.ground.height / 2;
23   },
24
25   onStartBtnClicked() {
26     this.enabled = true;
27     this.btnNode.x = 3000;
28     this.player.startMove(cc.v2(0, this.groundY));
29   }
30 });
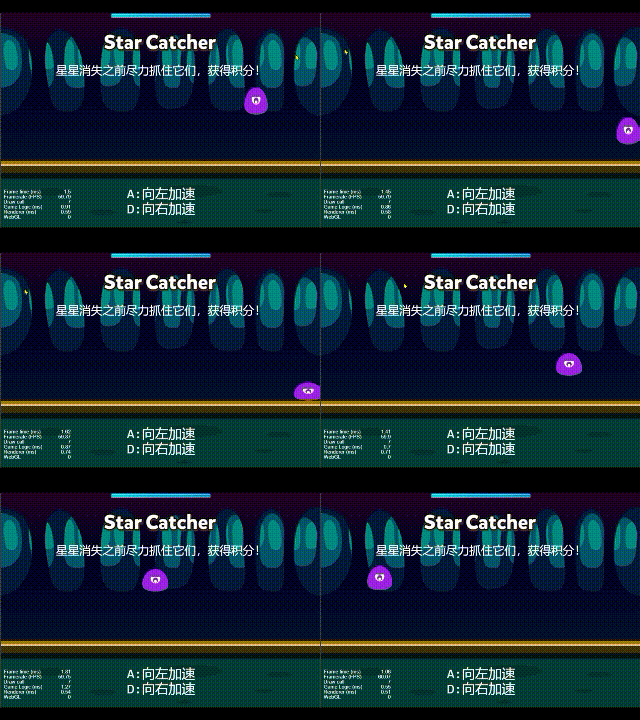
一切顺利就是酱紫的:

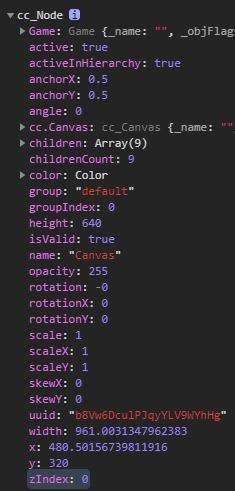
ps: 萌新可能不熟悉节点的属性,所以例如Canvas节点的node一览:

推荐安装辅助调试工具以完成查看以上信息等:
1.论坛大神自制版,会更新,能实时显示节点(比如确认一下吃星星后旧的星星预制和特效预制是不是没了,如果取出逻辑写错,它们很可能挂在主节点上,成百上千...)
https://forum.cocos.org/t/ccc-devtools/91496
2.官方弃婴版(最近一次更新在N年前) ,谷歌商店搜 "Cocos Creator Devtool”,虽然它垃圾,但有重载场景的按钮啊。
以上。