写在前面
一切技术都是纸老虎,技术就是一层膜,捅破了就什么也不是
// 读书推荐
设计模式:
    Head First Design Patterns
    设计模式之禅
// java 并发编程实战
// 深入理解 java 虚拟机
// effective java

// 代码工程化
代码整洁之道

Java 部分
1.Java NIO 编程
2.Java 并发编程
3.Java 容器类的实现
4.Java 异常、反射与注解、泛型
5.Java 网络编程
6.Java 虚拟机

数据库部分
1.《 MySQL 必知必会》
2.《 Redis 设计与实现》
NIO
Non blocked IO ==> New IO
传统 IO 面向流 是阻塞式的
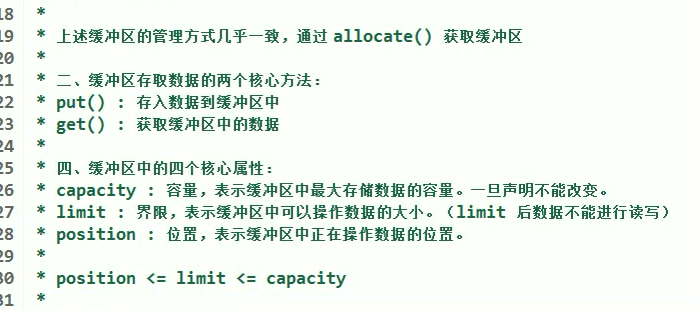
NIO 面向缓冲区 像是 火车轨道 (Channel) + 火车 (Buffer)
选择器

NIO 复制文件小例子
package com.ghc.mmall.concurrency.nio;

import java.io.FileInputStream;
import java.io.FileOutputStream;
import java.io.IOException;
import java.nio.ByteBuffer;
import java.nio.MappedByteBuffer;
import java.nio.channels.FileChannel;
import java.nio.file.Paths;
import java.nio.file.StandardOpenOption;

/**
 * @author :Frank Li
 * @date :Created in 2019/7/31 20:20
 * @description:${description}
 * @modified By:
 * @version: $version$
 */
public class ChannelDemo {
    public static void main(String[] args) throws IOException {
         long start = System.currentTimeMillis();
/*        FileInputStream fileInputStream = new FileInputStream("C:\Users\FrankLi\Desktop\AI\timesheet\favicon.ico");
        FileChannel inChannel = fileInputStream.getChannel();

        FileOutputStream fos = new FileOutputStream("C:\Users\FrankLi\Desktop\AI\timesheet\dist\favicon.ico");
        FileChannel  outChannel = fos.getChannel();

        ByteBuffer byteBuffer = ByteBuffer.allocate(1024);
        int len = -1;
        while((len=inChannel.read(byteBuffer)) != -1){
            byteBuffer.flip();
            outChannel.write(byteBuffer);
            byteBuffer.clear();
        }

        outChannel.close();
        inChannel.close();
        fos.close();
        fileInputStream.close();*/
//        copyFile("C:\Users\FrankLi\Desktop\AI\timesheet\favicon.ico","C:\Users\FrankLi\Desktop\AI\timesheet\favicon2.ico");
        copyFile2("C:\Users\FrankLi\Desktop\AI\timesheet\timesheet.py","C:\Users\FrankLi\Desktop\AI\timesheet\timesheet_copied.py");
        long end = System.currentTimeMillis();
        System.out.println(String.format("cost about %d s",end-start));
    }

    public static void copyFile(String src, String tar){
        // 首先获取 读取管道
        FileChannel readChannel = null;
        // 获取 写入管道
        FileChannel writeChannel =null;
        try{
            readChannel = FileChannel.open(Paths.get(src), StandardOpenOption.READ);
            writeChannel = FileChannel.open(Paths.get(tar), StandardOpenOption.WRITE,StandardOpenOption.CREATE);
            ByteBuffer buf = ByteBuffer.allocate(1024);
            while(readChannel.read(buf) != -1){
                buf.flip();
                writeChannel.write(buf);
                buf.clear();
            }
        }catch(IOException ioe){
            ioe.printStackTrace();
        }finally{
            if(readChannel!=null){
                try{
                    readChannel.close();
                }catch(IOException ioe){
                    ioe.printStackTrace();
                }
            }
            if(writeChannel!=null){
                try{
                    writeChannel.close();
                }catch(IOException ioe){
                    ioe.printStackTrace();
                }
            }
        }
    }

    //  使用直接缓冲区完成文件的复制(内存映射文件) ,这样操作可以省去内核与JVM 内存之间的数据 拷贝
    public static void copyFile2(String src, String tar){
        FileChannel inFileChannel = null;
        FileChannel outFileChannel = null;
        try{
            inFileChannel = FileChannel.open(Paths.get(src), StandardOpenOption.READ);
            outFileChannel = FileChannel.open(Paths.get(tar),StandardOpenOption.READ, StandardOpenOption.WRITE, StandardOpenOption.CREATE);


            // 这里 如果 直接通道数据传输会更加方便
            /*inFileChannel.transferTo(0,inFileChannel.size(),outFileChannel);
            outFileChannel.transferFrom(inFileChannel,0,inFileChannel.size());
            */

            // 内存映射页
            MappedByteBuffer inMappedByteBuffer = inFileChannel.map(FileChannel.MapMode.READ_ONLY,0,inFileChannel.size());
            MappedByteBuffer outMappedByteBuffer = outFileChannel.map(FileChannel.MapMode.READ_WRITE, 0 , inFileChannel.size());

            // 直接对缓冲区进行数据的读写操作
            byte [] dst = new byte[1024];
            inMappedByteBuffer.get(dst);
            outMappedByteBuffer.put(dst);

        }catch(IOException ioe){
            ioe.printStackTrace();
        }finally{
            if(inFileChannel != null){
                try{
                    inFileChannel.close();
                }catch(IOException ioe){
                    ioe.printStackTrace();
                }
            }
            if(outFileChannel != null){
                try{
                    outFileChannel.close();
                }catch(IOException ioe){
                    ioe.printStackTrace();
                }
            }
        }
    }
}
分散读取 聚集写入
public static void main(String[] args) throws IOException {
        copyFile("C:\Users\FrankLi\Desktop\AI\timesheet\timesheet.py","C:\Users\FrankLi\Desktop\AI\timesheet\timesheet_2.py");
    }

    public static void copyFile(String src, String dst) throws IOException{
        RandomAccessFile randomAccessFileReader = new RandomAccessFile(src,"r");
        FileChannel inChannel = randomAccessFileReader.getChannel();

        ByteBuffer byteBufferFirst = ByteBuffer.allocate(512);
        ByteBuffer byteBufferSecond = ByteBuffer.allocate(1024*6);
        ByteBuffer [] bufs = {byteBufferFirst,byteBufferSecond};

        inChannel.read(bufs);
        for(ByteBuffer buf:bufs){
            buf.flip();
            System.out.println(new String(buf.array(),0,buf.limit()));
            System.out.println("---------------=============---------------");
        }

        RandomAccessFile randomAccessFileWriter = new RandomAccessFile(dst,"rw");
        FileChannel outChannel = randomAccessFileWriter.getChannel();
        outChannel.write(bufs);

        inChannel.close();
        outChannel.close();
    }
NIO 字符集
        Map<String, Charset> charsetMap = Charset.availableCharsets();
        for(Map.Entry<String, Charset> entrySet:charsetMap.entrySet()){
            System.out.println(entrySet.getKey()+" <----> "+entrySet.getValue());
        }
读写 JSON
jackson 的强项是灵活可定制, 并且具有了一个生态, yaml 也能完美驾驭
gson是轻量 简洁
fastjson 似乎没有一个好的生态 , 性能也比较好
多线程两种实现方式

- 继承 Thread 类,实现 run 方法将需要多线程启动的功能代码放在 run 方法内 该方式有 isinterrupted 标志位,
可以根据该标志位在另一个能够获取到该线程的代码块中that.interrupt 实现中断,但是是否真的中断则由that线程决定 - 实现 runnable 接口,覆写 run 方法将需要多线程启动的功能代码放在 run 方法内,注意这里没有 isInterrupted 标志位
实际上在一个线程中停止另一个线程可以用 concurrent 包中的 cancel 方法,这个 跟 python 简直一毛一样啊啊啊
ExecutorService 接口下固定大小线程池 (Fixed),动态变化(Cached) , 以及只有单个(Single)线程的 线程池
// t1.start() 永远使用 start --》 start0 (本地方法) 去启动线程 而非 调用 run 方法
// 这里记得 t1.join() 是等待t1线程执行完成才会继续往下执行
// t1.setDaemon(true) 设置为守护线程,也就是不那么重要的,JVM 在所有非守护线程执行完成后就会退出,垃圾回收就是一个守护线程
// 虽然我们以后使用 concurrent 包来进行并发,但是基础原理一定要掌握牢固
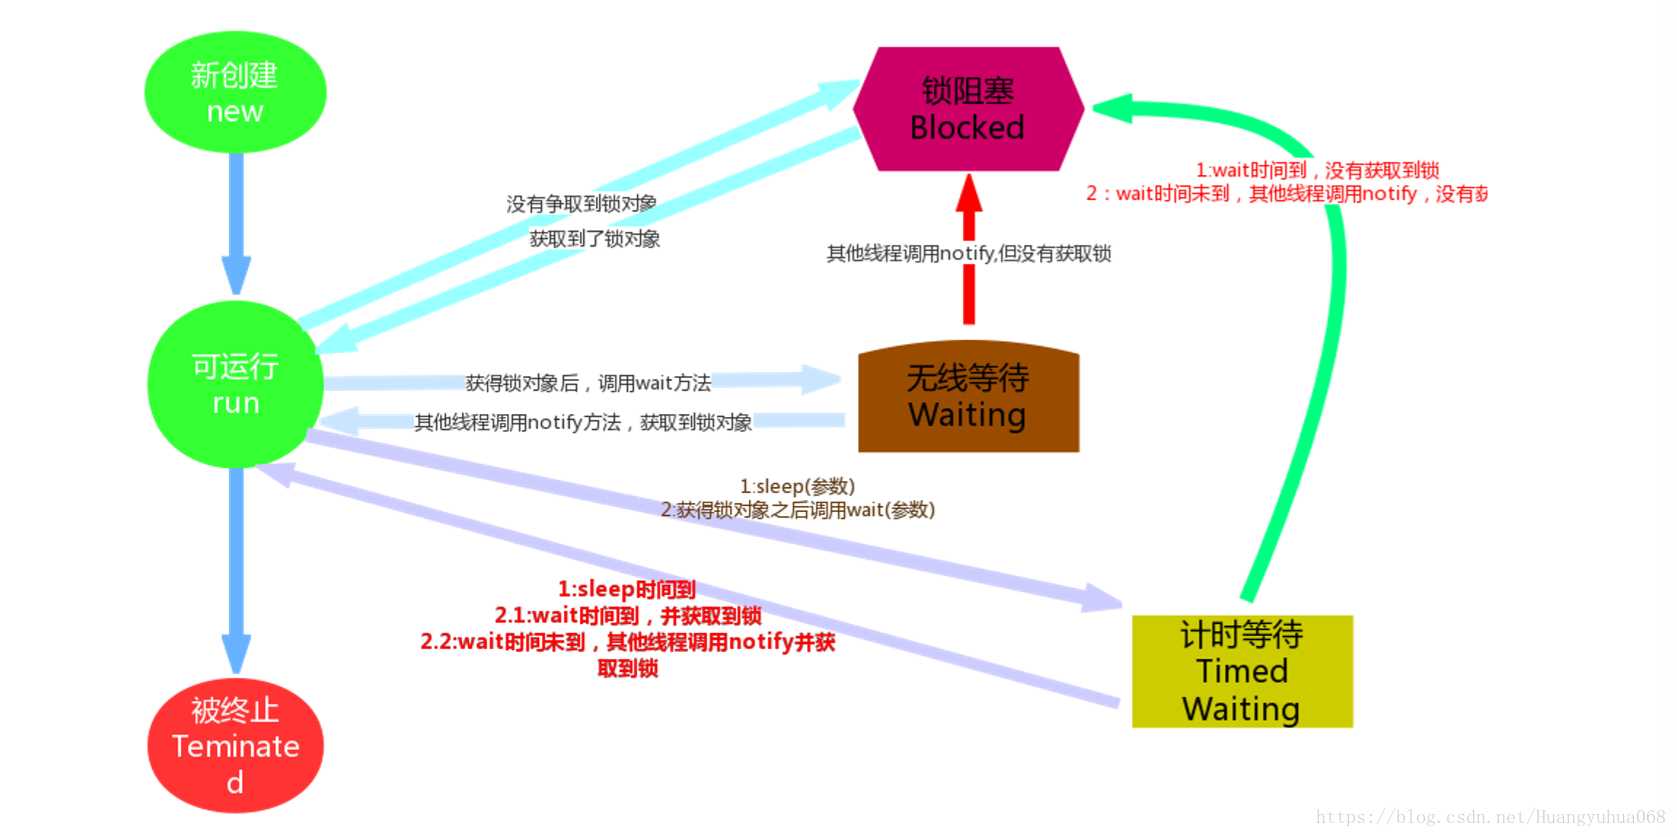
// 进程 六种状态
NEW:新建状态 刚刚创建出来,还没有调用start方法之前的状态。
RUNNABLE:可运行状态,可能正在执行,也可能不是正在执行,只有在该种状态下的线程才有资格抢CPU。
BLOCKED:锁阻塞状态 线程要等待另一个线程释放锁对象。
WAITING:无限等待 线程调用了wait()方法进入的状态,需要其它线程调用notify方法唤醒。
TIMED_WAITING:计时等待状态 线程调用了sleep方法获wait(long time)方法进入的状态。
TERMINATED:死亡状态 线程任务执行完毕或调用了stop方法。
Thread 常用方法
构造方法 Thread(Runnable target,String name)
静态方法:
Thread.currentThread().getName()
Thread.sleep(1000) // java 中 单位是毫秒 所以 1000ms = 1 s,python 中直接是 秒
线程安全同步机制 synchronized 同步代码快, 同步方法,可重入锁,可重入读写锁
// synchronized 代码块中 可以 wait  , notify() , notifyAll()
// lock.newCondition 也可以实现  await() signal()  signalAll()
加入 synchronized 同步方法, synchronized 这个方式不如 可重入锁安全,被synchronized修饰的要么获得锁,要么永远等待下去
public class Counter {
    private int value;
    public synchronized  void inc(int m){
            this.value+=m;
    }

    public synchronized void dec(int m){
            this.value-=m;
    }

}
引入可重入锁即可以在同一个线程内多次获取该锁
package com.ghc.test;

import java.util.concurrent.locks.Lock;
import java.util.concurrent.locks.ReentrantLock;

public class Counter {
    private Lock lock = new ReentrantLock();
    private int value;
    public void inc(int m){
            if(lock.tryLock()){
                try{
                    this.value+=m;
                }finally{
                    lock.unlock();
                }
        }
    }

    public void dec(int m){
        if(lock.tryLock()){
            try{
                this.value-=m;
            }finally {
                lock.unlock();
            }
        }
    }

    public int getValue(){
        lock.lock();
            try{
                return this.value;
            }finally {
                lock.unlock();
            }
    }

    public static void main(String [] args) throws InterruptedException{
        System.out.println(Thread.currentThread().getName()+" start...");
        new Thread(()->{
            System.out.println(Thread.currentThread().getName()+" start...");
            try{
                Thread.sleep(1000);
            }catch (InterruptedException e){}
            System.out.println(Thread.currentThread().getName()+" end...");
        },"download thread").start();
        Thread.sleep(500);
        System.out.println(Thread.currentThread().getName()+" end...");
    }

}
引入 可重入 读写锁,因为 可以同时读 , 不可同时写入 或者说不可同时读写
引入 可重入读写锁在同时写入的时候会加锁进行同步,而在同时读取的时候则不会提高并发性能
package com.ghc.test;

import java.util.concurrent.locks.ReentrantReadWriteLock;


public class Counter {
    private final ReentrantReadWriteLock lock = new ReentrantReadWriteLock();
    private final ReentrantReadWriteLock.ReadLock readLock = lock.readLock();
    private final ReentrantReadWriteLock.WriteLock writeLock = lock.writeLock();
    private int value;
    public void inc(int m){
        // 写 锁
        writeLock.lock();
        try{
            this.value+=m;
        }finally {
            writeLock.unlock();
        }
    }

    public void dec(int m){
        // 读锁
        readLock.lock();
        try{
            this.value-=m;
        }finally {
            readLock.unlock();
        }
    }

}
使用 线程池进行并发
package com.ghc.test;

import java.util.concurrent.*;
import java.time.LocalTime;
/**
 * @author :Frank Li
 * @date :Created in 2019/7/11 8:49
 * @description:${description}
 * @modified By:
 * @version: $version$
 */
class PrintThread extends Thread{
    private String taskName;
    PrintThread(String taskName, String threadName){
        this.taskName = taskName;
        this.setName(threadName);
    }
    @Override
    public void run(){
        System.out.println(this.getName()+": Hello, "+this.taskName);
        try{
            Thread.sleep(1000);
            int i = 1/0;
        }catch (InterruptedException e){}
        System.out.println(this.getName()+": Goodbye, "+this.taskName);
    }

}

public class ExecutorServiceTest {

    public static void main(String[] args) {
        // 阅读源码可以发现 ThreadPoolExecutor 才是万物之基

        // 创建 固定大小的 线程池
        ExecutorService executor = Executors.newFixedThreadPool(2);
        executor.submit(new PrintThread("Frank", "t1"));
        executor.submit(new PrintThread("May", "t2"));
        executor.shutdown();

        System.out.println("---***华丽的分割线***---");
        // 创建 弹性动态伸缩线程池
        ExecutorService cachedThreadPool = Executors.newCachedThreadPool(); // 不指定大小
        cachedThreadPool.submit(new PrintThread("SCALA", "t3"));
        cachedThreadPool.submit(new PrintThread("PYTHON", "t4"));
        cachedThreadPool.shutdown();

        // 创建弹性动态伸缩线程池 但是指定最大线程 为 10 个, 线程池中保持 corePoolSize 个线程即使是idle 的
        int corePoolSize = Runtime.getRuntime().availableProcessors();
        ExecutorService cachedThreadMaxSpecifiedPool = new ThreadPoolExecutor(corePoolSize, 10,
                60L, TimeUnit.SECONDS,
                new SynchronousQueue<Runnable>());
        Future<PrintThread> future = (Future<PrintThread>) cachedThreadMaxSpecifiedPool.submit(new PrintThread("China", "t5"));
        future.cancel(true); // 取消某个线程
        cachedThreadMaxSpecifiedPool.submit(new PrintThread("World", "t6"));
        cachedThreadMaxSpecifiedPool.shutdown();

        // 创建单个线程的线程池
    /*    Executor singleExecutor = Executors.newSingleThreadExecutor();
        singleExecutor.execute(new PrintThread("single", "dog"));
        singleExecutor.execute(new PrintThread("all the way", "single"));*/
        // 创建一个 定时执行 executor
        ScheduledExecutorService scheduledExecutor = Executors.newScheduledThreadPool(2);
        scheduledExecutor.scheduleAtFixedRate(new PrintThread("scheduled task "+LocalTime.now(),"t7"), 2, 3, TimeUnit.SECONDS);  // 每间隔 n 秒 执行一次
        scheduledExecutor.scheduleWithFixedDelay(new PrintThread("scheduled delay task "+LocalTime.now(),"t8"), 2, 2,TimeUnit.SECONDS); // 等待上一次任务运行结束delay 运行下一个
//        scheduledExecutor.shutdown();
    }
}
获取 返回值的 线程 需要使用 Callable 的 子类 , 否则 可用 Runnable 接口的子类
package com.ghc.test;
import java.util.concurrent.*;

/**
 * @author :Frank Li
 * @date :Created in 2019/7/11 15:31
 * @description:${description}
 * @modified By:
 * @version: $version$
 */

class CallableFuture implements Callable<String> {
    private String taskName;
    CallableFuture(String taskName){
        this.taskName = taskName;
    }
    @Override
    public String call() throws InterruptedException{
        System.out.println(Thread.currentThread().getName()+"--> "+ "start: Hello, "+this.taskName);
        Thread.sleep(3000);
        System.out.println(Thread.currentThread().getName()+"--> "+ "end: Goodbye, "+this.taskName);
        return this.taskName;
    }
}
public class FutureTest {
    public static void main(String [] args){
       Callable<String> callableTask = new CallableFuture("Frank");
        ExecutorService executor = Executors.newFixedThreadPool(4);
        Future<String> future =  executor.submit(callableTask);
       String result = null;
       try{
           result = future.get(2, TimeUnit.SECONDS); // 可能会阻塞 等待 线程完成 获取返回结果 ,设置超时
           /*java.util.concurrent.TimeoutException
           at java.util.concurrent.FutureTask.get(FutureTask.java:205)
           at com.ghc.test.FutureTest.main(FutureTest.java:32)*/
       }catch (InterruptedException interException){
           interException.printStackTrace();
       }catch (ExecutionException ee){
           ee.printStackTrace();
       }catch (TimeoutException te){
           te.printStackTrace();
       }
        System.out.println(result);
       executor.shutdown();
    }
}
ForkJoin 采用分治算法 ,想到快排 分治 + 挖坑 填坑。 思考, 他与 Map Reduce 并行框架的区别
package com.ghc.test;

import java.util.Random;
import java.util.concurrent.ForkJoinPool;
import java.util.concurrent.ForkJoinTask;
import java.util.concurrent.RecursiveTask;

/**
 * @author :Frank Li
 * @date :Created in 2019/7/11 16:56
 * @description:${description}
 * @modified By:
 * @version: $version$
 */
public class ForkJoinTest extends RecursiveTask<Long> {
    private static final int THRESHOLD = 250;
    long [] array;
    int start;
    int end;

    ForkJoinTest(long [] array, int start, int end){
        this.array = array;
        this.start = start;
        this.end = end;
    }

    @Override
    protected Long compute(){
        if(end-start <= THRESHOLD){
            // 如果任务量足够小,直接计算;
            long sum = 0;
            for(int i = start; i < end; i++){
                sum += this.array[i];
                try{
                    Thread.sleep(2);
                }catch (InterruptedException interExcept){
                    interExcept.printStackTrace();
                }
            }
            return sum;
        }else{
            // 当任务太大, 我们将大任务进行拆分
            int middle = (end + start) / 2;
            System.out.println(String.format("split %d~%d ==> %d~%d, %d~%d", start,end,start,middle,middle,end));
            ForkJoinTest subTask1 = new ForkJoinTest(this.array, start, middle);
            ForkJoinTest subTask2 = new ForkJoinTest(this.array,middle, end);
            invokeAll(subTask1, subTask2);
            Long subResult1 = subTask1.join();
            Long subResult2 = subTask2.join();
            Long result = subResult1 + subResult2;
            System.out.println(String.format("result = %d + %d ==> %d", subResult1,subResult2, subResult1+subResult2));
            return result;
        }
    }

    public static void main(String [] args){
        long [] array = new long[1000];
        long expectedSum = 0;
        for(int i=0; i < array.length; i++){
            array[i] = random();
            expectedSum+=array[i];
        }
        System.out.println("Expected sum: "+ expectedSum);
        ForkJoinTask<Long> task = new ForkJoinTest(array, 0, array.length);
        long startTime = System.currentTimeMillis();
        Long result = ForkJoinPool.commonPool().invoke(task);
        long endTime = System.currentTimeMillis();
        System.out.println("Fork/join sum: "+ result + " in "+(endTime-startTime)+" ms");
    }

    static Random random = new Random(0);
    static long random(){
        return random.nextInt(10000);
    }

}
ThreadLocal 用作单个线程内部,传递变量,必须用 try finally 处理 , 可以避免 变量在每一个调用方法处传递
package com.ghc.test;

/**
 * @author :Frank Li
 * @date :Created in 2019/7/11 18:23
 * @description:${description}
 * @modified By:
 * @version: $version$
 */

class User{
    String name;
    int level;
    User(String name, int level){
        this.name = name;
        this.level = level;
    }
}

class UserContext implements AutoCloseable{
    // 全局唯一静态变量
    private static final ThreadLocal<User> context = new ThreadLocal<>();
    // 获取当前线程的 ThreadLocal User:
    public static User getCurrentUser(){
        return context.get();
    }
    // 初始化 ThreadLocal 的 User
    public UserContext(User user){
        context.set(user);
    }

    @Override
    public void close(){
        context.remove();
    }
}

class ProcessThread extends Thread{
    User user;
    ProcessThread(User user){
        this.user = user;
    }

    public void run(){
        try(UserContext ctx = new UserContext(user)){
            new Greeting().hello();
            Level.checkLevel();

        }
    }

}
class Greeting{
    void hello(){
        User user = UserContext.getCurrentUser();
        System.out.println("hello "+user.name+" !");
    }
}
class Level{
    static void checkLevel(){
        User user = UserContext.getCurrentUser();
        if(user.level > 100){
            System.out.println(user.name+ " is a VIP user");
        }else{
            System.out.println(user.name + " is a registered user.");
        }
    }
}
public class ThreadLocalTest {
    public static void main(String [] args) throws InterruptedException{
        Thread t1 = new ProcessThread(new User("Bob", 120));
        Thread t2 = new ProcessThread(new User("Frank", 98));
        t1.start();
        t2.start();
        t1.join();
        t2.join();
        System.out.println("Main end...");
    }
}
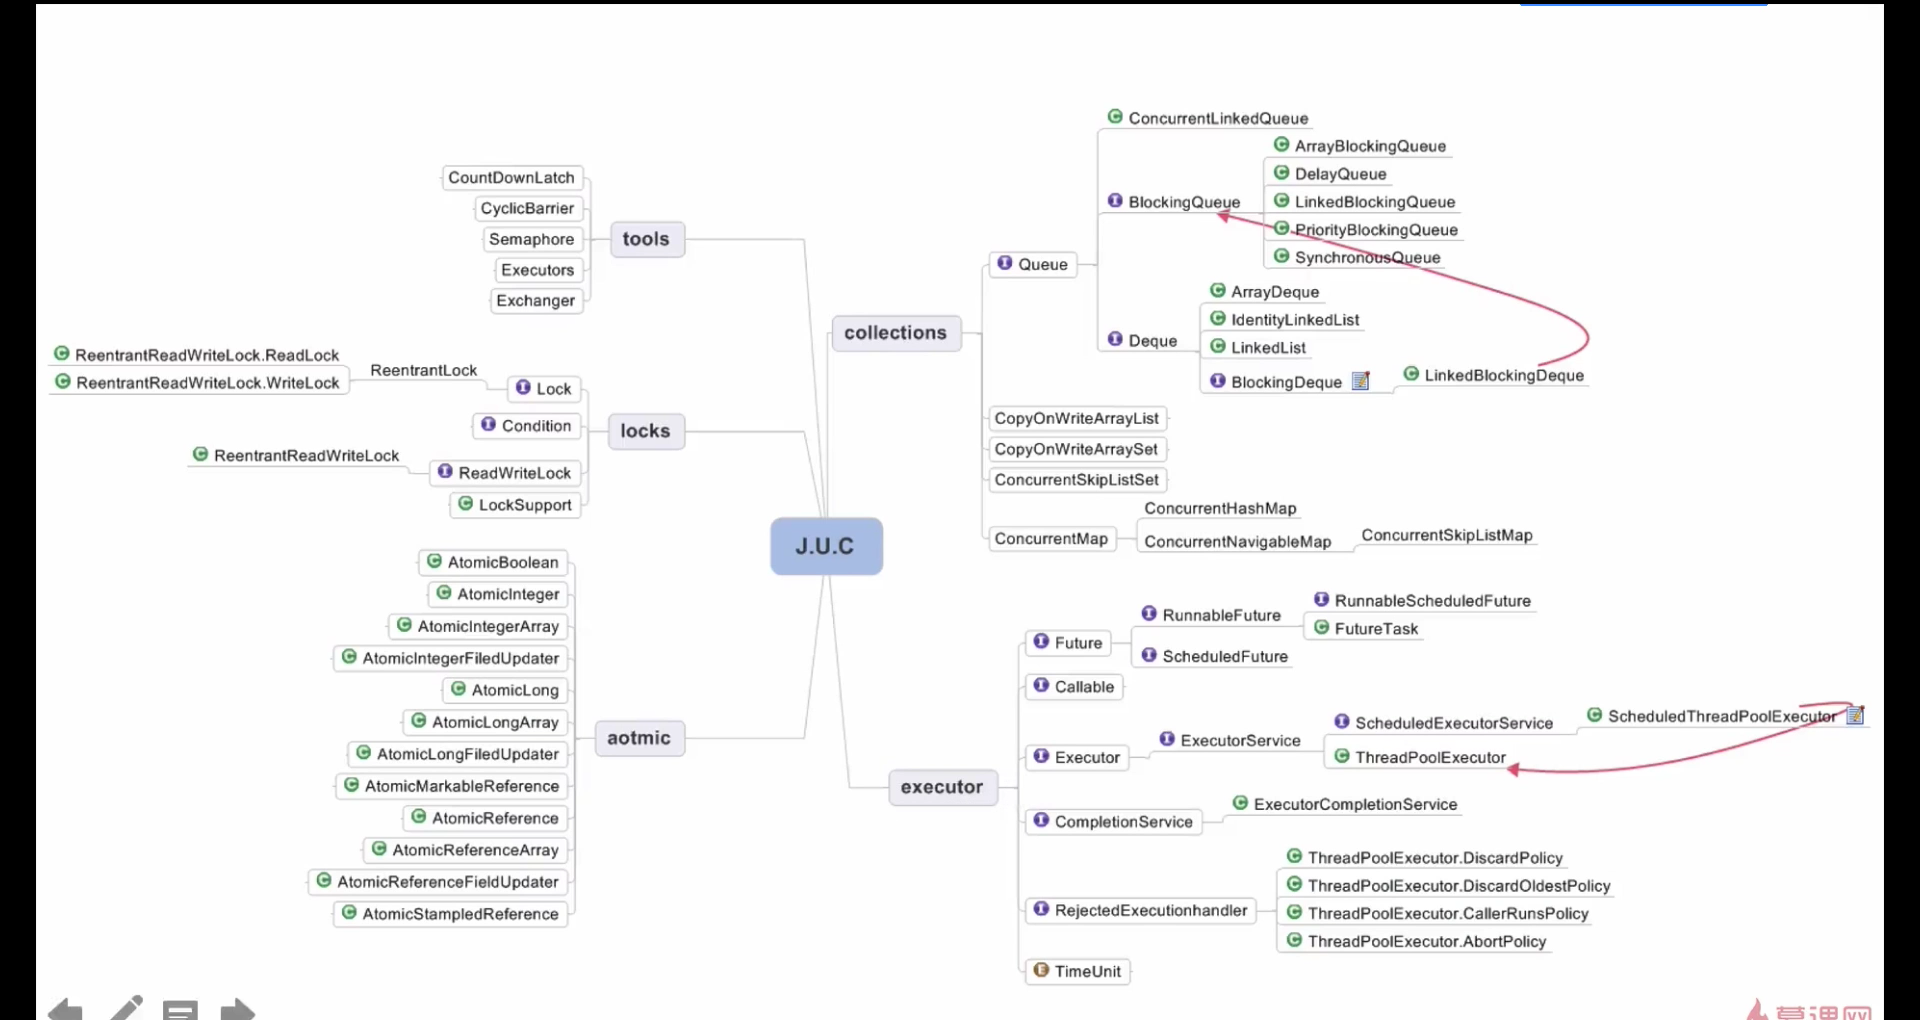
深入学习 并发编程以及 高并发
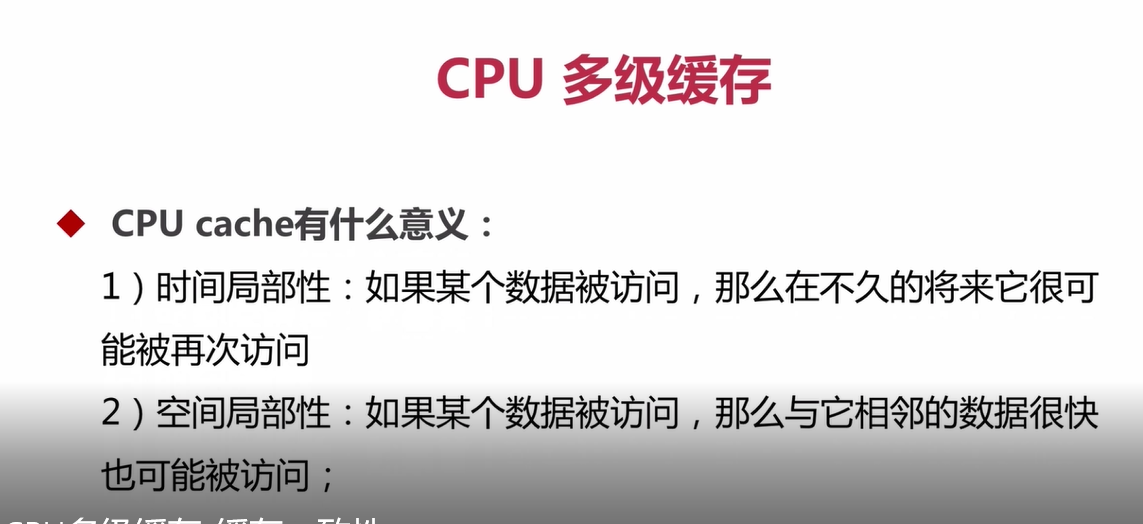
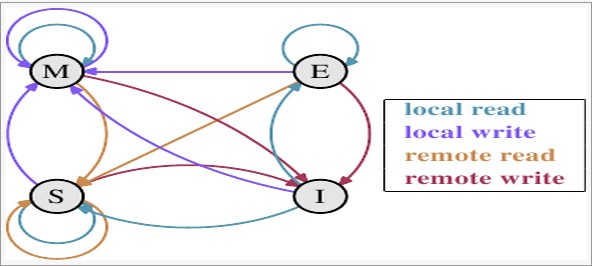
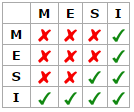
CPU 多级缓存机制 MESI (Modified Exclusive Shared Or Invalid) 四种状态 , Localread local write remote read remote write 四种读写
CPU 对运行代码 进行乱序 优化可能带来 实际结果与 逻辑结果不一致
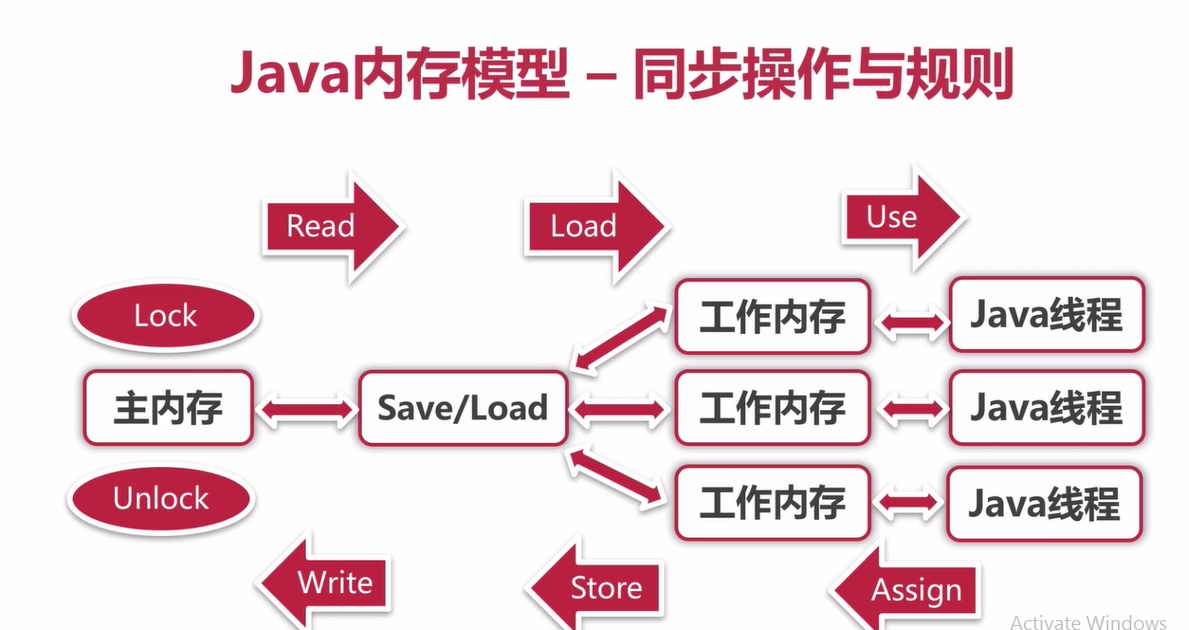
JMM java memory model ==》 java 虚拟机内存模型
JMM 同步操作 八个步骤 lock -> 从主内存 read -> load 到每个线程独享内存-> use --> assign --> store --> write --》unlock
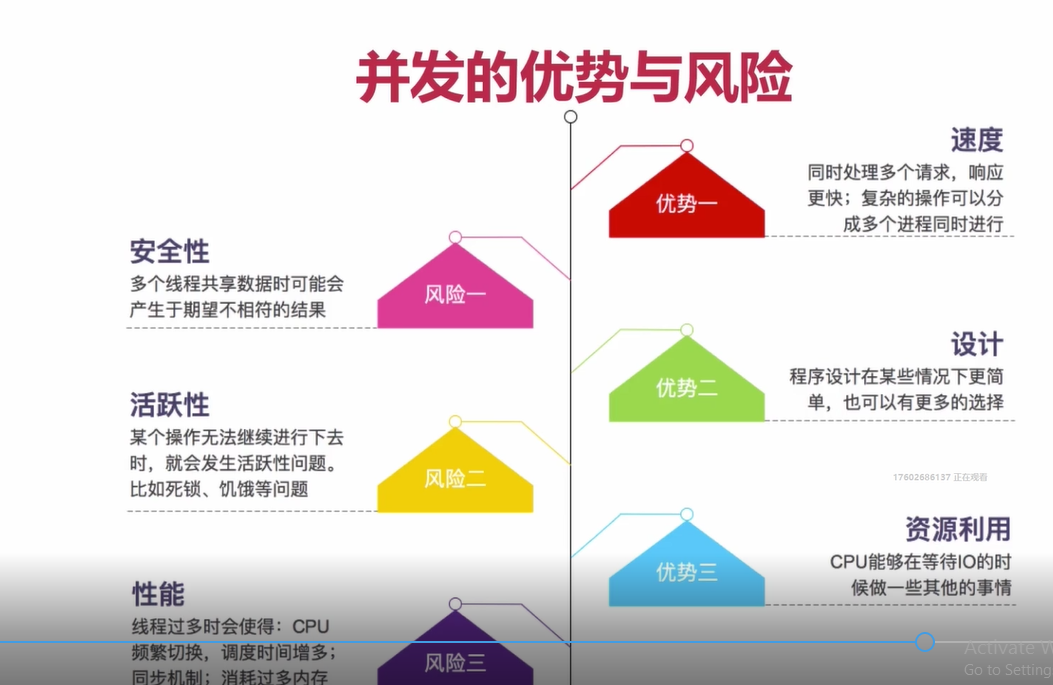
并发的 优缺点
一个 线程不安全的小例子
package com.ghc.mmall.concurrency.test;

import com.ghc.mmall.concurrency.annotations.UnThreadSafe;

import java.util.concurrent.CountDownLatch;
import java.util.concurrent.ExecutorService;
import java.util.concurrent.Executors;
import java.util.concurrent.Semaphore;
import java.util.concurrent.locks.Lock;
import java.util.concurrent.locks.ReentrantLock;
import java.util.logging.Level;
import java.util.logging.Logger;
/**
 * @author :Frank Li
 * @date :Created in 2019/7/17 16:27
 * @description:${description}
 * @modified By:
 * @version: $version$
 */
@UnThreadSafe
public class ConcurrencyTest {
    // 请求总数
    public static int clientTotal = 5000;

    // 同时并发执行的线程数
    public static int threadTotal = 200;
    public static int count = 0;
    private static final Logger logger = Logger.getGlobal();
    private static final Lock lock = new ReentrantLock();

    public static void main(String [] args) throws InterruptedException {
        logger.setLevel(Level.INFO);
        ExecutorService executor = Executors.newCachedThreadPool();
        final Semaphore  semaphore = new Semaphore(threadTotal);
        final CountDownLatch  countDownLatch = new CountDownLatch(clientTotal);
        for(int i=0;i<clientTotal;i++){
            executor.execute(()->{
                try {
                    semaphore.acquire();
                    add();
                    semaphore.release();
                } catch (InterruptedException e) {
                    e.printStackTrace();
                }
                countDownLatch.countDown();
            });
        }
        countDownLatch.await();
        logger.info("count after countDownLatch...:"+count);
    }

    public synchronized static void add(){
        count++;
    }
}
使用锁机制,手动加锁也是可以保证线程安全的
package com.ghc.mmall.concurrency.test;

import java.util.concurrent.*;
import java.util.logging.Level;
import java.util.logging.Logger;
import java.util.concurrent.locks.Lock;
import java.util.concurrent.locks.ReentrantLock;

public class ThreadSafeDemo {
    private static int count = 0;
    private final static int clientTotal = 5000;
    private final static int threadTotal = 200;
    private final static Lock lock = new ReentrantLock();
    private final static Logger logger = Logger.getGlobal();
    public static void main(String [] args) throws InterruptedException {
        logger.setLevel(Level.INFO);
        ExecutorService executor = Executors.newCachedThreadPool();
        Semaphore semaphore = new Semaphore(threadTotal);
        CountDownLatch countDownLatch = new CountDownLatch(clientTotal);
        for(int i=0;i<clientTotal;i++){
            executor.execute(()->{
                try{
                    semaphore.acquire();
                    add();
                    semaphore.release();
                }catch(InterruptedException e){}
                countDownLatch.countDown();
            });
        }
        countDownLatch.await();
        executor.shutdown();
        logger.info("count: "+count);
    }

    private  static void add() throws InterruptedException{

        /*synchronized(ThreadSafeDemo.class){
            count++;
        }*/

        if(lock.tryLock(1, TimeUnit.SECONDS)){// (可重入锁是JDK层面实现的锁)可以 有效避免死锁, 使用 上面的 synchronized (基于JVM层面的锁) 可能会 死锁
            try{
            count++;
            }finally{
                lock.unlock();
            }
        }
    }
}
下面这个采用 原子操作 所以是线程 安全的
package com.ghc.mmall.concurrency.test;

import com.ghc.mmall.concurrency.annotations.ThreadSafe;
import lombok.extern.slf4j.Slf4j;

import java.util.concurrent.CountDownLatch;
import java.util.concurrent.ExecutorService;
import java.util.concurrent.Executors;
import java.util.concurrent.Semaphore;
import java.util.concurrent.atomic.AtomicInteger;
import java.util.logging.Level;
import java.util.logging.Logger;
/**
 * @author :Frank Li
 * @date :Created in 2019/7/17 18:58
 * @description:${description}
 * @modified By:
 * @version: $version$
 */
@Slf4j
@ThreadSafe
public class AtomicBooleanTest {
    private static AtomicInteger count = new AtomicInteger(0);
    private static int clientTotal = 5000;
    private static int threadTotal = 200;
    private static final Logger logger = Logger.getGlobal();
    public static void main(String [] args) throws InterruptedException {
        logger.setLevel(Level.INFO);
        ExecutorService executor = Executors.newCachedThreadPool();
        final Semaphore  semaphore = new Semaphore(threadTotal);
        final CountDownLatch countDownLatch = new CountDownLatch(clientTotal);
        for(int i=0;i<clientTotal;i++){
            executor.execute(()->{
               try{
                   semaphore.acquire();
                   incr();
                   semaphore.release();
               } catch(InterruptedException e){

               }
               countDownLatch.countDown();
            });

        }
        countDownLatch.await();
        executor.shutdown();
        logger.info("count: "+count);
    }

    public static void incr(){
        count.getAndIncrement();
    }

}


// 改用 LongAdder 来 替代 AtomicLong 有时候会更加高效
package com.ghc.mmall.concurrency.test;

import com.ghc.mmall.concurrency.annotations.ThreadSafe;
import lombok.extern.slf4j.Slf4j;

import java.util.concurrent.CountDownLatch;
import java.util.concurrent.ExecutorService;
import java.util.concurrent.Executors;
import java.util.concurrent.Semaphore;
import java.util.concurrent.atomic.LongAdder;
import java.util.logging.Level;
import java.util.logging.Logger;
/**
 * @author :Frank Li
 * @date :Created in 2019/7/17 18:58
 * @description:${description}
 * @modified By:
 * @version: $version$
 */
@Slf4j
@ThreadSafe
public class AtomicBooleanTest {
    private static LongAdder count = new LongAdder();
    private static int clientTotal = 5000;
    private static int threadTotal = 200;
    private static final Logger logger = Logger.getGlobal();
    public static void main(String [] args) throws InterruptedException {
        logger.setLevel(Level.INFO);
        ExecutorService executor = Executors.newCachedThreadPool();
        final Semaphore  semaphore = new Semaphore(threadTotal);
        final CountDownLatch countDownLatch = new CountDownLatch(clientTotal);
        for(int i=0;i<clientTotal;i++){
            executor.execute(()->{
               try{
                   semaphore.acquire();
                   incr();
                   semaphore.release();
               } catch(InterruptedException e){

               }
               countDownLatch.countDown();
            });

        }
        countDownLatch.await();
        executor.shutdown();
        logger.info("count: "+count);
    }

    public static void incr(){
        count.increment();
    }

}
安全的线程需要 满足以下特性
- 原子性 , CAS (compareAndSwapxxx , compareAndSet xxx 为 Int Long 等) 底层采用循环不断比较本地内存与主内存中的值是否一样,不一样就一直去取直到一样取出来相加
- 可见性 一个线程 对住内存的修改可以及时地被其他线程观察到
- 有序性
// 特别注意 对于 Long 类型提供了 两个 原子操作的类
AutomicLong , LongAdder (后者更高效但有可能不够精确)  // 不妨优先考虑 后者
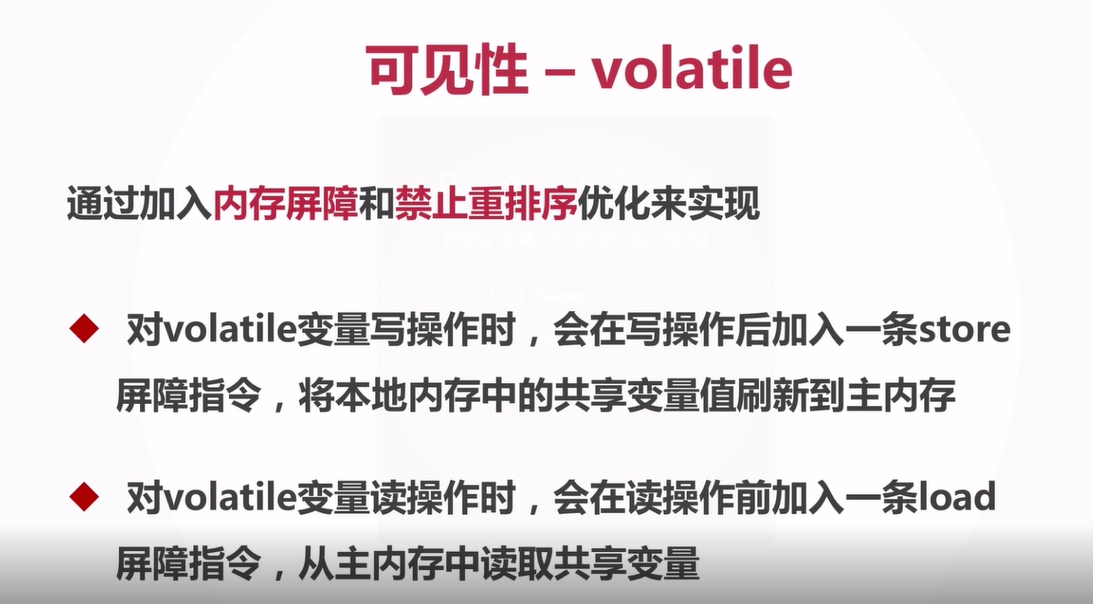
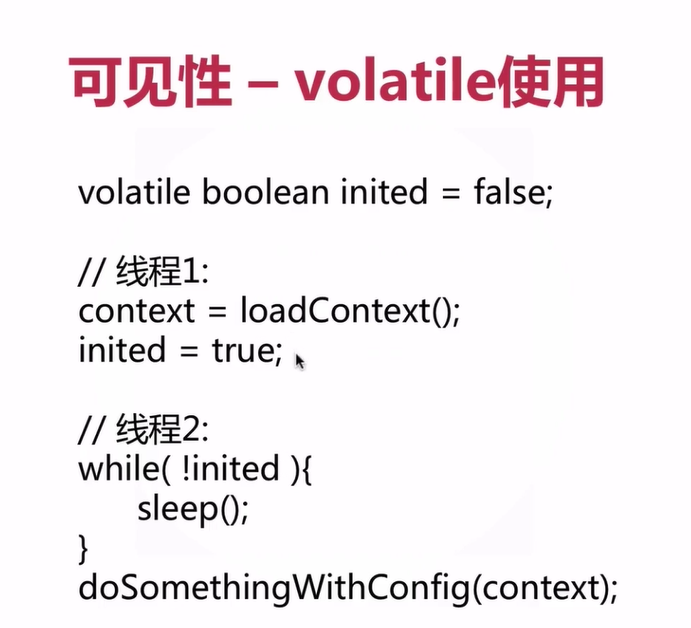
可见性

安全发布对象

线程安全的 例子, 推荐使用 枚举方法 创建单例
饿汉式单例模式 虽然简单 但是可能造成资源浪费
package com.ghc.mmall.concurrency.singleton;

import com.ghc.mmall.concurrency.annotations.NotRecommend;
import com.ghc.mmall.concurrency.annotations.ThreadSafe;

@ThreadSafe
@NotRecommend
public class Singleton1 {
    // 饿汉式  单例模式
    // 首先 私有构造方法
     private Singleton1(){}

     private  static Singleton1 singleton = new Singleton1();

     public static Singleton1 getInstance(){
         return singleton;
     }

}
懒汉式单例模式 虽然线程安全但是 书写复杂容易造成 线程不安全 所以也不推荐
package com.ghc.mmall.concurrency.singleton;

import com.ghc.mmall.concurrency.annotations.NotRecommend;
import com.ghc.mmall.concurrency.annotations.ThreadSafe;


@ThreadSafe
@NotRecommend
public class Singleton2 {
    // 懒汉式 单例模式
    // 第一步同样是需要私有化构造方法
    private Singleton2(){}

    // 1  memory= allocate()  分配对象的内存空间
    // 2  ctorInstance() 初始化对象
    // 3  instance = memory 设置 instance 指向刚分配的内存
    // 第二步 延迟给变量赋值 volatile 确保 JVM CPU 优化指令重排序不会影响线程安全
    private static volatile Singleton2 singleton = null;
    // volatile + 双重检测机制 --》 禁止对象指令重排

    // 静态工厂方法
    public static Singleton2 getInstance(){
        if(singleton==null){
            synchronized (Singleton2.class){
                // 双重同步锁 确保线程安全第一点
                if(singleton==null){
                    singleton = new Singleton2();
                }
            }
        }
        return singleton;
    }

}
使用内部枚举类 来利用JVM 控制多线程 运行时侯始终 只有一个实例被创建 推荐使用
package com.ghc.mmall.concurrency.singleton;

import com.ghc.mmall.concurrency.annotations.Recommend;
import com.ghc.mmall.concurrency.annotations.ThreadSafe;

/**
 *
 */
@ThreadSafe
@Recommend
public class Singleton3 {

    // 使用枚举类确保线程安全
    // 第一步 仍然是私有化构造方法
    private  Singleton3(){}

    // 第二步 提供对外访问的静态公用接口
    public static Singleton3 getInstance(){
        return Singleton.INSTANCE.getInstance();
    }

    public enum  Singleton{
        INSTANCE;
        private Singleton3 singleton = null;
        Singleton(){
            singleton = new Singleton3();
        }

        public Singleton3 getInstance(){
            return singleton;
        }
    }
}
不可变对象 参考 String 类


同步容器

并发容器


ForkJoin
package com.ghc.mmall.concurrency.test;

import lombok.extern.slf4j.Slf4j;

import java.util.concurrent.ForkJoinPool;
import java.util.concurrent.Future;
import java.util.concurrent.RecursiveTask;

@Slf4j
public class ForkJoinTaskExample extends RecursiveTask<Integer> {
    public static final int threshold = 2;
    private int start;
    private int end;

    public ForkJoinTaskExample(int start, int end){
        this.start = start;
        this.end = end;
    }

    @Override
    protected Integer compute() {
        int sum = 0;
        // 如果任务足够小 就计算任务
        boolean canCompute = (end - start) <= threshold;
        if(canCompute){
            for(int i = start; i<= end;i++){
                sum+=i;
            }
        }else{
            // 如果任务大于阈值 , 就分类成两个子任务计算
            int middle = (start + end) / 2;
            ForkJoinTaskExample leftTask = new ForkJoinTaskExample(start, middle);
            ForkJoinTaskExample rightTask = new ForkJoinTaskExample(middle+1, end);

            // 执行子任务
            leftTask.fork();
            rightTask.fork();

            // 等待子任务执行结束合并其结果
            int leftResult = leftTask.join();
            int rightResult = rightTask.join();

            // 合并子任务的结果
            sum = leftResult + rightResult;
        }
        return sum;
    }

    public static void main(String[] args) {
        ForkJoinPool forkJoinPool = new ForkJoinPool();

        // 生成一个计算任务  计算 1+2+3+4
        ForkJoinTaskExample task = new ForkJoinTaskExample(1, 100);
        Future<Integer> result = forkJoinPool.submit(task);
        try{
            log.info("result: {}", result.get());
        }catch(Exception e){
            log.error("exception: ", e);
        }
    }
}
写在最后