UINavigationController为导航控制器,在iOS里经常用到。
1.UINavigationController的结构组成
UINavigationController有Navigation bar ,Navigation View ,Navigation toolbar等组成。
将RootViewController添加到window上,在AppDelegate.m 文件的didFinishLaunchingWithOptions方法中创建添加navController,RootViewController视图。
- (BOOL)application:(UIApplication *)application didFinishLaunchingWithOptions:(NSDictionary *)launchOptions
{
self.window = [[UIWindow alloc] initWithFrame:[[UIScreen mainScreen] bounds]];
// Override point for customization after application launch.
RootViewController *rootViewController = [[RootViewController alloc] init];
rootViewController.title = @"rootView";
UINavigationController *nav = [[UINavigationController alloc] initWithRootViewController:rootViewController];
self.window.rootViewController = nav;
rootViewController = nil;
nav = nil;
self.window.backgroundColor = [UIColor whiteColor];
[self.window makeKeyAndVisible];
return YES;
}
控制视图推进推出的主要方法如下:
pushViewController:viewController animated:BOOL
(加载视图控制器)
– 添加指定的视图控制器并予以显示
popViewControllerAnimated:BOOL
(推出当前视图控制器)
– 弹出并向左显示前一个视图
popToViewController:viewController animated:BOOL
(推到指定视图控制器)
– 回到指定视图控制器, 也就是不只弹出一个
popToRootViewControllerAnimated:BOOL
退到根视图控制器
setNavigationBarHidden:BOOL animated:BOOL
设置导航栏是否显示
关于pushViewController:animated:的动画效果一般情况我们使用默认的动画就行,但我们也可以自定动画内容,我们可以使用CATransition来实现转换动画效果,代码如下:
- (void)tableView:(UITableView *)tableView didSelectRowAtIndexPath:(NSIndexPath *)indexPath{
if (indexPath.row == 0) {
OneViewController *oneViewController = [[OneViewController alloc] init];
CATransition *animation = [CATransition animation];
[animation setDuration:0.5];
[animation setType: kCATransitionMoveIn];
[animation setSubtype: kCATransitionFromTop];
[animation setTimingFunction:[CAMediaTimingFunction functionWithName:kCAMediaTimingFunctionDefault]];
[self.navigationController pushViewController:oneViewController animated:NO];
oneViewController = nil;
[self.navigationController.view.layer addAnimation:animation forKey:nil];
}
}
2.navigationItem
我们都知道navigationItem是UIViewController的一个属性,这个属性是为UINavigationController服务的。文档中是这么解释的“The navigation item used to represent the view controller in a parent’s navigation bar. (read-only)”,即navigation item在navigation Bar代表一个viewController,具体一点儿来说就是每一个加到navigationController的viewController都会有一个对应的navigationItem,该对象由viewController以懒加载的方式创建,稍后我们可以在对象中堆navigationItem进行配置,可以设置leftBarButtonItem, rightBarButtonItem, backBarButtonItem, title以及prompt等属性。前三个每一个都是一个UIBarButtonItem对象,最后两个属性是一个NSString类型描述,注意添加该描述以后NavigationBar的高度会增加30,总的高度会变成74(不管当前方向是Portrait还是Landscape,此模式下navigationbar都使用高度44加上prompt30的方式进行显示)。当然如果觉得只是设置文字的title不够爽,你还可以通过titleview属性指定一个定制的titleview,这样你就可以随心所欲了,当然注意指定的titleview的frame大小,不要显示出界。
a、添加UIBarButtonItem,
初始化UIBarButtonItem的方法有以下几种方法:
- (id)initWithImage:(UIImage *)image style:(UIBarButtonItemStyle)style target:(id)target action:(SEL)action;
- (id)initWithTitle:(NSString *)title style:(UIBarButtonItemStyle)style target:(id)target action:(SEL)action;
- (id)initWithBarButtonSystemItem:(UIBarButtonSystemItem)systemItem target:(id)target action:(SEL)action;
- (id)initWithCustomView:(UIView *)customView; //这个方法可以用来自定UIBarButtonItem
这里重点介绍下
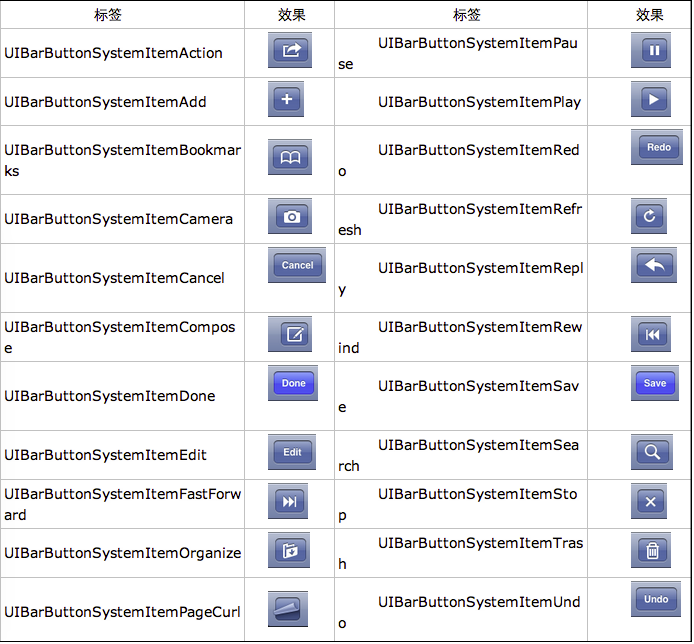
- (id)initWithBarButtonSystemItem:(UIBarButtonSystemItem)systemItem target:(id)target action:(SEL)action;
UIBarButtonSystemItem的风格,这是系统自带的按钮风格,看下图,你不用一个个试验,你也知道想用那个item,如下图:
给navigationItem 添加 UIBarButtonItem的方法有:
@property(nonatomic,retain) UIBarButtonItem *leftBarButtonItem;
@property(nonatomic,retain) UIBarButtonItem *rightBarButtonItem;
- (void)setLeftBarButtonItem:(UIBarButtonItem *)item animated:(BOOL)animated;
- (void)setRightBarButtonItem:(UIBarButtonItem *)item animated:(BOOL)animated;
@property(nonatomic,copy) NSArray *leftBarButtonItems NS_AVAILABLE_IOS(5_0);
@property(nonatomic,copy) NSArray *rightBarButtonItems NS_AVAILABLE_IOS(5_0);
- (void)setLeftBarButtonItems:(NSArray *)items animated:(BOOL)animated NS_AVAILABLE_IOS(5_0);
- (void)setRightBarButtonItems:(NSArray *)items animated:(BOOL)animated NS_AVAILABLE_IOS(5_0);
下面举例说明:
- (void)viewDidLoad
{
[super viewDidLoad];
self.view.backgroundColor = [UIColor scrollViewTexturedBackgroundColor];
UIBarButtonItem *buttonItem1 = [[UIBarButtonItem alloc] initWithTitle:@"登录"
style:UIBarButtonItemStyleBordered
target:self
action:@selector(barButtonItemClick:)];
UIBarButtonItem *buttonItem2 = [[UIBarButtonItem alloc] initWithImage:[UIImage imageNamed:@"setUp.png"]
style:UIBarButtonItemStyleBordered
target:self
action:@selector(barButtonItemClick:)];
UIBarButtonItem *buttonItem3 = [[UIBarButtonItem alloc] initWithBarButtonSystemItem:UIBarButtonSystemItemAdd
target:self
action:@selector(barButtonItemClick:)];
UIButton *button = [[UIButton alloc] initWithFrame:CGRectMake(0, 7, 50, 30)];
button.backgroundColor = [UIColor blueColor];
[button setTitle:@"按扭" forState:UIControlStateNormal];
UIBarButtonItem *buttonItem4 = [[UIBarButtonItem alloc] initWithCustomView:button];
self.navigationItem.leftBarButtonItem = buttonItem1;
self.navigationItem.rightBarButtonItems = @[buttonItem2, buttonItem3, buttonItem4];
}
//UIBarButtonItem击事件
- (void)barButtonItemClick:(UIBarButtonItem *)barButton{
//添加你要响应的代码
b、自定义backBarButtonItem
在项目中使用UINavigationController导航,当第一级页面的title较长,在进入第二级页面后返回按钮backBarButtonItem的title就会变得很长,于是使用代码对leftButtonItem的title文本进行修改,无论是设置self.navigationItem.leftBarButtonItem.title = @"返回";还是self.navigationItem.backBarButtonItem.title = @"返回";都没有效果,title始终不会发生变化,要怎第才能修改返回按扭的title呢?
原来使用pushViewController切换到下一个视图时,navigationController按照以下3条顺序更改导航栏的左侧按钮。
1)、如果B视图有一个自定义的左侧按钮(leftBarButtonItem),则会显示这个自定义按钮;
2)、如果B没有自定义按钮,但是A视图的backBarButtonItem属性有自定义项,则显示这个自定义项;
3)、如果前2条都没有,则默认显示一个后退按钮,后退按钮的标题是A视图的标题。
按照这个解释,我把UIBarButtonItem *backItem……这段代码放在A视图的pushViewController语句之前。
- (void)tableView:(UITableView *)tableView didSelectRowAtIndexPath:(NSIndexPath *)indexPath{
if (indexPath.row == 0) {
ItemOneViewController *itemOne = [[ItemOneViewController alloc] init];
itemOne.title = @"addItem";
[self.navigationController pushViewController:itemOne animated:YES];
itemOne = nil;
}
else{
ItemTwoViewController *itemTwo = [[ItemTwoViewController alloc] init];
itemTwo.title = @"setBackItemTitle";
UIBarButtonItem *back = [[UIBarButtonItem alloc] initWithTitle:@"返回"
style:UIBarButtonItemStyleBordered
target:nil
action:nil];
self.navigationItem.backBarButtonItem = back;
back = nil;
[self.navigationController pushViewController:itemTwo animated:YES];
itemTwo = nil;
}
}
OK问题解决了,B视图的后退按钮的标题变成“返回“了,也可以使用自定义的返回按扭。
c、自定义titleView,
UINavigationController的title可以用别的view替代,比如用UIview、 UIButton、 segmentedController、UILabel等,在下面的代码我用UIButton来演示.代码如下
- (void)viewDidLoad
{
[super viewDidLoad];
UIButton *button = [[UIButton alloc] initWithFrame:CGRectMake(0, 0, 90, 35)];
button.backgroundColor = [UIColor blueColor];
[button setTitle:@"自定义titleView" forState:UIControlStateNormal];
self.navigationItem.titleView = button;
}
注意:view的大小不要大小导航栏的大小,要不在就会显示不下。
3、Toolbar
在前面我们讲了UINavigationController有Navigation bar ,Navigation View ,Navigation toolbar等组成,下面就讲解一下toolbar的使用,
toolbar在UINavigationController默认是隐藏的,可通过下面的代码显示出来。
self.navigationController.toolbarHidden = NO;
或
[self.navigationController setToolbarHidden:NO animated:YES];
在ToolBar上添加UIBarButtonItem,新建几个UIBarButtonItem,然后以数组的形式添加到Toolbar中
{
[super viewDidLoad];
self.navigationController.toolbarHidden = NO;
UIBarButtonItem*one=[[UIBarButtonItem alloc]initWithBarButtonSystemItem:UIBarButtonSystemItemAdd
target:nil
action:nil];
UIBarButtonItem*two=[[UIBarButtonItem alloc]initWithBarButtonSystemItem:UIBarButtonSystemItemBookmarks
target:nil
action:nil];
UIBarButtonItem*three=[[UIBarButtonItem alloc]initWithBarButtonSystemItem:UIBarButtonSystemItemAction
target:nil
action:nil];
UIBarButtonItem*four=[[UIBarButtonItem alloc]initWithBarButtonSystemItem:UIBarButtonSystemItemEdit
target:nil
action:nil];
UIBarButtonItem*flexItem=[[UIBarButtonItem alloc]initWithBarButtonSystemItem:UIBarButtonSystemItemFlexibleSpace
target:nil
action:nil];
[self setToolbarItems:@[flexItem,one,flexItem,two,flexItem,three,flexItem,four,flexItem]];
}
注意:用[self.navigationController.toolbar setItems:(NSArray *) animated:(BOOL)]这个方法添加item是不起效果的。
但调用这个方法后所有UINavigationController中的viewController都会显示出toolbar.
所以为了不出现这种情况可以不用UINavigationController中的toolbar、需重写toolbar来实现。这样在返回上级视图时就不会出现本来隐藏着的toolbar,代码如下:
- (void)viewDidLoad
{
[super viewDidLoad];
UIBarButtonItem*one=[[UIBarButtonItem alloc]initWithBarButtonSystemItem:UIBarButtonSystemItemAdd
target:nil
action:nil];
UIBarButtonItem*two=[[UIBarButtonItem alloc]initWithBarButtonSystemItem:UIBarButtonSystemItemBookmarks
target:nil
action:nil];
UIBarButtonItem*three=[[UIBarButtonItem alloc]initWithBarButtonSystemItem:UIBarButtonSystemItemAction
target:nil
action:nil];
UIBarButtonItem*four=[[UIBarButtonItem alloc]initWithBarButtonSystemItem:UIBarButtonSystemItemEdit
target:nil
action:nil];
UIBarButtonItem*flexItem=[[UIBarButtonItem alloc]initWithBarButtonSystemItem:UIBarButtonSystemItemFlexibleSpace
target:nil
action:nil];
UIToolbar *toolBar = [[UIToolbar alloc] initWithFrame:CGRectMake(0, self.view.frame.size.height - 44, self.view.frame.size.width, 44)];
[toolBar setBarStyle:UIBarStyleBlack];
toolBar.autoresizingMask = UIViewAutoresizingFlexibleTopMargin;
[toolBar setItems:@[flexItem,one,flexItem,two,flexItem,three,flexItem,four,flexItem] animated:YES];
[self.view addSubview:toolBar];
}
设置导航栏的一些属性
设置导航栏中title的字体效果
NSDictionary *dict = @{UITextAttributeTextColor: [UIColor colorWithRed:27.0/255 green:125.0/255 blue:197.0/255 alpha:1],
UITextAttributeTextShadowColor: [UIColor whiteColor]};
self.navigationController.navigationBar.titleTextAttributes = dict;
设置导航栏的背影色
self.navigationController.navigationBar.barTintColor = [UIColor blueColor];
用图片设置导航栏的背影
[self.navigationController.navigationBar setBackgroundImage:[UIImage imageNamed:@"nav_bg.png"] forBarMetrics:UIBarMetricsDefault];
将导航栏设置为半透明,
self.navigationController.navigationBar.translucent = YES; //设置这个属性后视图的坐标会上移到导航栏的上面
将导航栏设置为透明的效果
先做一张全透明的图片1*1的像素就行,作为UINavigationBar的背景色,然后将barStyle设置成通道就可以了。
[self.navigationController.navigationBar setBackgroundImage:[UIImage imageNamed:@"clear.png"] forBarMetrics:UIBarMetricsDefault];
self.navigationController.navigationBar.barStyle = UIBarStyleBlackTranslucent
总结下上面讲到的属性使用方法
//设置导航栏title字体的样式
NSDictionary *dict = @{UITextAttributeTextColor: [UIColor colorWithRed:27.0/255 green:125.0/255 blue:197.0/255 alpha:1],
UITextAttributeTextShadowColor: [UIColor whiteColor]};
self.navigationController.navigationBar.titleTextAttributes = dict;
//设置导航栏的背影图片,可以设置成透明效果。
[self.navigationController.navigationBar setBackgroundImage:[UIImage imageNamed:@"nav_bg.png"] forBarMetrics:UIBarMetricsDefault];
//设置导航栏的样式
self.navigationController.navigationBar.barStyle = UIBarStyleBlackTranslucent;
//门置导航栏为半透明效果,同时视图坐标上移。
self.navigationController.navigationBar.translucent = YES;
注意,上面设置和修改的属性都是全局的,设置后在当前这个UINavigationController中的导航栏都将改变。