Spark算子之aggregateByKey详解
一、介绍
根据源码中的注释介绍,总结下来,有这么几个点:
1. 该函数需要一个combine函数以及一个初始值
2. 函数可以返回一个与RDD中值类型不同的结果类型U
3. 我们需要一个针对每个分区合并操作,将单个分区中值(V)合并到该分区的聚合结果(U)中
4. 我们需要一个针对各个分区合并操作,将各个分区所聚合的结果(U)合并为一个结果(U)
5. 以上两步这两个参数返回的是聚合后的结果U,而并非是新创建了一个U
二、源码跟踪
来看一下spark源码(org.apache.spark.rdd.PairRDDFunctions)中对于该算子的使用介绍:
/**
   * Aggregate the values of each key, using given combine functions and a neutral "zero value".
   * This function can return a different result type, U, than the type of the values in this RDD,
   * V. Thus, we need one operation for merging a V into a U and one operation for merging two U's,
   * as in scala.TraversableOnce. The former operation is used for merging values within a
   * partition, and the latter is used for merging values between partitions. To avoid memory
   * allocation, both of these functions are allowed to modify and return their first argument
   * instead of creating a new U.
   */
  def aggregateByKey[U: ClassTag](zeroValue: U, partitioner: Partitioner)(seqOp: (U, V) => U,
      combOp: (U, U) => U): RDD[(K, U)] = self.withScope {
    // Serialize the zero value to a byte array so that we can get a new clone of it on each key
    val zeroBuffer = SparkEnv.get.serializer.newInstance().serialize(zeroValue)
    val zeroArray = new Array[Byte](zeroBuffer.limit)
    zeroBuffer.get(zeroArray)

    lazy val cachedSerializer = SparkEnv.get.serializer.newInstance()
    val createZero = () => cachedSerializer.deserialize[U](ByteBuffer.wrap(zeroArray))

    // We will clean the combiner closure later in `combineByKey`
    val cleanedSeqOp = self.context.clean(seqOp)
    combineByKeyWithClassTag[U]((v: V) => cleanedSeqOp(createZero(), v),
      cleanedSeqOp, combOp, partitioner)
  }

  /**
   * 注释省略
   */
  def aggregateByKey[U: ClassTag](zeroValue: U, numPartitions: Int)(seqOp: (U, V) => U,
      combOp: (U, U) => U): RDD[(K, U)] = self.withScope {
    aggregateByKey(zeroValue, new HashPartitioner(numPartitions))(seqOp, combOp)
  }

  /**
   * 注释省略
   */
  def aggregateByKey[U: ClassTag](zeroValue: U)(seqOp: (U, V) => U,
      combOp: (U, U) => U): RDD[(K, U)] = self.withScope {
    aggregateByKey(zeroValue, defaultPartitioner(self))(seqOp, combOp)
  }
从上面可以看到,该算子一共重写了三个方法:
- 只指定分区聚合的初始值以及自定义的分区器
- 指定分区聚合的初始值以及分区数,这种情况下,函数会使用Hash分区器,即
HashPartition(num) - 指定分区聚合的初始值以及,该情况下,函数会使用
defaultPartitioner,此时针对于分区数以及分区器的选择是这样的:- 分区数:时如果设置了任务并行度
spark.default.parallelism,则取用该值,否则取用上游RDD中的最大分区数 - 分区器:如果上游RDD中对应的分区器可用的话,则会选择上游RDD中分区数最大的所对应的分区器。如果这个分区器合适(在RDD中按照最大分区数进行排序)或者说是最高的分区数大于默认的分区数,则使用该对应的分区器,否则的使用一个带有默认分区号的新的HashPartitioner。
- 分区数:时如果设置了任务并行度
其实从上面源码中可以看到,该函数底层其实使用的还是combineByKey
三、图解函数
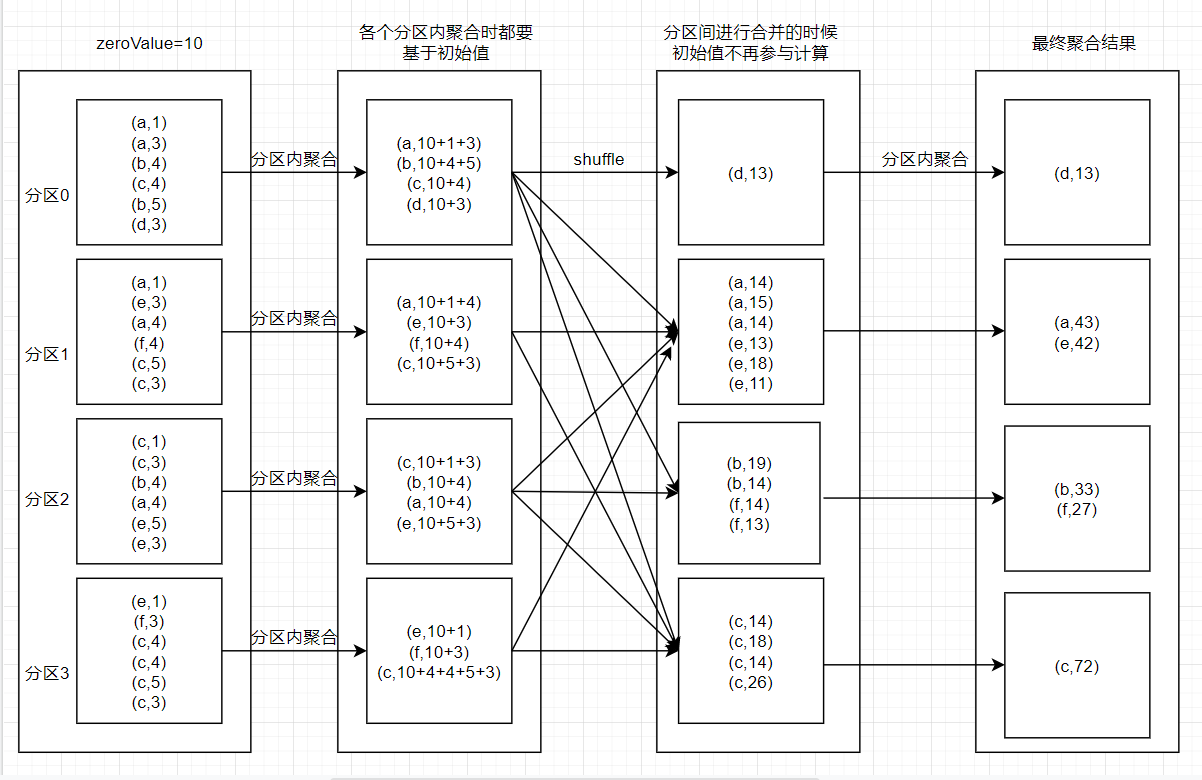
函数聚合步骤如下:
- 首先是分区内进行根据key进行聚合,每个key进行聚合的时候都要基于初始值
- 按照分区算法将各个分区内聚合后的key进行shuffle,传输到各自对应的分区内
- 分区间再次进行最终的聚合,此时聚合初始值不在参与计算
- 最后得出结果
四、代码验证
代码:
package com.yd.spark.job.batch.analysis

import com.yd.spark.common.config.SparkEnvInit

/**
 * @Author Guozy
 * @Description
 * @Date 2021/12/16 22:14
 **/

object testAggregateBykey extends App {

  //初始换环境,这里是一个初始换spark的一个工具类
  SparkEnvInit.init()
  // 获取spark上下文
  val sc = SparkEnvInit.getSparkContext

  val testData = Array(
    ("a", 1), ("a", 3), ("b", 4), ("c", 4), ("b", 5), ("d", 3),
    ("a", 1), ("e", 3), ("a", 4), ("f", 4), ("c", 5), ("c", 3),
    ("c", 1), ("c", 3), ("b", 4), ("a", 4), ("e", 5), ("e", 3),
    ("e", 1), ("f", 3), ("c", 4), ("c", 4), ("c", 5), ("c", 3)
  )
  val testRDD = sc.parallelize(testData, 4)
  val resultRDD = testRDD.aggregateByKey(10)(
    (u: Int, v: Int) => u + v,
    (u1: Int, u2: Int) => u1 + u2
  )
  resultRDD.foreach(record => {
    val partIndex = TaskContext.getPartitionId()
    println("分区:" + partIndex + "," + record._1 + "=" + record._2)
  })
}
运行结果
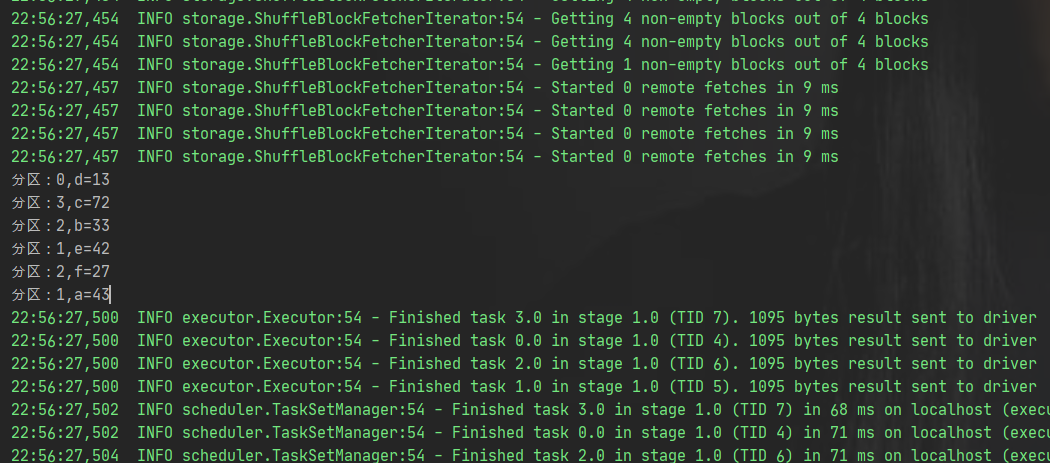
由此可见,图解分析正确