1,SSM的简介
SSM(Spring+SpringMVC+MyBatis)框架集由Spring、SpringMVC、MyBatis三个开源框架整合而成,常作为数据源较简单的web项目的框架。
其中spring是一个轻量级的控制反转(IoC)和面向切面(AOP)的容器框架。
SpringMVC分离了控制器、模型对象、分派器以及处理程序对象的角色,这种分离让它们更容易进行定制。
MyBatis是一个支持普通SQL查询,存储过程和高级映射的优秀持久层框架。
2,SSM的搭建
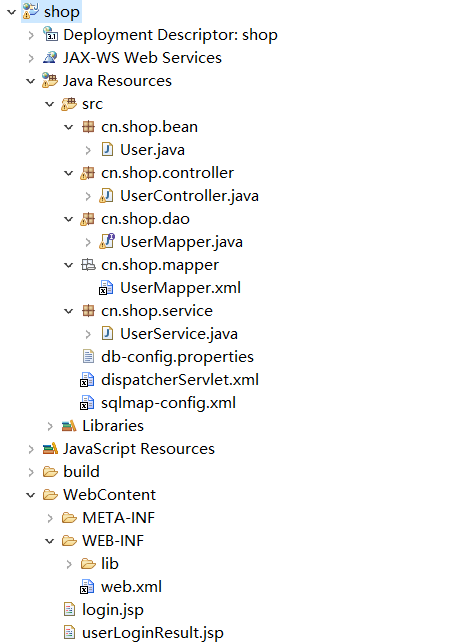
笔者的数据库是Oracle,开发工具为Eclipse,项目的结构如下:

首先配置Spring+MyBatis部分,关于MyBatis的配置可以参见MyBatis之如何配置。
sqlmap-config.xml 文件

<?xml version="1.0" encoding="UTF-8" ?>  <!DOCTYPE configuration             PUBLIC "-//ibatis.apache.org//DTD Config 3.0//EN"            "http://ibatis.apache.org/dtd/ibatis-3-config.dtd">
<configuration>
    <!-- 加载SQL定义文件 -->
    <mappers>
        <mapper resource="cn/shop/mapper/UserMapper.xml" />
    </mappers>
</configuration>
UserMapper.xml 文件

<?xml version="1.0" encoding="UTF-8" ?>
<!DOCTYPE mapper PUBLIC "-//ibatis.apache.org//DTD Mapper 3.0//EN"
 "http://ibatis.apache.org/dtd/ibatis-3-mapper.dtd">
<mapper namespace="cn.shop.dao.UserMapper">
    <!--用户登录-->
    <select id="login" parameterType="Map" resultType="cn.shop.bean.User">
        <!--sq_s_user 是专门为user表创建的序列-->
        select * from s_user where name=#{name} and password=#{password}
    </select>
</mapper>
UserMapper.java 文件

package cn.shop.dao;

import java.util.Map;

import org.springframework.stereotype.Component;

import cn.shop.bean.User;

public interface UserMapper {

    /**
     * 用户登录
     * @param user 需要登录的用户信息,其中必须包含两个key,name和password。
     * @return 用户登录成功后的信息
     */
    User login(Map map);
}
User.java 文件

package cn.shop.bean;

import java.util.Date;

public class User {
    private Integer id;
    private String name;
    private String password;
    private Date register_time;
    public User() {
        super();
    }
    public User(Integer id, String name, String password, Date register_time) {
        super();
        this.id = id;
        this.name = name;
        this.password = password;
        this.register_time = register_time;
    }
    public Integer getId() {
        return id;
    }
    public void setId(Integer id) {
        this.id = id;
    }
    public String getName() {
        return name;
    }
    public void setName(String name) {
        this.name = name;
    }
    public String getPassword() {
        return password;
    }
    public void setPassword(String password) {
        this.password = password;
    }
    public Date getRegister_time() {
        return register_time;
    }
    public void setRegister_time(Date register_time) {
        this.register_time = register_time;
    }

}
dispatcherServlet.xml 文件

<?xml version="1.0" encoding="UTF-8"?>
<beans xmlns="http://www.springframework.org/schema/beans"
    xmlns:xsi="http://www.w3.org/2001/XMLSchema-instance"
    xmlns:context="http://www.springframework.org/schema/context"
    xmlns:jdbc="http://www.springframework.org/schema/jdbc"
    xmlns:jee="http://www.springframework.org/schema/jee"
    xmlns:tx="http://www.springframework.org/schema/tx"
    xmlns:aop="http://www.springframework.org/schema/aop"
    xmlns:mvc="http://www.springframework.org/schema/mvc"
    xmlns:util="http://www.springframework.org/schema/util"
    xmlns:jpa="http://www.springframework.org/schema/data/jpa"
    xsi:schemaLocation="
        http://www.springframework.org/schema/beans http://www.springframework.org/schema/beans/spring-beans-4.1.xsd
        http://www.springframework.org/schema/context http://www.springframework.org/schema/context/spring-context-4.1.xsd
        http://www.springframework.org/schema/jdbc http://www.springframework.org/schema/jdbc/spring-jdbc-4.1.xsd
        http://www.springframework.org/schema/jee http://www.springframework.org/schema/jee/spring-jee-4.1.xsd
        http://www.springframework.org/schema/tx http://www.springframework.org/schema/tx/spring-tx-4.1.xsd
        http://www.springframework.org/schema/data/jpa http://www.springframework.org/schema/data/jpa/spring-jpa-1.3.xsd
        http://www.springframework.org/schema/aop http://www.springframework.org/schema/aop/spring-aop-4.1.xsd
        http://www.springframework.org/schema/mvc http://www.springframework.org/schema/mvc/spring-mvc-4.1.xsd
        http://www.springframework.org/schema/util http://www.springframework.org/schema/util/spring-util-4.1.xsd">
       <!--
            开启注解扫描
         -->
         <context:component-scan base-package="cn.shop"></context:component-scan>
         <!--
             开启mvc注解扫描
          -->
        <mvc:annotation-driven/>

          <!--定义视图 通过internalResourceView来表示 使用的是Servlet/jsp技术-->
  <bean id="viewResolver"    class="org.springframework.web.servlet.view.InternalResourceViewResolver">
    <property name="viewClass">
      <value>org.springframework.web.servlet.view.InternalResourceView</value>
    </property>
    <!--jsp存放的目录-->
    <property name="prefix">
      <value>/</value>
    </property>
    <!--jsp文件的后缀-->
    <property name="suffix">
      <value>.jsp</value>
    </property>
  </bean>


  <!-- 获取properties配置文件 -->
  <bean id="config" class="org.springframework.beans.factory.config.PropertyPlaceholderConfigurer">
    <property name="locations">
      <list>
        <value>classpath:db-config.properties</value>
      </list>
  </property>
  </bean>

  <!-- 获取数据源 -->
  <bean id="dataSource" class="org.apache.commons.dbcp.BasicDataSource">
    <property name="url">
      <value>${db.url}</value>
    </property>
    <property name="username">
      <value>${db.username}</value>
    </property>
    <property name="password">
      <value>${db.password}</value>
    </property>
     <property name="driverClassName">
      <value>${db.dirverClass}</value>
    </property>
  </bean>

    <bean id="ssf" class="org.mybatis.spring.SqlSessionFactoryBean">
           <property name="configLocation" value="classpath:sqlmap-config.xml"></property>
        <property name="dataSource" ref="dataSource"></property>
    </bean>

      <bean class="org.mybatis.spring.mapper.MapperScannerConfigurer">
        <property name="sqlSessionFactoryBeanName" value="ssf"></property>
        <property name="basePackage" value="cn.shop.dao"></property>
   </bean>

</beans>
db-config.properties 文件

db.url=jdbc:oracle:thin:@localhost:1521:xe
db.username=system
db.password=517839
db.dirverClass=oracle.jdbc.OracleDriver
配置到这里就完成了Spring和MyBatis的结合,接下来就是和SpringMVC的整合了。关于SpringMVC的配置可以参考基于注解实现SpringMVC+MySQL
web.xml 文件

<?xml version="1.0" encoding="UTF-8"?>
<web-app xmlns:xsi="http://www.w3.org/2001/XMLSchema-instance" xmlns="http://xmlns.jcp.org/xml/ns/javaee" xsi:schemaLocation="http://xmlns.jcp.org/xml/ns/javaee http://xmlns.jcp.org/xml/ns/javaee/web-app_3_1.xsd" id="WebApp_ID" version="3.1">
  <display-name>shop</display-name>
  <welcome-file-list>
    <welcome-file>index.html</welcome-file>
  </welcome-file-list>

  <!-- 这里是一个总控制器 -->
  <servlet>
    <servlet-name>spring</servlet-name>
    <servlet-class>org.springframework.web.servlet.DispatcherServlet</servlet-class>
    <init-param>
        <param-name>contextConfigLocation</param-name>
        <param-value>classpath:dispatcherServlet.xml</param-value>
    </init-param>
  </servlet>
  <servlet-mapping>
    <servlet-name>spring</servlet-name>
    <url-pattern>*.do</url-pattern>
  </servlet-mapping>

  <!-- 解决POST提交乱码问题 -->
  <filter>
    <filter-name>EncodingName</filter-name>
    <filter-class>org.springframework.web.filter.CharacterEncodingFilter</filter-class>
    <init-param>
      <param-name>encoding</param-name>
      <param-value>utf-8</param-value>
    </init-param>
  </filter>
  <filter-mapping>
    <filter-name>EncodingName</filter-name>
    <url-pattern>*.do</url-pattern>
  </filter-mapping>

</web-app>
UserService.java 文件

package cn.shop.service;

import java.util.Map;

import javax.annotation.Resource;

import org.springframework.stereotype.Service;

import cn.shop.bean.User;
import cn.shop.dao.UserMapper;

@Service
public class UserService {

    @Resource
    private UserMapper userMapper;

    public User userlogin(Map<String,String> map){
        return userMapper.login(map);
    }
}
编写完UserService.java文件后,我们可以进行一些测试,否则以后出错不便于调试:
新建一个cn.user.test.UserTest.java文件:
public class UserTest {
    @Test
    public void testName1() throws Exception {
        ApplicationContext ac=new ClassPathXmlApplicationContext("dispatcherServlet.xml");

                Map<String,String> map=new HashMap<String,String>();
                map.put("name","jame");
                map.put("password","123456");

        UserService userService= ac.getBean("userService",UserService.class);
        User user=userService.userlogin(map);//测试jame,123456
        System.out.println(user);

    }
}
UserController.java 文件

package cn.shop.controller;

import java.util.HashMap;
import java.util.Map;

import javax.annotation.Resource;

import org.springframework.beans.factory.annotation.Autowired;
import org.springframework.stereotype.Controller;
import org.springframework.web.bind.annotation.RequestMapping;
import org.springframework.web.servlet.ModelAndView;

import cn.shop.bean.User;
import cn.shop.service.UserService;

@Controller
public class UserController {

    @Resource
    private UserService userService;

    @RequestMapping("/login.do")
    public ModelAndView userLogin(String uname,String upass){
        Map<String,String> map=new HashMap<String,String>();
        map.put("name", uname);
        map.put("password", upass);
        User user = userService.userlogin(map);
        ModelAndView mav=new ModelAndView();
        if(user!=null){
            mav.getModel().put("loginresult", "登录成功");
        }else{
            mav.getModel().put("loginresult", "登录失败");
        }
        mav.setViewName("userLoginResult");
        return mav;
    }
}
@Resource注解和@Autowired注解都可以取出IOC中容器的对象,关于两者的区别可以查看Spring注解@Resource和@Autowired区别对比.
login.jsp 文件

<%@ page language="java" contentType="text/html; charset=utf-8"
    pageEncoding="utf-8"%>
<!DOCTYPE html PUBLIC "-//W3C//DTD HTML 4.01 Transitional//EN" "http://www.w3.org/TR/html4/loose.dtd">
<html>
<head>
<meta http-equiv="Content-Type" content="text/html; charset=utf-8">
<title>用户登录</title>
</head>
<body>
<h1>用户登录</h1>
<form action="login.do" method="POST">
用户名:<input type="text" name="uname"/><br/>
密码:<input type="password" name="upass"/><br/>
<input type="submit" value="登录"/>
</form>
</body>
</html>
userLoginResult.jsp文件

<%@ page language="java" contentType="text/html; charset=utf-8"
    pageEncoding="utf-8"%>
<!DOCTYPE html PUBLIC "-//W3C//DTD HTML 4.01 Transitional//EN" "http://www.w3.org/TR/html4/loose.dtd">
<html>
<head>
<meta http-equiv="Content-Type" content="text/html; charset=utf-8">
<title>登录结果页面</title>
</head>
<body>
${loginresult}
</body>
</html>
到这里就完成了Spring+SpringMVC+MyBatis的配置了。
