-
创建独立的运行环境:

-
cd 到 目录下,使用 source ven/bin/activate 进入该环境 (Linux) (window 直接在bin目录下 输入 activate进入,deactivate退出)

-
deacivate退出
-
pip install virtualenv
-
cd到指定目录下 virtualenv env_name 创建虚拟环境
-
cd 到 env_name的 Scripts 目录下
-
输入 activate 激活
-
输入 deactivate关闭
二、vscode 内配置 virtualenv、Python环境和代码规范
1.扩展搜索python,并且安装 python for vscode
2.调试按钮,点击选择python解释器,然后在当前目录会有.vscode文件夹,内含 配置文件launch.json 和 settings.json
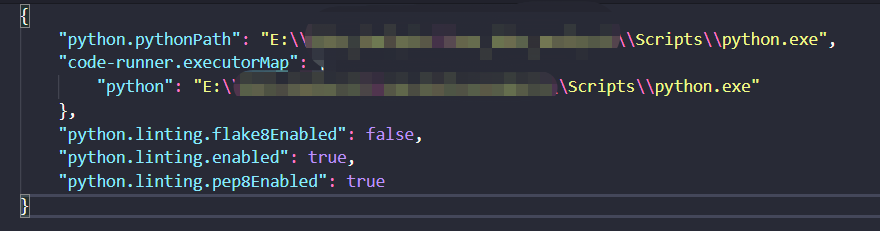
3. 在setting.json文件中,配置virtualenv、coder-runner和编码风格(如pep8、flake8等)
‘
注: 解决 code-runner中运行中文乱码:
三、ubuntu安装jupyter notebook
python2: sudo pip install jupyter
python3: sudo pip3 install jupyter
系统安装jupyter:
sudo apt-get install ipython3
sudo apt-get install jupyter-notebook
启动:jupyter notebook
可能遇到的问题:
1、python2中安装好notebook其中时,报 DecoderError: ASCII的的一个编码错误,
解决:把python2的jupyter相关的都卸载了,然后安装python3的pip,使用pip3安装就解决了
sudo pip3 uninstall jupyter
sudo pip3 uninstall jupyter-core
sudo pip uninstall jupyter-console
sudo pip uninstall jupyter-client
sudo apt-get install pip3
sudo pip3 install jupyter notebook
四、 ubuntu 中 virtualenv 的安装、使用和jupyter notebook中添加virtualenv 的虚拟环境
(1) 安装
sudo apt-get install virtualenv
pip install --user virtualenv / sudo pip install virtualenv ( 以 当前用户/root 安装virtualenv
(2) 使用
创建python虚拟环境:virtualenv env_name
激活: source env_name/bin/activate
关闭:deactivate
(3)jupyter notebook 添加ivirtualenv 环境
source ./bin/activate # 激活要添加的虚拟环境
(env ) pip3 install jupyter # 虚拟环境中安装jupyter
(env)ipython kernel install --name "you_env_name" --user # 添加env
详见:https://cloud.tencent.com/developer/ask/52701/answer/86416 && https://ipython.readthedocs.io/en/stable/install/kernel_install.html
五、ubuntu中切换python版本
sudo update-alternatives --install /usr/bin/python python /usr/bin/python2.7 1 # 1:表示优先级为1
sudo update-alternatives --install /usr/bin/python python /usr/bin/python3.6 2 # 2:表示优先级为2
sudo update-alternatives --config python # 切换python 版本
六、windows jupyter添加、删除virtualenv
添加 python -m ipykernel install --name=your_env_name
删除:jupyter kernelspec remove your_env_name
查看kernel: jupyter kernelspec list
参考且感谢博主:https://blog.csdn.net/SineObama/article/details/83445104
* 注: 如果python3在cmd中添加virtualenv时,报错“ASCII类型错误”,就用powershell操作
*注: linxu 和 windows 的删除 和查看kernel命令都相同,当出现 ”
Error executing Jupyter command 'kernelspec': [Errno 2] No such file or directory“ 错误时,解决如下:
sudo chmod +x /usr/bin/jupyter-kernelspec
linux删除 kernel,需要加sudo(如果是 python3 -m ipykernel install --user --name /home/xxx/da_env --display-name "Python(python_env)" 用virtualenv的路径添加的kernel )