这里使用网上开源的PHPSHE商城系统(该系统采用PHP+MYSQL设计的)
下载地址:
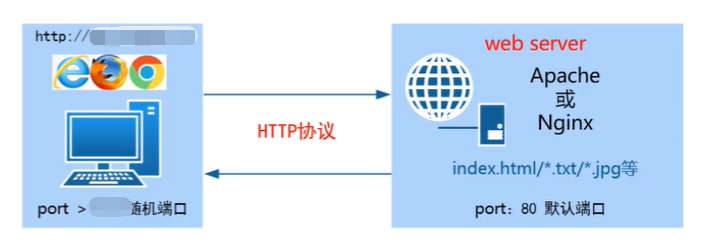
LAMP架构了解
LAMP分别表示Linux,Apche、MySQL、PHP/Perl/Python。
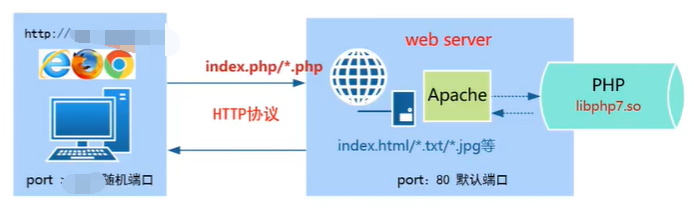
- Apache(httpd):提供web服务。接受用户的连接请求(只支持静态页面解析,当客户端请求的是静态资源时,web服务(httpd程序)会直接将静态资源返回给客户端)
- PHP:负责PHP脚本程序解析及实现与MySQL数据库的交互。当客户端请求的是动态资源时,Apache(httpd程序)会调用libphpN.so模块进行解析。如果解析处理需用到后台数据库,此时php会连接数据库,最终php程序将解析后的结果返回给Apache。Apache返回给客户端。
- MySQL:是一个关系型数据库管理系统,由瑞典MySQL AB公司开发,目前属于oracle旗下产品。主要用于永久的存储数据。

一键部署LAMP环境
1、环境准备
- 关闭防火墙和selinux
# 关闭防火墙
[root@rhel8 ~]# systemctl stop firewalld
[root@rhel8 ~]# systemctl status firewalld
● firewalld.service - firewalld - dynamic firewall daemon
   Loaded: loaded (/usr/lib/systemd/system/firewalld.service; disabled; vendor preset: enabled)
   Active: inactive (dead)
     Docs: man:firewalld(1)

# 设置selinux为disabled或permissive
[root@rhel8 ~]# vi /etc/selinux/config
SELINUX=disabled
[root@rhel8 ~]# getenforce
Disabled
配置本地软件仓库
[root@rhel8 ~]# mount -o ro /dev/sr0 /media/
[root@rhel8 ~]# df -h /media/
文件系统        容量  已用  可用 已用% 挂载点
/dev/sr0        7.4G  7.4G     0  100% /media

[root@rhel8 ~]# vi /etc/yum.repos.d/local.repo

[BaseOS]
name=BaseOS
enabled=1
baseurl=file:///media/BaseOS/
gpgcheck=0

[AppStream]
name=AppStream
enable=1
baseurl=file:///media/AppStream/
gpgcheck=0
# 写入开机自启动配置文件中
[root@rhel8 ~]# echo "mount -o ro /dev/sr0 /mnt" >> /etc/rc.local
[root@rhel8 ~]# ll /etc/rc.local
lrwxrwxrwx. 1 root root 13 8月  30 2019 /etc/rc.local -> rc.d/rc.local
[root@rhel8 ~]# ll /etc/rc.d/rc.local
-rw-r--r--. 1 root root 500 6月   6 04:24 /etc/rc.d/rc.local
[root@rhel8 ~]# chmod +x /etc/rc.d/rc.local
# 清空缓存
yum clean all
yum makecache
yum repolist
2、部署LAMP环境
- 安装Apache(httpd)软件(RedHat8默认自带2.4版本)
[root@rhel8 ~]# yum -y install httpd
- 安装PHP相关软件(自带2.7版本)
# 先查询php相关软件包
[root@rhel8 ~]# yum list | grep "php-"

# 安装相关php软件
[root@rhel8 ~]# yum -y install php-xml.x86_64
> php-json.x86_64
> php-mysqlnd.x86_64
> php-common.x86_64
> php-fpm.x86_64
> php-bcmath.x86_64
> php-cli.x86_64
> php.x86_64
> php-gd.x86_64
> php-pdo.x86_64
> php-devel.x86_64

- 安装MySQL数据库软件(RedHat7后默认自带Mariadb数据库)
[root@rhel8 ~]# yum -y install mariadb-server mariadb
3、启动相应服务
- 启动数据库服务
# 启动服务,设置开机自启
[root@rhel8 ~]# systemctl start mariadb.service
[root@rhel8 ~]# systemctl enable mariadb.service

# 查看端口
[root@rhel8 ~]# netstat -nltp | grep 3306
tcp6       0      0 :::3306                 :::*                    LISTEN      6914/mysqld

# 设置数据库密码
[root@rhel8 ~]# mysqladmin -u root password '密码'

# 进入数据库(回车输入密码即可)
[root@rhel8 ~]# mysql -u root -p

# 文件数据目录
[root@rhel8 ~]# ll /var/lib/mysql/

# 重启下数据库
[root@rhel8 ~]# systemctl restart mariadb
- 启动httpd服务
# 启动httpd服务,设置开机自启
[root@rhel8 ~]# systemctl start httpd.service
[root@rhel8 ~]# systemctl enable httpd.service
Created symlink /etc/systemd/system/multi-user.target.wants/httpd.service → /usr/lib/systemd/system/httpd.service.

# 查看端口情况
[root@rhel8 ~]# netstat -nltp | grep 80
tcp6       0      0 :::80                   :::*                    LISTEN      7232/httpd

# 配置文件目录
[root@rhel8 ~]# cd /etc/httpd/conf
[root@rhel8 conf]# ll
总用量 28
-rw-r--r-- 1 root root 11899 9月   2 2019 httpd.conf
-rw-r--r-- 1 root root 13064 9月   2 2019 magic

# 该文件中定义了访问的路径(122行)
[root@rhel8 conf]# vi httpd.conf
122 DocumentRoot "/var/www/html"
4、测试是否能解析php页面
# 编辑一个php文件
[root@rhel8 ~]# vim /var/www/html/index.php
<?php
        phpinfo();
?>
通过浏览器访问IP地址能访问到phpinfo信息界面就表示搭建成功
二、PHPSHE商城网站部署
1、上传源码至web服务器
# 新建目录存放源码,将源码上传至lamp目录
[root@rhel8 ~]# mkdir /lamp
[root@rhel8 ~]# ll /lamp/
总用量 4368
-rw-r--r-- 1 root root 4469363 6月   6 06:31 phpshe1.7.rar
2、解压并拷贝指定位置
# 由于下载的时候默认是rar压缩,但服务器上并没有rar解压命令,需要安装下rar软件(https://www.rarlab.com/download.htm)
[root@rhel8 ~]# wget https://www.rarlab.com/rar/rarlinux-x64-5.9.1b1.tar.gz

# 解压文件(这里建议将下载的软件放入/usr/local/下)
[root@rhel8 ~]# mkdir /usr/local/soft
[root@rhel8 ~]# mv *.gz /usr/local/soft/
[root@rhel8 ~]# ll /usr/local/soft/
总用量 584
-rw-r--r-- 1 root root 595665 6月   4 18:31 rarlinux-x64-5.9.1b1.tar.gz
[root@rhel8 ~]# cd /usr/local/soft/
[root@rhel8 soft]# tar -zxvf rarlinux-x64-5.9.1b1.tar.gz

# 进入rar目录编译
[root@rhel8 rar]# make

# 解压商城源码(unrar没有指定目录会在当前目录解压)
[root@rhel8 lamp]# unrar x phpshe1.7.rar
[root@rhel8 lamp]# pwd
/lamp

# 将解压的文件拷贝到/var/www/html中(为了方便,上面解压时是没有目录,所以这里新建一个目录存放刚刚解压的文件,然后再将这些文件拷贝过去)
[root@rhel8 lamp]# mv *.php *.ico *.txt .ini data hook install include module template phpshe1.7
[root@rhel8 lamp]# cd phpshe1.7/
[root@rhel8 phpshe1.7]# ls
admin.php   config.php   hook       index.php    module                  template
api.php     data         httpd.ini  install      PHPSHE安装升级说明.txt  user.php
common.php  favicon.ico  include    license.php  robots.txt

[root@rhel8 phpshe1.7]# mv ./* /var/www/html/
# 为源码文件设置所有者权限(httpd默认属主和属组为apache),配置文件中有写
[root@rhel8 html]# vi /etc/httpd/conf/httpd.conf
69 User apache
70 Group apache

[root@rhel8 html]# chown -R apache.apache ./*
4、安装商城系统
通过浏览器进行安装:http://IP地址/install。点击下一步进入数据库配置页面
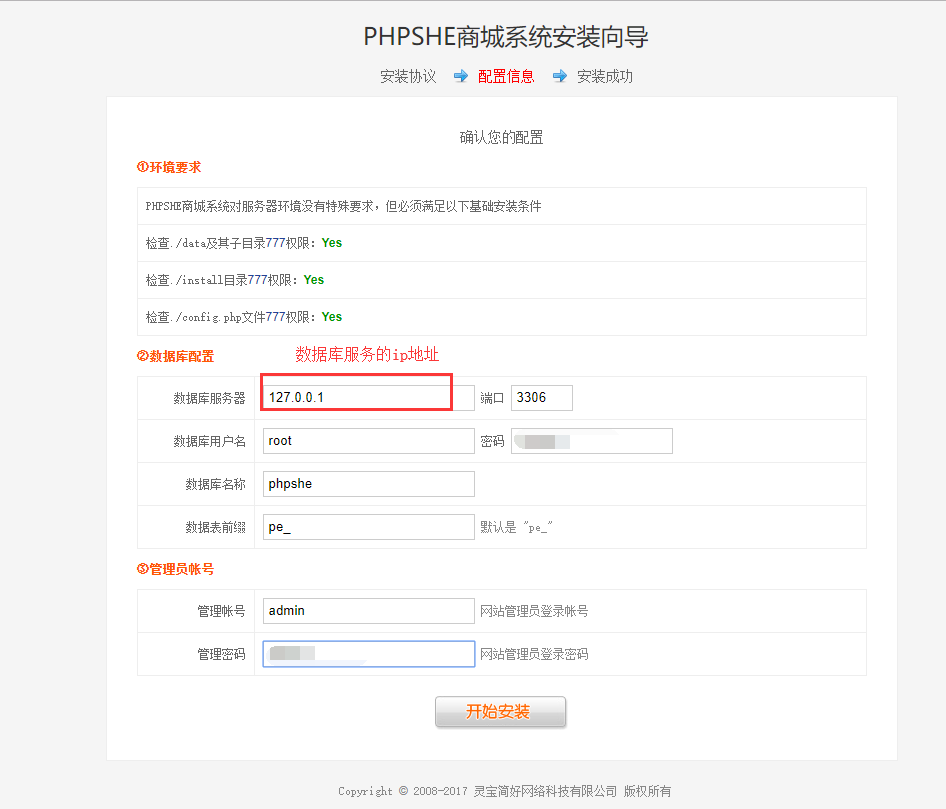
配置好点击【开始安装】
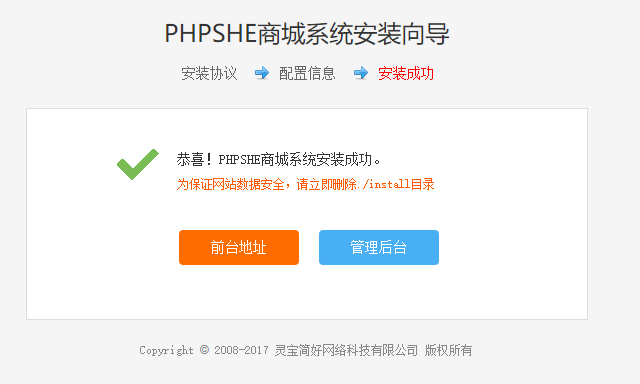
点击【管理后台】输入刚刚的管理员密码进入后台 管理系统
可以点击首页进入商城首页,测试注册