从零开始,搭建一个简单的购物平台(十五)前端商城部分:
https://blog.csdn.net/time_____/article/details/108680599
项目源码(持续更新):https://gitee.com/DieHunter/myCode/tree/master/shopping
在前几篇文章中,我们对首页,分类列表,公共组件,工具类进行了实现,这篇文章将实现商品详情页进行介绍,这里我们将商品详情页细化成多个组件,利用组件通信方式进行监听传递方式从而实现数据传递和效果逻辑
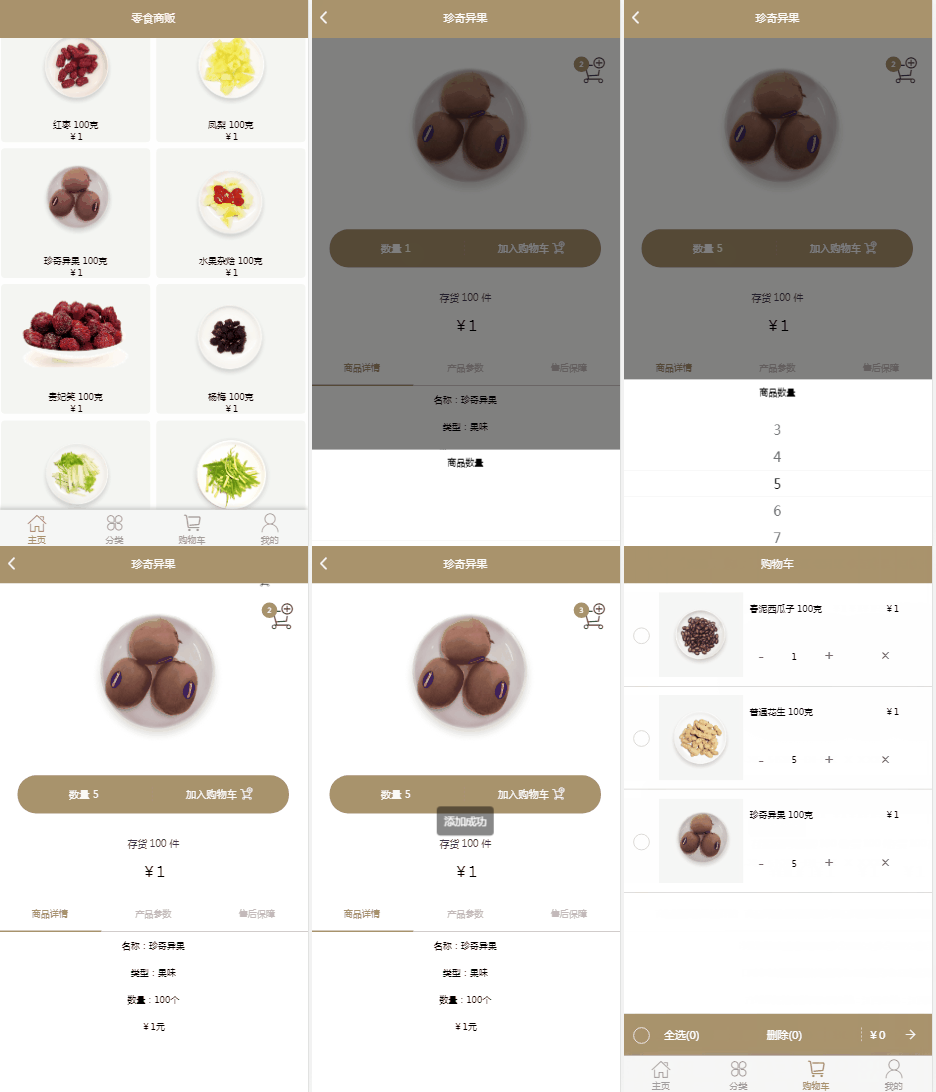
先来看看效果
这个界面我们可以把页面分解成几个组件,分别是顶部的Top,商品信息展示,商品选项框及加入购物车按钮,最后是下方的一个tab切换效果
商品选项框:
首先对mint-ui官方的Picker,Navbar进行简单的二次封装,然后在商品选项框及加入购物车按钮组件中触发picker组件,加入购物车中有一个添加的动画需要用到animate动画,并将全局购物车列表更新
- shopPicker.vue,封装官方组件,通过商品最大数量显示列表
<template> <div class="shopPicker"> <mt-popup v-model="popupVisible" position="bottom"> <mt-picker class="pickerItem" :slots="count" :showToolbar="true" @change="onValuesChange"> <div>{{pickerTitle}}</div> </mt-picker> </mt-popup> </div> </template> <script> import { Picker, Popup } from "mint-ui"; import Config from "../../config/config"; const { EventName } = Config; export default { name: "shopPicker", props: ["ShopMaxCount","pickerTitle"],//最大购买数,picker的标题 data() { return { popupVisible: false,//是否显示组件 count: [{ flex: 1, values: [] }]//组件默认模板 }; }, mounted() { this.createShopCount();//初始化组件 this.$events.onEvent(EventName.ShowPicker, this.showPicker);//监听显示picker事件 }, destroyed() { this.$events.offEvent(EventName.ShowPicker);//注销显示picker事件 }, methods: { onValuesChange(comp, count) {//数据变化时触发counter中的显示商品数量 this.$events.emitEvent(EventName.ChangeCount, count[0]); }, showPicker() { this.popupVisible = true; }, createShopCount() {//根据传进来的最大数量显示商品数量列表 this.count[0].values = this.ShopMaxCount; for (let i = 0; i < this.ShopMaxCount; i++) { this.count[0].values.push(i + 1); } } } }; </script> <style lang="less" scoped> @import "../../style/init.less"; </style> - 修改navbar样式并应用至自己组件中
<template> <div class="info"> <mt-navbar v-model="selected"> <mt-tab-item v-for="(item,index) in navTitle" :key="index" :id="item.val">{{item.name}}</mt-tab-item> </mt-navbar> <mt-tab-container v-model="selected"> <mt-tab-container-item class="doc" id="0"> <div>名称:{{shopName}}</div> <div>类型:{{Type[shopType].name}}</div> <div>数量:{{shopNum}}个</div> <div>¥{{shopPrice}}元</div> </mt-tab-container-item> <mt-tab-container-item class="doc" id="1"> <div>净含量/克(g):{{shopScale}}</div> <div>口味:{{taste}}</div> <div>产地:{{address}}</div> <div>保质期:{{expiryDate}}</div> <div>上架时间:{{time}}</div> </mt-tab-container-item> <mt-tab-container-item id="2"> <h3>7天包退</h3> <h3>15天包换</h3> <h3>一年保修</h3> </mt-tab-container-item> </mt-tab-container> </div> </template> <script> import { Navbar, TabItem } from "mint-ui"; import NavConfig from "../../config/navConfig"; import ShopType from "../../config/shopType"; export default { name: "infoNav", data() { return { selected: "0",//默认选中第一项 navTitle: NavConfig.NavTitle, Type: ShopType.shopType, ...this.$route.query//路由传参,将商品信息传递到data中 }; } }; </script> <style lang="less" scoped> @import "../../style/init.less"; @fontcolor: #bababa; .info { .mg(20px auto); .navBar(); h3 { text-align: center; color: @mainColor; } .doc div { text-align: center; padding: 0.625rem 0; } } </style> -
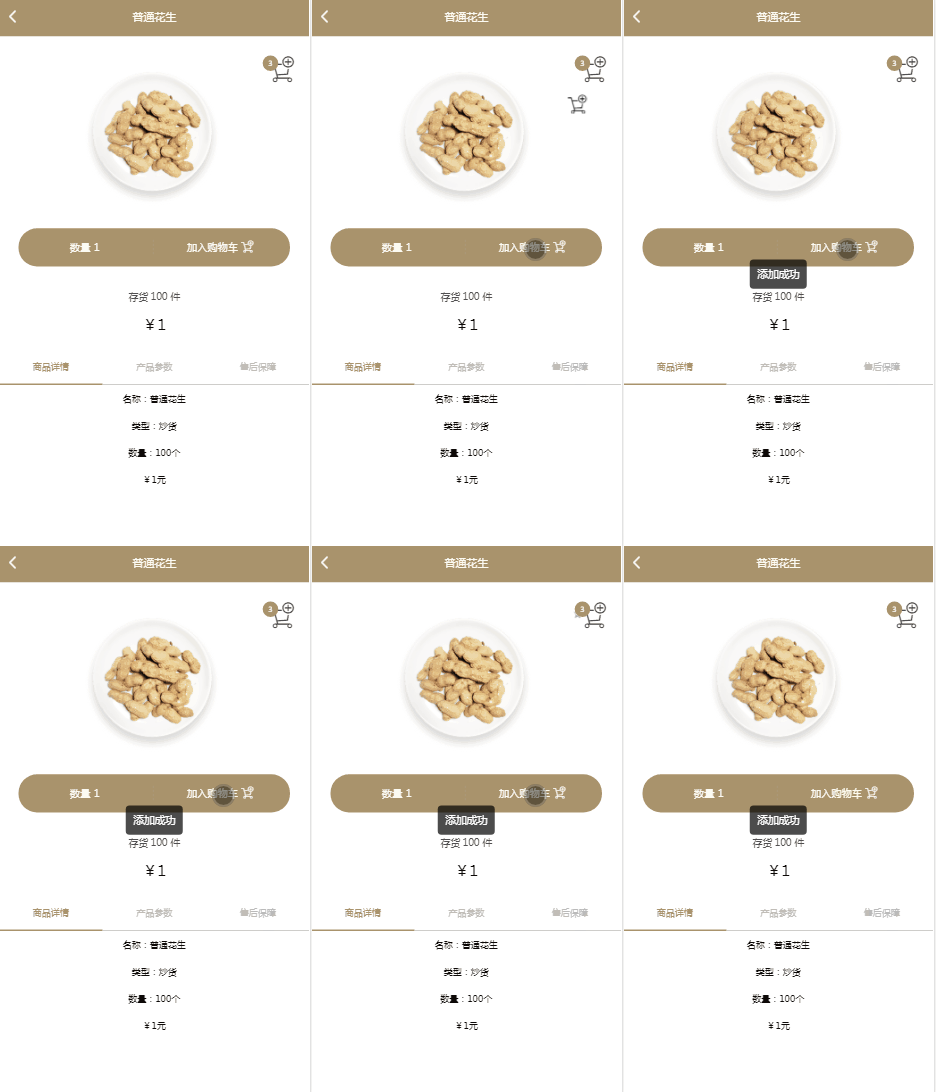
这里的一个难点是加入购物车的动画,想了很多种方法,
最后采用一个标签隐藏,另一个标签执行动画的方式让动画效果更好,
通过showAnimate变量进行控制执行动画的标签v-show
在动画标签里使用animate.css中的zoomOutUp 效果
<transition enter-active-class="animated zoomOutUp slow">
        <span v-show="showAnimate" class="icon-jiarugouwuche iconfont addIcon"></span>
</transition>
当点击加入购物车时触发事件
addShopCar() {
      this.showAnimate = true;//显示元素
      setTimeout(() => {//延时的目的是等待动画完成
        this.shopCar.countShopItem({//缓存添加购物车数据
          ...this.$route.query,
          shopCount: this.shopCount
        });
        this.showAnimate = false;//隐藏元素
      }, 1000);
    }
完整的counter组件
<template> <ul class="counter"> <li @click="showPicker"> 数量 <span>{{shopCount}}</span> </li> <li @click="addShopCar"> 加入购物车 <span class="icon-jiarugouwuche iconfont"></span> <transition enter-active-class="animated zoomOutUp slow"> <span v-show="showAnimate" class="icon-jiarugouwuche iconfont addIcon"></span> </transition> </li> </ul> </template> <script> import Config from "../../config/config"; const { EventName } = Config; export default { name: "Counter", data() { return { shopCount: 1,//默认购买商品数量 showAnimate: false//动画标签隐藏 }; }, created() { this.$events.onEvent(EventName.ChangeCount, _count => {//添加事件监听,监听商品数量变化 this.shopCount = _count; }); this.shopCar = new this.$store.ShopCar(); }, destroyed() { this.$events.offEvent(EventName.ChangeCount); }, methods: { showPicker() { this.$events.emitEvent(EventName.ShowPicker); }, addShopCar() { this.showAnimate = true;//显示元素 setTimeout(() => {//延时的目的是等待动画完成 this.shopCar.countShopItem({//缓存添加购物车数据 ...this.$route.query, shopCount: this.shopCount }); this.showAnimate = false;//隐藏元素 }, 1000); } } }; </script> <style lang="less" scoped> @import "../../style/init.less"; .counter { .h(120); .w(850); background: @mainColor; border-radius: 4rem; margin: 0 auto; .l_h(120); li { 49%; display: inline-block; .h(46); .l_h(46); .titleFont(); .f_s(32); text-align: center; } li:nth-child(2) { margin-left: -2px; border-left: 1px dashed #dacda3; .addIcon { position: fixed; .f_s(75); z-index: -1; color: black; } } } </style>最后在全局store中添加购物车变量处理方法
 countShopItem(_data) {
    if (!_data._id) {//阻塞商品id为空现象
      return
    }
    let _shopCar = this.state//获取原购物车列表
    let list = _shopCar.filter(function (item) {
      return item._id === _data._id;//通过id查找购物车中传递项
    });
    if (list.length == 0) {//未找到时新建购物车商品
      _data.sum = _data.shopCount * _data.shopPrice;//商品总价
      _data.isSelect = false//是否选中商品,购物车界面默认值
      _shopCar.push(_data);
    } else if ((_data.shopNum > list[0].shopCount + _data.shopCount) && (list[0].shopCount + _data.shopCount <= 9) && list[0].shopCount + _data.shopCount > 0) {//找到时更新商品
      list[0].shopCount += _data.shopCount;
      list[0].sum = list[0].shopCount * list[0].shopPrice;
    } else if (list[0].shopCount + _data.shopCount <= 0) {//购物车允许最小值
      this.$events.emitEvent(EventName.CountShop, 'min');
      return;
    } else {//购物车允许最大值
      this.$events.emitEvent(EventName.CountShop, 'max');
      return;
    }
    this.state = _shopCar
    this.$events.emitEvent(EventName.CountShop);
  }
这样,一个简单的商品详情页面就完成了