本篇将介绍如何使用OpenResty和ModSecurity 来构建自己的WAF,安装过程整体与Nginx是类似的,但也有些区别,在文中会特别指出,本篇算是用openresty对前面两篇nginx和crs的集中介绍。
Preface
版本信息
- CentOS Linux release 7.6.1810 (Core)
- nginx version: openresty/1.13.6.1
- ModSecurity 3.0
安装依赖
# yum install epel-release -y
# 安装modsecurity依赖
# yum install gcc-c++ flex bison yajl yajl-devel curl-devel curl GeoIP-devel doxygen zlib-devel pcre pcre-devel libxml2 libxml2-devel autoconf automake lmdb-devel ssdeep-devel ssdeep-libs lua-devel libmaxminddb-devel git apt-utils autoconf automake build-essential git libcurl4-openssl-dev libgeoip-dev liblmdb-dev ibpcre++-dev libtool libxml2-dev libyajl-dev pkgconf wget zlib1g-dev -y
# 安装nginx/openresty依赖
# yum install gcc pcre pcre-devel zlib zlib-devel openssl openssl-devel -y
下载
# mkdir /opt/waf          #创建一个专属目录
# cd /opt/waf
# git clone --depth 1 -b v3/master --single-branch https://github.com/SpiderLabs/ModSecurity      # 下载ModSecurity
# wget https://openresty.org/download/openresty-1.13.6.1.tar.gz                        # 下载openresty
# git clone --depth 1 https://github.com/SpiderLabs/ModSecurity-nginx.git                  # 下载ModSecurity-nginx连接器
# pwd
/opt/waf
# ls
ModSecurity  ModSecurity-nginx  openresty-1.13.6.1.tar.gz
编译ModSecurity
# cd /opt/waf/
# cd ModSecurity/        # 切换到ModSecurity目录
# git submodule init      # 初始化
# git submodule update    # 更新
# ./build.sh
# ./configure
# make
# make install
【注】在执行build.sh会出现如下错误,可忽略。
fatal: No names found, cannot describe anything
编译modsecurity_module
# cd /opt/waf/
# tar xvf openresty-1.13.6.1.tar.gz
# ls
ModSecurity  ModSecurity-nginx  openresty-1.13.6.1  openresty-1.13.6.1.tar.gz
# cd openresty-1.13.6.1/
# ./configure --with-compat --add-dynamic-module=/opt/waf/ModSecurity-nginx    # 需用绝对路径,相对路径会出问题
# gmake            # 不能使用make modules命令
# gmake install
... 上一步的输出
cp objs/ngx_http_modsecurity_module.so '/usr/local/openresty/nginx/modules/ngx_http_modsecurity_module.so'
gmake[2]: Leaving directory `/opt/waf/openresty-1.13.6.1/build/nginx-1.13.6'
gmake[1]: Leaving directory `/opt/waf/openresty-1.13.6.1/build/nginx-1.13.6'
mkdir -p /usr/local/openresty/site/lualib /usr/local/openresty/site/pod /usr/local/openresty/site/manifest
ln -sf /usr/local/openresty/nginx/sbin/nginx /usr/local/openresty/bin/openresty
openresty默认安装到/usr/local/openresty,最终的是ngx_http_modsecurity_module.so库文件ok。
配置
基本测试
为了便于后续操作,创建一个openresty的符号链接。
# ln -s /usr/local/openresty/bin/openresty /usr/bin/openresty
# openresty -v
nginx version: openresty/1.13.6.1
# cd /usr/local/openresty/nginx/conf
# head -1 nginx.conf
load_module /usr/local/openresty/nginx/modules/ngx_http_modsecurity_module.so;    # 首行加入
# openresty             # 启动
# openresty -s reload       # 重载配置(如果已启动则重载配置即可)
# openresty -t           # 测试ok
nginx: the configuration file /usr/local/openresty/nginx/conf/nginx.conf syntax is ok
nginx: configuration file /usr/local/openresty/nginx/conf/nginx.conf test is successful
启用WAF
# cd /usr/local/openresty/nginx
# ls
client_body_temp  conf  fastcgi_temp  html  logs  modules  proxy_temp  sbin  scgi_temp  uwsgi_temp
# mkdir modsec      # 创建一个专属modsecurity的规则文件夹
# cd modsec/
# sudo wget https://raw.githubusercontent.com/SpiderLabs/ModSecurity/v3/master/modsecurity.conf-recommended
# mv modsecurity.conf-recommended modsecurity.conf
修改modsecurity.conf配置文件
# vim  modsecurity.conf
# -- Rule engine initialization ----------------------------------------------
...
SecRuleEngine On    <== 设置为On
拷贝mapping文件。
# cp /opt/waf/ModSecurity/unicode.mapping .
# ls
main.conf  modsecurity.conf  unicode.mapping
创建一个主规则文件main.conf,内容如下。
# cat /etc/nginx/modsec/main.conf
# Include the recommended configuration
Include /usr/local/openresty/nginx/modsec/modsecurity.conf
# A test rule
SecRule ARGS:testparam "@contains test" "id:1234,deny,log,status:403"
修改nginx配置文件,简要图示如下:
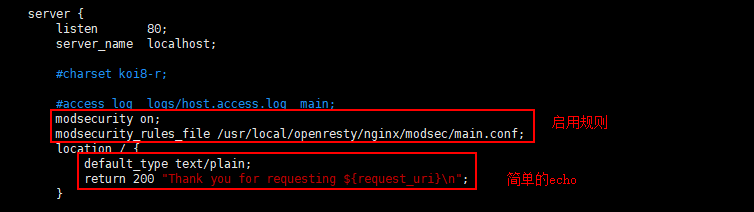
...
server {
        listen       80;
        server_name  localhost;

        #charset koi8-r;

        #access_log  logs/host.access.log  main;
        modsecurity on;
        modsecurity_rules_file /usr/local/openresty/nginx/modsec/main.conf;
        location / {
            default_type text/plain;
            return 200 "Thank you for requesting ${request_uri}
";
        }
...
- modsecurity on:启用Nginx WAF;
- modsecurity_rules_file:指定规则文件路径。
测试WAF
# curl localhost
Thank you for requesting /
[root@localhost conf]# curl localhost/foo?testparam=thisisatestofmodsecurity    # 携带恶意参数test
<html>
<head><title>403 Forbidden</title></head>
<body bgcolor="white">
<center><h1>403 Forbidden</h1></center>        <<= 禁止访问
<hr><center>openresty/1.13.6.1</center>
</body>
</html>
可以看到参数testparam中带有test关键字会被拦截。
CRS
OpenResrty 配置文件nginx.conf请参考:https://www.cnblogs.com/Hi-blog/p/ModSecurity.html#autoid-3-4-0