验证码解析环境搭建
安装Tesseract
Tesserocr 是 Python 的一个 OCR 识别库,但其实是对 Tesseract 做的一层 Python API 封装,所以它的核心是 Tesseract,所以在安装 Tesserocr 之前我们需要先安装 Tesseract
官方网址:https://digi.bib.uni-mannheim.de/tesseract/
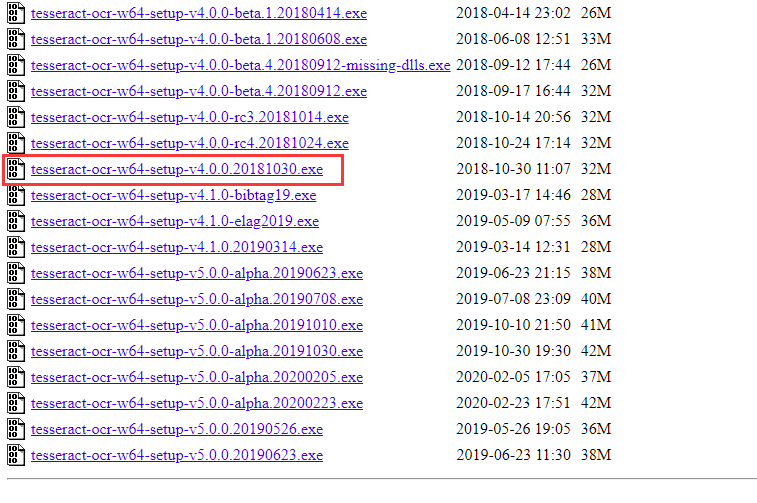
选择版本:
此处选择4.0.0版本,因为截至目前(2020-2-28)对应的python库的支持最新只到这个版本。
具体看https://github.com/simonflueckiger/tesserocr-windows_build/releases的显示版本,括号里是支持Tesserocr的版本。

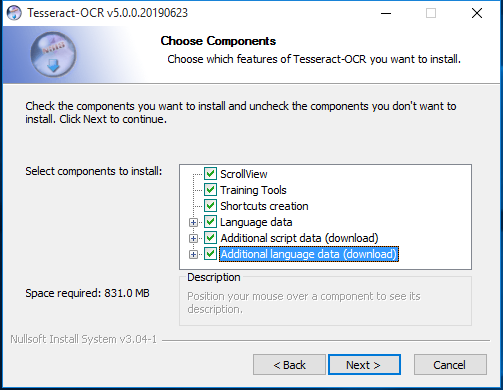
安装时可以勾选多语言支持(但会导致整个过程很慢):

安装完成后,需要设置环境变量。在Path中设置C:Program FilesTesseract-OCR(路径以自己为准)
确认是否设置正确:

安装Tesserocr(Tesseract-OCR)
使用pip直接安装:
pip install tesserocr pillow
如果安装失败,尝试使用以下方法:
下载安装tesserocr的whl格式文件。
whl格式本质上是一个压缩包,里面包含了py文件,以及经过编译的pyd文件
网址:https://github.com/simonflueckiger/tesserocr-windows_build/releases
查看本机python对应的版本:
新建test2.py文件并执行:
import pip import pip._internal print(pip._internal.pep425tags.get_supported())
输出:
[('cp37', 'cp37m', 'win_amd64'), ('cp37', 'none', 'win_amd64'), ('py3', 'none', 'win_amd64'), ('cp37', 'none', 'any'), ('cp3', 'none', 'any'), ('py37', 'none', 'any'), ('py3', 'none', 'any'), ('py36', 'none', 'any'), ('py35', 'none', 'any'), ('py34', 'none', 'any'), ('py33', 'none', 'any'), ('py32', 'none', 'any'), ('py31', 'none', 'any'), ('py30', 'none', 'any')]
意思是对应版本是'cp37', 'cp37m', 'win_amd64'。
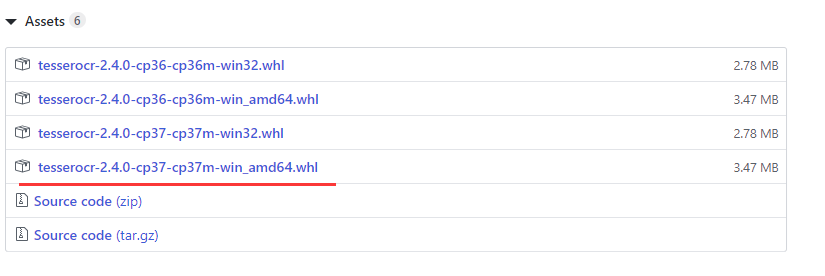
找到对应的版本:

下载后使用pip安装.whl文件(路径以自己实际路径为准):
pip install C: esserocr-2.4.0-cp37-cp37m-win_amd64.whl
开始编码
解析验证码
首先安装依赖:
pip install pillow
如果安装失败。使用:
python -m pip install --upgrade pip
完成后执行install命令。
使用tesseract识别验证码
找一张验证码(test.jpg):

解析验证码(test3.py):
import tesserocr
from PIL import Image
image=Image.open('test.jpg')
image.show()  #可以打印出图片,供预览
print(tesserocr.image_to_text(image))
如果执行过程中报错:
Failed to init API, possibly an invalid tessdata path: C:UsersXXXXXAppDataLocalProgramsPythonPython37/tessdata/
则将Tesseract安装目录下的tessdata文件夹复制到python的根目录,即报错显示的目录。
使用pytesseract识别验证码
以上范例使用的是tesserocr.image_to_text(),但是识别效率很低,推荐使用pytesseract。pytesseract是在Tesseract-OCR基础上封装的,识别效果更好的类库。
官方介绍:Python-tesseract is a wrapper for Google’s Tesseract-OCR Engine. It is also useful as a stand-alone invocation script to tesseract, as it can read all image types supported by the Pillow and Leptonica imaging libraries, including jpeg, png, gif, bmp, tiff, and others.
首先安装pytesseract:
pip install pytesseract
使用pytesseract的image_to_string()方法:
1 from PIL import Image
2 from pytesseract import *
3
4 result = image_to_string(Image.open("test.jpg"), lang='eng', config='--psm 10 --oem 3 -c tessedit_char_whitelist=0123456789')
lang表示识别的语言。
psm是一个设置验证码识别的重要参数,可以用它来精确提升验证通过率(下方是官网给出的值范围)。
oem没有找到专门的解释,官网给的范例使用的值是3。
tessedit_char_whitelist表示白名单,将识别的结果控制在白名单范围(经测试,效果有限)
psm值:
Page segmentation modes:
0 Orientation and script detection (OSD) only.
1 Automatic page segmentation with OSD.
2 Automatic page segmentation, but no OSD, or OCR.
3 Fully automatic page segmentation, but no OSD. (Default)
4 Assume a single column of text of variable sizes.
5 Assume a single uniform block of vertically aligned text.
6 Assume a single uniform block of text.
7 Treat the image as a single text line.
8 Treat the image as a single word.
9 Treat the image as a single word in a circle.
10 Treat the image as a single character.
11 Sparse text. Find as much text as possible in no particular order.
12 Sparse text with OSD.
13 Raw line. Treat the image as a single text line,bypassing hacks that are Tesseract-specific.