1.总体浏览效果及布局分析
1.1.看一下我的帖子预览效果
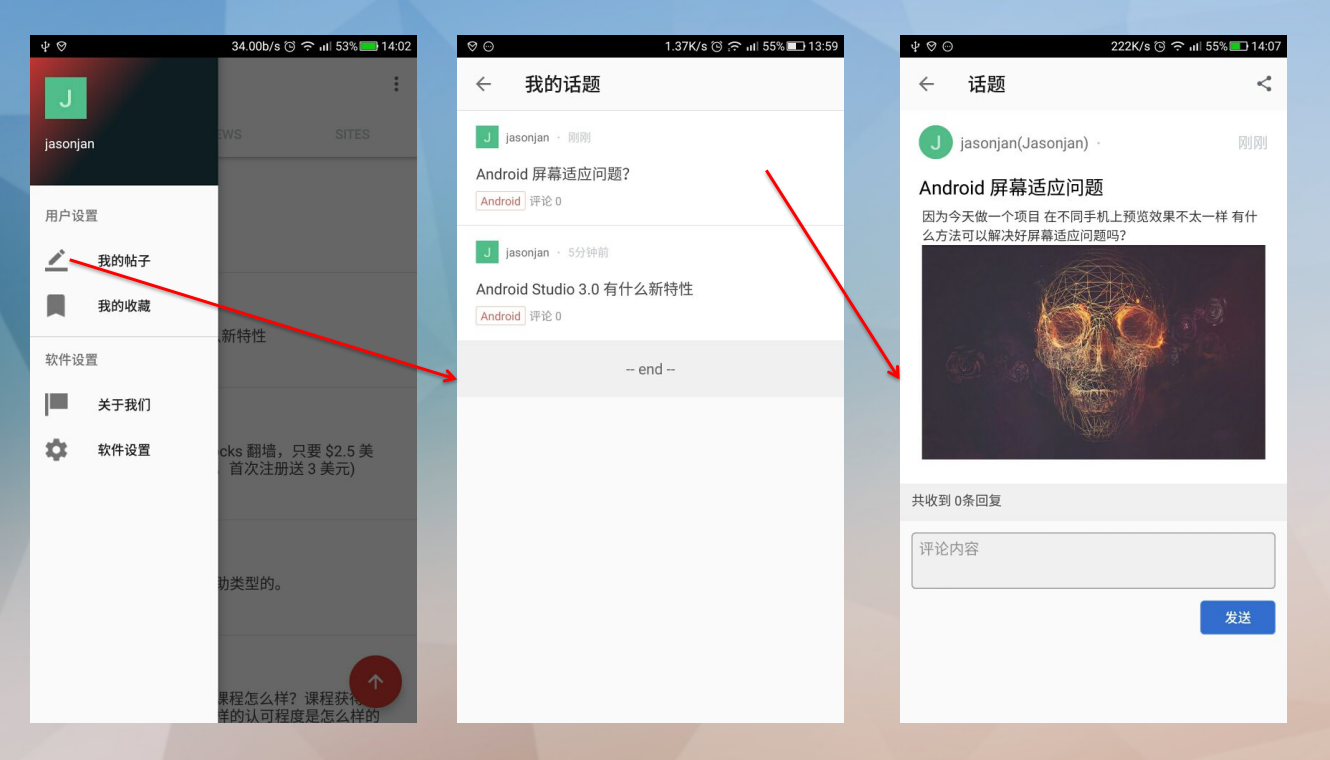
1.2.然后看一下我的收藏预览效果

1.3.归纳一下
所以我的帖子和我的收藏可以共用同一个类。
布局效果几乎一样,只是用户的选择不同。
所以今天我研究的就是共用的同一个类MyTopicActivity。
1.4.中间这个活动就是MyTopicActivity。布局为:activity_fragment.
1.4.1.看一下布局的源代码。


<?xml version="1.0" encoding="utf-8"?>
<!--
  ~ Copyright 2017 GcsSloop
  ~
  ~ Licensed under the Apache License, Version 2.0 (the "License");
  ~ you may not use this file except in compliance with the License.
  ~ You may obtain a copy of the License at
  ~
  ~    http://www.apache.org/licenses/LICENSE-2.0
  ~
  ~ Unless required by applicable law or agreed to in writing, software
  ~ distributed under the License is distributed on an "AS IS" BASIS,
  ~ WITHOUT WARRANTIES OR CONDITIONS OF ANY KIND, either express or implied.
  ~ See the License for the specific language governing permissions and
  ~ limitations under the License.
  ~
  ~ Last modified 2017-04-09 19:39:57
  ~
  ~ GitHub:  https://github.com/GcsSloop
  ~ Website: http://www.gcssloop.com
  ~ Weibo:   http://weibo.com/GcsSloop
  -->

<LinearLayout
    xmlns:android="http://schemas.android.com/apk/res/android"
    xmlns:tools="http://schemas.android.com/tools"
    android:id="@+id/activity_topic"
    android:layout_width="match_parent"
    android:layout_height="match_parent"
    android:orientation="vertical"
    tools:context="com.gcssloop.diycode.activity.TopicActivity">

    <android.support.v7.widget.Toolbar
        android:id="@+id/toolbar"
        android:layout_width="match_parent"
        android:layout_height="wrap_content"/>

    <FrameLayout
        android:id="@+id/fragment"
        android:layout_width="match_parent"
        android:layout_height="match_parent"/>

</LinearLayout>
1.4.2.布局对应实体关系。
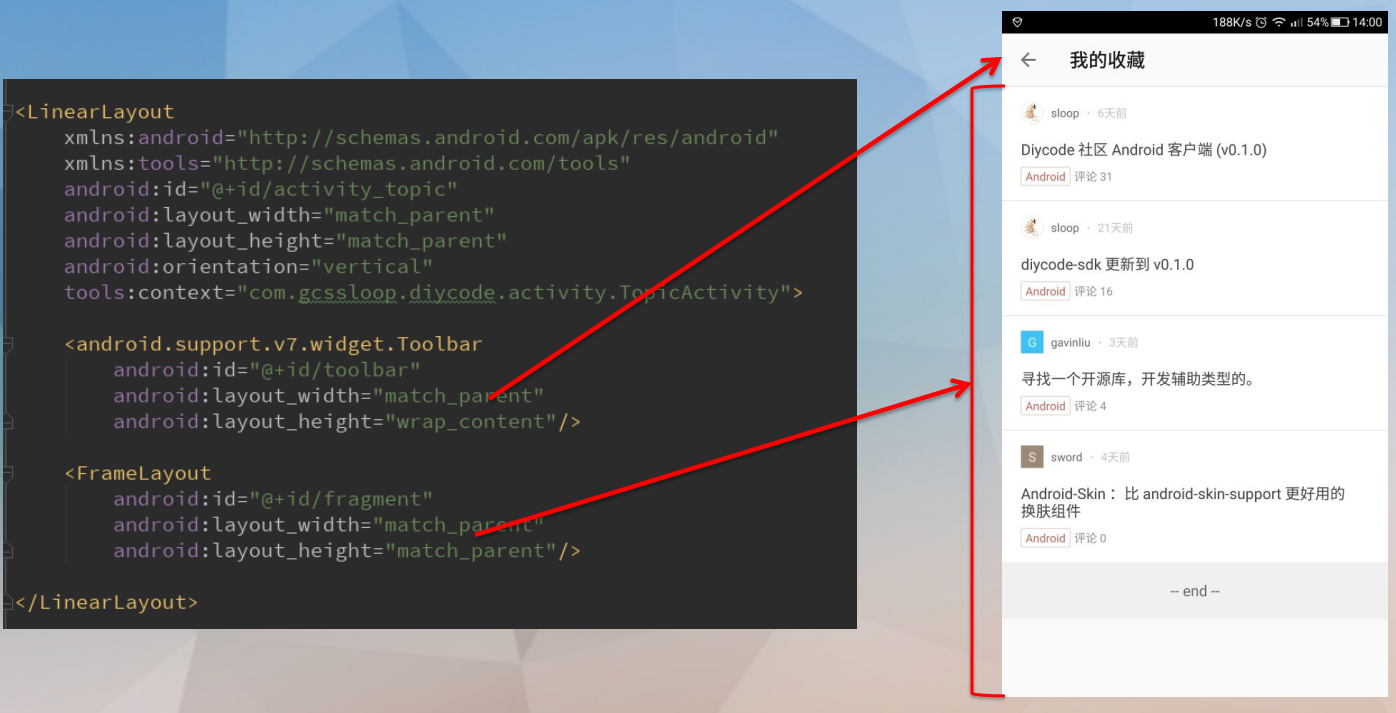
1.4.3.分析整体布局
外层是一个LinearLayout线性布局。
然后是Toolbar标题栏。
然后是FrameLayout布局。
2.分析MyTopicActivity中的成员变量及部分函数
2.1.预览一下所有的变量。
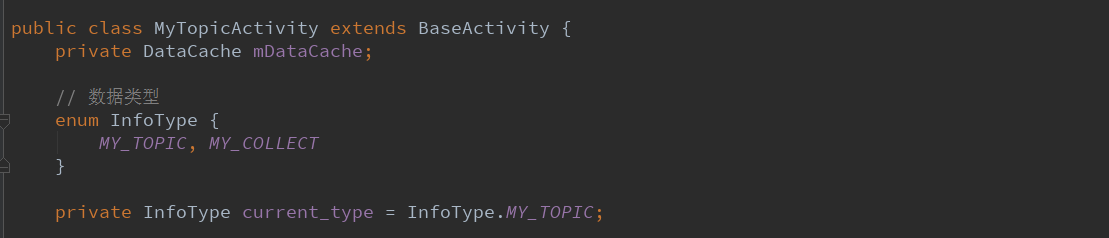
这里使用了一个DataCache类,在通用类中的数据缓存工具,之前分析过。
然后使用了一个枚举类型,enum InfoType{MY_TOPIC,MY_COLLECT}
代表我的话题,我的收藏。
建立一个枚举类型的变量,初始化为我的话题。
2.2.建立一个新的实例。

在外部可以直接用MyTopicActivity.newInstance来建立一个实例,来打开这个话题列表。
2.3.获取布局资源id。
![]()
2.4.初始化数据。
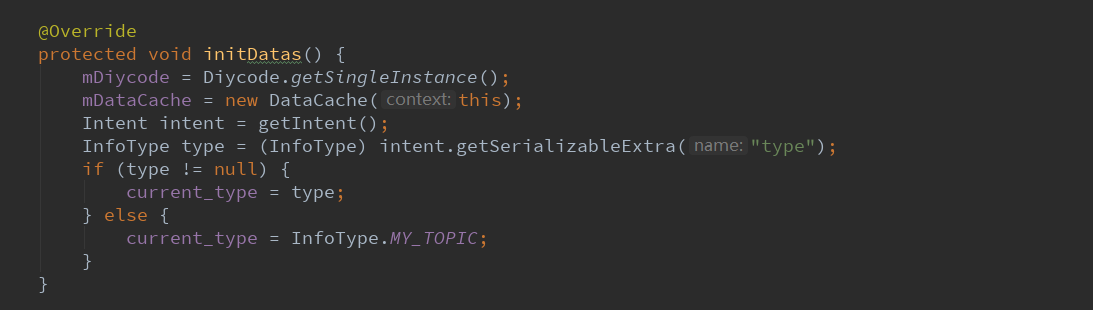
在BaseActivity中执行顺序为:
getLayoutId()==>initActionBar()==>initDatas()==>initViews()
首先获取SDK中API的单例,然后建立一个缓存类。
然后获取intent中的枚举类型,如果为空就默认“我的话题”。
3.MyTopActivity关键函数initViews分析
3.1.首先看一下源代码。
 @Override
    protected void initViews(ViewHolder holder, View root) {
        if (!mDiycode.isLogin()) {
            toastShort("用户未登录");
            return;
        }

        // 获取用户名
        if (mDataCache.getMe() == null) {
            try {
                UserDetail me = mDiycode.getMeNow();
                mDataCache.saveMe(me);
            } catch (IOException e) {
                e.printStackTrace();
            }
        }
        String username = mDataCache.getMe().getLogin();

        // 初始化 Fragment
        FragmentManager fragmentManager = getSupportFragmentManager();
        FragmentTransaction transaction = fragmentManager.beginTransaction();

        if (current_type == InfoType.MY_COLLECT){
            setTitle("我的收藏");
            UserCollectionTopicFragment fragment1 = UserCollectionTopicFragment.newInstance(username);
            transaction.add(R.id.fragment, fragment1);
        } else if (current_type == InfoType.MY_TOPIC){
            setTitle("我的话题");
            UserCreateTopicFragment fragment2 = UserCreateTopicFragment.newInstance(username);
            transaction.add(R.id.fragment, fragment2);
        }
        transaction.commit();
    }
3.2.预览一下这个函数。
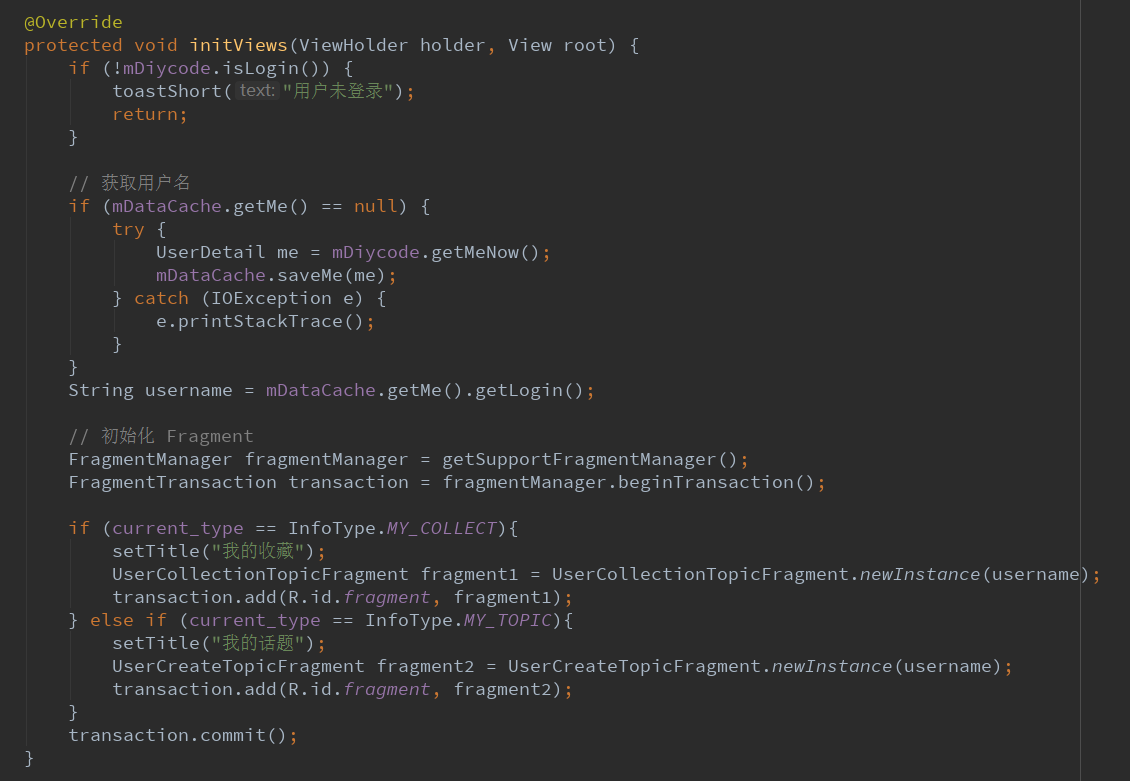
3.3.第一个if
判断是否登录==>如果没有,就不存在我的话题和我的收藏了。
3.4.第二个if
判断缓存中有没有我的信息,如果没有,调用API获得并存进缓存,如果有,那继续。
3.5.然后初始化碎片。
采用方式:开启事务模式。

先从活动中得到FragmentManager,然后开启事务,动态加载碎片。
然后判断枚举类型
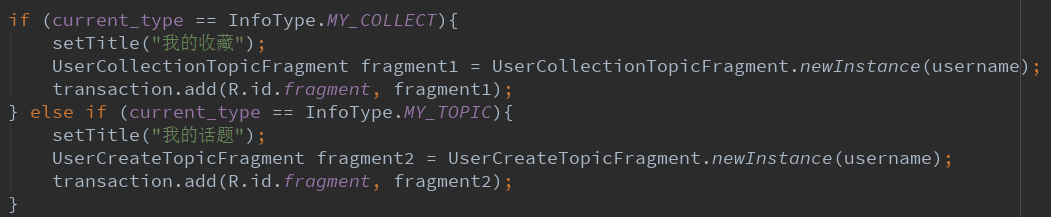
最后提交事务
transaction.commit()。
4.分析两个碎片
4.1.我的话题==>UserCreateTopicFragment源代码
/*
 * Copyright 2017 GcsSloop
 *
 * Licensed under the Apache License, Version 2.0 (the "License");
 * you may not use this file except in compliance with the License.
 * You may obtain a copy of the License at
 *
 *    http://www.apache.org/licenses/LICENSE-2.0
 *
 * Unless required by applicable law or agreed to in writing, software
 * distributed under the License is distributed on an "AS IS" BASIS,
 * WITHOUT WARRANTIES OR CONDITIONS OF ANY KIND, either express or implied.
 * See the License for the specific language governing permissions and
 * limitations under the License.
 *
 * Last modified 2017-04-09 20:34:58
 *
 * GitHub:  https://github.com/GcsSloop
 * Website: http://www.gcssloop.com
 * Weibo:   http://weibo.com/GcsSloop
 */

package com.gcssloop.diycode.fragment;

import android.content.Context;
import android.os.Bundle;
import android.support.annotation.NonNull;
import android.support.v7.widget.RecyclerView;

import com.gcssloop.diycode.fragment.base.SimpleRefreshRecyclerFragment;
import com.gcssloop.diycode.fragment.provider.TopicProvider;
import com.gcssloop.diycode_sdk.api.topic.bean.Topic;
import com.gcssloop.diycode_sdk.api.user.event.GetUserCreateTopicListEvent;
import com.gcssloop.recyclerview.adapter.multitype.HeaderFooterAdapter;

/**
 * 用户创建的 topic 列表
 */
public class UserCreateTopicFragment extends SimpleRefreshRecyclerFragment<Topic,
        GetUserCreateTopicListEvent> {
    private static String Key_User_Login_Name = "Key_User_Login_Name";
    private String loginName;

    public static UserCreateTopicFragment newInstance(String user_login_name) {
        Bundle args = new Bundle();
        args.putString(Key_User_Login_Name, user_login_name);
        UserCreateTopicFragment fragment = new UserCreateTopicFragment();
        fragment.setArguments(args);
        return fragment;
    }

    @Override public void initData(HeaderFooterAdapter adapter) {
        Bundle args = getArguments();
        loginName = args.getString(Key_User_Login_Name);
        loadMore();
    }

    @Override
    protected void setAdapterRegister(Context context, RecyclerView recyclerView,
                                      HeaderFooterAdapter adapter) {
        adapter.register(Topic.class, new TopicProvider(context));
    }

    @NonNull @Override protected String request(int offset, int limit) {
        return mDiycode.getUserCreateTopicList(loginName, null, offset, limit);
    }
}
4.2.分析我的话题 Fragment源代码
继承了可以刷新,加载的一个片段==>SimpleRefreshRecyclerFragment<Topic,GetUserCreateTopicListEvent>
后者GetUserCreateTopicListEvent不用管,是API中定义的一个事件。
4.2.1.分析成员变量。

主要有一个用户的登录名,用来请求服务器。
还有一个静态的字段,临时存储作用。
4.2.2.开启新的实例。

以用户名为参数,返回一个碎片。
直接新建一个类,传递了用户名的信息放入Bundle。
4.2.3.初始化数据。

采用了借刀杀人的战术,将Bundle中的数据存入本类。然后利用本类的另一个函数去请求API。
然后默认加载更多。
loadMore()定义在RefreshRecyclerFragment中,这里面去request数据。
4.2.4.设置适配器。

因为我的话题和我的收藏有可能没有,所以也包含了一个头部和尾部的适配器HeaderFooterAdapter。
采用的基类为Topic,采用的提供者为TopicProvider(context)
4.2.5.请求数据。
这个方法定义在RefreshRecyclerFragment中。

作用:实质上请求API,采用了分页效果,所以有offset和limit。
4.3.我的收藏==>UserCollectionTopicFragment源代码
/*
 * Copyright 2017 GcsSloop
 *
 * Licensed under the Apache License, Version 2.0 (the "License");
 * you may not use this file except in compliance with the License.
 * You may obtain a copy of the License at
 *
 *    http://www.apache.org/licenses/LICENSE-2.0
 *
 * Unless required by applicable law or agreed to in writing, software
 * distributed under the License is distributed on an "AS IS" BASIS,
 * WITHOUT WARRANTIES OR CONDITIONS OF ANY KIND, either express or implied.
 * See the License for the specific language governing permissions and
 * limitations under the License.
 *
 * Last modified 2017-04-09 20:45:09
 *
 * GitHub:  https://github.com/GcsSloop
 * Website: http://www.gcssloop.com
 * Weibo:   http://weibo.com/GcsSloop
 */

package com.gcssloop.diycode.fragment;

import android.content.Context;
import android.os.Bundle;
import android.support.annotation.NonNull;
import android.support.v7.widget.RecyclerView;

import com.gcssloop.diycode.fragment.base.SimpleRefreshRecyclerFragment;
import com.gcssloop.diycode.fragment.provider.TopicProvider;
import com.gcssloop.diycode_sdk.api.topic.bean.Topic;
import com.gcssloop.diycode_sdk.api.user.event.GetUserCollectionTopicListEvent;
import com.gcssloop.recyclerview.adapter.multitype.HeaderFooterAdapter;

/**
 * 用户收藏的 topic 列表
 */
public class UserCollectionTopicFragment extends SimpleRefreshRecyclerFragment<Topic,
        GetUserCollectionTopicListEvent> {
    private static String Key_User_Login_Name = "Key_User_Login_Name";
    private String loginName;

    public static UserCollectionTopicFragment newInstance(String user_login_name) {
        Bundle args = new Bundle();
        args.putString(Key_User_Login_Name, user_login_name);
        UserCollectionTopicFragment fragment = new UserCollectionTopicFragment();
        fragment.setArguments(args);
        return fragment;
    }

    @Override public void initData(HeaderFooterAdapter adapter) {
        Bundle args = getArguments();
        loginName = args.getString(Key_User_Login_Name);
        loadMore();
    }

    @Override
    protected void setAdapterRegister(Context context, RecyclerView recyclerView,
                                      HeaderFooterAdapter adapter) {
        adapter.register(Topic.class, new TopicProvider(context));
    }

    @NonNull @Override protected String request(int offset, int limit) {
        return mDiycode.getUserCollectionTopicList(loginName, offset, limit);
    }
}
4.4.分析我的收藏 Fragment源代码。
继承了可以刷新,加载的一个片段==>SimpleRefreshRecyclerFragment<Topic,GetUserCollectionTopicListEvent>
后者GetUserCollectionTopicListEvent不用管,是API中定义的一个事件。
4.4.1.分析成员变量。

主要有一个用户的登录名,用来请求服务器。
还有一个静态的字段,临时存储作用。
4.4.2.开启新的实例。

以用户名为参数,返回一个碎片。
直接新建一个类,传递了用户名的信息放入Bundle。
4.4.3.初始化数据。
采用了借刀杀人的战术,将Bundle中的数据存入本类。然后利用本类的另一个函数去请求API。
然后默认加载更多。
loadMore()定义在RefreshRecyclerFragment中,这里面去request数据。
4.4.4.设置适配器。
因为我的话题和我的收藏有可能没有,所以也包含了一个头部和尾部的适配器HeaderFooterAdapter。
采用的基类为Topic,采用的提供者为TopicProvider(context)
4.4.5.请求数据。
这个方法定义在RefreshRecyclerFragment中。

作用:实质上请求API,采用了分页效果,所以有offset和limit。
5.总结一下
5.1.理解了把我的话题和我的收藏放在一起,因为收藏的只能是话题,所以我的话题和我的收藏都是同一个活动。
如何区分的?由碎片+枚举来完成。枚举是为了区分intent中获得type是话题还是收藏,然后选择不同的碎片。
5.2.理解了为什么很多活动都有一个newInstance的静态函数,用了打开本身。比如一个其他活动的按钮,点击后,
直接跳转到这个活动,直接调用这个活动的newInstance函数岂不是很方便,耦合性也低,nice啊。
5.3.理解了为什么要把initDatas函数放在initViews之前执行,因为要获取缓存数据,以及如何请求的问题,数据
互相之间是有关联的,从一个数据到另一个数据,必然存在一个纽带,首先要从initDatas找到这个纽带,然后
去API中请求数据,得到数据之后,将数据完美显示在视图中又是另外一个过程。
5.4.理解了碎片的加载过程,首先要从活动中getSupportFragmentManager(),然后开启一个事务,然后transaction
来动态添加这个碎片类到一个布局中,这个布局应该是主活动的一个FrameLayout视图,这里的意义就是当前
共用活动中的FrameLayout布局的id,最后transaction.commit()一下就好了。
5.5.一个注意点,缓存问题,首先一定要从我的缓存类中获取一下,如果获取不到,再去请求API,这样才能显示缓
存的意义。同时,如果之前没有缓存,那么API请求到数据后,一定要加入缓存。