前一篇拙文是利用了Jmeter来测试带有CSRF令牌验证的Web API;最近几天趁着项目不忙,练习了用编码的方式实现。
有了之前Jmeter脚本的基础,基本上难点也就在两个地方:获取CSRF令牌、Cookie的传递。
首先添加依赖,在POM.xml中添加以下内容:
        <!-- https://mvnrepository.com/artifact/org.apache.httpcomponents/httpclient -->
        <dependency>
            <groupId>org.apache.httpcomponents</groupId>
            <artifactId>httpclient</artifactId>
            <version>4.5.6</version>
        </dependency>

        <!-- https://mvnrepository.com/artifact/org.jsoup/jsoup -->
        <dependency>
            <groupId>org.jsoup</groupId>
            <artifactId>jsoup</artifactId>
            <version>1.11.3</version>
        </dependency>
解释作用:
- httpClient:用来创建httpClient、管理Get和Post的方法、获取请求报文头、应答报文内容、管理CookieStore等等;
- jsoup:用来解析应答报文,获得CSRF令牌的值。
创建一个Web API测试类:
public class LoginEHR {

    private final static String EHR_ADDRESS = "http://ourTestEHRServer:8083";

    static BasicCookieStore cookieStore = new BasicCookieStore();
    static CloseableHttpClient httpClient = HttpClients.custom().setDefaultCookieStore(cookieStore).build();


}
我选择了CookieStore的方式管理会话;HttpClient现在还有另一种Context的方式实现会话持久,以后再做深入研究。
先写一个打印应答报文的方法,并不做什么处理,纯打印;根据实际需要调用或者注释:
public class LoginEHR {
private static void printResponse(HttpResponse httpResponse)
throws ParseException, IOException {
        // 获取响应消息实体
        HttpEntity entity = httpResponse.getEntity();
        // 响应状态
        System.out.println("--------Status: " + httpResponse.getStatusLine());
        System.out.println("--------Headers: ");
        HeaderIterator iterator = httpResponse.headerIterator();
        while (iterator.hasNext()) {
            System.out.println("	" + iterator.next());
        }
        // 判断响应实体是否为空
        if (entity != null) {
            String responseString = EntityUtils.toString(entity);
            System.out.println("--------Response length: " + responseString.length());
            System.out.println("--------Response content: "
                    + responseString.replace("
", ""));
        }
    }
}
现在开始写测试方法,虽然篇幅较长,仍然写在main()方法里,便于展示:
public class LoginEHR {

    private final static String EHR_ADDRESS = "http://ourTestEHRServer:8083";

    static BasicCookieStore cookieStore = new BasicCookieStore();
    static CloseableHttpClient httpClient = HttpClients.custom().setDefaultCookieStore(cookieStore).build();

    public static void main(String[] args) throws Exception {

        String username = "00022222";
        String password = "abc123456";

        CloseableHttpResponse httpResponse = null;

        try {
            HttpGet httpGet = new HttpGet(EHR_ADDRESS);
            httpResponse = httpClient.execute(httpGet);
            System.out.println("--------Cookie store for the 1st GET: " + cookieStore.getCookies());
            // 唯一的作用是打印应答报文,没有任何处理;实际测试时,可以不执行
//            printResponse(httpResponse);

            // 取出第一次请求时,服务器端返回的JSESSIONID;
            // 实际上此处只是取出JSESSIONID用作打印;cookieStore自动保存了本次会话的Cookie信息
//            List cookies = cookieStore.getCookies();
//            String cookie = cookies.toString();
//            String sessionID = cookie.substring("[[version: 0][name: JSESSIONID][value: ".length(),
//                    cookie.indexOf("][domain"));
//            System.out.println("--------The current JSESSIONID is: " + sessionID);


            httpClient.close();
        } catch (Exception ex) {
            ex.printStackTrace();
        }

    }
private static void printResponse(HttpResponse httpResponse)
        throws ParseException, IOException { ...... }
}
根据之前Jmeter测试脚本的经验,先发送一次Get请求,从应答报文中得到CSRF令牌和JSESSIONID。
大家注意我注释掉的那几行打印JSESSIONID的代码,之前在没有引入CookieStore之前,我想的是自己写一个新的Cookie,并把它赋给后面几次请求。
当使用CookieStore之后,就不需要自己封装Cookie、以及添加到Request的Header了,这过程会自动完成。没有删掉也是为了需要的时候打印。
交代完Cookie之后,该轮到处理CSRF令牌了。如果打印出第一次Get的应答,我们能看到令牌的格式是如下呈现的:
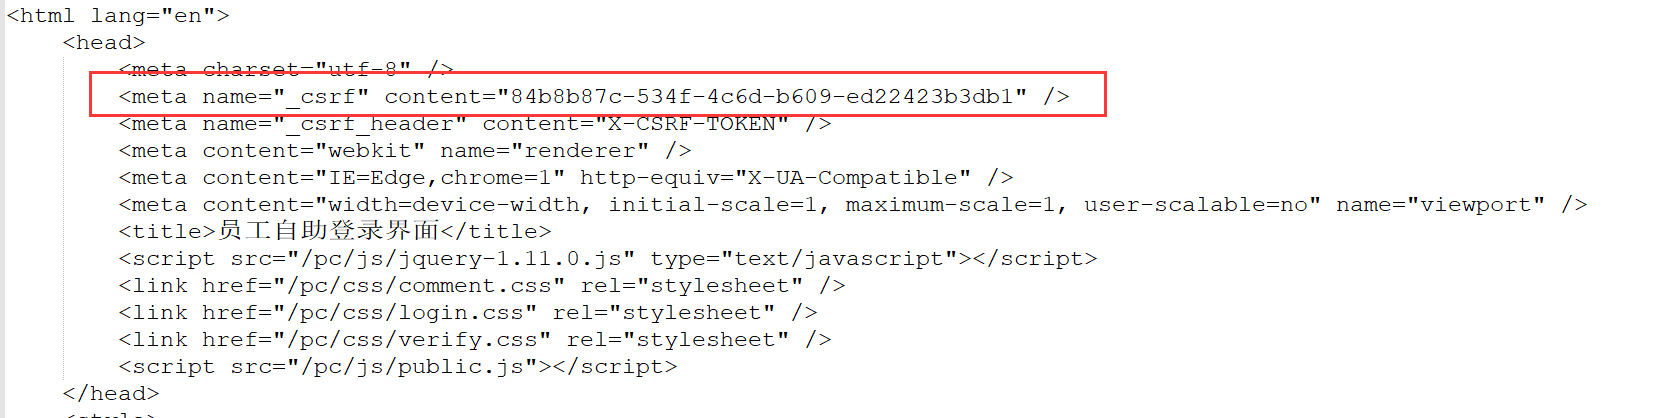
之前在Jmeter脚本中,我是添加了一个正则表达式提取器,把_csrf的content提取出来。
现在我将用jsoup来解析和返回content的内容,代码如下:
private static String getCsrfToken(HttpEntity responseEntity) throws IOException{
        //获取网页内容,指定编码
        String web = EntityUtils.toString(responseEntity,"utf-8");
        Document doc= Jsoup.parse(web);
        // 选择器,选取特征信息
        String token = doc.select("meta[name=_csrf]").get(0).attr("content");
        System.out.println( "--------The current CSRF Token is: " + token);

        return token;
    }
在main()中调用此方法:
            // 利用Jsoup从应答报文中读取CSRF Token
            HttpEntity responseEntity = httpResponse.getEntity();
       String token = getCsrfToken(responseEntity);
然后再封装POST的请求内容:
            // 获取到CSRF Token后,用Post方式登录
            HttpPost httpPost = new HttpPost(EHR_ADDRESS);

            // 拼接Post的消息体
            List<NameValuePair> nvps = new ArrayList<NameValuePair>();
            nvps.add(new BasicNameValuePair("username", username));
            nvps.add(new BasicNameValuePair("password", password));
            nvps.add(new BasicNameValuePair("_csrf", token));
            HttpEntity loginParams = new UrlEncodedFormEntity(nvps, "utf-8");
            httpPost.setEntity(loginParams);

            // 第二次请求,带有CSRF Token
            httpResponse = httpClient.execute(httpPost);
//            System.out.println("--------Cookie store for the POST: " + cookieStore.getCookies());
            printResponse(httpResponse);
然后。。。这里发生了一点小意外:
按照设想,应该能跳转到登录成功、或者验证失败的页面;而Post方法执行后,从服务器返回的状态码是302,被跳转到另一个网址。
如果放任不管,直接提交后面的业务查询,是不会得到成功的;执行的结果是又回到了登录页面。
我在网上爬了一会,发现提问Post得到301、302的人还不在少数,说明这个坑还是给很多人造成了困扰。
简单的说,如果得到了服务器重定向到新的地址,我们也要跟着执行一次新地址的访问;否则服务器会认为这次请求没有得到正确处理,即便我之后的请求带着全套的验证令牌和Cookie,也会被拦截在系统外。
有了这个认识,下面我需要完成的就是对Code:302的处理;添加代码如下:
            // 取POST方法返回的HTTP状态码;不出意外的话是302
            int code = httpResponse.getStatusLine().getStatusCode();
            if (code == 302) {
                Header header = httpResponse.getFirstHeader("location"); // 跳转的目标地址是在 HTTP-HEAD 中的
                String newUri = header.getValue(); // 这就是跳转后的地址,再向这个地址发出新申请,以便得到跳转后的信息是啥。
                // 实际打印出来的是接口服务地址,不包括IP Address部分
                System.out.println("--------Redirect to new location: " + newUri);
                httpGet = new HttpGet(EHR_ADDRESS + newUri);

                httpResponse = httpClient.execute(httpGet);
//                printResponse(httpResponse);
            }
这里需要注意的地方是跳转的location内容。在我这里,服务器给的只是一个单词【/work】,最好加一个打印的步骤。
确认不是一个完整的URL之后,需要把链接拼完整,然后进行一次httpGet请求。
这个httpGet执行之后,我可以确认已经登录成功(或者,又被送回登录页面,当然我这里是成功了)。
接下来是提交一次业务查询的Get,确认能够在系统中进行业务操作:
            // 请求一次绩效;确认登录成功
            String queryUrl = EHR_ADDRESS + "/emp/performance/mt/query";
            httpGet = new HttpGet(queryUrl);
            httpResponse = httpClient.execute(httpGet);
            System.out.println("--------Result of the Cardpunch Query: ");
            printResponse(httpResponse);
最后确认查询的结果无误后,整个脚本完成;只需要修改最后的业务查询,就可以生成其他的测试脚本了。
完整的源码如下:
package com.jason.apitest;

import org.apache.http.Header;
import org.apache.http.HeaderIterator;
import org.apache.http.HttpEntity;
import org.apache.http.HttpResponse;
import org.apache.http.NameValuePair;
import org.apache.http.ParseException;
import org.apache.http.client.entity.UrlEncodedFormEntity;
import org.apache.http.client.methods.HttpGet;
import org.apache.http.client.methods.HttpPost;
import org.apache.http.impl.client.BasicCookieStore;
import org.apache.http.impl.client.CloseableHttpClient;
import org.apache.http.impl.client.HttpClients;
import org.apache.http.message.BasicNameValuePair;
import org.apache.http.protocol.HTTP;
import org.apache.http.util.EntityUtils;
import org.jsoup.Jsoup;
import org.jsoup.nodes.Document;

import java.io.IOException;
import java.util.ArrayList;
import java.util.List;

public class LoginEHR {

    private final static String EHR_ADDRESS = "http://ourTestEHRServer:8083";

    static BasicCookieStore cookieStore = new BasicCookieStore();
    static CloseableHttpClient httpClient = HttpClients.custom().setDefaultCookieStore(cookieStore).build();

    public static void main(String[] args) throws Exception {

        String username = "00022222";
        String password = "abc123456";

        HttpResponse httpResponse = null;

        try {
            HttpGet httpGet = new HttpGet(EHR_ADDRESS);
            httpResponse = httpClient.execute(httpGet);
            System.out.println("--------Cookie store for the 1st GET: " + cookieStore.getCookies());
            // 唯一的作用是打印应答报文,没有任何处理;实际测试时,可以不执行
//            printResponse(httpResponse);

            // 取出第一次请求时,服务器端返回的JSESSIONID;
            // 实际上此处只是取出JSESSIONID用作打印;cookieStore自动保存了本次会话的Cookie信息
//            List cookies = cookieStore.getCookies();
//            String cookie = cookies.toString();
//            String sessionID = cookie.substring("[[version: 0][name: JSESSIONID][value: ".length(),
//                    cookie.indexOf("][domain"));
//            System.out.println("--------The current JSESSIONID is: " + sessionID);

            // 利用Jsoup从应答报文中读取CSRF Token
            HttpEntity responseEntity = httpResponse.getEntity();
            String token = getCsrfToken(responseEntity);

            // 获取到CSRF Token后,用Post方式登录
            HttpPost httpPost = new HttpPost(EHR_ADDRESS);

            // 拼接Post的消息体
            List<NameValuePair> nvps = new ArrayList<NameValuePair>();
            nvps.add(new BasicNameValuePair("username", username));
            nvps.add(new BasicNameValuePair("password", password));
            nvps.add(new BasicNameValuePair("_csrf", token));
            HttpEntity loginParams = new UrlEncodedFormEntity(nvps, "utf-8");
            httpPost.setEntity(loginParams);

            // 第二次请求,带有CSRF Token
            httpResponse = httpClient.execute(httpPost);
//            System.out.println("--------Cookie store for the POST: " + cookieStore.getCookies());
            printResponse(httpResponse);

            // 取POST方法返回的HTTP状态码;不出意外的话是302
            int code = httpResponse.getStatusLine().getStatusCode();
            if (code == 302) {
                Header header = httpResponse.getFirstHeader("location"); // 跳转的目标地址是在 HTTP-HEAD 中的
                String newUri = header.getValue(); // 这就是跳转后的地址,再向这个地址发出新申请,以便得到跳转后的信息是啥。
                // 实际打印出来的是接口服务地址,不包括IP Address部分
                System.out.println("--------Redirect to new location: " + newUri);
                httpGet = new HttpGet(EHR_ADDRESS + newUri);

                httpResponse = httpClient.execute(httpGet);
//                printResponse(httpResponse);
            }


            // 请求一次绩效;确认登录成功
            String queryUrl = EHR_ADDRESS + "/emp/performance/mt/query";
            httpGet = new HttpGet(queryUrl);
            httpResponse = httpClient.execute(httpGet);
            System.out.println("--------Result of the Cardpunch Query: ");
            printResponse(httpResponse);

            httpClient.close();
        } catch (Exception ex) {
            ex.printStackTrace();
        }

    }

    private static void printResponse(HttpResponse httpResponse)
            throws ParseException, IOException {
        // 获取响应消息实体
        HttpEntity entity = httpResponse.getEntity();
        // 响应状态
        System.out.println("--------Status: " + httpResponse.getStatusLine());
        System.out.println("--------Headers: ");
        HeaderIterator iterator = httpResponse.headerIterator();
        while (iterator.hasNext()) {
            System.out.println("	" + iterator.next());
        }
        // 判断响应实体是否为空
        if (entity != null) {
            String responseString = EntityUtils.toString(entity);
            System.out.println("--------Response length: " + responseString.length());
            System.out.println("--------Response content: "
                    + responseString.replace("
", ""));
        }
    }

    private static String getCsrfToken(HttpEntity responseEntity) throws IOException{
        //获取网页内容,指定编码
        String web = EntityUtils.toString(responseEntity,"utf-8");
        Document doc= Jsoup.parse(web);
        // 选择器,选取特征信息
        String token = doc.select("meta[name=_csrf]").get(0).attr("content");
        System.out.println( "--------The current CSRF Token is: " + token);

        return token;
    }


}
补充:如果使用HttpClientContext方式来维持会话,与CookieStore很接近;直接帖上需要修改的部分内容:
// 创建httpClient和context
static CloseableHttpClient httpClient = HttpClients.createDefault();
static HttpClientContext context = HttpClientContext.create();

// 下面的代码写在main()方法中
CloseableHttpResponse httpResponse = null;
// 先发起一个Get请求,获取CSRF令牌和Cookie
HttpGet httpGet = new HttpGet(EHR_ADDRESS);
// 保存context上下文
httpResponse = httpClient.execute(httpGet, context);
...
// 处理完CSRF令牌后,准备发起POST请求
HttpPost httpPost = new HttpPost(EHR_ADDRESS);
... // 封装POST报文

// 发起POST请求
httpResponse = httpClient.execute(httpPost, context);

// 处理HTTP 302和业务查询操作的GET,也要携带着context
httpResponse = httpClient.execute(httpGet, context);