0x00 概述
视频讲解通过链接网易云课堂·IT技术快速入门学院进入,更多关于Prometheus的文章。
Prometheus是最近几年开始流行的一个新兴监控告警工具,特别是kubernetes的流行带动了prometheus的应用。
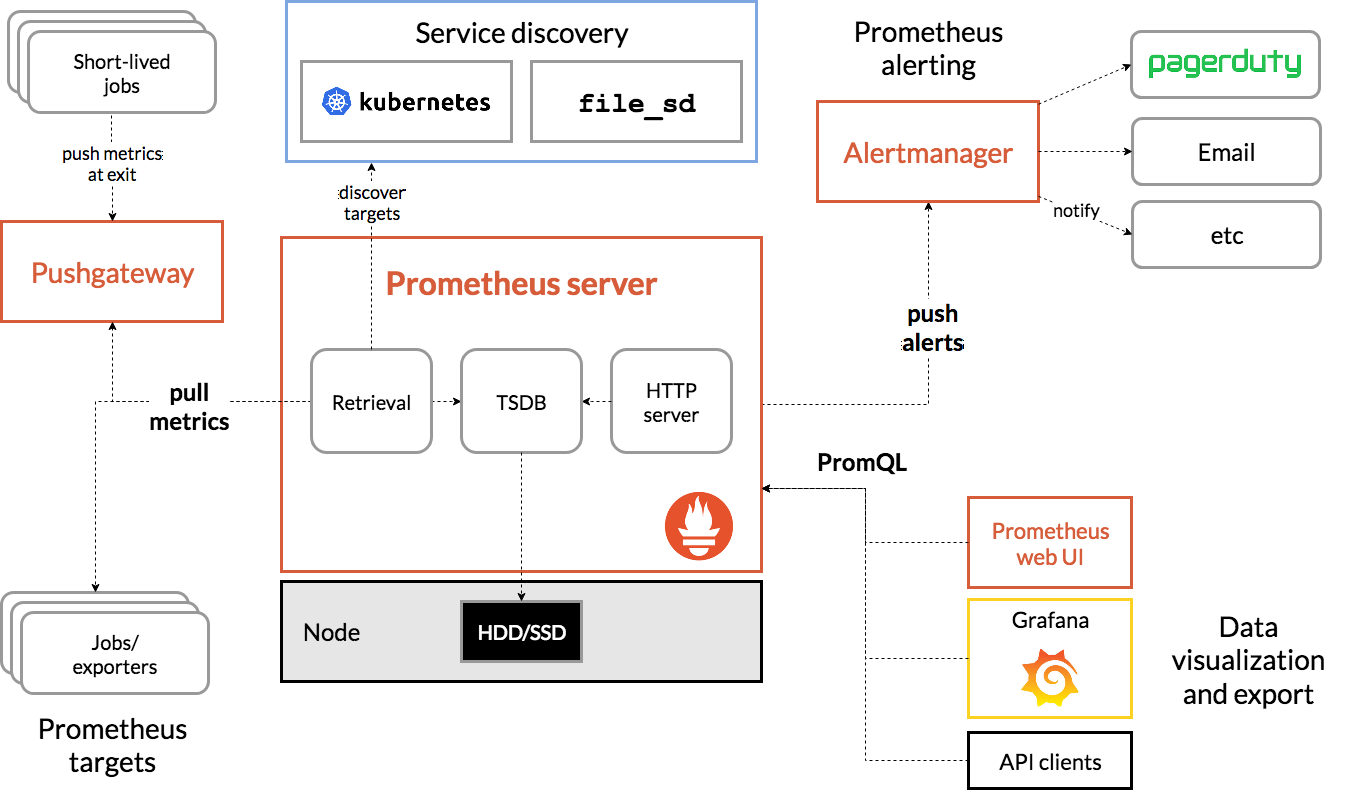
Prometheus是一套完整的监控告警系统:
Prometheus的主要特点有:
1. a multi-dimensional data model with time series data identified by metric name and key/value pairs
2. a flexible query language to leverage this dimensionality
3. no reliance on distributed storage; single server nodes are autonomous
4. time series collection happens via a pull model over HTTP
5. pushing time series is supported via an intermediary gateway
6. targets are discovered via service discovery or static configuration
7. multiple modes of graphing and dashboarding support
influxdb、openTSDB等,是专门时间序列数据库,不是一套完整的监控告警系统,缺少告警功能。
Prometheus系统的服务发现功能很强大,可以直接通过Kubernetes等系统的接口,发现要监控的目标,不需要人员干预,不需要做系统对接方面的开发。
Prometheus系统的三部分:prometheus、alertmanager、*_exporter(多个),下文将分别讲解。
这里使用的机器IP为:192.168.88.10。
0x01 Prometheus
prometheus是最主要的组件,负责采集数据,将告警发送到alertmanager,alertmanager再将告警以各种形式送出。
1. 命名规则
prometheus data model中介绍了数据模型。时间序列以metric的名字命名,可以附带有多个label,label是一个键值对。
metric的命名规则为[a-zA-Z_:][a-zA-Z0-9_:]*,其中:被保留用于用户定义的记录规则。
label的命名规则为[a-zA-Z_][a-zA-Z0-9_]*,以__开头的label名称被保留用于内部label。
每个采样点叫做sample,它是float64的数值或者精确到毫秒的时间戳。
通过metric名称和label查询samples,语法如下:
<metric name>{<label name>=<label value>, ...}
例如:
api_http_requests_total{method="POST", handler="/messages"}
2. metric类型
metric有Counter、Gauge、Histogram和Summary四种类型。在指标生成端,也就是应用程序中,调用prometheus的sdk创建metrics的时候,必须要明确是哪一种类型的metrics。 见:使用Prometheus SDK输出Prometheus格式的Metrics
Counter是累计数值,只能增加或者在重启时被归零。
Gauge是瞬时值。
Histogram(直方图)对采集的指标进行分组计数,会生成多个指标,分别带有后缀_bucket(仅histogram)、_sum、_count,其中_bucket是区间内计数:
<basename>_bucket{le="<upper inclusive bound>"}
名为rpc_durations_secondshistogram生成的metrics:
# TYPE rpc_durations_histogram_seconds histogram
rpc_durations_histogram_seconds_bucket{le="-0.00099"} 0
rpc_durations_histogram_seconds_bucket{le="-0.00089"} 0
rpc_durations_histogram_seconds_bucket{le="-0.0007899999999999999"} 0
rpc_durations_histogram_seconds_bucket{le="-0.0006899999999999999"} 1
rpc_durations_histogram_seconds_bucket{le="-0.0005899999999999998"} 1
rpc_durations_histogram_seconds_bucket{le="-0.0004899999999999998"} 1
rpc_durations_histogram_seconds_bucket{le="-0.0003899999999999998"} 10
rpc_durations_histogram_seconds_bucket{le="-0.0002899999999999998"} 26
rpc_durations_histogram_seconds_bucket{le="-0.0001899999999999998"} 64
rpc_durations_histogram_seconds_bucket{le="-8.999999999999979e-05"} 117
rpc_durations_histogram_seconds_bucket{le="1.0000000000000216e-05"} 184
rpc_durations_histogram_seconds_bucket{le="0.00011000000000000022"} 251
rpc_durations_histogram_seconds_bucket{le="0.00021000000000000023"} 307
rpc_durations_histogram_seconds_bucket{le="0.0003100000000000002"} 335
rpc_durations_histogram_seconds_bucket{le="0.0004100000000000002"} 349
rpc_durations_histogram_seconds_bucket{le="0.0005100000000000003"} 353
rpc_durations_histogram_seconds_bucket{le="0.0006100000000000003"} 356
rpc_durations_histogram_seconds_bucket{le="0.0007100000000000003"} 357
rpc_durations_histogram_seconds_bucket{le="0.0008100000000000004"} 357
rpc_durations_histogram_seconds_bucket{le="0.0009100000000000004"} 357
rpc_durations_histogram_seconds_bucket{le="+Inf"} 357
rpc_durations_histogram_seconds_sum -0.000331219501489902
rpc_durations_histogram_seconds_count 357
Summary同样产生多个指标,分别带有后缀_bucket(仅histogram)、_sum、_count,可以直接查询分位数:
<basename>{quantile="<φ>"}
名为rpc_durations_secondssummary生成到metrics:
# TYPE rpc_durations_seconds summary
rpc_durations_seconds{service="exponential",quantile="0.5"} 7.380919552318622e-07
rpc_durations_seconds{service="exponential",quantile="0.9"} 2.291519677915514e-06
rpc_durations_seconds{service="exponential",quantile="0.99"} 4.539723552933882e-06
rpc_durations_seconds_sum{service="exponential"} 0.0005097984764772547
rpc_durations_seconds_count{service="exponential"} 532
Histogram和Summary都可以获取分位数。
通过Histogram获得分位数,要将直方图指标数据收集prometheus中, 然后用prometheus的查询函数histogram_quantile()计算出来。 Summary则是在应用程序中直接计算出了分位数。
Histograms and summaries中阐述了两者的区别,特别是Summary的的分位数不能被聚合。
注意,这个不能聚合不是说功能上不支持,而是说对分位数做聚合操作通常是没有意义的。
LatencyTipOfTheDay: You can’t average percentiles. Period中对“分位数”不能被相加平均的做了很详细的说明:分位数本身是用来切分数据的,它们的平均数没有同样的分位效果。
3. Job和Instance
被监控的具体目标是instance,监控这些instances的任务叫做job。每个job负责一类任务,可以为一个job配置多个instance,job对自己的instance执行相同的动作。
隶属于job的instance可以直接在配置文件中写死。也可以让job自动从consul、kuberntes中动态获取,这个过程就是下文说的服务发现。
4. 部署、启动
prometheus负责根据配置文件发现监控目标,主动收集数据指标,并检查是否触发告警规则,是整个系统的核心。
可以直接使用Prometheus提供二进制文件:prometheus download。
先下载下来,简单试用一下:
# wget # https://github.com/prometheus/prometheus/releases/download/v2.3.2/prometheus-2.3.2.linux-amd64.tar.gz
# tar -xvf prometheus-2.3.2.linux-amd64.tar.gz
解压以后得到下面的文件:
# $ ls
console_libraries  consoles  LICENSE  NOTICE  prometheus  prometheus.yml  promtool
如果想要学习源代码,可以自己从代码编译:
go get github.com/prometheus/prometheus
cd $GOPATH/src/github.com/prometheus/prometheus
git checkout <需要的版本>
make build
然后直接运行prometheus程序即可:
#  ./prometheus
level=info ts=2018-08-18T12:57:33.232435663Z caller=main.go:222 msg="Starting Prometheus" version="(version=2.3.2, branch=HEAD, revision=71af5e29e815795e9dd14742ee7725682fa14b7b)"
level=info ts=2018-08-18T12:57:33.235107465Z caller=main.go:223 build_context="(go=go1.10.3, user=root@5258e0bd9cc1, date=20180712-14:02:52)"
...
通过192.168.88.10:9090,可以打开promtheus的网页。
5. prometheus的配置文件
使用prometheus最关键的还是搞清楚它的配置文件,仔细定制了配置文件,才能发挥出它的功能。
略微不幸的是,prometheus的配置文件有一些复杂,官方文档也不是很好:prometheus configuration。
配置文件是yaml格式,结构如下:
# $  cat prometheus.yml
# my global config
global:
  scrape_interval:     15s # Set the scrape interval to every 15 seconds. Default is every 1 minute.
  evaluation_interval: 15s # Evaluate rules every 15 seconds. The default is every 1 minute.
  # scrape_timeout is set to the global default (10s).

# Alertmanager configuration
alerting:
  alertmanagers:
  - static_configs:
    - targets:
      # - alertmanager:9093

# Load rules once and periodically evaluate them according to the global 'evaluation_interval'.
rule_files:
  # - "first_rules.yml"
  # - "second_rules.yml"

# A scrape configuration containing exactly one endpoint to scrape:
# Here it's Prometheus itself.
scrape_configs:
  # The job name is added as a label `job=<job_name>` to any timeseries scraped from this config.
  - job_name: 'prometheus'

    # metrics_path defaults to '/metrics'
    # scheme defaults to 'http'.

    static_configs:
    - targets: ['localhost:9090']
其中global是一些常规的全局配置,这里只列出了两个参数:
  scrape_interval:     15s      #每15s采集一次数据
  evaluation_interval: 15s      #每15s做一次告警检测
rule_files指定加载的告警规则文件,告警规则放到下一节讲。
scrape_configs指定prometheus要监控的目标,这部分是最复杂的。
在scrape_config中每个监控目标是一个job,但job的类型有很多种。可以是最简单的static_config,即静态地指定每一个目标,例如上面的:
  - job_name: prometheus
    static_configs:
      - targets: ['localhost:9090']
也可以使用服务发现的方式,动态发现目标,例如将kubernetes中的node作为监控目标:
  - job_name: 'kubernetes-nodes'
    kubernetes_sd_configs:
    - role: node
      api_server: https://192.168.88.10
      tls_config:
        ca_file:   /opt/app/k8s/admin/cert/ca/ca.pem
        cert_file: /opt/app/k8s/admin/cert/apiserver-client/cert.pem
        key_file:  /opt/app/k8s/admin/cert/apiserver-client/key.pem
    bearer_token_file: /opt/app/k8s/apiserver/cert/token.csv
    scheme: https
    tls_config:
      ca_file:   /opt/app/k8s/admin/cert/ca/ca.pem
      cert_file: /opt/app/k8s/admin/cert/apiserver-client/cert.pem
      key_file:  /opt/app/k8s/admin/cert/apiserver-client/key.pem
使用这个新的配置文件,启动prometheus:
./prometheus --config.file=./prometheus.k8s.yml
prometheus运行时会自动探测kubernetes中的node变化,自动将kubernetes中的node作为监控目标。
在prometheus的页面中可以看到自动生成的监控目标。这里就不贴图了,可以自己试一下,或者看一下演示视频。
当前@2018-08-10 17:14:05,prometheus中与服务发现有关的配置有以下几项(前缀就是支持的系统,sd表示service discovery):
    azure_sd_config
    consul_sd_config
    dns_sd_config
    ec2_sd_config
    openstack_sd_config
    file_sd_config
    gce_sd_config
    kubernetes_sd_config
    marathon_sd_config
    nerve_sd_config
    serverset_sd_config
    triton_sd_config
服务发现是prometheus最强大的功能之一,这个功能配合relabel_config、*_exporter可以做成很多事情。
6. 使用relabel_config扩展采集能力
relabel_config,顾名思义,可以用来重新设置标签。标签是附属在每个监控目标的每个指标上的。
但有些标签是双下划线开头的,例如__address__,这样的标签是内置的有特殊意义的,不会附着在监控指标上。
这样的标签有:
__address__         : 检测目标的地址
__scheme__          : http、https等
__metrics_path__    : 获取指标的路径
上面的三个标签将被组合成一个完整url,这个url就是监控目标,可以通过这个url读取到指标。
relabel_config提供了标签改写功能,通过标签改写,可以非常灵活地定义url。
另外在每个服务发现配置中,还会定义与服务相关的内置指标,例如kubernetes_sd_config的node的类型中又定义了:
__meta_kubernetes_node_name: The name of the node object.
__meta_kubernetes_node_label_<labelname>: Each label from the node object.
__meta_kubernetes_node_annotation_<annotationname>: Each annotation from the node object.
__meta_kubernetes_node_address_<address_type>: The first address for each node address type, if it exists.
在上一节中,是直接从默认的地址http://< NODE IP>/metrics中采集到每个node数据的,这里用relabel修改一下,改成从apiserver中获取:
  - job_name: 'kubernetes-nodes'
    kubernetes_sd_configs:
    - role: node
      api_server: https://192.168.88.10
      tls_config:
        ca_file:   /opt/app/k8s/admin/cert/ca/ca.pem
        cert_file: /opt/app/k8s/admin/cert/apiserver-client/cert.pem
        key_file:  /opt/app/k8s/admin/cert/apiserver-client/key.pem
    bearer_token_file: /opt/app/k8s/apiserver/cert/token.csv
    scheme: https
    tls_config:
      ca_file:   /opt/app/k8s/admin/cert/ca/ca.pem
      cert_file: /opt/app/k8s/admin/cert/apiserver-client/cert.pem
      key_file:  /opt/app/k8s/admin/cert/apiserver-client/key.pem
    relabel_configs:
    - action: labelmap
      regex: __meta_kubernetes_node_label_(.+)
    - target_label: __address__
      replacement: 192.168.88.10
    - source_labels: [__meta_kubernetes_node_name]
      regex: (.+)
      target_label: __metrics_path__
      replacement: /api/v1/nodes/${1}/proxy/metrics
其实就是在原先的配置后面增加了一节relabel_configs的配置。
重新加载配置文件,过一小会儿,就会发现target的url发生了变化。
relabel_config是一个很强大的功能,除了修改标签,还可以为采集的指标添加上新标签:
- source_labels: [__meta_kubernetes_node_name]
      regex: (.+)
      replacement: hello_${1}
      target_label: label_add_by_me
在配置文件中加上上面的内容后,为每个指标都将被添加了一个名为label_add_by_me的标签。
7. 使用relabel_config过滤目标
还可以通过relabel_config将不需要的target过滤:
  - job_name: "user_server_icmp_detect"
    consul_sd_configs:
    - server: "127.0.0.1:8500"
    scheme: http
    metrics_path: /probe
    params:
      module: [icmp]
    relabel_configs:
    - action: keep
      source_labels: [__meta_consul_tags]        #如果__meta_consul_tags匹配正则,则保留该目标
      regex: '.*,icmp,.*'
    - source_labels: [__meta_consul_service]
      regex: '(.+)@(.+)@(.+)'
      replacement: ${2}
      target_label: type
    - source_labels: [__meta_consul_service]
      regex: '(.+)@(.+)@(.+)'
      replacement: ${1}
      target_label: user
    - source_labels: [__address__]
      regex: (.+):(.+)
      replacement: ${1}
      target_label: __param_target
    - target_label: __address__
      replacement:  10.10.199.154:9115
    - source_labels: [__param_target]
      target_label: instance
8. prometheus的查询语句
prometheus的查询语句也是很重要的内容,除了用来查询数据,后面将要讲的告警规则也要用查询语句描述。
查询语句直接就是指标的名称:
go_memstats_other_sys_bytes
但是可以通过标签筛选:
go_memstats_other_sys_bytes{instance="192.168.88.10"}
标签属性可以使用4个操作符:
=: Select labels that are exactly equal to the provided string.
!=: Select labels that are not equal to the provided string.
=~: Select labels that regex-match the provided string (or substring).
!~: Select labels that do not regex-match the provided string (or substring).
并且可以使用多个标签属性,用“,”间隔,彼此直接是与的关系,下面是prometheus文档中的一个例子:
http_requests_total{environment=~"staging|testing|development",method!="GET"}
甚至只有标签:
{instance="192.168.88.10"}
对查询出来的结果进行运算也是可以的:
# 时间范围截取,Range Vector Selectors
http_requests_total{job="prometheus"}[5m]

# 时间偏移
http_requests_total offset 5m

# 时间段内数值累加
sum(http_requests_total{method="GET"} offset 5m)
还可以进行多元运算:Operators,以及使用函数:Functions。
9. prometheus的告警规则配置
alert rules在单独的文件中定义,然后在prometheus.yml中引用:
rule_files:
  - "first_rules.yml"
  # - "second_rules.yml"
rules文件格式如下:
# $ cat first_rules.yml
groups:
- name: rule1-http_requst_total
  rules:
  - alert:  HTTP_REQUEST_TOTAL
    expr: http_requests_total > 100
    for: 1m
    labels:
      severity: page
    annotations:
      summary: Http request total reach limit
需要注意,还要在prometheus.yml中配置alertmanager的地址:
# Alertmanager configuration
alerting:
  alertmanagers:
  - static_configs:
    - targets:
      - 127.0.0.1:9093
重新加载配置文件后,可以在prometheus的rule页面看到告警规则,在alert页面看到触发的告警,
现在alertmanager还没有部署,在下一节部署了alertmanager之后,告警可以在alertmanager中看到。
0x02 alertmanager
alertmanager是用来接收prometheus发出的告警,然后按照配置文件的要求,将告警用对应的方式发送出去。
将告警集中到alertmanager,可以对告警进行更细致的管理。
1. alertmanager部署启动
# wget https://github.com/prometheus/alertmanager/releases/download/v0.15.2/alertmanager-0.15.2.linux-amd64.tar.gz
# tar -xvf alertmanager-0.15.2.linux-amd64.tar.gz
解压以后会得到下面这些文件:
alertmanager alertmanager.yml amtool LICENSE NOTICE
直接运行alertmanager就可以启动,然后通过http://IP地址:9093/#/alerts可以打开alertmanager的页面。
2. alertmanager的配置文件
alertmanager的配置文件格式如下:
global:
  resolve_timeout: 5m

route:
  group_by: ['alertname']
  group_wait: 10s
  group_interval: 10s
  repeat_interval: 1h
  receiver: 'web.hook'
receivers:
- name: 'web.hook'
  webhook_configs:
  - url: 'http://127.0.0.1:5001/'
inhibit_rules:
  - source_match:
      severity: 'critical'
    target_match:
      severity: 'warning'
    equal: ['alertname', 'dev', 'instance']
其中最主要的是receivers,它定义了告警的处理方式,这里是webhook_config,意思是alertmananger将告警转发到这个url。
alertmanager configuration提供多种告警处理方式,webhook_configs只是其中一种:
email_config
hipchat_config
pagerduty_config
pushover_config
slack_config
opsgenie_config
victorops_config
webhook_config
wechat_config
3. alertmanager配置邮件通知
这里给出一个用邮件通知告警的例子,发件邮箱用的是网易邮箱:
global:
  resolve_timeout: 5m
route:
  group_by: ['alertname']
  group_wait: 10s
  group_interval: 10s
  repeat_interval: 1h
  receiver: 'mail'
receivers:
- name: 'web.hook'
  webhook_configs:
  - url: 'http://127.0.0.1:5001/'
- name: 'mail'
  email_configs:
  - to: 接收告警用的邮箱
    from: 你的发件用的网易邮箱
    smarthost:  smtp.163.com:25
    auth_username: 网易邮箱账号
    auth_password: 网易邮箱密码
    # auth_secret:
    # auth_identity:
inhibit_rules:
  - source_match:
      severity: 'critical'
    target_match:
      severity: 'warning'
    equal: ['alertname', 'dev', 'instance']
注意这里有web.hook和mail两个reciver,使用哪个receive是在上面的router中配置的:
route:
  group_by: ['alertname']
  group_wait: 10s
  group_interval: 10s
  repeat_interval: 1h
  receiver: 'mail'
重新加载配置后,就可以收到告警邮件了。
4. alertmanager集群模式
alertmanager可以配置成集群模式,即多个alaertmanager一起运行,彼此之间通过gossip协议获知告警的处理状态,防止告警重复发出。
这种模式通常用在prometheus需要做高可用的场景中。
prometheus ha deploy的高可用部署通常至少会有两套prometheus独立工作,它们会执行各自的告警检查。
与之相伴的通常也要部署多个alaertmanager,这时候这些alertmanager之间就需要同步信息,防止告警重复发出。
由于使用的是gossip协议,alermanager的集群模式配置很简单,只需要启动时指定另一个或多个alertmanager的地址即可:
--cluster.peer=192.168.88.10:9094
0x03 *_exporter
exporter是一组程序,它们分别被用来采集物理机、中间件的信息。有prometheus官方实现的,还有更多第三方实现的:
Databases
    Aerospike exporter
    ClickHouse exporter
    Consul exporter (official)
    CouchDB exporter
    ElasticSearch exporter
    EventStore exporter
...
Hardware related
    apcupsd exporter
    Collins exporter
    IoT Edison exporter
...
Messaging systems
    Beanstalkd exporter
    Gearman exporter
    Kafka exporter
...
Storage

    Ceph exporter
    Ceph RADOSGW exporter
...
HTTP

    Apache exporter
    HAProxy exporter (official)
...
APIs
    AWS ECS exporter
    AWS Health exporter
    AWS SQS exporter
Logging

    Fluentd exporter
    Google's mtail log data extractor
...
Other monitoring systems
    Akamai Cloudmonitor exporter
    AWS CloudWatch exporter (official)
    Cloud Foundry Firehose exporter
    Collectd exporter (official)
...
Miscellaneous

    ACT Fibernet Exporter
    Bamboo exporter
    BIG-IP exporter
...
这些exporter分别采集对应系统的指标,并将其以prometheus的格式呈现出来,供prometheus采集。
1. blackbox_exporter
blackbox_exporter是一个用来探测url、domain等联通、响应情况的exporter。
1.1 blackbox_exporter部署启动
# wegt https://github.com/prometheus/blackbox_exporter/releases/download/v0.12.0/blackbox_exporter-0.12.0.linux-amd64.tar.gz
# tar -xvf blackbox_exporter-0.12.0.linux-amd64.tar.gz
解压后得到:
blackbox_exporter blackbox.yml LICENSE NOTICE
直接运行,默认监听地址是:9115:
# ./blaxkbox_exporter
1.2 blackbox_exporter配置文件与工作原理
prometheus/blackbox_exporter是一个用来探测HTTP、HTTPS、DNS、TCP和ICMP等网络状态的工具。
在blockbox_exporter中配置的一个个工作模块,prometheus/blackbox_exporter config。
配置文件如下:
# $ cat blackbox.yml
modules:
  http_2xx:
    prober: http
    http:
  http_post_2xx:
    prober: http
    http:
      method: POST
  tcp_connect:
    prober: tcp
  pop3s_banner:
    prober: tcp
    tcp:
      query_response:
      - expect: "^+OK"
      tls: true
      tls_config:
        insecure_skip_verify: false
  ssh_banner:
    prober: tcp
    tcp:
      query_response:
      - expect: "^SSH-2.0-"
  irc_banner:
    prober: tcp
    tcp:
      query_response:
      - send: "NICK prober"
      - send: "USER prober prober prober :prober"
      - expect: "PING :([^ ]+)"
        send: "PONG ${1}"
      - expect: "^:[^ ]+ 001"
  icmp:
    prober: icmp
例如下面的配置中,有两个工作模块http_2xx和http_post_2xx。
modules:
  http_2xx:
    prober: http
    http:
  http_post_2xx:
    prober: http
    timeout: 5s
    http:
      method: POST
      headers:
        Content-Type: application/json
    body: '{}'
模块可以根据需要设置更多的参数和判断条件:
http_2xx_example:
  prober: http
  timeout: 5s
  http:
    valid_http_versions: ["HTTP/1.1", "HTTP/2"]
    valid_status_codes: []  # Defaults to 2xx
    method: GET
    headers:
      Host: vhost.example.com
      Accept-Language: en-US
    no_follow_redirects: false
    fail_if_ssl: false
    fail_if_not_ssl: false
    fail_if_matches_regexp:
      - "Could not connect to database"
    fail_if_not_matches_regexp:
      - "Download the latest version here"
    tls_config:
      insecure_skip_verify: false
    preferred_ip_protocol: "ip4" # defaults to "ip6"
通过blackbox_exporter的服务地址调用这些模块,并传入参数。
例如要获取域名www.baidu.com的指标,要用http_2xx模块,传入参数 http://www.baidu.com :
# http://192.168.88.10:9115/probe?module=http_2xx&target=http%3A%2F%2Fwww.baidu.com%2F
blackbox_exporter将按照http_2xx中的配置探测目标网址http://www.baidu.com, 并返回探测到的指标:
# HELP probe_dns_lookup_time_seconds Returns the time taken for probe dns lookup in seconds
...<省略>....
probe_http_version 1.1
# HELP probe_ip_protocol Specifies whether probe ip protocol is IP4 or IP6
# TYPE probe_ip_protocol gauge
probe_ip_protocol 4
# HELP probe_success Displays whether or not the probe was a success
# TYPE probe_success gauge
probe_success 1
通过这种方式,prometheus就可以采集到域名、dns、ip等虚拟资源的指标。
可以借助relabel_configs将__address__替换为blackbox_exporter的地址,使带有指定参数的blackbox_exporter的url成为prometheus的监控目标。
1.3 示例:监测kubernetes的集群node的ping的情况
在blackbox的配置文件中配置icmp模块:
  icmp:
    prober: icmp
在prometheus.yml中配置服务发现,将__address__改写为blackbox_exporter的地址,并带上相关参数:
  - job_name: 'kubernetes-nodes-ping'
    kubernetes_sd_configs:
    - role: node
      api_server: https://192.168.88.10
      tls_config:
        ca_file:   /opt/app/k8s/admin/cert/ca/ca.pem
        cert_file: /opt/app/k8s/admin/cert/apiserver-client/cert.pem
        key_file:  /opt/app/k8s/admin/cert/apiserver-client/key.pem
    bearer_token_file: /opt/app/k8s/apiserver/cert/token.csv
    scheme: http
    metrics_path: /probe
    params:
      module: [icmp]
    relabel_configs:
    - source_labels: [__address__]
      regex: (.+):(.+)
      replacement: ${1}
      target_label: __param_target
    - target_label: __address__
      replacement: 192.168.88.10:9115
    - action: labelmap
      regex: __meta_kubernetes_node_label_(.+)
重新加载配置后,就可以在prometheus的页面中可以看到新增的target,而它们的地址是blackbox的地址。
可以在prometheus中搜索指标probe_success:
# http://10.10.199.154:9090/graph?g0.range_input=1h&g0.expr=probe_success&g0.tab=0
可以编写下面的告警规则,如果持续2分钟ping不通,触发告警:
- name: node_icmp_avaliable
  rules:
  - alert: NODE_ICMP_UNREACHABLE
    expr: probe_success{job="kubernetes-nodes-ping"} == 0
    for: 2m
    labels:
      level: 1
    annotations:
      summary: node is {{ $labels.instance }}
0x03 更改标签的时机:抓取前修改、抓取后修改、告警时修改
prometheus支持修改标签。metric的标签可以在采集端采集的时候直接打上,这是最原始的标签。
除此之外,还可以在prometheus的配置文件里,对metric的label进行修改。
修改的时机有两个:采集数据之前,通过relabel_config;采集数据之后,写入存储之前,通过metric_relabel_configs。
两个的配置方式是相同的:
relabel_configs:
- source_labels: [__meta_kubernetes_pod_label_app]
  regex: 'rabbitmq01-exporter'
  replacement: 'public-rabbitmq01.paas.production:5672'
  target_label: instance

metric_relabel_configs:
- source_labels: [node]
  regex: 'rabbit01@rabbit01'
  replacement: 'public-rabbitmq01.paas.production:5672'
  target_label: node_addr
第一个是采集之前通过已有的标签,采集之前的标签通常是服务发现时设置的,生成新的标签instance。
第一个是采集之后,检查采集的指标,如果标签node匹配正则,生成新的标签node_addr。
如果要修改标签,target_label指定同名的标签。
另外alert_relabel_configs可以在告警前修改标签。
参考:relabel_configs vs metric_relabel_configs
0x04 杂项
下面是学习过程中,查询的一些资料,直接罗列,没有做整理。
规则检查:
# promtool check rules /etc/prometheus/alert-rules.yml
# ./promtool check rules alert_rule_test.yml
监测cpu:
# https://stackoverflow.com/questions/49083348/cadvisor-prometheus-integration-returns-container-cpu-load-average-10s-as-0

# In order to get the metric “container_cpu_load_average_10s” the cAdvisor must run with the option “–enable_load_reader=true”
设置kubelet的参数:–enable-load-reader
Write a bash shell script that consumes a constant amount of RAM for a user defined time
Cadvisor metric “container_network_tcp_usage_total” always “0”
# 容器CPU负载告警
# container_cpu_load_average_10s, container_spec_cpu_quota, container_spec_cpu_shares, container_spec_cpu_quota
# 容器CPU limit: container_spec_cpu_quota / container_spec_cpu_period
# 计算空间的CPU使用率:sum(rate(container_cpu_usage_seconds_total{namespace=~".+"}[1m])) by (namespace) * 100
# 计算容器CPU使用率:sum(rate(container_cpu_usage_seconds_total{name=~".+"}[1m])) by (name) * 100
# rate(container_cpu_usage_seconds_total{name=~".+"}[1m])
计算容器的内存使用率:
# container_memory_usage_bytes{container_name!="", pod_name!=""} / container_spec_memory_limit_bytes{container_name!="", pod_name!=""}

# container_memory_usage_bytes{instance="prod-k8s-node-155-171",container_name!="", pod_name!=""} / container_spec_memory_limit_bytes{instance="prod-k8s-node-155-171",container_name!="", pod_name!=""}

# container_memory_usage_bytes{container_name!="", pod_name!=""} / container_spec_memory_limit_bytes{container_name!="", pod_name!=""} > 0.98

# container_memory_rss{container_name!="", pod_name!=""}/container_spec_memory_limit_bytes{container_name!="", pod_name!=""} >0.98
0x05 参考
- prometheus documents
- prometheus configuration
- prometheus download
- prometheus first_steps
- prometheus relabel_config
- prometheus exporters
- prometheus/blackbox_exporter
- prometheus/blackbox_exporter config
- Promtheus Remote Storage使用案例:多Kubernetes集群监控方案
- Operators
- Functions
- alerting rules
- alertmanager configuration
- prometheus ha deploy
- prometheus exporter
- prometheus data model
- prometheus metric types
- prometheus Histograms and summaries
- LatencyTipOfTheDay: You can’t average percentiles. Period.
- relabel_configs vs metric_relabel_configs