ListBox控件的用法,创建一个xml,代码如下:
<?xml version="1.0" encoding="UTF-8" standalone="yes"?>
<nifty xmlns:xsi="http://www.w3.org/2001/XMLSchema-instance" xmlns="http://nifty-gui.lessvoid.com/nifty-gui" xsi:schemaLocation="https://raw.githubusercontent.com/void256/nifty-gui/1.4/nifty-core/src/main/resources/nifty.xsd https://raw.githubusercontent.com/void256/nifty-gui/1.4/nifty-core/src/main/resources/nifty.xsd">
    <useControls filename="nifty-default-controls.xml"/>
    <useStyles filename="nifty-default-styles.xml"/>
    <screen id="ListBoxScreen" controller="mygame.appState.ListBox01AppState">
        <layer id="ListBoxLayer" childLayout="absolute">
            <control name="listBox" id="myListBox" childLayout="overlay" horizontal="optional" width="612px" x="104" y="163" valign="center" vertical="optional" align="center" selectionMode="Single" displayItems="5" height="244px"/>
        </layer>
    </screen>
</nifty>
Java控制器,代码如下:
/*
 * To change this license header, choose License Headers in Project Properties.
 * To change this template file, choose Tools | Templates
 * and open the template in the editor.
 */
package mygame.appState;

import com.jme3.app.Application;
import com.jme3.app.SimpleApplication;
import com.jme3.app.state.BaseAppState;
import com.jme3.niftygui.NiftyJmeDisplay;
import de.lessvoid.nifty.Nifty;
import de.lessvoid.nifty.NiftyEventSubscriber;
import de.lessvoid.nifty.controls.ListBox;
import de.lessvoid.nifty.controls.ListBoxSelectionChangedEvent;
import de.lessvoid.nifty.render.batch.BatchRenderConfiguration;
import de.lessvoid.nifty.screen.Screen;
import de.lessvoid.nifty.screen.ScreenController;
import java.util.List;

/**
 *
 * @author JhonKkk
 */
public class ListBox01AppState extends BaseAppState implements ScreenController{
    private Nifty nifty;
    private NiftyJmeDisplay niftyDisplay;
    public class JustAnExampleModelClass {
        private String label;

        public JustAnExampleModelClass(final String label) {
          this.label = label;
        }

        public String toString() {
          return label; // we could really use anything in here, the name of the sword or something ;-)
        }
    }
    @Override
    protected void initialize(Application app) {
        SimpleApplication simpleApplication = (SimpleApplication) app;
        BatchRenderConfiguration config = new BatchRenderConfiguration();
        config.atlasWidth = 1024;
        config.atlasHeight = 1024;
        config.fillRemovedImagesInAtlas = false;
        config.disposeImagesBetweenScreens = false;
        config.useHighQualityTextures = true;
        niftyDisplay = NiftyJmeDisplay.newNiftyJmeDisplay(
                simpleApplication.getAssetManager(),
                simpleApplication.getInputManager(),
                simpleApplication.getAudioRenderer(),
                simpleApplication.getGuiViewPort(),config);
        nifty = niftyDisplay.getNifty();
        nifty.enableAutoScaling(800, 600);
        nifty.fromXml("Interface/ListBox01.xml", "ListBoxScreen", this);
        simpleApplication.getGuiViewPort().addProcessor(niftyDisplay);
    }

    @Override
    protected void cleanup(Application app) {
    }

    @Override
    protected void onEnable() {
    }

    @Override
    protected void onDisable() {
    }

    @Override
    public void bind(Nifty nifty, Screen screen) {
//        ListBox listBox = screen.findNiftyControl("myListBox", ListBox.class);
//        listBox.addItem("a");
//        listBox.addItem("b");
//        listBox.addItem("c");
        ListBox<JustAnExampleModelClass> listBox = (ListBox<JustAnExampleModelClass>) screen.findNiftyControl("myListBox", ListBox.class);
        listBox.addItem(new JustAnExampleModelClass("You can add more lines to this ListBox."));
        listBox.addItem(new JustAnExampleModelClass("Use the append button to do this."));
    }
    @NiftyEventSubscriber(id="myListBox")
    public void onMyListBoxSelectionChanged(final String id, final ListBoxSelectionChangedEvent<JustAnExampleModelClass> event) {
        List<JustAnExampleModelClass> selection = event.getSelection();
        for (JustAnExampleModelClass selectedItem : selection) {
            System.out.println("listbox selection [" + selectedItem.label + "]");
        }
    }

    @Override
    public void onStartScreen() {
    }

    @Override
    public void onEndScreen() {
    }

}
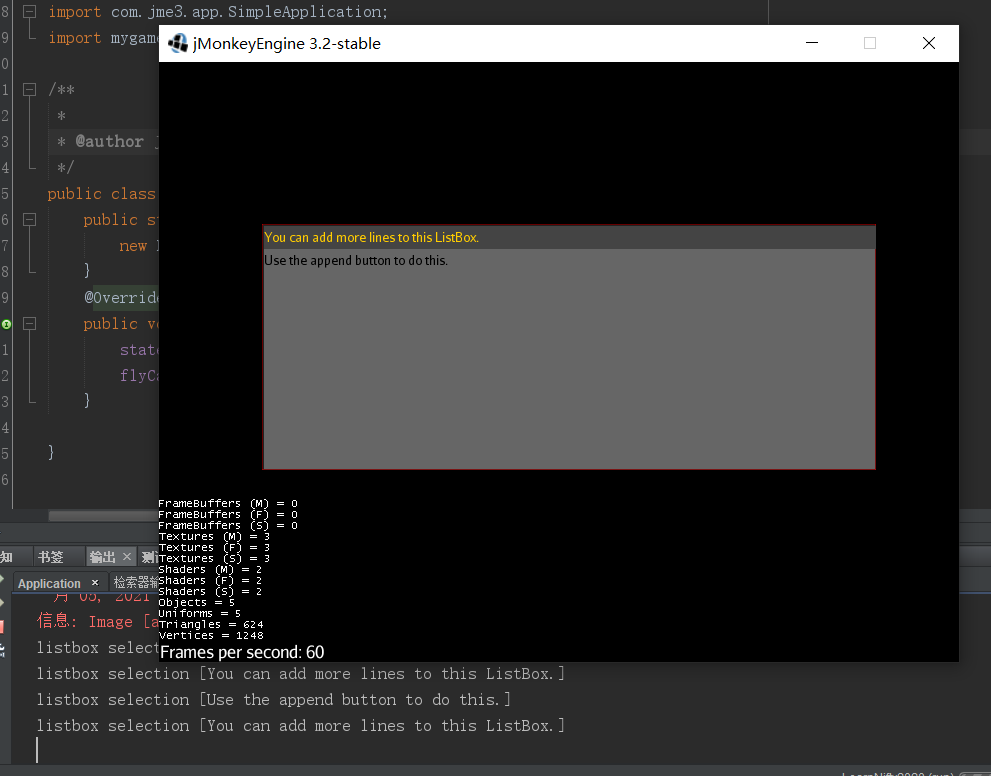
其中@NiftyEventSubscriber(id="myListBox")注解方法onMyListBoxSelectionChanged在每次listBox发生事件时回调,然后我们在方法里获取当前选择项并打印。
注意,该注解并非监听onSelect或onCheck事件,而是监听事件发生。
如图:

如果需要改变ListBox的字体,需要通过修改ListBox的Style来实现,通过研读默认的Style,可以发现ListBox使用默认的NiftyLabel作为Item,而默认的NiftyLabel又使用了默认的字体。所以我们只需要改变ListBox的Style,甚至可以通过Style修改用其他控件作为ListBox的Item。
默认的Style文件:
<?xml version="1.0" encoding="UTF-8"?>
<nifty-styles xmlns="http://nifty-gui.lessvoid.com/nifty-gui">

    <style id="nifty-listbox">
        <attributes/>
    </style>
    <style id="nifty-listbox#scrollpanel">
        <attributes focusable="true" padding="1px"/>
        <effect overlay="true">
            <onActive name="colorBar" color="#666f" post="false" neverStopRendering="true" timeType="infinite"/>
            <onActive name="border" border="1px" color="#222f" inset="1px,0px,0px,1px"/>
            <onFocus name="border" border="1px" color="#f006"/>
            <onEnabled name="renderQuad" startColor="#2228" endColor="#2220" post="false" length="150"/>
            <onDisabled name="renderQuad" startColor="#2220" endColor="#2228" post="false" length="150"/>
        </effect>
    </style>
    <style id="nifty-listbox#bottom-right">
        <attributes width="23px" height="23px"/>
    </style>
    <style id="nifty-listbox-item" base="nifty-label">
        <attributes color="#000f" width="100%" align="left" textVAlign="center" textHAlign="left"/>
        <interact onClick="listBoxItemClicked()"/>
        <effect>
            <onCustom customKey="focus" name="colorBar" post="false" color="#444f" neverStopRendering="true"
                      timeType="infinite"/>
            <onCustom customKey="select" name="colorBar" post="false" color="#444f" neverStopRendering="true"
                      timeType="infinite"/>
            <onCustom customKey="select" name="textColor" post="false" color="#fc0f" neverStopRendering="true"
                      timeType="infinite"/>
            <onHover name="colorBar" color="#444f" post="false" neverStopRendering="true" timeType="infinite"
                     inset="1px"/>
            <onClick name="focus" targetElement="#parent#parent"/>
        </effect>
    </style>
</nifty-styles>
其中<style id="nifty-listbox-item" base="nifty-label">表明了ListBox默认使用自带的NiftyLabel作为Item,而默认的NiftyLabel使用默认的字体。
自定义Item
通过研读默认的nifty-listbox.xml,我们会发现默认的ListBox的item是一个NiftyLabel。而我们在游戏开发中往往不仅仅局限于显示文本列表。更多的是复杂的图文列表。那么,NiftyGUI是否可以像Android一样,提供自定义List Item的接口呢?答案是肯定的。
具体而言,我们需要了解ListBox如何渲染一个Item,通过Wiki和源码可以简单了解到,ListBox渲染一个Item需要先提供模板控制器,然后每次渲染时通过模板控制器去获取Item并适配相应数据,这个过程其实和Android的RecylerView差不多,在Android里面,使用RecylerView渲染自定义Item,通常,我们可以用一个独立的布局文件来作为Item的模板,然后在java代码里实现适配器,加载对应的布局item,并填充数据。在NiftyGUI里,也是类似的。
第一步,添加一个自定Item,在NiftyGUI中,UI控件分为两大类,一类是NiftyElement(如Layer,Panel等),另一类就是具体的控件类型(如Button,Label等),所以,在NiftyGUI中,添加一个自定义控件,就是一个自定义Control。在SDK中,在Interface目录下创建一个control目录,然后右键新建一个名为ImgLabelItem的Item控制器,如下:
<?xml version="1.0" encoding="UTF-8"?>
<nifty-controls xmlns="http://nifty-gui.lessvoid.com/nifty-gui">
    <controlDefinition style="img-label-listbox" name="img-label-item">
        <panel style="#panel" childLayout="horizontal" width="100%" align="center">
            <image id="#icon" width="23px" height="23px" />
            <control id="#text" name="label" align="left" style="img-label-listbox-label-item" textHAlign="left" height="23px" width="*" wrap="true" />
        </panel>
    </controlDefinition>
</nifty-controls>
分析下这里的代码,首先第一行<nifty-controls>标签定义这是一个nifty控制器(所有具体的ui控件都是一个控制器或element),这表明我们正在创建一个自定义nifity控件;接下来的<controlDefinition>表明我们的控件定义从这里开始,在controlDefinition标签中,有一个style属性,这个非常重要,我们引用自己定义的img-label-listbox样式,这在接下来介绍,接着name属性指定了这个控件的名称是img-label-item(为何不叫id呢?其实可以这样理解,id是一个具体的实例的标识符,而name表明这是一个类的名称),以便我们在布局文件中使用这种控件。
接着,我们通过组合基础控件类panel,image,control完成了我们这个自定义控件的内容(panle,image和control这些是基础类型控件,复杂的自定义控件都是通过组合基础类型得到,就像复合数据类型是通过组合各种基础数据类型实现的道理一样)。
panel提供了一个容器,使用id为#panel的样式(这个样式定义在默认的nifty中,你可能会不解,没看到哪里引入了这个样式文件,没错,这里没有引入其他样式文件,因为我们在最后的屏幕布局中才引入默认的nifty style,同样,上面的img-label-listbox是一个自定义样式的id,但是在这个xml中我们并没有看到任何引入样式文件的代码,因为我们统一在最后的屏幕布局中才引入),childLayout指定子对象使用水平布局,width指定为填充100%宽度,而algin指定了panel对齐中心于父控件。
image提供了一个图标控件,id为#icon,width为23像素,height为23像素。
control的name属性表明这个control是一个label-control控件,有一点需要注意,image和panel都是element类型的控件,所以直接用image或panel作为标签名;而label是一个control类型的控件,所以通过control并指定name属性来描述这种控件。style使用id为img-label-listbox-label-item的样式,其他属性不用多说都能理解是什么意思。
自定义控件定义好了,接下来,创建我们的自定义控件的样式文件,如果不创建自定义样式文件,则不存在上面id为img-label-listbox和img-label-listbox-label-item的样式,则只能使用默认的样式(样式必须显式指定,否则渲染会黑屏,但由于复杂控件由基础控件组成,基础控件默认就指定了样式,所以可以忽略style属性,但是controlDefinition必须显式指定样式)。我们在Interface下创建一个styles文件夹,然后添加一个名为img-label-list.xml的空样式文件,如下:

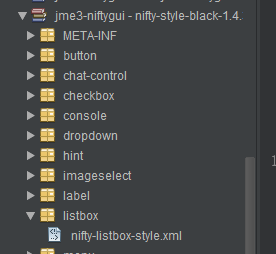
打开样式文件,我们找到默认的nifty的listbox样式文件,具体位置在如下位置:

把里面的内容复制到我们新建的style中,然后进行修改,如下:
 1 <?xml version="1.0" encoding="UTF-8"?>
 2 <nifty-styles xmlns="http://nifty-gui.lessvoid.com/nifty-gui">
 3
 4     <style id="img-label-listbox">
 5         <attributes/>
 6     </style>
 7     <style id="img-label-listbox#scrollpanel">
 8         <attributes focusable="true" padding="1px"/>
 9         <effect overlay="true">
10             <onActive name="colorBar" color="#666f" post="false" neverStopRendering="true" timeType="infinite"/>
11             <onActive name="border" border="1px" color="#222f" inset="1px,0px,0px,1px"/>
12             <onFocus name="border" border="1px" color="#f006"/>
13             <onEnabled name="renderQuad" startColor="#2228" endColor="#2220" post="false" length="150"/>
14             <onDisabled name="renderQuad" startColor="#2220" endColor="#2228" post="false" length="150"/>
15         </effect>
16     </style>
17     <style id="img-label-listbox#bottom-right">
18         <attributes width="23px" height="23px"/>
19     </style>
20     <style id="img-label-listbox-label-item" base="nifty-label">
21         <attributes color="#000f" width="100%" align="left" textVAlign="center" textHAlign="left"/>
22         <interact onClick="listBoxItemClicked()"/>
23         <effect>
24             <onCustom customKey="focus" name="colorBar" post="false" color="#444f" neverStopRendering="true"
25                       timeType="infinite"/>
26             <onCustom customKey="select" name="colorBar" post="false" color="#444f" neverStopRendering="true"
27                       timeType="infinite"/>
28             <onCustom customKey="select" name="textColor" post="false" color="#fc0f" neverStopRendering="true"
29                       timeType="infinite"/>
30             <onHover name="colorBar" color="#444f" post="false" neverStopRendering="true" timeType="infinite"
31                      inset="1px"/>
32             <onClick name="focus" targetElement="#parent#parent"/>
33         </effect>
34     </style>
35 </nifty-styles>
在第4行定义了一个id为img-label-listbox的样式,但这是一个空样式;接着在第7行和第17行定义了img-label-listbox的伪类样式,这才是真正的img-label-listbox的各个项的样式;然后,在第20行定义了一个img-label-listbox#bottom-right样式,通过base属性表明该样式继承自nifty-label样式,说明这是一个为label控件类型定制的样式。我们看看这个样式定义,首先attributes定义了color,width,align等一些属性,然后通过interact标签定义了用户交互响应listBoxItemClicked()函数,这个是函数是默认的listbox控制器内部的函数,建议你直接用这个,因为你自己实现的话需要写适配器,绑定等一系列逻辑;接下来effect标签定义了控件的一些效果,比如鼠标悬浮时(onHover事件)的效果,或者点击时(onClick事件)的效果,另外,也可通过onCustom标签来描述事件,比如将onClick事件改为onCustom描述则是:<onCustom customKey="click"/>,所以,我们通过onCustom标签分别定义了focus事件,select事件发生时,哪些属性产生效果;如<onCustom customKey="focus" name="colorBar".../>定义了当focus事件发生时,属性colorBar产生特效效果,具体效果由后面的post,color,neverStopRendering等参数定义。
现在,我们完成了自定义样式和自定义控件,可以实现我们的listBox的自定义item了,我们创建一个新的名为ImgLabelListBox01的gui文件,然后,代码如下:
 1 <?xml version="1.0" encoding="UTF-8" standalone="yes"?>
 2 <nifty xmlns:xsi="http://www.w3.org/2001/XMLSchema-instance" xmlns="http://nifty-gui.lessvoid.com/nifty-gui" xsi:schemaLocation="https://raw.githubusercontent.com/void256/nifty-gui/1.4/nifty-core/src/main/resources/nifty.xsd https://raw.githubusercontent.com/void256/nifty-gui/1.4/nifty-core/src/main/resources/nifty.xsd">
 3     <useControls filename="nifty-default-controls.xml"/>
 4     <!--引入自定义控制器-->
 5     <useControls filename="Interface/control/ImgLabelItem.xml"/>
 6     <useStyles filename="nifty-default-styles.xml"/>
 7     <!--引入自定义样式-->
 8     <useStyles filename="Interface/styles/img-label-listbox.xml"/>
 9     <screen id="ListBoxScreen" controller="mygame.appState.ImgLabelItemListBoxAppState">
10         <layer id="ListBoxLayer" childLayout="absolute">
11             <control name="listBox" id="myListBox" childLayout="overlay" horizontal="optional" width="612px" x="104" y="163" valign="center" vertical="optional" align="center" selectionMode="Single" displayItems="5" height="244px" viewConverterClass="mygame.gui.ImgLabelConverter">
12                 <control name="img-label-item" controller="de.lessvoid.nifty.controls.listbox.ListBoxItemController" />
13             </control>
14         </layer>
15     </screen>
16 </nifty>
这里可以看到,我们在自定义控件中使用的样式(如id为img-listbox的样式),是包含在img-label-listbox.xml这个文件中,我们在gui文件中引入了这个样式文件,然后引入了自定义控制器文件ImgLabelItem.xml。这样,我们的gui文件就可以访问到自定义控件,同时可以访问我们的自定义样式了。
在第11行这里,我们定义了一个id为myListBox的listBox控件,然后添加了一个viewConverterClass="mygame.gui.ImgLabelConverter"属性,这个是item数据适配器对象,是一个我们自定义的item适配器java类,等会我们会介绍;然后,我们在内部定义了一个control标签,这个标签的name属性表明,这个control是一个img-label-item类型的控件,也就是我们自定义的类型为img-label-item的控件。同时指定controller属性,这个值可以写死,它使用默认的控制器类处理控件交互。
接下来实现名称为mygame.gui.ImgLabelConverter的类,代码如下:
 1 /*
 2  * To change this license header, choose License Headers in Project Properties.
 3  * To change this template file, choose Tools | Templates
 4  * and open the template in the editor.
 5  */
 6 package mygame.gui;
 7
 8 import de.lessvoid.nifty.controls.ListBox;
 9 import de.lessvoid.nifty.elements.Element;
10 import de.lessvoid.nifty.elements.render.ImageRenderer;
11 import de.lessvoid.nifty.elements.render.TextRenderer;
12
13 /**
14  *
15  * @author JhonKkk
16  */
17 public class ImgLabelConverter implements ListBox.ListBoxViewConverter<ImgLabel>{
18     private static final String ICON = "#icon";
19     private static final String TEXT = "#text";
20
21     /**
22      * Default constructor.
23      */
24     public ImgLabelConverter() {
25     }
26
27     /**
28      * {@inheritDoc}
29      */
30     @Override
31     public final void display(final Element listBoxItem, final ImgLabel item) {
32         final Element text = listBoxItem.findElementById(TEXT);
33         final TextRenderer textRenderer = text.getRenderer(TextRenderer.class);
34         final Element icon = listBoxItem.findElementById(ICON);
35         final ImageRenderer iconRenderer = icon.getRenderer(ImageRenderer.class);
36         if (item != null) {
37             textRenderer.setText(item.getLabel());
38             iconRenderer.setImage(item.getIcon());
39         } else {
40             textRenderer.setText("");
41             iconRenderer.setImage(null);
42         }
43     }
44
45     /**
46      * {@inheritDoc}
47      */
48     @Override
49     public final int getWidth(final Element listBoxItem, final ImgLabel item) {
50         final Element text = listBoxItem.findElementById(TEXT);
51         final TextRenderer textRenderer = text.getRenderer(TextRenderer.class);
52         final Element icon = listBoxItem.findElementById(ICON);
53         final ImageRenderer iconRenderer = icon.getRenderer(ImageRenderer.class);
54         return ((textRenderer.getFont() == null) ? 0 : textRenderer.getFont().getWidth(item.getLabel()))
55                 + ((item.getIcon() == null) ? 0 : item.getIcon().getWidth());
56     }
57
58 }
其中该类继承自ListBoxViewConverter类,这是item适配器父类,实现了两个方法display和getWidth。其中display在每个item被渲染时回调,在这里填入item的数据(就跟Android里的RecerverView适配器一样);在getWidth返回当前渲染的item的宽度,返回0不可见。
其中ImgLabel是一个javaBean类,代码如下:
 1 /*
 2  * To change this license header, choose License Headers in Project Properties.
 3  * To change this template file, choose Tools | Templates
 4  * and open the template in the editor.
 5  */
 6 package mygame.gui;
 7
 8 import de.lessvoid.nifty.render.NiftyImage;
 9
10 /**
11  *
12  * @author JhonKkk
13  */
14 public class ImgLabel {
15     private String label;
16     private NiftyImage icon;
17
18     public ImgLabel(String label, NiftyImage icon) {
19         this.label = label;
20         this.icon = icon;
21     }
22
23     public NiftyImage getIcon() {
24         return icon;
25     }
26
27     public String getLabel() {
28         return label;
29     }
30
31 }
这没啥好说的,就是包含一个label和icon的数据结构。接着,我们创建名为mygame.appState.ImgLabelItemListBoxAppState的gui屏幕控制器类,用于实现最终整合gui的逻辑。如下:
 1 /*
 2  * To change this license header, choose License Headers in Project Properties.
 3  * To change this template file, choose Tools | Templates
 4  * and open the template in the editor.
 5  */
 6 package mygame.appState;
 7
 8 import com.jme3.app.Application;
 9 import com.jme3.app.SimpleApplication;
10 import com.jme3.app.state.BaseAppState;
11 import com.jme3.niftygui.NiftyJmeDisplay;
12 import de.lessvoid.nifty.Nifty;
13 import de.lessvoid.nifty.NiftyEventSubscriber;
14 import de.lessvoid.nifty.controls.ListBox;
15 import de.lessvoid.nifty.controls.ListBoxSelectionChangedEvent;
16 import de.lessvoid.nifty.render.batch.BatchRenderConfiguration;
17 import de.lessvoid.nifty.screen.Screen;
18 import de.lessvoid.nifty.screen.ScreenController;
19 import java.util.List;
20 import mygame.gui.ImgLabel;
21
22 /**
23  *
24  * @author JhonKkk
25  */
26 public class ImgLabelItemListBoxAppState extends BaseAppState implements ScreenController{
27     private Nifty nifty;
28     private NiftyJmeDisplay niftyDisplay;
29     public class JustAnExampleModelClass {
30         private String label;
31
32         public JustAnExampleModelClass(final String label) {
33           this.label = label;
34         }
35
36         public String toString() {
37           return label; // we could really use anything in here, the name of the sword or something ;-)
38         }
39     }
40     @Override
41     protected void initialize(Application app) {
42         SimpleApplication simpleApplication = (SimpleApplication) app;
43         BatchRenderConfiguration config = new BatchRenderConfiguration();
44         config.atlasWidth = 1024;
45         config.atlasHeight = 1024;
46         config.fillRemovedImagesInAtlas = false;
47         config.disposeImagesBetweenScreens = false;
48         config.useHighQualityTextures = true;
49         niftyDisplay = NiftyJmeDisplay.newNiftyJmeDisplay(
50                 simpleApplication.getAssetManager(),
51                 simpleApplication.getInputManager(),
52                 simpleApplication.getAudioRenderer(),
53                 simpleApplication.getGuiViewPort(),config);
54         nifty = niftyDisplay.getNifty();
55         nifty.enableAutoScaling(800, 600);
56         nifty.fromXml("Interface/ImgLabelListBox01.xml", "ListBoxScreen", this);
57         simpleApplication.getGuiViewPort().addProcessor(niftyDisplay);
58     }
59
60     @Override
61     protected void cleanup(Application app) {
62     }
63
64     @Override
65     protected void onEnable() {
66     }
67
68     @Override
69     protected void onDisable() {
70     }
71
72     @Override
73     public void bind(Nifty nifty, Screen screen) {
74         ListBox<ImgLabel> listBox = screen.findNiftyControl("myListBox", ListBox.class);
75         listBox.addItem(new ImgLabel("Help", nifty.getRenderEngine().createImage(screen, "Interface/help.png", false)));
76         listBox.addItem(new ImgLabel("Text", nifty.getRenderEngine().createImage(screen, "Interface/help.png", false)));
77     }
78     @NiftyEventSubscriber(id="myListBox")
79     public void onMyListBoxSelectionChanged(final String id, final ListBoxSelectionChangedEvent<ImgLabel> event) {
80         List<ImgLabel> selection = event.getSelection();
81         for (ImgLabel selectedItem : selection) {
82             System.out.println("listbox selection [" + selectedItem.getLabel() + "]");
83         }
84     }
85
86     @Override
87     public void onStartScreen() {
88     }
89
90     @Override
91     public void onEndScreen() {
92     }
93
94 }
在bind()函数中初始化数据项目,在onMyListBoxSelectionChanged()方法中,获取选中的item并打印。最终效果如下:

很显然,这就是我们的自定义Item。
总结,一个自定义Item的实现需要以下几个步骤:
1.实现自定义控件布局
2.实现自定义控件样式
3.实现自定义控件Item适配器
需要注意的一点,如果你的自定义Item无法选中,即无法获取选中事件,那么极有可能是你没有为Item定义样式并定义Effect效果,要是一个item能够被选中,必须包含select效果,在这个例子中,是这样的:
1 <onCustom customKey="select" name="colorBar" post="false" color="#444f" neverStopRendering="true"
2                       timeType="infinite"/>
3             <onCustom customKey="select" name="textColor" post="false" color="#fc0f" neverStopRendering="true"
4                       timeType="infinite"/>
还有一点需要注意,我们仅仅为id为#text控件定义了select效果,所以点击#text控件会有效,但是点击id为#icon的控件仍然无效。