SpringMVC是什么
SpringMVC是目前最好的实现MVC设计模式的框架,是Spring框架的一个分支产品,以SpringIOC容器为基础,并利用容器的特性来简化它的配置。SpringMVC相当于Spring的一个子模块,可以很好的和Spring结合起来进行开发,是JavaWeb开发者必须要掌握的框架。实现了MVC设计模式,MVC设计模式是一种常用的软件架构方式:以Controller(控制层),Model(模型层),View(视图层)三个模块分离的形式来组织代码。
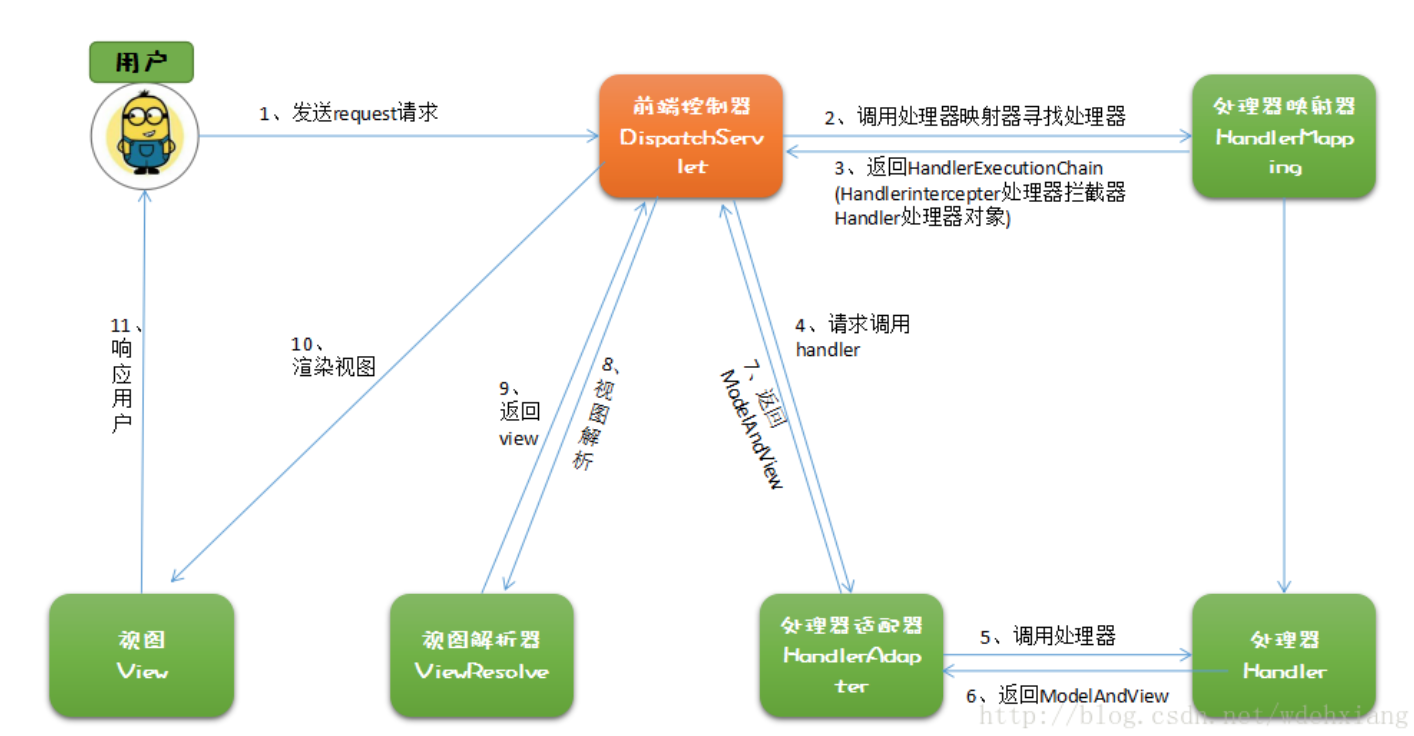
SpringMVC的执行顺序
1、 用户发送请求至前端控制器DispatcherServlet
2、 DispatcherServlet收到请求调用HandlerMapping处理器映射器。
3、 处理器映射器根据请求url找到具体的处理器,生成处理器对象及处理器拦截器(如果有则生成)一并返回给DispatcherServlet。
4、 DispatcherServlet通过HandlerAdapter处理器适配器调用处理器
5、 执行处理器(Controller,也叫后端控制器)。
6、 Controller执行完成返回ModelAndView
7、 HandlerAdapter将controller执行结果ModelAndView返回给DispatcherServlet
8、 DispatcherServlet将ModelAndView传给ViewReslover视图解析器
9、 ViewReslover解析后返回具体View
10、 DispatcherServlet对View进行渲染视图(即将模型数据填充至视图中)。
11、 DispatcherServlet响应用户
代码编写
1、配置web.xml文件
<?xml version="1.0" encoding="UTF-8"?>
<web-app version="2.5"
    xmlns="http://java.sun.com/xml/ns/javaee"
    xmlns:xsi="http://www.w3.org/2001/XMLSchema-instance"
    xsi:schemaLocation="http://java.sun.com/xml/ns/javaee
    http://java.sun.com/xml/ns/javaee/web-app_2_5.xsd">
  <display-name></display-name>
      <welcome-file-list>
           <welcome-file>index.jsp</welcome-file>
      </welcome-file-list>

    <servlet>
        <servlet-name>springmvc</servlet-name>
        <servlet-class>org.springframework.web.servlet.DispatcherServlet</servlet-class>
        <init-param>
              <param-name>contextConfigLocation</param-name>
              <!-- 指定springmvc.xml的路径 -->
              <param-value>classpath:springmvc.xml</param-value>
        </init-param>
      </servlet>
      <servlet-mapping>
        <servlet-name>springmvc</servlet-name>
        <url-pattern>/</url-pattern>
      </servlet-mapping>

</web-app>
3、配置springmvc.xml文件
<?xmlversion="1.0"encoding="UTF-8"?>
<beansxmlns="http://www.springframework.org/schema/beans"
    xmlns:xsi="http://www.w3.org/2001/XMLSchema-instance"xmlns:p="http://www.springframework.org/schema/p"
    xmlns:context="http://www.springframework.org/schema/context"
    xmlns:dubbo="http://code.alibabatech.com/schema/dubbo"xmlns:mvc="http://www.springframework.org/schema/mvc"
    xsi:schemaLocation="http://www.springframework.org/schema/beans http://www.springframework.org/schema/beans/spring-beans-4.0.xsd
        http://www.springframework.org/schema/mvc http://www.springframework.org/schema/mvc/spring-mvc-4.0.xsd
        http://code.alibabatech.com/schema/dubbo http://code.alibabatech.com/schema/dubbo/dubbo.xsd
        http://www.springframework.org/schema/context http://www.springframework.org/schema/context/spring-context-4.0.xsd">
         <!-- 配置自动扫描 -->
    <context:component-scanbase-package="cn.test.springmvc.controller"/>
       <!-- 配置视图解析器 -->
    <bean class="org.springframework.web.servlet.view.InternalResourceViewResolver">
        <!-- 前缀 -->
        <property name="prefix" value="/"></property>
        <!-- 后缀 -->
        <property name="suffix" value=".jsp"></property>
    </bean>

</beans>
3、编写测试类
@Controller
publicclass ItemController {

    @RequestMapping("/itemList")
    public ModelAndView itemList() throws Exception {

        List<Items>itemList = new ArrayList<>();

        //商品列表
        Items items_1 = new Items();
        items_1.setName("联想笔记本_3");
        items_1.setPrice(6000f);
        items_1.setDetail("ThinkPad T430 联想笔记本电脑!");

        Items items_2 = new Items();
        items_2.setName("苹果手机");
        items_2.setPrice(5000f);
        items_2.setDetail("iphone6苹果手机!");

        itemList.add(items_1);
        itemList.add(items_2);
        //创建modelandView对象
        ModelAndView modelAndView = new ModelAndView();
        //添加model
        modelAndView.addObject("itemList", itemList);
        //添加视图
        modelAndView.setViewName("/WEB-INF/jsp/itemList.jsp");
//        modelAndView.setViewName("itemsList");
        returnmodelAndView;
    }

}
SpringMVC的注解
一、@RequestMapping
SpringMVC通过@RequestMapping注解将URL请求与业务方法进行进行映射。
参数:
1.value:指定URL请求的实际地址,是@RequestMapping的默认值。
2.method:指定请求的method类型, GET、POST、PUT、DELETE等。
3.params:指定request中必须包含某些参数值,否则无法调用该方法。
    @RequestMapping(value="paramsTest",params={"name","id=10"})
    public String paramsTest(){
        System.out.println("paramsTest");
        return "index";
    }
二、参数绑定:
params是对URL请求的参数进行限制,不满足条件的URL无法到达业务方法,这个特性并不是我们开发中常用的,我们需要用到的是在业务方法中获取URL的参数,实现这一步很简单。
1.在业务方法定义时声明参数列表。
2.给参数列表添加@RequestParam注解。
    @RequestMapping(value="paramsBind")
    public String paramsBind(@RequestParam("name") String name,@RequestParam("id") int id){
        System.out.println(name);
        int num = id+10;
        System.out.println(num);
        return "index";
    }
三、映射Cookie:
SpringMVC通过映射可以直接在业务方法中获取Cookie的值。
    @RequestMapping("/cookieTest")
    public String getCookie(@CookieValue(value="JSESSIONID") String sessionId){
        System.out.println(sessionId);
        return "index";
    }
使用pojo绑定参数
SpringMVC会根据请求参数名和pojo属性名进行自动匹配,自动为该对象填充属性值。并且支持级联属性。
1.创建实体类Address,User并进行级联设置。
    public class Address {
    private int id;
    private String name;
    public int getId() {
        return id;
    }
    public void setId(int id) {
        this.id = id;
    }
    public String getName() {
        return name;
    }
    public void setName(String name) {
        this.name = name;
    }

}
    public class User {
    private int id;
    private String name;
    private Address address;

    public Address getAddress() {
        return address;
    }
    public void setAddress(Address address) {
        this.address = address;
    }
    public int getId() {
        return id;
    }
    public void setId(int id) {
        this.id = id;
    }
    public String getName() {
        return name;
    }
    public void setName(String name) {
        this.name = name;
    }

}
2.创建addUser.jsp。
  <%@ page language="java" contentType="text/html; charset=UTF-8"
    pageEncoding="UTF-8"%>
<!DOCTYPE html PUBLIC "-//W3C//DTD HTML 4.01 Transitional//EN" "http://www.w3.org/TR/html4/loose.dtd">
<html>
<head>
<meta http-equiv="Content-Type" content="text/html; charset=UTF-8">
<title>Insert title here</title>
</head>
<body>
    <form action="addUser" method="post">
        编号:<input type="text" name="id"/><br/>
        姓名:<input type="text" name="name"/><br/>
        地址:<input type="text" name="address.name"/><br/>
        <input type="submit" value="提交"/>
    </form>
</body>
</html>
3.业务方法。
    @RequestMapping("/addUser")
    public String getPOJO(User user){
        System.out.println(user);
        return "index";
    }
重定向和转发
//重定向
@RequestMapping("redirectTest")
    public String redirectTest(){
        return "redirect:/index.jsp";
    }


//转发
    @RequestMapping("forwardTest")
    public String forwardTest(){
        return "forward:/index.jsp";
    }