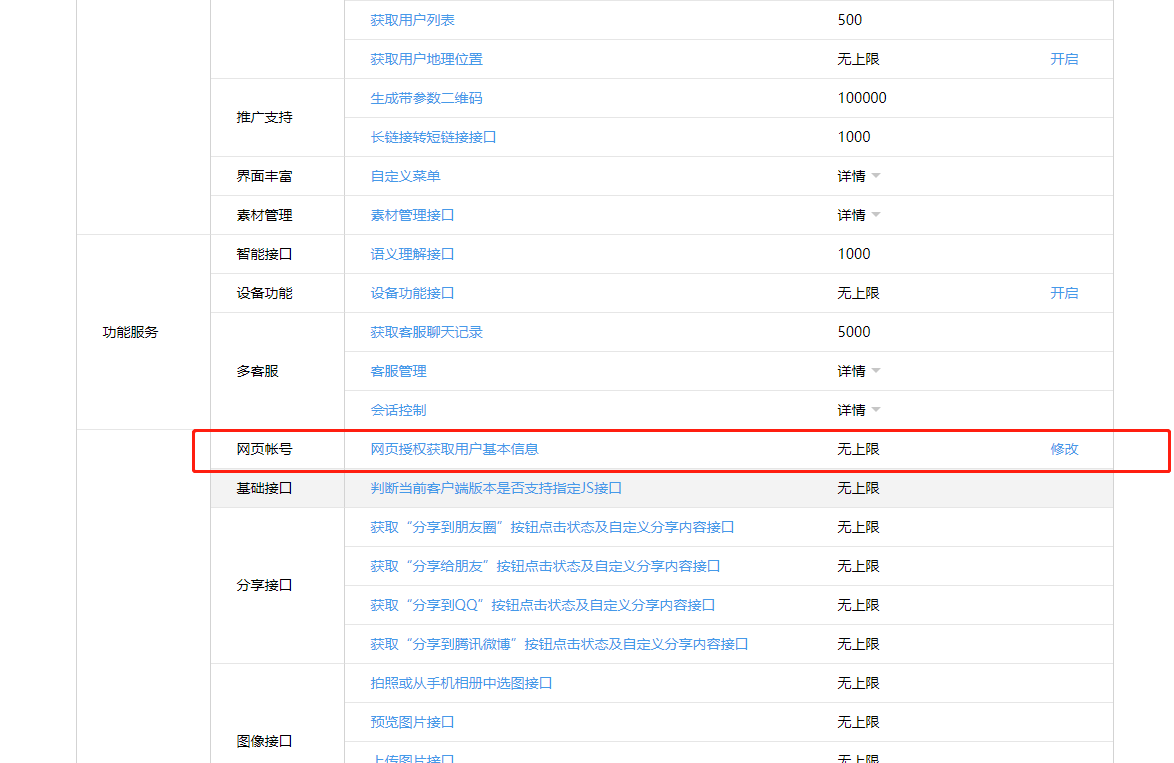
一.关于网页授权回调域名的说明
1、在微信公众号请求用户网页授权之前,开发者需要先到公众平台官网中的“开发 - 接口权限 - 网页服务 - 网页帐号 - 网页授权获取用户基本信息”的配置选项中,修改授权回调域名。请注意,这里填写的是域名(是一个字符串),而不是URL,因此请勿加 http:// 等协议头;

2、授权回调域名配置规范为全域名,比如需要网页授权的域名为:www.qq.com,配置以后此域名下面的页面http://www.qq.com/music.html 、 http://www.qq.com/login.html 都可以进行OAuth2.0鉴权。但http://pay.qq.com 、 http://music.qq.com 、 http://qq.com 无法进行OAuth2.0鉴权
3、如果公众号登录授权给了第三方开发者来进行管理,则不必做任何设置,由第三方代替公众号实现网页授权即可
二.具体而言,网页授权流程分为四步:
1 第一步:用户同意授权,获取code
2 第二步:通过code换取网页授权access_token
3 第三步:刷新access_token(如果需要)
4 第四步:拉取用户信息(需scope为 snsapi_userinfo)
5 附:检验授权凭证(access_token)是否有效
第一步:用户同意授权,获取code
在确保微信公众账号拥有授权作用域(scope参数)的权限的前提下(服务号获得高级接口后,默认拥有scope参数中的snsapi_base和snsapi_userinfo),引导关注者打开如下页面:
https://open.weixin.qq.com/connect/oauth2/authorize?appid=APPID&redirect_uri=REDIRECT_URI&response_type=code&scope=SCOPE&state=STATE#wechat_redirect 若提示“该链接无法访问”,请检查参数是否填写错误,是否拥有scope参数对应的授权作用域权限。
尤其注意:由于授权操作安全等级较高,所以在发起授权请求时,微信会对授权链接做正则强匹配校验,如果链接的参数顺序不对,授权页面将无法正常访问
	/**
	 * 用户点击菜单“专业注册”,按照微信规范进行Oauth2授权
	 * @param request
	 * @param response
	 * @param session
	 * @throws Exception
	 */
	@RequestMapping("/oauth2/bind")
	public void oauth2bind(HttpServletRequest request,HttpServletResponse response,HttpSession session) throws Exception{
		String url ="http://ksweixin.free.idcfengye.com/weichat/wx/bind/index";
		log.info("进入[专业用户]授权页面,授权url="+url);
		//对回调地址编码,防止提交给服务器后乱码
		url = URLEncoder.encode(url,"UTF-8");
		String redirect = "https://open.weixin.qq.com/connect/oauth2/authorize" +
				"?appid=" +appId +
				"&redirect_uri=" +url +  // 执行回调的地址,由微信服务器去调用
				"&response_type=code" +
				"&scope=snsapi_base" +
				"&state=jgjk" +   // 自定义,会传递到上面的url中
				"#wechat_redirect";
		response.sendRedirect(redirect);
	}
用户同意授权后
如果用户同意授权,页面将跳转至 redirect_uri/?code=CODE&state=STATE。
开发文档提到对于以snsapi_base为scope的网页授权,就静默授权的,用户无感知,所以这里不需要用户同意的步骤;
第二步:通过code换取网页授权access_token和openid
首先请注意,这里通过code换取的是一个特殊的网页授权access_token,与基础支持中的access_token(该access_token用于调用其他接口)不同。
公众号可通过下述接口来获取网页授权access_token。如果网页授权的作用域为snsapi_base,则本步骤中获取到网页授权access_token的同时,也获取到了openid,snsapi_base式的网页授权流程即到此为止。
请求方法
获取code后,请求以下链接获取access_token: https://api.weixin.qq.com/sns/oauth2/access_token?appid=APPID&secret=SECRET&code=CODE&grant_type=authorization_code
/**
	 * 回调方法
	 * @param request
	 * @param response
	 * @param session
	 * @throws Exception
	 */
	@RequestMapping("/bind/index")
	public String bindindex(
			HttpServletRequest request,
			HttpServletResponse response,
			ModelMap mdmap,
			HttpSession session) throws Exception{

		// 1.得到授权验证code
		String code = request.getParameter("code");
		String state = request.getParameter("state");
		if(state!=null){
			//2.拿到openid
			String openid=GetOauthAccessOpenId(code);
			log.info("本次拿到openid"+openid);
			if(openid!=null) {
				Map<String,Object> map = userService.queryWxuserByWxpassport(openid);
				mdmap.put("openid", openid);
				if(map!=null){  // 已经绑定了,进入解绑页面
					mdmap.put("passport", map.get("passport"));
					return "unbinding";
				}else{  // 还没有绑定,进入绑定页面
					return "binding";
				}
			}
		}
		return "binding";

	}
	/**
	 *  <summary>根据Code获取用户的openid、access_token</summary>
	 * @param code
	 * @return
	 */
	public  String GetOauthAccessOpenId(String code){
		log.info("拿到的code是:" + code);
		String url = "https://api.weixin.qq.com/sns/oauth2/access_token?appid=" + appId + "&secret=" + appSecret + "&code=" + code + "&grant_type=authorization_code";
		String content =HttpUtil.get(url);
		log.info("拿到的url是:" + url);
		log.info("获取到的gethtml是" + content);
		JSONObject json = JSONObject.fromObject(content);
		String  Openid = (String) json.get("openid");
		return Openid!=null?Openid:null;
	}
然后就可以在页面取到openid的值,把这个接口放入菜单的超链接地址,当点击菜单时,就会会获取到openid,下一步就可以根据openid做用户关联绑定等。
<script type="text/javascript">
function my_form_submit(){
    var pcpassport = $("#pcpassport").val();
    var pwd = $("#pwd").val();
    if(pwd==null||pwd==''||pcpassport==null||pcpassport==''){
        alert("请先输入完整信息,再提交");
        return;
    }
    $.ajax({
        type: "POST",
        url: "/weichat/wx/bind",
        data: {"openid":"${openid}","pcpassport":pcpassport,"pwd":pwd},
        success: function (result) {
            var data = eval("("+result+")");
            if(data.errCode==0){
                // 绑定用户成功
                $(".window_wait").hide();
                $(".msg_desc").html("用户绑定成功");
                $(".window_msg").show();
            }else if(data.errCode==303){ // 303是自定义的一数据 ,不是http 的303
                // 解决微信同一个链接发送两次请求的问题
            }else{
                $(".window_msg").hide();
                $(".window_wait").hide();
                $(".login").show();
                alert("failed:"+data.errMsg);
            }
        },
        error: function(result) {
            alert("绑定失败:"+result);
        }
       });
}
</script>