辅助器方法
在开发ASP.NET MVC项目时,经常会用到辅助器方法,它能够提供很多遍历的工作,比如可以对代码块和标记进行打包等。下面通过新建一个示例项目来看看其在实际使用中的情况。
示例项目
-
项目名:HelperMethods
-
模板:Basic(基本)

首先要在项目中添加一个控制器——Home:
using System;
using System.Collections.Generic;
using System.Linq;
using System.Web;
using System.Web.Mvc;

namespace HelperMethods.Controllers
{
    public class HomeController : Controller
    {

        public ActionResult Index()
        {
            ViewBag.Fruits = new string[] { "Apple", "Orange", "Pear" };
            ViewBag.Cities = new string[] { "New York", "London", "Paris" };

            string message = "This is an HTML element: <input>";

            return View((object)message);
        }

    }
}
该控制器的Index动作方法的视图为一个强类型视图,且未使用布局,内容如下:
@model string

@{
    Layout = null;
}

<!DOCTYPE html>

<html>
<head>
    <meta name="viewport" content="width=device-width" />
    <title>Index</title>
</head>
<body>
    <div>
        Here are the fruits:
        @foreach (string str in (string[])ViewBag.Fruits)
        {
            <b>@str</b>
        }
    </div>
    <div>
        Here are the cities:
        @foreach (string str in (string[])ViewBag.Cities)
        {
            <b>@str</b>
        }
    </div>
    <div>
        Here is the message:
        <p>@Model</p>
    </div>
</body>
</html>
效果如图:

创建自定义辅助器方法
后面通过创建自定义的辅助器方法了解内联辅助器方法和外部辅助器方法。
内联的辅助器方法
故名思议,内联辅助器方法是在视图中定义的一种辅助器方法,这也是最简单的一种辅助器方法。下面创建的自定义内联辅助器方法使用了@helper标签,内容如下:
@model string

@{
    Layout = null;
}

@helper ListArrayItems(string[] items)
{
    foreach (string str in items)
    {
        <b>@str</b>
    }
}

<!DOCTYPE html>

<html>
<head>
    <meta name="viewport" content="width=device-width" />
    <title>Index</title>
</head>
<body>
    <div>
        Here are the fruits: @ListArrayItems(ViewBag.Fruits)
    </div>
    <div>
        Here are the cities: @ListArrayItems(ViewBag.Cities)
    </div>
    <div>
        Here is the message:
        <p>@Model</p>
    </div>
</body>
</html>
从上面的代码中可以看出内联辅助器方法的定义类似于规则的C#方法。内联辅助器具有名称和参数。但是这和一般的方法不同的是它没有返回值。
提示:在使用内敛的辅助器时,不需要将ViewBag的动态属性转换成相应的类型,辅助器方法会在运行时进行评估。
内联辅助器的方法体遵循Razor视图其余部分的通用语法。即:文字字符串被视为静态HTML,需要有Razor处理的语句需要以@字符为前缀。
外部辅助器方法
外部的HTML辅助器方法会被表示成C#的扩展方法。它的使用更为广泛,但由于C#不能方便的直接处理HTML元素的生成,所以,编写这类的方法会更难一些。下面是一个自定义的外部辅助器方法——CustomHelpers.cs,内容:
using System;
using System.Collections.Generic;
using System.Linq;
using System.Web;
using System.Web.Mvc;

namespace HelperMethods.Infrastructure
{
    public static class CustomHelpers
    {

        public static MvcHtmlString ListArrayItems(this HtmlHelper html, string[] list)
        {
            TagBuilder tag = new TagBuilder("ul");

            foreach (string str in list)
            {
                TagBuilder itemTag = new TagBuilder("li");
                itemTag.SetInnerText(str);
                tag.InnerHtml += itemTag.ToString();
            }

            return new MvcHtmlString(tag.ToString());
        }

    }
}
上面的方法ListArrayItems采取的是扩展方法的方式,这一点在第一个参数中通过this关键字进行了定义。该类型的参数具有一些很有用的属性,这里简单做个列举:
HtmlHelper:
-
RouteCollection:返回应用程序定义的路由集合
-
ViewBag:返回视图包数据,这些数据是从动作方法传递给调用辅助器方法的视图的
-
ViewContext:返回ViewContext对象,该对象能够对请求的细节以及请求的处理方式进行访问
当创建的内容与正在处理的请求有关时,ViewContext属性非常有用,下面是该属性具有的一些常用的属性:
ViewContext
-
Controller:返回处理当前请求的控制器,继承自ControllerContext
-
HttpContext:返回描述当前请求的HttpContext对象,继承自ControllerContext
-
IsChildAction:如果已调用辅助器的视图正由一个子动作渲染,则返回true,继承自ControllerContext
-
RouteData:返回请求的路由数据,继承自ControllerContext
-
View:返回已调用辅助器方法的IView实现的实例
在创建HTML元素时,最简单常用的方式是使用TagBuilder类,它能够建立HTML字符串,而且可以处理各种转义及特殊字符。
该类具有的一些最有用的成员如下:
-
InnerHtml:将元素内容设置为HTML字符串的一个属性。赋给这个属性的值将不进行编码,即可以将它嵌入HTML元素
-
SetInnerText(string):设置HTML元素的文本内容。String参数将被编码,以使它安全显示
-
AddCssClass(string):对HTML元素添加一个CSS的class
-
MergeAttribute(string,string,bool):对HTML元素添加一个标签属性。第一个参数是标签属性名称,第二个是其值。bool参数指定是否替换已存在的同名标签属性
说明:为了区别其他属性的说法,这里讲HTML元素的属性叫做标签属性,如<a id="123" />,其中,id就是a元素的一个标签属性。
下面来看一下外部辅助器方法是如何使用的,这和前面的内联辅助器方法的使用不同:
@model string
@using HelperMethods.Infrastructure

@{
    Layout = null;
}

<!--自定义的内联辅助器方法-->
@*@helper ListArrayItems(string[] items)
{
    foreach (string str in items)
    {
        <b>@str</b>
    }
}*@

<!DOCTYPE html>

<html>
<head>
    <meta name="viewport" content="width=device-width" />
    <title>Index</title>
</head>
<body>
    <!--使用内联辅助器方法-->
    @*<div>
        Here are the fruits: @ListArrayItems(ViewBag.Fruits)
    </div>
    <div>
        Here are the cities: @ListArrayItems(ViewBag.Cities)
    </div>*@
    <!--使用自定义的外部辅助器方法-->
    <div>
        Here are the fruits: @Html.ListArrayItems((string[])ViewBag.Fruits)
    </div>
    <div>
        Here are the cities: @Html.ListArrayItems((string[])ViewBag.Cities)
    </div>
    <div>
        Here is the message:
        <p>@Model</p>
    </div>
</body>
</html>
从上面示例代码中可以看出使用外部辅助器方法的方式,下面做一下简单总结(上面示例中保留了内联的辅助器方法以及其使用的代码——注释调用部分,是为了方便比较这两种辅助器方法的使用的对比)。
使用外部辅助器方法的注意事项:
-
需要引用辅助器扩展方法所在的命名空间。引用方式:@using,但如果定义了大量的自定义辅助器,最好将它们的命名空间添加到/Views/Web.config文件中,以方便它们在视图中总是可用的。
-
使用@ Html.<helper>引用辅助器,<helper>表示扩展方法的名称(即定义的外部辅助器方法的名称)。在使用外部辅助器方法时需要注意的是需要将传递给方法参数的数据转换成对应的类型,这点和内联辅助器方法的使用不同。比如这里的ViewBag.Fruits需要转成string数组类型。
使用辅助器方法的时机
一个让我们容易迷惑的是该何时使用辅助器方法,而不是分部视图或子动作,尤其是在特性功能之间有重叠的时候。
使用辅助器方法只是为了减少视图中的重复量,且只用于简单的内容。对于更复杂的标记和内容,可以使用分部视图,而在需要实现对模型数据操作时,则应该使用子动作。建议要注意保持辅助器方法尽可能简单(如果辅助器不只是含有少量的C#代码,或者C#代码多余HTML元素,那么最好选择子动作)。
管理辅助器方法中的字符串编码
ASP.NET MVC框架通过自动对数据编码的方式实现了安全地将数据添加到Web页面。我们可以模拟一个存在潜在问题的字符串,并将其传递给视图,来看看其效果:
using System;
using System.Collections.Generic;
using System.Linq;
using System.Web;
using System.Web.Mvc;

namespace HelperMethods.Controllers
{
    public class HomeController : Controller
    {
        public ActionResult Index()
        {
            ViewBag.Fruits = new string[] { "Apple", "Orange", "Pear" };
            ViewBag.Cities = new string[] { "New York", "London", "Paris" };

            string message = "This is an HTML element: <input>";

            return View((object)message);
        }

    }
}
现在模型对象包含了一个有效的HTML元素,但当Razor渲染该值时,将看到如下HTML结果:
<div> Here is the message: <p>This is an HTML element: <input></p> </div>
这是一种基本的安全性保护,可以防止数据值被浏览器解释成为有效标记。这也是一种常见的网站攻击形式的基础,恶意用户试图添加他们自己的HTML标记或JavaScript代码,以试图破坏应用程序的行为。
Razor会自动地对视图中使用的数据值进行编码,但辅助器方法却需要能够生成HTML,因此,视图引擎对它们给予了更高的信任等级——这可能需要一些特别的注意。
-
演示问题
为了能够演示这种问题,我们对CustomerHelpers按照下面的方式做些修改
using System;
using System.Collections.Generic;
using System.Linq;
using System.Web;
using System.Web.Mvc;

namespace HelperMethods.Infrastructure
{
    public static class CustomHelpers
    {

        public static MvcHtmlString ListArrayItems(this HtmlHelper html, string[] list)
        {
            TagBuilder tag = new TagBuilder("ul");

            foreach (string str in list)
            {
                TagBuilder itemTag = new TagBuilder("li");
                itemTag.SetInnerText(str);
                tag.InnerHtml += itemTag.ToString();
            }

            return new MvcHtmlString(tag.ToString());
        }

        public static MvcHtmlString DisplayMessage(this HtmlHelper html, string msg)
        {
            string result = String.Format("This is the message: <p>{0}</p>", msg);
            return new MvcHtmlString(result);
        }

    }
}
下面是对Index.cshtml视图的修改,用来使用上面的辅助器方法:
@model string
@using HelperMethods.Infrastructure

@{
    Layout = null;
}

<!DOCTYPE html>

<html>
<head>
    <meta name="viewport" content="width=device-width" />
    <title>Index</title>
</head>
<body>
    <p>This is the content from the view:</p>
    <div style="border:thin solid black;padding:10px">
        Here is the message:
        <p>@Model</p>
    </div>

    <p>This is the content from the helper method:</p>
    <div style="border:thin solid black;padding:10px">
        @Html.DisplayMessage(Model)
    </div>
</body>
</html>
效果如下:
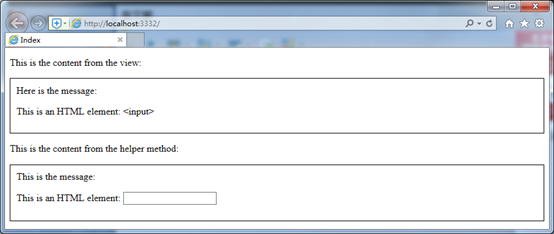
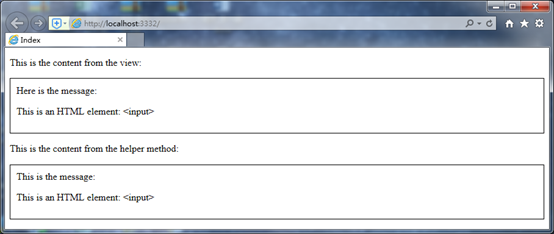
MVC框架会认为辅助器方法生成的内容是安全的,但事实上未必如此,因此也导致了浏览器错误的显示了结果——显示成了input元素,这样该元素也就成为了被利用的对象。
-
对辅助器方法的内容进行编码
要解决上面的问题,有两种方式:
-
将辅助器方法的返回类型改为string——这是最简单一种方式。
-
HtmlHelper类定义的Encode的实例方法可以解决这个问题,它能够对字符串值进行编码,以使它能够安全地包含在视图中。
在实际项目中如何选择,要取决于辅助器方法产生的内容的性质决定。后面分别看看这两种方式:
第一种,字符串化的方法会警告视图引擎,这是一段不安全的内容,需要在添加到视图之前进行编码。
        /// <summary>
        /// 字符串的返回结果,以通知视图引擎在添加信息之前进行编码
        /// </summary>
        /// <param name="html"></param>
        /// <param name="msg"></param>
        /// <returns></returns>
        public static string DisplayMessage(this HtmlHelper html, string msg)
        {
            return String.Format("This is the message: <p>{0}</p>", msg);
        }
这种方式的问题是如果打算生HTML元素,则会是一个问题,如果只是显示内容,这样做还是很方便的。

从上面的截图可以看到,我们不需要对p元素也做这种处理,这样就不太友好了。我们可以通过有选择地对数据值进行编码,这就需要用到第二种方法了——选择性的编码:
        /// <summary>
        /// 使用 Encode 实例方法解决字符串编码问题
        /// </summary>
        /// <param name="html"></param>
        /// <param name="msg"></param>
        /// <returns></returns>
        public static MvcHtmlString DisplayMessage(this HtmlHelper html, string msg)
        {
            string encodeMessage = html.Encode(msg);
            string result = String.Format("This is the message: <p>{0}</p>", encodeMessage);
            return new MvcHtmlString(result);
        }
当然,使用这种办法也是有一些问题的,因为它不是自动进行的,所以,在开发的时候需要人为地及时使用。所以,最好在一开始就明确地编码所有数据值。
使用内建的Form辅助器方法
创建Form元素
首先,添加一些内容以方便后面的演示。先添加一个模型类到Models文件夹中——Person.cs,该类用来做视图模型类,而Address和Role类型将展示一些更高级的特性。
using System;
using System.Collections.Generic;
using System.Linq;
using System.Web;

namespace HelperMethods.Models
{
    public class Person
    {
        public int PersonId { get; set; }
        public string FirstName { get; set; }
        public string LastName { get; set; }
        public DateTime BirthDate { get; set; }
        public Address HomeAddress { get; set; }
        public bool IsApproved { get; set; }
        public Role Role { get; set; }
    }

    public class Address
    {
        public string Line1 { get; set; }
        public string Line2 { get; set; }
        public string City { get; set; }
        public string PostalCode { get; set; }
        public string Country { get; set; }
    }

    public enum Role
    {
        Admin,
        User,
        Guest
    }

}
向Home控制器中添加新方法来使用这些模型对象:
using HelperMethods.Models;
using System;
using System.Collections.Generic;
using System.Linq;
using System.Web;
using System.Web.Mvc;

namespace HelperMethods.Controllers
{
    public class HomeController : Controller
    {
        public ActionResult Index()
        {
            ViewBag.Fruits = new string[] { "Apple", "Orange", "Pear" };
            ViewBag.Cities = new string[] { "New York", "London", "Paris" };

            string message = "This is an HTML element: <input>";

            return View((object)message);
        }

        public ActionResult CreatePerson()
        {
            return View(new Person());
        }

        [HttpPost]
        public ActionResult CreatePerson(Person person)
        {
            return View(person);
        }

    }
}
依靠模型绑定,MVC框架将通过表单数据创建一个Person对象,并将其传递给待遇HttpPost注解属性的动作方法。
为了明白表单的各部分是如何通过辅助器方法实现的,我们从一个标准的HTML表单开始观察其与辅助器方法之间的不同。
@model HelperMethods.Models.Person

@{
    ViewBag.Title = "CreatePerson";
}

<h2>CreatePerson</h2>

<form action="/Home/CreatePerson" method="post">
    <div class="dataElem">
        <label>PersonId</label>
        <input name="personId" value="@Model.PersonId"/>
    </div>
    <div class="dataElem">
        <label>First Name</label>
        <input name="firstName" value="@Model.FirstName" />
    </div>
    <div class="dataElem">
        <label>Last Name</label>
        <input name="lastName" value="@Model.LastName" />
    </div>
    <input type="submit" value="提交"/>
</form>
提示:这里设置了所以input元素中name标签属性的值,以便与input元素显示的模型属性相对应。在处理post请求时,MVC框架默认的模型绑定器会使用name属性,用input元素包含的值构造模型类型的属性值。而且,如果省略了name属性,表单将不能正常工作。
下面的/View/Shared/_Layout.cshtml视图删掉了对Razor标签@Scripts和@Styles的调用,以保证示例尽可能的简单,具体如下:
<!DOCTYPE html>
<html>
<head>
    <meta charset="utf-8" />
    <meta name="viewport" content="width=device-width" />
    <title>@ViewBag.Title</title>
    <link href="~/Content/Site.css" rel="stylesheet" />
    <style type="text/css">
        label {
            display: inline-block;
            width: 100px;
        }

        .dateElem {
            margin: 5px;
        }
    </style>
</head>
<body>
    @RenderBody()
</body>
</html>
启动并导航到/Home/CreatePerson来查看效果:

在该示例中点击"提交"按钮仅会重新显示表单中的数据,因为前面我们未对其做任何处理。通过F12(IE11浏览器)来查看一下最终浏览器端的HTML代码:
<!DOCTYPE html>
<html>
<head>
<meta charset="utf-8">
<meta name="viewport" content="width=device-width">
<title>CreatePerson</title>
<link href="/Content/Site.css" rel="stylesheet">
<style type="text/css">
label {
display: inline-block;
100px;
}
.dateElem {
margin: 5px;
}
</style>
</head>
<body>
<h2>CreatePerson</h2>
<form action="/Home/CreatePerson" method="post">
<div class="dataElem">
<label>PersonId</label>
<input name="personId" value="1">
</div>
<div class="dataElem">
<label>First Name</label>
<input name="firstName" value="L">
</div>
<div class="dataElem">
<label>Last Name</label>
<input name="lastName" value="yf">
</div>
<input type="submit" value="提交">
</form>
</body>
</html>
后面我们通过它来了解运用辅助器方法后引起的变化。
注:用辅助器方法生成form、input等HTML元素也不是必须的。还可以像我们这里的做法,通过纯手工编写静态的HTML标签,并用视图数据或视图模型对象对它们进行填充。使用辅助器方法可以提供很多便利,不是因为它们创建了必需的或特殊的HTML,因此,如果不喜欢,完全可以不使用(辅助器方法)。
-
创建表单元素
最常用的生成表单的辅助器是Html.BeginForm和Html.EndForm。它们生成form标签,且会根据应用程序的路由机制,为这个form生成一个有效的action标签属性。
BeginForm方法有13个重载版本,EndForm只有一个版本定义——只是用来生成</form>,下面示例仅适用于BeginForm的最基本的版本,来演示一下这是如何使用的:
@model HelperMethods.Models.Person

@{
    ViewBag.Title = "CreatePerson";
}

<h2>CreatePerson</h2>

@Html.BeginForm()
<div class="dataElem">
    <label>PersonId</label>
    <input name="personId" value="@Model.PersonId" />
</div>
<div class="dataElem">
    <label>First Name</label>
    <input name="firstName" value="@Model.FirstName" />
</div>
<div class="dataElem">
    <label>Last Name</label>
    <input name="lastName" value="@Model.LastName" />
</div>
<input type="submit" value="提交" />
@{Html.EndForm();}
通过上面示例可以发现EndForm方法是被当做一条C#语句使用的,和BeginForm不同——BeginForm返回的是一个能够插入到视图中的结果。这样会有种怪异的感觉——两种方法的使用风格完全不同。但是,这也没多大关系,我们可以采取下面的这种做法——将BeginForm封装在一个using表达式中。在using块的最后,.NET运行时会在BeginForm方法返回的对象上调用Dispose方法,这会自动地调用EndForm方法。
@model HelperMethods.Models.Person

@{
    ViewBag.Title = "CreatePerson";
}

<h2>CreatePerson</h2>

<!--创建自关闭的表单-->
@using (Html.BeginForm())
{
    <div class="dataElem">
        <label>PersonId</label>
        <input name="personId" value="@Model.PersonId" />
    </div>
    <div class="dataElem">
        <label>First Name</label>
        <input name="firstName" value="@Model.FirstName" />
    </div>
    <div class="dataElem">
        <label>Last Name</label>
        <input name="lastName" value="@Model.LastName" />
    </div>
    <input type="submit" value="提交" />
}
这种方式被称为自关闭表单,其好处就是它使得form开、闭标签之间的内容很清楚。由于BeginForm方法的重载版本较多,这里就不一一列举了,在开发的过程中可以慢慢体会。
@model HelperMethods.Models.Person

@{
    ViewBag.Title = "CreatePerson";
}

<h2>CreatePerson</h2>

<!--BeginForm的复杂重载-->
@using (Html.BeginForm("CreatePerson", "Home",                          // 动作方法、控制器
    new { id = "MyIdValue" },                                           // 路由配置中 id 片段变量的值
    FormMethod.Post,                                                    // form 元素中 method 标签属性的值
    new { @class = "personClass", data_formType = "person" }))          // form 元素的其他标签属性
                                                                        // 其中 class 前面的 @ 符合是为了使用保留的关键字,这样 class 将会被作为标签属性使用
                                                                        // data_formType 中使用下划线是因为在 C# 中不能使用连接符,但这最终会被映射为连接符
{
    <div class="dataElem">
        <label>PersonId</label>
        <input name="personId" value="@Model.PersonId" />
    </div>
    <div class="dataElem">
        <label>First Name</label>
        <input name="firstName" value="@Model.FirstName" />
    </div>
    <div class="dataElem">
        <label>Last Name</label>
        <input name="lastName" value="@Model.LastName" />
    </div>
    <input type="submit" value="提交" />
}
以下是最终产生的HTML的结果:
…
<form class="personClass" action="/Home/CreatePerson/MyIdValue" method="post" data-formtype="person">
…
指定表单使用的路由
如果使用BeginForm方法,则需要MVC框架在能够用来生成指定动作和控制器目标URL的路由配置中找出第一条路由。也就是说需要MVC框架自行判断路由的选择。如果希望确保使用一条特定的路由,那么可以使用BeginRouteForm辅助器方法。下面在RouteConfig类中添加一条新路由来进行演示:
using System;
using System.Collections.Generic;
using System.Linq;
using System.Web;
using System.Web.Mvc;
using System.Web.Routing;

namespace HelperMethods
{
    public class RouteConfig
    {
        public static void RegisterRoutes(RouteCollection routes)
        {
            routes.IgnoreRoute("{resource}.axd/{*pathInfo}");

            routes.MapRoute(
                name: "Default",
                url: "{controller}/{action}/{id}",
                defaults: new { controller = "Home", action = "Index", id = UrlParameter.Optional }
            );

            routes.MapRoute(name: "FormRoute", url: "app/forms/{controller}/{action}");

        }
    }
}
在这种路由配置的情况下使用BeginForm方法,则得到的form中,action标签属性包含的URL是通过默认路由创建的。现在我们使用BeginRouteForm方法指定我们想要使用的新路由:
@model HelperMethods.Models.Person

@{
    ViewBag.Title = "CreatePerson";
}

<h2>CreatePerson</h2>

@using (Html.BeginRouteForm("FormRoute",                        // 使用 BeginRouteForm 方法;指定路由名:FormRoute
    new { },                                                    // 用于路由片段变量
    FormMethod.Post,                                            // 用于 form 的 method 标签属性
    new { @class = "personClass", data_formType = "person" }))  // 用于 form 的其他标签属性
{
    <div class="dataElem">
        <label>PersonId</label>
        <input name="personId" value="@Model.PersonId" />
    </div>
    <div class="dataElem">
        <label>First Name</label>
        <input name="firstName" value="@Model.FirstName" />
    </div>
    <div class="dataElem">
        <label>Last Name</label>
        <input name="lastName" value="@Model.LastName" />
    </div>
    <input type="submit" value="提交" />
}
该方法生成的HTML 的 form 标签如下(注意其中的action标签):
<form class="personClass" action="/app/forms/Home/CreatePerson" method="post" data-formtype="person">
使用input辅助器
下表列出了一些常用的基本的input辅助器方法,这些所有的方法的第一个参数都用于设置input元素的id和name标签属性值,第二个参数用于设置value标签属性。
|
HTML元素 |
示例 |
|
Checkbox (检查框,或复选框) |
Html.CheckBox("myCheckbox",false) 输出: <input id="myCheckbox" name="myCheckbox" type="checkbox" value="true" /> < input name="myCheckbox" type="hidden" value="false" /> |
|
Hidden field (隐藏字段) |
Html.Hidden("myHidden","val") 输出: <input id="myHidden" name="myHidden" type="hidden" value="val" /> |
|
Radio button (无线按钮,或单选按钮) |
Html.RadioButton("myRadiobutton","val",true) 输出: <input checked="checked" id="myRadiobutton" name="myRadiobutton" type="radion" value="val" /> |
|
Password (口令字段) |
Html.Password("myPassword","val") 输出: <input id="myPassword" name="myPassword" type="password" value="val" /> |
|
Text area (文本区) |
Html.TextArea("myTextarea","val",5,20,null) 输出: <textarea cols="20" id="myTextarea" name="myTextarea" rows="5" >val</textarea> |
|
Text box (文本框) |
Html.TextBox("myTextbox","val") 输出: <input id="myTextbox" name="myTextbox" type="text" value="val" /> |
注:CheckBox辅助器渲染了两个input元素——一个检查框和随后的一个同名的隐藏input元素。这是因为浏览器在检查框未作出选择时,不会递交检查框的值。有了这个隐藏控件,可以确保MVC框架在作出选择后,从这个隐藏字段获得一个值。
下面是对CreatePerson.cshtml视图的修改,使用了input辅助器方法:
@model HelperMethods.Models.Person

@{
    ViewBag.Title = "CreatePerson";
}

<h2>CreatePerson</h2>

@using (Html.BeginRouteForm("FormRoute",new { },FormMethod.Post, new { @class = "personClass", data_formType = "person" }))
{
    <div class="dataElem">
        <label>PersonId</label>
        @Html.TextBox("personId", @Model.PersonId)
    </div>
    <div class="dataElem">
        <label>First Name</label>
        @Html.TextBox("firstName", @Model.FirstName)
    </div>
    <div class="dataElem">
        <label>Last Name</label>
        @Html.TextBox("lastName", @Model.LastName)
    </div>
    <input type="submit" value="提交" />
}
下面是生成的HTML form表单,其中一些data形式的标签属性是MVC框架自行添加用来支持表单验证的:
<form class="personClass" action="/app/forms/Home/CreatePerson" method="post" data-formtype="person">
<div class="dataElem" >
<label >PersonId</label>
<input name="personId" id="personId" type="text" value="0" data-val-required="PersonId 字段是必需的。" data-val-number="字段 PersonId 必须是一个数字。" data-val="true">
</div>
<div class="dataElem" >
<label >First Name</label>
<input name="firstName" id="firstName" type="text" value="" >
</div>
<div class="dataElem" >
<label >Last Name</label>
<input name="lastName" id="lastName" type="text" value="" >
</div>
<input type="submit" value="提交" >
</form>
提示:对于这些用以支持整个应用程序验证的data标签属性,是可以取消其生成的,只需要在Web.config文件中将UnobtrusiveJavaScriptEnabled的值设置为false即可。也可在一个Razor代码块中,通过调用Html.EnableClientValidation(false),是这个视图禁用这一特性。

-
根据模型属性创建input元素
像前面对于input辅助器的使用时,需要注意一点,就是必须确保第一个参数与第二个参数的模型值相对于。否则,MVC框架将不能通过表单数据重构模型对象,因为name标签属性与input元素的表单值不匹配。
@model HelperMethods.Models.Person

@{
    ViewBag.Title = "CreatePerson";
}

<h2>CreatePerson</h2>

@using (Html.BeginRouteForm("FormRoute",new { },FormMethod.Post, new { @class = "personClass", data_formType = "person" }))
{
    <div class="dataElem">
        <label>PersonId</label>
        @Html.TextBox("personId")
    </div>
    <div class="dataElem">
        <label>First Name</label>
        @Html.TextBox("firstName")
    </div>
    <div class="dataElem">
        <label>Last Name</label>
        @Html.TextBox("lastName")
    </div>    <input type="submit" value="提交" />
}
像上面这种用法,将会使用string参数搜索视图数据ViewBag和视图模型,以找到一个能用于input元素的相应数据项。查找位置如下:
-
ViewBag.DataValue
-
@Model.DataValue
找到的第一个值将用于设置生成HTML的value标签属性(最后对@Model.DataValue的检查,如果该视图的视图模型中含有名为DataValue的属性或字段时,才会起作用)。
如果指定的是一个如DataValue.First.Name这样的字符串,这种搜索就会变得复杂起来。MVC框架会尝试这个点分隔元素的不同排列,如:
-
ViewBag.DataValue.First.Name
-
ViewBag.DataValue ["First"].Name
-
ViewBag.DataValue ["First.Name"]
-
ViewBag.DataValue ["First"]["Name"]
-
使用强类型的input辅助器
前面提到的这些辅助器都有对应的强类型辅助器方法,可参考下表的介绍,需要清楚的是它们只能用于强类型视图:
|
HTML元素 |
示例 |
|
Check box |
Html.CheckBoxFor(x > x.IsApproved) Output : <input id "IsApproved" name "IsApproved" type "checkbox" value "true" /> <input name "IsApproved" type "hidden" value "false" /> |
|
Hidden field |
Html.HiddenFor(x > x.FirstName) Output : <input id "FirstName" name "FirstName" type "hidden" value "" /> |
|
Radio button |
Html.RadioButtonFor(x > x.IsApproved, "val") Output : <input id "IsApproved" name "IsApproved" type "radio" value "val" /> |
|
Password |
Html.PasswordFor(x > x.Password) Output : <input id "Password" name "Password" type "password" /> |
|
Text area |
Html.TextAreaFor(x > x.Bio, 5, 20, new{}) Output : <textarea cols "20" id "Bio" name "Bio" rows "5">Bio value</textarea> |
|
Text box |
Html.TextBoxFor(x > x.FirstName) Output : <input id "FirstName" name "FirstName" type "text" value "" /> |
这些辅助器是通过lambda表达式进行工作的,传递给表达式的值是视图模型对象,以及可以选择的字段或属性,它们将被用于设置value标签属性。下面就来看看它们的用法:
@model HelperMethods.Models.Person

@{
    ViewBag.Title = "CreatePerson";
}

<h2>CreatePerson</h2>

@using (Html.BeginRouteForm("FormRoute",new { },FormMethod.Post, new { @class = "personClass", data_formType = "person" }))
{
    <div class="dataElem">
        <label>PersonId</label>
        @Html.TextBoxFor(m => m.PersonId)
    </div>
    <div class="dataElem">
        <label>First Name</label>
        @Html.TextBoxFor(m => m.FirstName)
    </div>
    <div class="dataElem">
        <label>Last Name</label>
        @Html.TextBoxFor(m => m.LastName)
    </div>    <input type="submit" value="提交" />
}
通过和强类型辅助器使用的对比,很容易看出使用强类型辅助器可以避免出现前面说的由于前后两个参数不匹配导致的错误。
创建select元素
下表中的辅助器可以生成一个下拉列表的控件,也可以设置其运行多选,具体辅助器参见下表(它们也和前面的input辅助器一样存在强类型的辅助器):
|
HTML元素 |
示例 |
|
Drop-down list (弱类型) |
Html.DropDownList ("myList", new SelectList (new [] {"A", "B"}), "Choose") Output : <select id "myList" name "myList"> <option value "">Choose</option> <option>A</option> <option>B</option> </select> |
|
Drop-down list (强类型) |
Html.DropDownListFor(x > x.Gender, new SelectList (new [] {"M", "F"})) Output : <select id "Gender" name "Gender"> <option>M</option> <option>F</option> </select> |
|
Multiple-select (弱类型) |
Html.ListBox ("myList", new MultiSelectList (new [] {"A", "B"})) Output : <select id "myList" multiple "multiple" name "myList"> <option>A</option> <option>B</option> </select> |
|
Multiple-select (强类型) |
Html.ListBoxFor(x > x.Vals, new MultiSelectList (new [] {"A", "B"})) Output : <select id "Vals" multiple "multiple" name "Vals"> <option>A</option> <option>B</option> </select> |
select辅助器以SelectList或MultiSelectList为参数。这两个类都是基于IEnumerble对象序列进行操作的,它们有一个很好的特性,就是它们能够为这个列表项提取对象的值,包括模型对象的值。详见下面示例:
    <div class="dataElem">
        <label>Role</label>
        @Html.DropDownListFor(m => m.Role, new SelectList(Enum.GetNames(typeof(HelperMethods.Models.Role))))
    </div>
下面是生成的HTML:
<!DOCTYPE html>
<html>
<head>
<meta charset="utf-8">
<meta name="viewport" content="width=device-width">
<title>CreatePerson</title>
<link href="/Content/Site.css" rel="stylesheet">
<style type="text/css">
label {
display: inline-block;
100px;
}
.dateElem {
margin: 5px;
}
</style>
</head>
<body>
<h2>CreatePerson</h2>
<form class="personClass" action="/app/forms/Home/CreatePerson" method="post" data-formtype="person">
<div class="dataElem">
<label>PersonId</label>
<input name="PersonId" id="PersonId" type="text" value="0" data-val-required="PersonId 字段是必需的。" data-val-number="字段 PersonId 必须是一个数字。" data-val="true">
</div>
<div class="dataElem">
<label>First Name</label>
<input name="FirstName" id="FirstName" type="text" value="">
</div>
<div class="dataElem">
<label>Last Name</label>
<input name="LastName" id="LastName" type="text" value="">
</div>
<div class="dataElem">
<label>Role</label>
<select name="Role" id="Role" data-val-required="Role 字段是必需的。" data-val="true"><option selected="selected">Admin</option>
<option>User</option>
<option>Guest</option>
</select>
</div>
<input type="submit" value="提交">
</form>
</body>
</html>