一、前述
VGG16是由16层神经网络构成的经典模型,包括多层卷积,多层全连接层,一般我们改写的时候卷积层基本不动,全连接层从后面几层依次向前改写,因为先改参数较小的。
二、具体
1、因为本文中代码需要依赖OpenCV,所以第一步先安装OpenCV

因为VGG要求输入244*244,而数据集是28*28的,所以需要通过OpenCV在代码里去改变。
2、把模型下载后离线放入用户的管理目录下面,这样训练的时候就不需要从网上再下载了

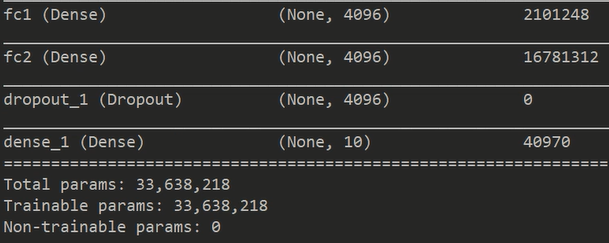
3、我们保留的是除了全连接的所有层。
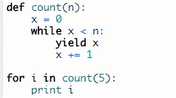
4、选择数据生成器,在真正使用的时候才会生成数据,加载到内存,前面yield只是做了一个标记
代码:
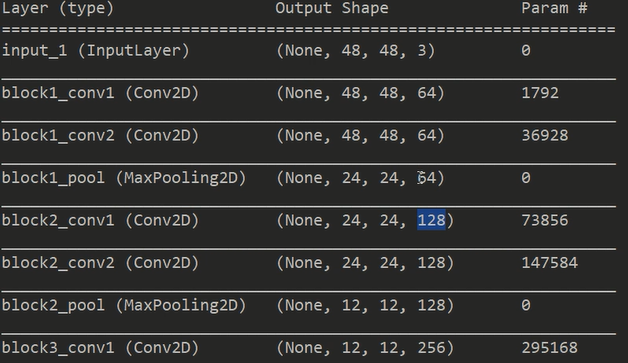
# 使用迁移学习的思想,以VGG16作为模板搭建模型,训练识别手写字体
# 引入VGG16模块
from keras.applications.vgg16 import VGG16

# 其次加载其他模块
from keras.layers import Input
from keras.layers import Flatten
from keras.layers import Dense
from keras.layers import Dropout
from keras.models import Model
from keras.optimizers import SGD

# 加载字体库作为训练样本
from keras.datasets import mnist

# 加载OpenCV(在命令行中窗口中输入pip install opencv-python),这里为了后期对图像的处理,
# 大家使用pip install C:Users28542Downloadsopencv_python-3.4.1+contrib-cp35-cp35m-win_amd64.whl
# 比如尺寸变化和Channel变化。这些变化是为了使图像满足VGG16所需要的输入格式
import cv2
import h5py as h5py
import numpy as np

# 建立一个模型,其类型是Keras的Model类对象,我们构建的模型会将VGG16顶层(全连接层)去掉,只保留其余的网络
# 结构。这里用include_top = False表明我们迁移除顶层以外的其余网络结构到自己的模型中
# VGG模型对于输入图像数据要求高宽至少为48个像素点,由于硬件配置限制,我们选用48个像素点而不是原来
# VGG16所采用的224个像素点。即使这样仍然需要24GB以上的内存,或者使用数据生成器
model_vgg = VGG16(include_top=False, weights='imagenet', input_shape=(48, 48, 3))#输入进来的数据是48*48 3通道
#选择imagnet,会选择当年大赛的初始参数
#include_top=False 去掉最后3层的全连接层看源码可知
for layer in model_vgg.layers:
    layer.trainable = False#别去调整之前的卷积层的参数
model = Flatten(name='flatten')(model_vgg.output)#去掉全连接层,前面都是卷积层
model = Dense(4096, activation='relu', name='fc1')(model)
model = Dense(4096, activation='relu', name='fc2')(model)
model = Dropout(0.5)(model)
model = Dense(10, activation='softmax')(model)#model就是最后的y
model_vgg_mnist = Model(inputs=model_vgg.input, outputs=model, name='vgg16')
#把model_vgg.input  X传进来
#把model Y传进来 就可以训练模型了

# 打印模型结构,包括所需要的参数
model_vgg_mnist.summary()


#以下是原版的模型结构 224*224
model_vgg = VGG16(include_top=False, weights='imagenet', input_shape=(224, 224, 3))
for layer in model_vgg.layers:
    layer.trainable = False#别去调整之前的卷积层的参数
model = Flatten()(model_vgg.output)
model = Dense(4096, activation='relu', name='fc1')(model)
model = Dense(4096, activation='relu', name='fc2')(model)
model = Dropout(0.5)(model)
model = Dense(10, activation='softmax', name='prediction')(model)
model_vgg_mnist_pretrain = Model(model_vgg.input, model, name='vgg16_pretrain')

model_vgg_mnist_pretrain.summary()

# 新的模型不需要训练原有卷积结构里面的1471万个参数,但是注意参数还是来自于最后输出层前的两个
# 全连接层,一共有1.2亿个参数需要训练
sgd = SGD(lr=0.05, decay=1e-5)#lr 学习率 decay 梯度的逐渐减小 每迭代一次梯度就下降 0.05*(1-(10的-5))这样来变
#随着越来越下降 学习率越来越小 步子越小
model_vgg_mnist.compile(loss='categorical_crossentropy',
                                 optimizer=sgd, metrics=['accuracy'])

# 因为VGG16对网络输入层需要接受3通道的数据的要求,我们用OpenCV把图像从32*32变成224*224,把黑白图像转成RGB图像
# 并把训练数据转化成张量形式,供keras输入
(X_train, y_train), (X_test, y_test) = mnist.load_data("../test_data_home")
X_train, y_train = X_train[:1000], y_train[:1000]#训练集1000条
X_test, y_test = X_test[:100], y_test[:100]#测试集100条
X_train = [cv2.cvtColor(cv2.resize(i, (48, 48)), cv2.COLOR_GRAY2RGB)
           for i in X_train]#变成彩色的
#np.concatenate拼接到一起把
X_train = np.concatenate([arr[np.newaxis] for arr in X_train]).astype('float32')

X_test = [cv2.cvtColor(cv2.resize(i, (48, 48)), cv2.COLOR_GRAY2RGB)
          for i in X_test]
X_test = np.concatenate([arr[np.newaxis] for arr in X_test]).astype('float32')

print(X_train.shape)
print(X_test.shape)

X_train = X_train / 255
X_test = X_test / 255


def tran_y(y):
    y_ohe = np.zeros(10)
    y_ohe[y] = 1
    return y_ohe


y_train_ohe = np.array([tran_y(y_train[i]) for i in range(len(y_train))])
y_test_ohe = np.array([tran_y(y_test[i]) for i in range(len(y_test))])

model_vgg_mnist.fit(X_train, y_train_ohe, validation_data=(X_test, y_test_ohe),
                             epochs=100, batch_size=50)
结果:
自定义的网络层: