[Vue 牛刀小试]:第十五章 - 传统开发模式下的 axios 使用入门
一、前言#
在没有接触 React、Angular、Vue 这类 MVVM 的前端框架之前,无法抛弃 Jquery 的重要理由,除了优秀的前端 DOM 元素操作性以外,能够非常便捷的发起 http 请求也占有非常重要的地位。
既然我们已经开始使用 Vue 进行前端开发,抛弃了对页面 DOM 元素的操作,难道,为了方便的发起 http 请求,还需要在项目中加载 jquery 或者是手动创建 http 请求吗?
答案当然是不用的,作为目前主流的前端框架,开发者、社区早已经为我们提供好了解决方案。随着 Vue 作者尤雨溪宣布不再维护 vue-resource,转而推荐大家使用 axios,目前在 Vue 社区中 axios 开始占据 http 库的主导地位,所以这一章我们就介绍下如何使用 axios 发起 http 请求。
学习系列目录地址:https://www.cnblogs.com/danvic712/p/9549100.html
仓储地址(前端):https://github.com/Lanesra712/VueTrial/blob/master/chapter02-bronze/front/axios.html
仓储地址(后端):https://github.com/Lanesra712/VueTrial/tree/master/chapter02-bronze/rear/Sample
二、干货合集#
axios 是一个基于 Promise 的 http 客户端,可以用于浏览器和 node.js。官方文档对于 axios 库的使用方法已经写的很清楚了,所以这里只介绍如何与 Vue 进行结合,从而使用 axios 发起 http 请求。
这一章会涉及到简单的前后端的数据交互,作为一名 .NETer,本篇文章将采用 ASP.NET Core Web API 作为后端服务,你可以根据自己的喜好进行选择。当然,如果你之前并没有接触过后端,不知道怎么选择的话,推荐你尝试 .NET Core,示例的后端项目我也会同步放在 Github 上。
PS:在后端模板项目上,我会添加对于 Swagger API 文档的支持,以及在后端程序中进行配置跨域请求,从而允许后端接口可以接受跨域请求的访问。这些内容并不会在本篇文章中展现,如果你需要详细了解,你可以查看另一个系列的文章(ASP.NET Core 项目实战)那里会介绍一些关于 ASP.NET Core 项目的开发,两个系列相辅相成,后续所有涉及到前后端的交互开发,全部在此系列(ASP.NET Core 项目实战)中进行呈现。
1、加载#
同目前的前端发展方向相同,axios 可以从 npm、yarn、bower 这种前端包管理工具中进行下载,同时,也提供了 cdn 链接,方便我们在传统的项目中进行使用。

// 使用 npm 加载
npm install axios

// 使用 bower 加载
bower install axios

// 使用 yarn 加载
yarn add axios
在这篇文章中,我还是与之前一样,采用下载源文件的方式进行使用,在后续的前端框架搭建完成后再改用前端包管理工具进行加载。
// 使用 cdn 加载
<script src="https://unpkg.com/axios/dist/axios.min.js"></script>
2、get & post#
相比于 put 请求和 delete 请求,get 请求和 post 请求是我们最常用的两个方法,一个很常见的使用场景,我们通过 get 请求来搜索数据,通过 post 请求来提交数据。
在示例的后端接口中,提供了五个接口方法,分别对应了 get、post、put、delete 这四个 HTTP 谓词。put 和 delete 对应的接口方法这里并没有实现,这篇文章主要使用的是 get 和 post 谓词对应的三个接口。
2.1、获取所有的用户数据(/api/user)
get 请求,加载全部的用户数据,按照创建时间进行降序排列。
2.2、根据搜索条件搜索用户数据(/api/user/query)
get 请求,根据用户输入框输入的数据,从全部的用户数据中查找出符合条件的数据,因为这里会存在多个查询条件,其实并不太符合 Restful 的接口设计,所以这里我采用 ASP.NET Core 中的特性路由的方式,指定此路由为专门的数据查询接口。
2.3、新增用户数据(/api/user)
post 请求,提交一条新的用户数据,因为是采用 Restful 风格的接口设计,所以请求的地址与获取所有的用户数据相同,仅仅是 http 谓词的不同。

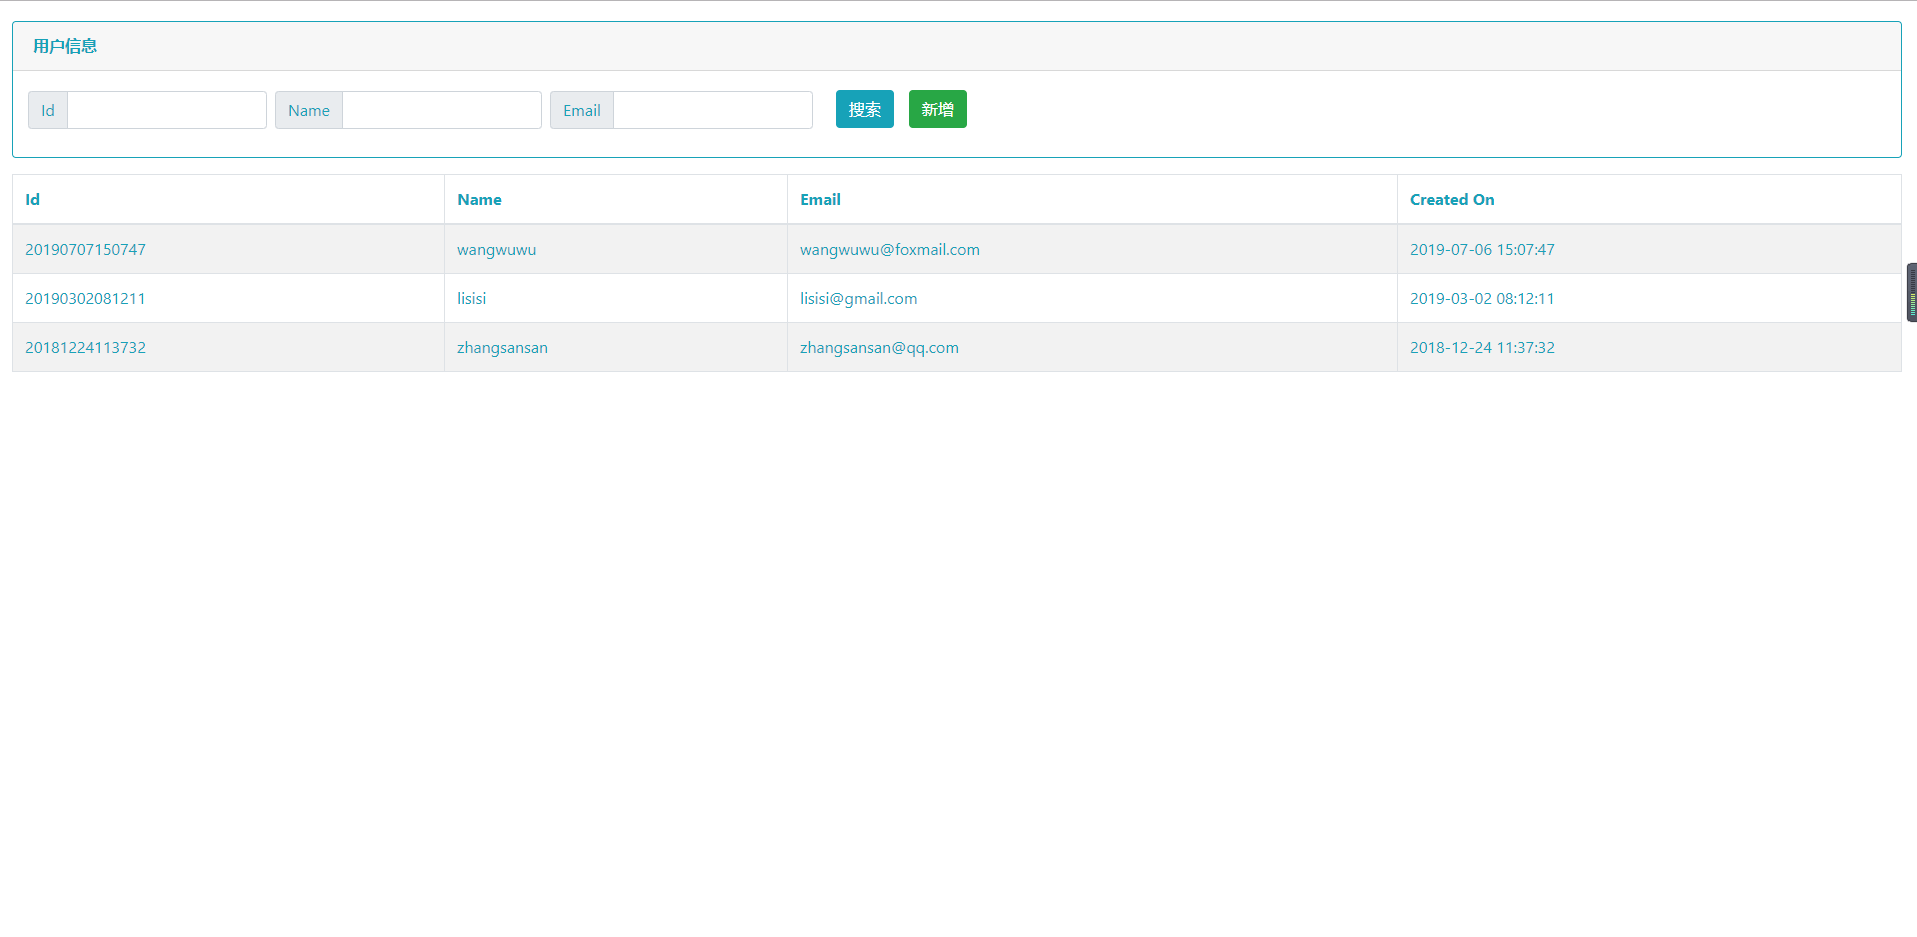
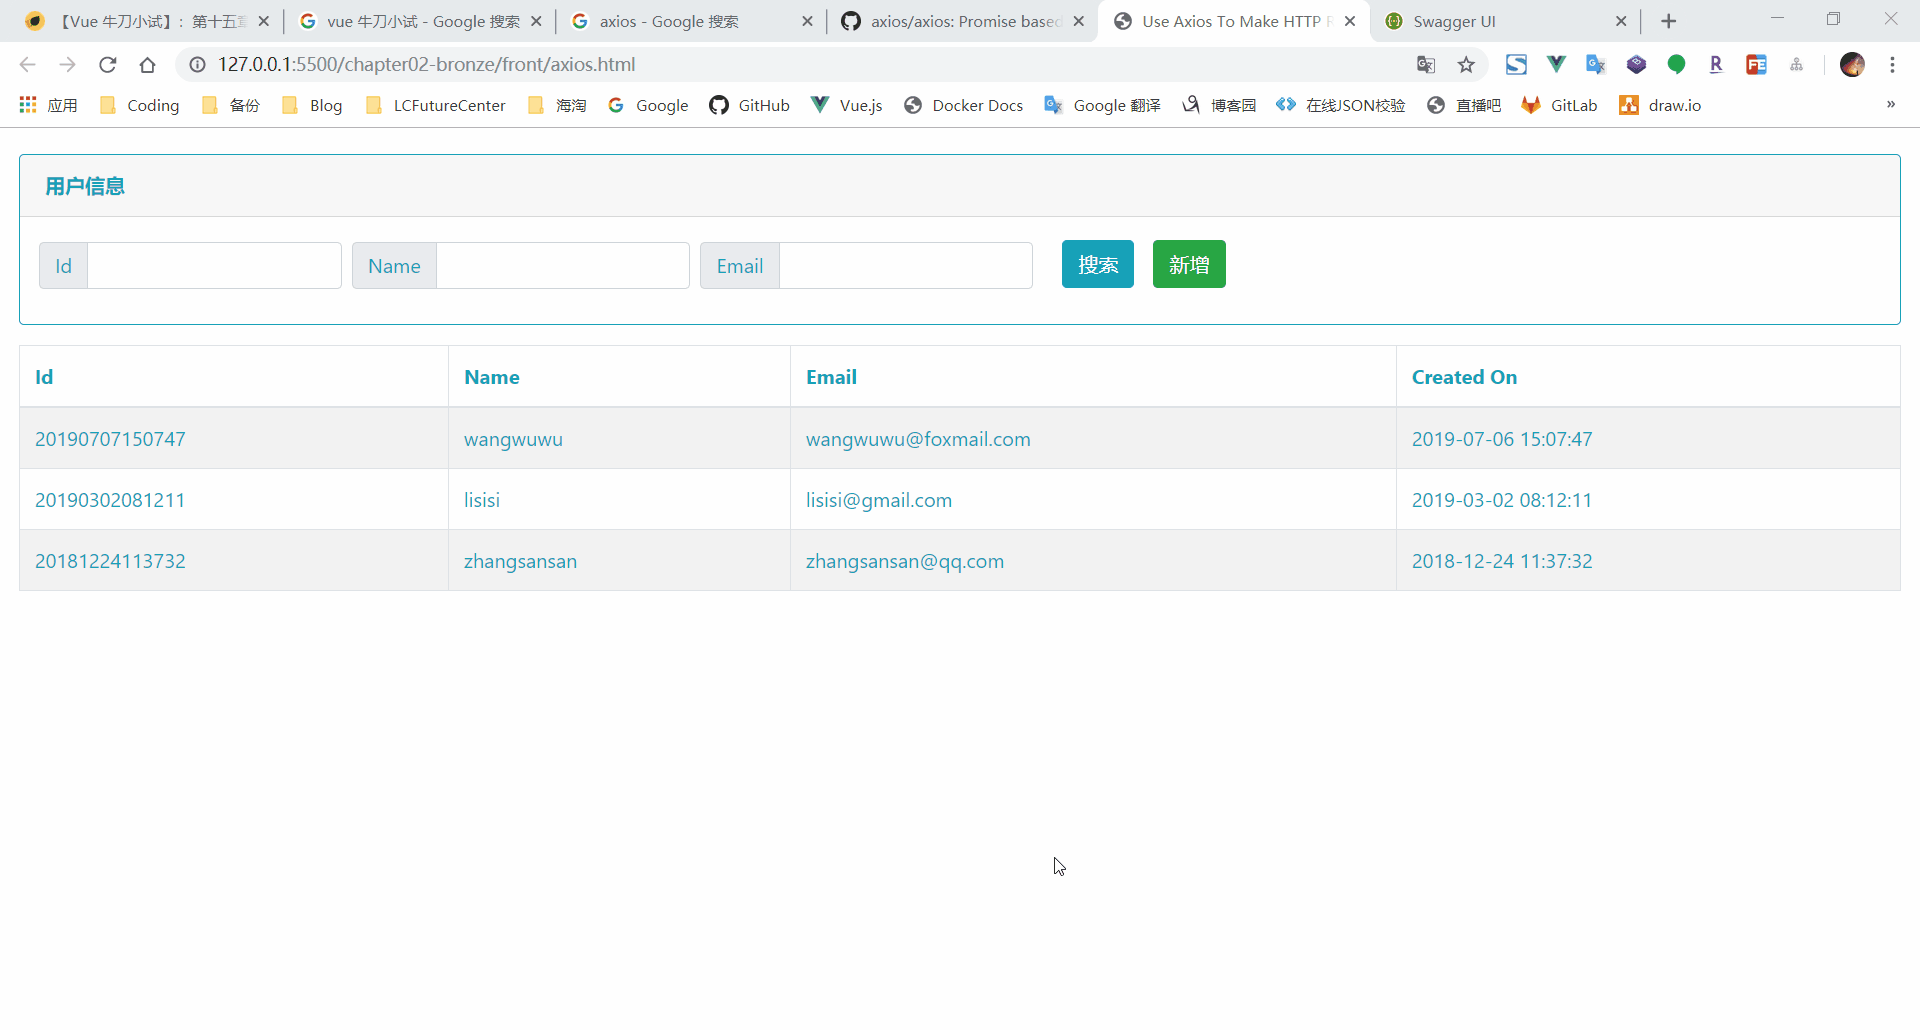
最终实现的前端页面如下所示,页面第一次加载时会加载全部的用户数据;当用户点击搜索按钮时,会根据顶部的三个输入框中的值,从用户数据中进行筛选;当点击新增按钮时,则会根据 Name 和 Email 输入框中的值新增一条新的用户数据。
首先我们需要在页面加载的时候请求后端接口,去获取我们的用户数据,这里我们在 Vue 实例的 methods 中定义一个 getList 方法,在这个方法中我们去请求后端接口。
在之前学习 Vue 的生命周期钩子函数时我们了解到,在 created 钩子函数中,对于 Vue 实例的 data 和 methods 已经初始化完成,此时,整个 Vue 实例已经初始化完成。但是,初始化完成的 Vue 实例没有与 DOM 进行绑定。所以,如果我们想要在页面初始加载时就渲染出整个用户信息表格,created 函数是能够调用 getList 方法最早的一个钩子函数。
在 axios 中,我们发起一个 http 请求后,在 then 回掉方法中进行请求成功后的数据处理,在 catch 回掉方法中捕获请求失败的信息。这里的 then 方法就相当于我们在 Jquery 中使用 ajax 时的 success 回调方法,而 catch 方法则是 error 回调。
axios.get('http://localhost:5000/api/user')
    .then(function (response) {
        console.log(response)
    }).catch(function (error) {
        console.log(error)
    })
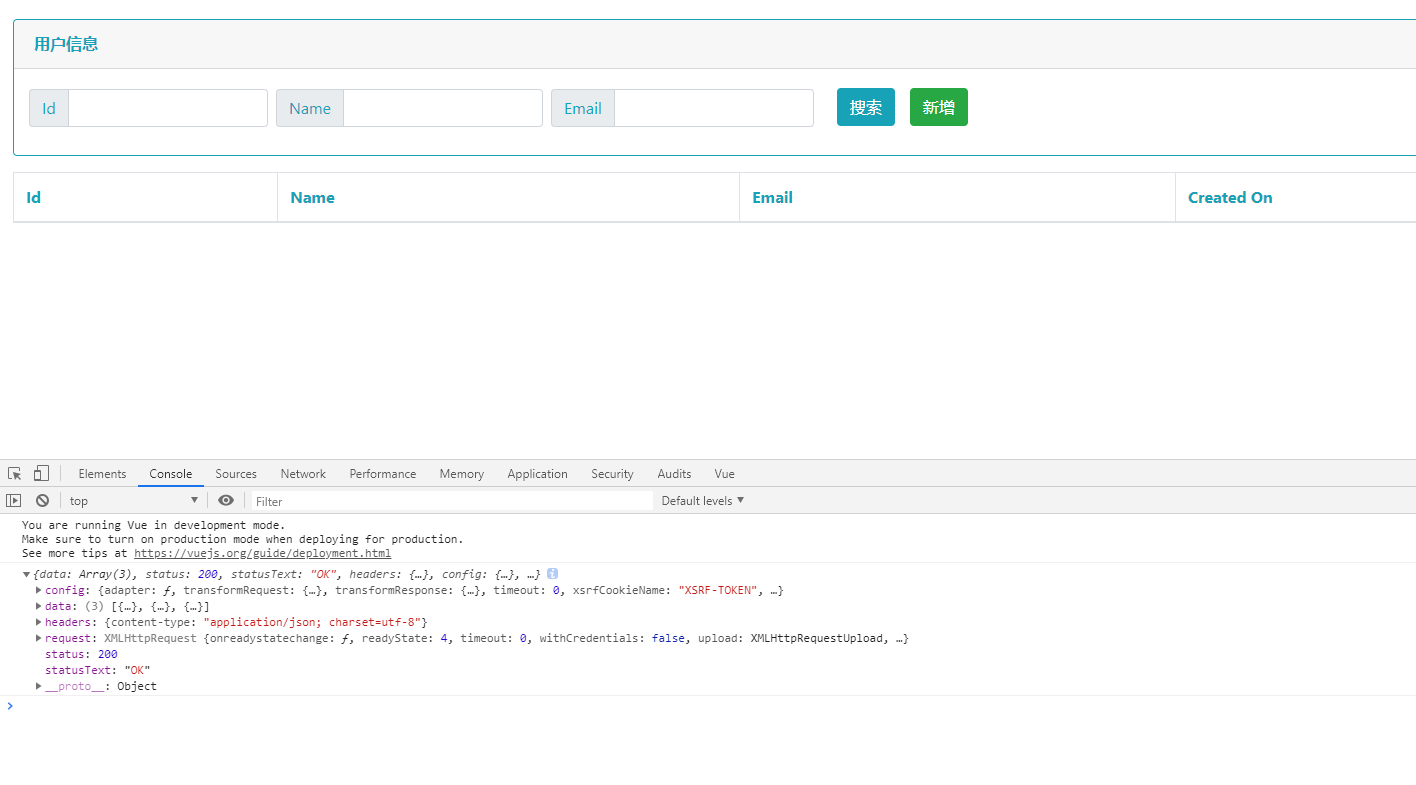
从接口打印出的返回结果可以看到,接口返回的 response 中包含了五部分的信息。这里 data 属性显示的就是整个的用户数据集合,在实际使用中,你需要与 http 响应状态码进行结合,考虑如果后端出现错误如何使前端知晓,从而相对友好的通知用户。
{
  // 后端接口返回的数据
  data: {},

  // 服务端接口返回的 HTTP 状态码
  status: 200,

  // 服务端接口返回的 HTTP 状态信息
  statusText: 'OK',

  // 后端接口返回的响应 header 信息
  headers: {},

  // axios 发起的接口请求时的配置信息
  config: {},

  // 接口响应的请求信息
  request: {}
}
针对 axios 发起请求时的配置信息,我们可以自己进行配置。例如我们可以设置请求的接口域名是什么,设置 post 请求时的 Content-Type,或者针对前后端数据交互时经常使用的 Jwt Token 验证,我们可以在请求的 header 中添加 token 信息,从而通过后端的权限验证。
axios.defaults.baseURL = 'https://api.example.com';
axios.defaults.headers.common['Authorization'] = AUTH_TOKEN;
axios.defaults.headers.post['Content-Type'] = 'application/x-www-form-urlencoded';
当我们获取到所有的用户数据后,我们就可以将结果值赋值给我们 Vue 实例中的 users 数据集合对象(这个 users 需要你事先在 Vue 实例的 data 中进行提前定义好)。
axios.get('http://localhost:5000/api/user')
    .then(function (response) {
        console.log(response)
        this.users = response.data
    }).catch(function (error) {
        console.log(error)
    })
如果你按照上面的写法进行赋值,你会发现页面上并没有按照我们的想法渲染出数据。既然我们已经获取到了后端接口返回的数据值,那么这里的问题就可能出现在赋值这上面。我们可以在 then 回调中打印 this.users 看看。

可以看到,这里的 this 指向的其实是浏览器的 window 对象,因此我们给 this.users 赋值最终是赋值到 window 对象上了。因为是 this 指向出了问题,所以这里我就直接采用箭头函数的方式进行数据赋值,最终的实现代码如下所示。
var vm = new Vue({
    el: '#app',
    data: {
        id: '',
        name: '',
        email: '',
        users: []
    },
    created() {
        this.getList()
    },
    methods: {
        getList() {
            axios.get('http://localhost:5000/api/user')
                .then(response => {
                    this.users = response.data
                }).catch(error => {
                    console.log(error)
                })
        }
    },
});
搜索按钮的功能与获取所有用户信息的代码比较相似,这里我们需要将搜索的参数添加到 get 请求中。从下图的浏览器控制台中可以看到,当点击查询按钮之后,我们添加的参数会以 query 查询字符串的方式添加到请求的 url 地址上。
var vm = new Vue({
    el: '#app',
    data: {
        id: '',
        name: '',
        email: '',
        users: []
    },
    methods: {
        search() {
            axios.get('http://localhost:5000/api/user/query', {
                params: {
                    id: this.id,
                    name: this.name,
                    email: this.email,
                }
            }).then(response => {
                this.users = response.data
            }).catch(error => {
                console.log(error)
            })
        }
    },
});

与 get 请求相似,使用 axios 发起 post 请求也是在 then 回掉方法中获取接口返回值,在 catch 回掉方法中捕获错误信息。
var vm = new Vue({
    el: '#app',
    data: {
        id: '',
        name: '',
        email: '',
        users: []
    },
    methods: {
        getList() {
            axios.get('http://localhost:5000/api/user')
                .then(response => {
                    this.users = response.data
                }).catch(error => {
                    console.log(error)
                })
        },
        add() {
            axios.post('http://localhost:5000/api/user', {
                name: this.name,
                email: this.email,
            }).then(response => {
                console.log(response)
                this.getList()
            }).catch(error => {
                console.log(error)
            })
        }
    },
});
就像我们使用 jquery 发起 ajax 请求一样,我们可以使用 $.ajax/$.post 方法去发起一个 get/post 请求,也可以在 $.ajax 方法中通过指定请求的 type 类型来确定我们是以 get 请求还是 post 请求的方式执行,在 axios 中也提供了相似的功能。
// get 请求
axios({
  method: 'get',
  url: 'http://localhost:5000/api/user'
})

// post 请求
axios({
  method: 'post',
  url: 'http://localhost:5000/api/user',
  data: {
    name: this.name,
    email: this.email,
  }
});
整个前端页面完整的示例代码以及实现的效果如下所示。
<div id="app">
    <div class="card border-info mb-3" style="margin-top: 20px;">
        <div class="card-header text-info">
            <b>用户信息</b>
        </div>
        <div class="card-body text-info form-inline">
            <div class="form-row">
                <div class="form-group">
                    <div class="input-group mb-2 mr-sm-2">
                        <div class="input-group-prepend">
                            <div class="input-group-text text-info"> Id </div>
                        </div>
                        <input type="text" class="form-control" id="id" v-model="id" autocomplete="off">
                    </div>
                </div>
                <div class="form-group">
                    <div class="input-group mb-2 mr-sm-2">
                        <div class="input-group-prepend">
                            <div class="input-group-text text-info"> Name </div>
                        </div>
                        <input type="text" class="form-control" id="name" v-model="name" autocomplete="off">
                    </div>
                </div>
                <div class="form-group">
                    <div class="input-group mb-2 mr-sm-2">
                        <div class="input-group-prepend">
                            <div class="input-group-text text-info"> Email </div>
                        </div>
                        <input type="email" class="form-control" id="email" v-model="email" autocomplete="off">
                    </div>
                </div>
                <div class="form-group">
                    <a class="btn btn-info" href="#" role="button" @click="search">搜索</a>
                    <a class="btn btn-success" href="#" role="button" @click="add">新增</a>
                </div>
            </div>

        </div>
    </div>

    <table class="table table-striped table-bordered table-hover text-info">
        <thead class="thead-inverse">
            <tr>
                <th>Id</th>
                <th>Name</th>
                <th>Email</th>
                <th>Created On</th>
            </tr>
        </thead>
        <tbody>
            <tr v-for="item in users" :key="item.id">
                <td scope="row">{{item.id}}</td>
                <td>{{item.name}}</td>
                <td>{{item.email}}</td>
                <td>{{item.createdTime}}</td>
            </tr>
        </tbody>
    </table>

</div>

<script>
    var vm = new Vue({
        el: '#app',
        data: {
            id: '',
            name: '',
            email: '',
            users: []
        },
        created() {
            this.getList()
        },
        methods: {
            getList() {
                axios.get('http://localhost:5000/api/user')
                    .then(response => {
                        this.users = response.data
                    }).catch(error => {
                        console.log(error)
                    })
            },
            search() {
                axios.get('http://localhost:5000/api/user/query', {
                    params: {
                        id: this.id,
                        name: this.name,
                        email: this.email,
                    }
                }).then(response => {
                    this.users = response.data
                }).catch(error => {
                    console.log(error)
                })
            },
            add() {
                axios.post('http://localhost:5000/api/user', {
                    name: this.name,
                    email: this.email,
                }).then(response => {
                    console.log(response)
                    this.getList()
                }).catch(error => {
                    console.log(error)
                })
            }
        },
    });
</script>
3、拦截器#
在前后端分离的项目中,我们一般采用 Jwt token 的方式进行权限控制。前端在获取数据之前,需要从后端获取到 token 令牌。当前端获取到后端回传的 token 信息后,我们需要将此 token 信息保存下来,此后所有的请求都需要在请求的 header 信息中添加此 token 信息。那么,能不能有一种方式可以在触发后端验证之前,统一的进行 token 信息校验,当判断没有包含 token 信息之后,前端直接跳转到登录页面。
在 axios 中,我们可以将此类操作放置到拦截器中。你可以将 axios 中的拦截器看成是 ASP.NET Core 中的 Filters 过滤器,例如,这里的需求,我们完全可以将获取到的 token 信息置于 request 请求拦截器中,在发起的每一次 http 请求时去校验是否包含 token 信息,当没有包含 token 信息时,就可以直接跳转到登录页面。
这里因为我并没有实现后端 token 验证,所以这里就只是进行一个演示,你可以从浏览器的控制台中看到只要我们发起一个 http 请求,就会输出的我们打印的信息。
// request 请求拦截
axios.interceptors.request.use(function (request) {
    // 对 request 进行拦截
    if(true){
        console.log('跳转到登录页面')
    }
    return request;
}, function (error) {
    // 在错误请求时进行操作
    return Promise.reject(error);
});

既然有针对发起 request 请求时的拦截器,毫无疑问,对于获取到接口返回的 response 信息,我们同样可以使用拦截器进行拦截。例如,在定义 restful 接口时,我们一般会根据 http 响应状态码去反映接口的调用是否成功。在每一个通过 axios 发起请求的 then 回掉方法中,我们都需要对获取到响应状态码进行判断,判断接口的调用是否成功。
当我们使用拦截器后,我们完全可以在针对 response 的拦截器中进行统一的判断。例如,当调用接口不成功时,http 响应状态码为 400,同时返回错误信息,我们完全可以在拦截器中进行判断,当所有的接口响应状态码为 400 时,弹出后端返回的错误信息。
// response 请求拦截
axios.interceptors.response.use(function (response) {
    // 对 response 进行拦截
    switch (response.status) {
        case 200:
            console.log('接口访问成功')
            break
        case 400:
            console.log('提示错误信息')
            break
        case 401:
            console.log('重定向到登录页面')
            break
    }

    return response;
}, function (error) {
    // 在错误请求时进行操作
    return Promise.reject(error);
});
三、总结#
这篇文章主要是简单介绍如何使用 axios 去实现发起一个 http 请求。至此,在现阶段的 Vue 学习使用中,对于一些基础知识点就已经完成了一个初步的梳理,接下来,从下一章开始,我会从 0 开始通过 Vue CLI 去搭建一个前端的项目模板,因为自己并不是一个前端开发人员,个人的关注点还在于 .NET Core 后端,所以这里可能并不会涉及到 webpack 相关的知识点。同时,一些在之前的学习中没有涉及到的知识点也会在后续的文章中进行补充。之后,就像开篇时所说的那样,Vue.js 牛刀小试 和 ASP.NET Core 项目实战 相辅相成,后期的关注点将聚焦于如何通过 ASP.NET Core 和 Vue 进行前后端开发,欢迎持续关注~~~
作者:墨墨墨墨小宇
出处:https://www.cnblogs.com/danvic712/p/11154613.html
本站使用「署名 4.0 国际」创作共享协议,转载请在文章明显位置注明作者及出处。
个人简介:96年生人,出生于安徽某四线城市,毕业于Top 10000000 院校。.NET 程序员,枪手死忠,喵星人。于2016年12月开始.NET程序员生涯,微软.NET技术的坚定坚持者,立志成为云养猫的少年中面向谷歌编程最厉害的.NET程序员。
个人博客:https://yuiter.com