自定义树型下拉框
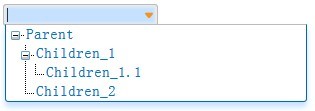
这里为大家展示一下前段时间自定义了一个树型下拉框,相对功能比较简单,欢迎引用或改造。让我们先来看一下效果:
接下来,我们做个简单的拆解和说明:
1、javacript 脚本
 脚本初始化
脚本初始化
1 $(function () {
 2     $('.treedropdown').each(function () {
 3         var id = $(this).attr('id') + "_tree";
 4         var loca = $(this).offset();
 5         $(this).after('<span class="tree" id="' + id + '" style="display:none"></span>');
 6
 7         $('#' + id)
 8             .offset({ top: loca.top, left: loca.left })
 9             .hover(function () {
10                 $(this).show();
11             }, function () {
12                 $(this).fadeOut();
13             });
14
15         $(this).click(function () {
16             $.target = $(this);
17             $('#' + $(this).attr('id') + '_tree').fadeIn('100');
18         });
19     });
20     GetDataSource('');
21 });
在初始化中我们为页面中 class 标记了 “treedropdown” 的元素创建一个 “tree” 的容器,及指定数据将在这里绑定树型结构,并指定位置。笔者将定义文本框的单击事件来触发显示 “Tree”。
绑定数据源
1 function GetDataSource(id) {
 2     isAll = false;
 3     $.post('datasource.json', function (json) {
 4         var tree = eval(json);
 5         if ($('.tree').html() == "") {
 6             for (var i in tree) {
 7                 var node = tree[i];
 8                 $('.tree').append('<dl class="treenode"><dt class="nodename rooticon" treeid="' + node.id + '"><t onclick="node_select(this)">' + node.name + '</t></dt></dl>');
 9                 addChildren(node.children, true);
10             }
11         } else {
12             if (json == "[]") {
13                 var icon = $('dt[treeid="' + id + '"]').next().length == 0 ? "lasticon" : "nodeicon";
14                 $('dt[treeid="' + id + '"] span').removeAttr('onclick').attr('class', icon);
15             } else {
16                 addChildren(tree);
17                 var dt = $('dt[treeid="' + id + '"]');
18                 if (dt.nextAll('dt').length > 0) {
19                     dt.next().addClass('joinicon');
20                 }
21             }
22         }
23         if (isAll) {
24             CheckNodeStatus();
25         }
26     });
27 }
在这里我们请求 JSON 数据源,使用 jQuery 的 append 方法追加到 “tree”中。代码中 “isAll” 是一个布尔类型的变量,初始值为 “false”,它表示该数据源提供不完整数据,及展开节点将判断读取其子节点。这里需要读者根据使用需求自行改造。
添加子节点
1 function addChildren(children, isroot) {
 2     for (var i in children) {
 3         var node = children[i];
 4         var pId = node.parentid;
 5         var foldicon = (parseInt(i) + 1) == children.length ? 'foldlasticon' : 'foldicon';
 6         var unfoldicon = (parseInt(i) + 1) == children.length ? 'unfoldlasticon' : 'unfoldicon';
 7         if (i == 0) {
 8             $('dt[treeid="' + pId + '"]').after('<dd><dl><dt class="nodename" treeid="' + node.id + '" pid="' + pId + '"><span class=" + foldicon + " onclick="node_click(this)"></span><t onclick="node_select(this)">' + node.name + '</t></dt></dl></dd>');
 9         } else {
10             $('dt[treeid="' + pId + '"] ~ dd:first dl:first').append('<dt class="nodename" treeid="' + node.id + '" pid="' + pId + '"><span class=" + foldicon + " onclick="node_click(this)"></span><t onclick="node_select(this)">' + node.name + '</t></dt>');
11         }
12
13         if (node.children != null && node.children.length > 0) {
14             addChildren(node.children);
15             isAll = true;
16         }
17     }
18 }
比较常见的递归添加子节点,不做详细说明了。
检查节点状态
1 function CheckNodeStatus() {
 2     $('.tree dl').each(function (i, o) {
 3         $(o).children('dt').each(function (y, dt) {
 4             if ($(dt).nextAll('dt').length > 0) {
 5                 if ($(dt).next('dd').length > 0) {
 6                     $(dt).children('span').attr('class', 'unfoldicon');
 7                     $(dt).next().addClass('joinicon');
 8                 } else
 9                     $(dt).children('span').attr('class', 'nodeicon');
10             } else {
11                 $(dt).children('span').attr('class', 'unfoldlasticon');
12                 if ($(dt).next('dd').length == 0) {
13                     $(dt).children('span').attr('class', 'lasticon');
14                 }
15             }
16         });
17     });
18 }
检查节点的状态指定树节点的图片,比较简单,不详解了,注:替换图标可在样式文件中更改。
两个事件
1 function node_click(obj) {
 2     var dt = $(obj).parent();
 3     var children = dt.nextUntil('dt');
 4     if (children.length == 0) {
 5         GetDataSource(dt.attr('treeid'));
 6     } else {
 7         children.stop().slideToggle('fast');
 8     }
 9     var foldicon = dt.nextAll('dt').length == 0 ? "foldlasticon" : "foldicon";
10     var unfoldicon = dt.nextAll('dt').length == 0 ? "unfoldlasticon" : "unfoldicon";
11     $(obj).attr('class', $(obj).is("." + foldicon) ? unfoldicon : foldicon);
12 }
13
14 function node_select(obj) {
15     $.target.val($(obj).text());
16     $('#' + $.target.attr('targetid')).val($(obj).parent().attr('treeid'));
17     $('#' + $.target.attr('id') + "_tree").fadeOut('fast');
18 }
这里分别是两个事件,单击节点和选择节点的事件。点击节点事件无非要注意更改节点状态图标。选择节点这里有一点需要注意,节点值的存储,笔者采用的方式关联到一个隐藏域(读者根据需要修改),所以需要与当前文本框有一个关联——“targetid”,“targetid” 是存放值的隐藏域的 Id。
2、CSS 样式
笔者在这里就写了简单的样式,童鞋们别太计较 UI 好不好看了,O(∩_∩)O哈哈~~
样式表
 1 .treeviewDropdown {
 2     border: 1px solid #BBBBBB;
 3     border-radius: 0px 0px 6px 6px;
 4     color: #333333;
 5     margin-top: 1px;
 6     margin-left: -3px;
 7     background-color: white;
 8     overflow: auto;
 9 }
10 .treeviewDropdown table tr{
11     height:auto;
12 }
13 .treeviewDropdown table td{
14     height:auto;
15 }
16 .treeviewDropdown .stretch { height:auto; max-height:200px; overflow:auto; }
17
18 .tree {
19     clear:both;
20     position:absolute;
21     top:20px;
22     left:2px;
23     border: 1px solid #0066B9;
24     border-top: 1px solid #BBBBBB;
25     box-shadow: 0px 5px 5px #C6E1FF;
26     border-radius: 0px 0px 3px 3px;
27     -moz-border-radius: 3px;
28     -webkit-border-radius: 3px;
29     -moz-box-shadow: 0px 5px 8px #C6E1FF;
30     -webkit-box-shadow: 0px 5px 8px #C6E1FF;
31     background-color:#fff;
32     width:300px; height:auto; max-height:200px; overflow:auto; font-size:11.5pt; }
33 .tree dl { margin: 0px; }
34 .tree dd { margin:0px; padding-left:10px; }
35 .tree .nodename { cursor: pointer; color:#0079C2; }
36 .tree .nodename:hover { cursor: pointer; color:#F7931D; }
37 .tree .rooticon { padding-left:20px; background:url('rooticon.png') no-repeat; }
38 .tree .foldicon { padding-left:20px; background:url('foldicon.png') no-repeat; }
39 .tree .foldlasticon { padding-left:20px; background:url('foldlasticon.png') no-repeat; }
40 .tree .unfoldicon { padding-left:20px; background:url('unfoldicon.png') no-repeat;}
41 .tree .unfoldlasticon { padding-left:20px; background:url('unfoldlasticon.png') no-repeat;}
42 .tree .joinicon { background:url('joinicon.png') repeat-y; }
43 .tree .nodeicon { padding-left:20px; background:url('nodeicon.png') no-repeat; }
44 .tree .lasticon { padding-left:20px; background:url('lasticon.png') no-repeat; }
45 .treedropdown { border: 1px solid #BBBBBB; padding:2px; border-radius: 3px 3px 3px 3px; box-shadow: 0 0 2px 2px #EEEEEE inset; color: #333333;}
46 .treedropdown:hover { cursor:pointer; background:url('dropdown.png') no-repeat scroll  97% 50% transparent; background-color: #C6E1FF }
3、页面中引用
这样一来,这个简单的控件就算完成。我们来看下如何使用。
页面
1 <input type="text" class="treedropdown" targetid="selectVal" />
2 <input type="hidden" id="selectVal" />
哈哈哈,简单吧,别忘记引用 jquery 基本包哦 ^_^
说这么多不如直接看下源码吧!记住密码:f-ye