ASP.NET MVC 文件上传和路径处理总结
目录
文件的上传和路径处理必须解决下面列出的实际问题:
1.重复文件处理
2.单独文件上传
3.编辑器中文件上传
4.处理文章中的图片路径
5.处理上传地址的变化
一.上传文件和重复文件处理
文件处理的原则是:不在数据库中保存文件,只在数据库中保存文件信息(Hash值等)。采取文件的MD5重命名文件在一般情况足够处理文件的重复问题,强迫症倾向则可以考虑将MD5和其他摘要算法结合。
     public static string Save(HttpPostedFileBase file, string path)
        {
            var root = "~/Upload/" + path + "/";
            var phicyPath = HostingEnvironment.MapPath(root);
            Directory.CreateDirectory(phicyPath);
            var fileName = Md5(file.InputStream) + file.FileName.Substring(file.FileName.LastIndexOf('.'));
            file.SaveAs(phicyPath + fileName);
            return fileName;
        }
二.单独文件上传
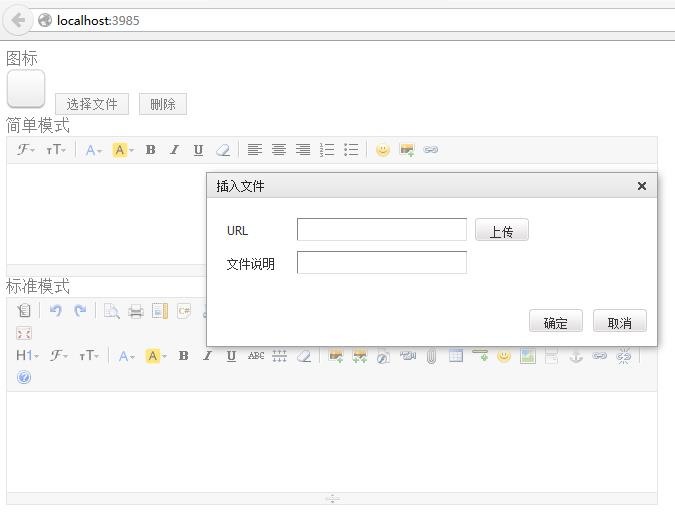
网站Logo、分类图标等各种场景需要单独文件上传的处理。通过使用UIHintAttribute或自定义继承自UIHintAttribute的特性我们将文件上传的前端逻辑的重复代码消灭,使用统一的视图文件处理。曾经使用过Uplodify和AjaxFileUploader,前者存在flash依赖和cookie问题,后者基本已经过时。此处我们采用KindEditor中的文件上传组件作为演示。非Flash的支持IE6+的方案的核心都是通过iframe方式实现伪AJax上传,核心还是通过html form post到服务器。
    public class UploadModel
    {
        [Display(Name = "图标")]
        [UIHint("Upload")]
        public string Image { get; set; }

        [Display(Name = "简单模式")]
        [UIHint("Editor")]
        [AdditionalMetadata("useSimple", true)]
        public string Text1 { get; set; }

        [Display(Name = "标准模式")]
        [UIHint("Editor")]
        public string Text2 { get; set; }
    }
在我们的实际项目中采取继承UIHintAttribute的方式,其中的path路径指定存储的下级地址,类似的还有DropDownAttribute、EditorAtrribute等等。仅供参考。
    [AttributeUsage(AttributeTargets.Property)]
    public class UploadAttribute : UIHintAttribute, IMetadataAware
    {
        public string Path { get; private set; }

        public UploadAttribute(string path = "")
            : base("Upload")
        {
            this.Path = path;
        }

        public virtual void OnMetadataCreated(ModelMetadata metadata)
        {
            metadata.AdditionalValues.Add("Path", this.Path);
        }
    }
Razor:在Shared中添加EditorTemplates文件夹,新建Upload.cshtml文件。
<script>
    KindEditor.ready(function (K) {
        var editor = K.editor({
            allowFileManager: false,
            allowImageUpload: true,
            formatUploadUrl: false,
            uploadJson: '@url',
        });
        K('#btn_@id').click(function () {
            editor.loadPlugin('insertfile', function () {
                editor.plugin.fileDialog({
                    fileUrl: K('#@id').val(),
                    clickFn: function (url, title) {
                        K('#@id').val(url);
                        $('#image_@id').attr('src', url);
                        editor.hideDialog();
                    }
                });
            });
        });
    });
    $('#rest_@id').click(function () {
        $('#@id').attr('value', '');
        $('#image_@id').attr('src', '@Url.Content("~/Images/default.png")');
    });
</script>
三.编辑器中的文件上传
编辑器中的文件上传和单独文件上传的主要区别是上传后返回值的处理,编辑器需要将url插入到编辑的位置。编辑器采用过CKeditor和UMeditor,两者都需要我改源代码才能处理路径问题。上传地址和返回值的配置如果不能方便的视图中调整的编辑器,我个人不认为是好编辑器,这就好比一个类库没法扩展和自定义配置一样。仍然采用KindEditor作为演示。Editor.cshtml的主要内容如下:
|
1
2
3
4
5
6
7
8
9
10
11
12
13
14
15
16
17
18
19
20
21
|
<script type="text/javascript"> var editor; KindEditor.ready(function (K) { editor = K.create('textarea[name="@Html.IdForModel()"]', { resizeType: 1, allowPreviewEmoticons: false, allowImageUpload: true, uploadJson: '@UploadManager.UploadUrl', formatUploadUrl: false, allowFileManager: false @if(useSimple) { <text>, items: [ 'fontname', 'fontsize', '|', 'forecolor', 'hilitecolor', 'bold', 'italic', 'underline', 'removeformat', '|', 'justifyleft', 'justifycenter', 'justifyright', 'insertorderedlist', 'insertunorderedlist', '|', 'emoticons', 'image', 'link'] </text> } }); });</script> |
四.处理文章中的图片路径
重头戏来了,这个看似问题可以回避,其实真的无法回避。更换目录、域名和端口,使用子域名或其他域名作为图片服务器等等,这些情况让我们必须处理好这个问题,否则日后会浪费更多的时间。这不是小问题,打开支持插入图片的各个网站的编辑器,查看一下图片的路径,大多是绝对url的,又或者只基于根目录的。如果你以产品的形式提供给客户,更不可能要求客户自己挨个替换文章中的路径了。
1.在数据库中不存储文件路径,使用URL路径作为存储。
2.使用html base元素解决相对路径的引用问题。
就是base元素,可能有的人认为这个base可有可无,但在处理图片路径的问题上,没有比base更简洁更优雅的方案了。至少我没有也没找到过。其实可以把全部的静态资源都移除到外部存储,如果你需要。在测试时,我们切换回使用本地存储。
@{
    var baseUrl = UploadManager.UrlPrefix;
}
<!DOCTYPE html>
<html>
<head>
    <meta charset="utf-8" />
    <meta name="viewport" content="width=device-width, initial-scale=1.0">
    <link href="~/favicon.ico" rel="shortcut icon" type="image/x-icon" />

    <title>@ViewBag.Title</title>
    <base href="@baseUrl" />

    <script src="~/Scripts/jquery-1.11.2.min.js"></script>
    @RenderSection("head",false)
</head>
<body>
    @RenderBody()
</body>
</html>
五.处理上传地址的变化
我们需要独立的图片服务器处理上传或者使用第三方的图片存储服务时,我们的上传地址改变了,如果刚刚提到的图片路径一样,因此我们将上传路径和图片路径都采取配置的方式方便更改,我们就曾经切换到又拍云又切换到自有的服务器。在我的实际使用时配置在数据中使用时采用缓存。为了便于演示我们直接使用配置文件。
首先定义配置文件的处理程序
    public class UploadConfig : IConfigurationSectionHandler
    {
        public object Create(object parent, object configContext, System.Xml.XmlNode section)
        {
            var config = new UploadConfig();
            var urloadUrlNode = section.SelectSingleNode("UploadUrl");
            if (urloadUrlNode != null && urloadUrlNode.Attributes != null && urloadUrlNode.Attributes["href"] != null)
            {
                config.UploadUrl = Convert.ToString(urloadUrlNode.Attributes["href"].Value);
            }

            var urlPrefixNode = section.SelectSingleNode("UrlPrefix");
            if (urlPrefixNode != null && urlPrefixNode.Attributes != null && urlPrefixNode.Attributes["href"] != null)
            {
                config.UrlPrefix = Convert.ToString(urlPrefixNode.Attributes["href"].Value);
            }

            return config;
        }

        public string UploadUrl { get; private set; }

        public string UrlPrefix { get; private set; }
    }
在web.config中配置
 <configSections>
    <section name="UploadConfig" type="SimpleFileManager.UploadConfig, SimpleFileManager" requirePermission="false" />
  </configSections>
  <UploadConfig>
    <UploadUrl href="~/File/Upload/" />
    <UrlPrefix href="~/Upload/" />
 </UploadConfig>
使用UploadMange缓存和管理配置
    public static class UploadManager
    {
        private static string uploadUrl;
        private static string urlPrefix;

        static UploadManager()
        {
            var config = ConfigurationManager.GetSection("UploadConfig") as UploadConfig;
            var url = config != null && !string.IsNullOrEmpty(config.UploadUrl) ? config.UploadUrl : "~/File/Upload";
            uploadUrl = url.StartsWith("~") ? UploadHelper.GetUrlFromVisualPath(url) : url;
            var prefix = config != null && !string.IsNullOrEmpty(config.UrlPrefix) ? config.UrlPrefix : "~/Upload";
            urlPrefix = prefix.StartsWith("~") ? UploadHelper.GetUrlFromVisualPath(prefix) : prefix;
        }

        public static string UploadUrl
        {
            get
            {
                return uploadUrl;
            }
        }

        public static string UrlPrefix
        {
            get
            {
                return urlPrefix;
            }
        }
    }
文件Hash的Md5、返回值的Json处理、完整URL的生成和文件的保存这些具体技术的依赖为了便于演示,统一放置在UploadHelper中,因为这些不是重点。实际应用中可以采取接口隔离并通过IoC注入的方式解耦。

Demo下载:点击下载
