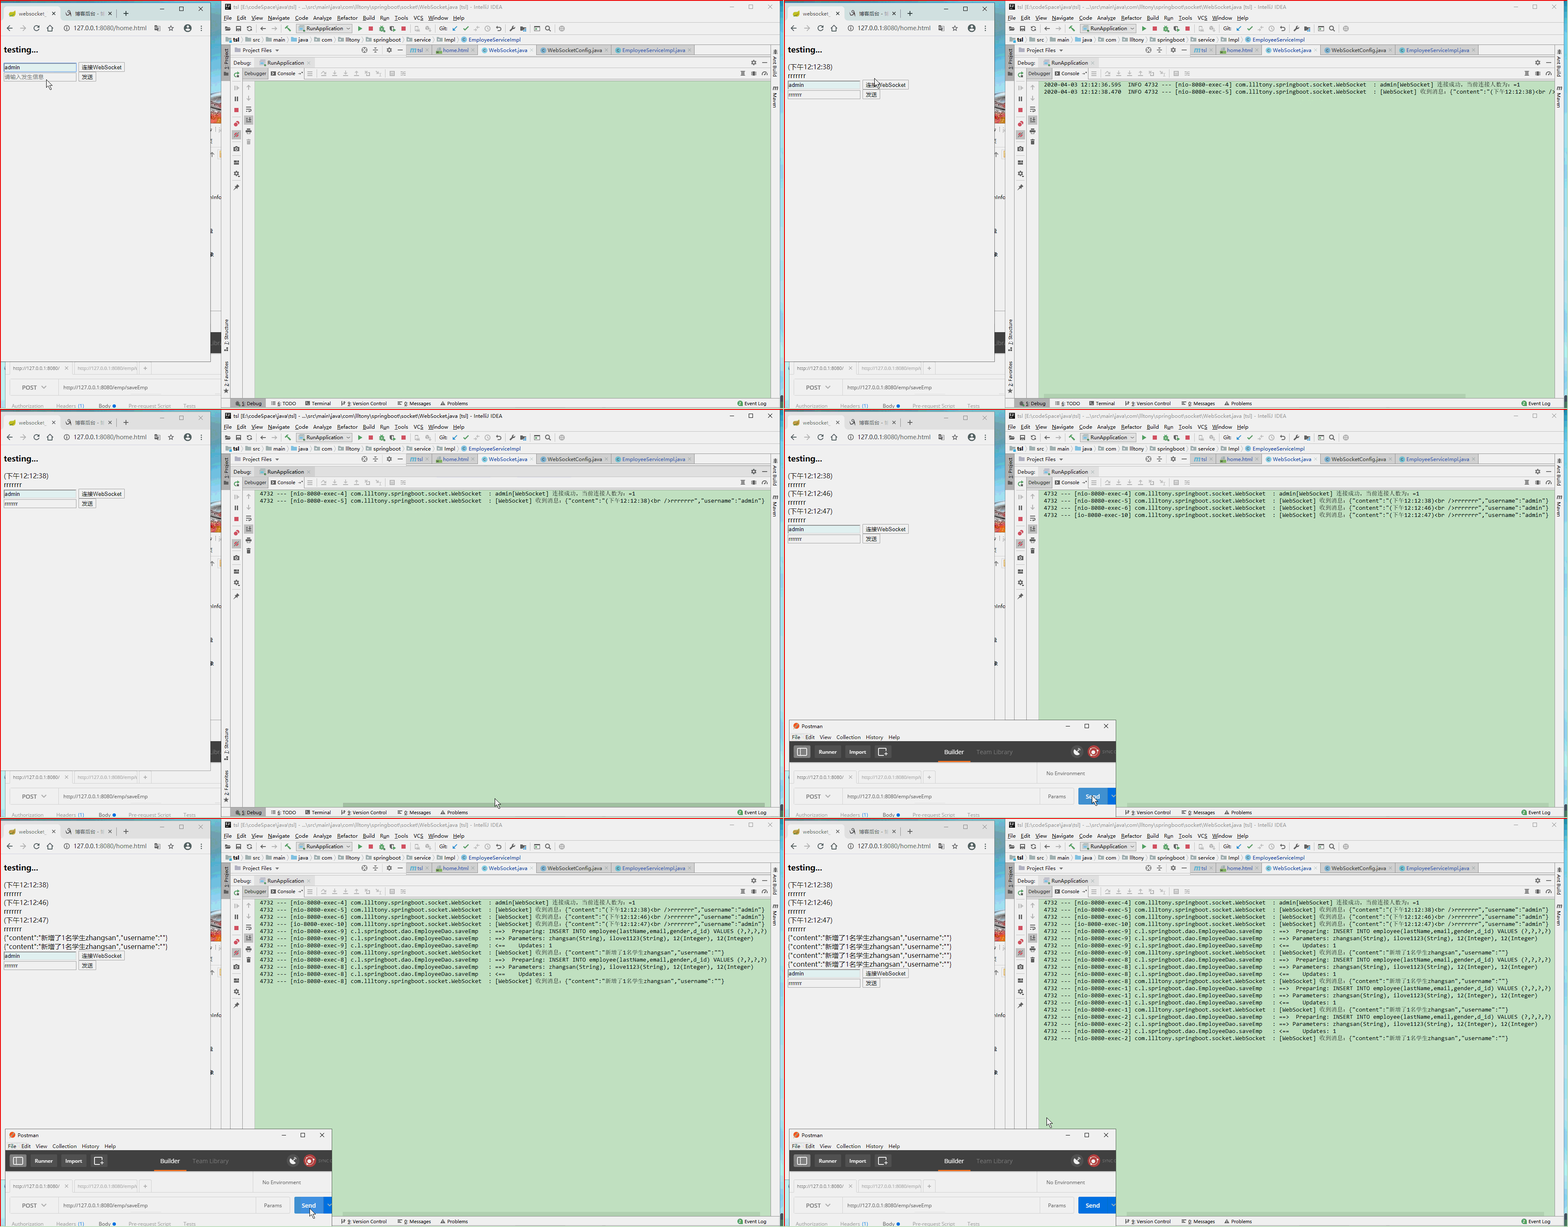
1.实际效果

2.添加一个WebSocketConfig
package com.llltony.springboot.config;

import org.springframework.context.annotation.Bean;
import org.springframework.stereotype.Component;
import org.springframework.web.socket.server.standard.ServerEndpointExporter;

@Component
public class WebSocketConfig {

    /**
     * ServerEndpointExporter 作用
     *
     * 这个Bean会自动注册使用@ServerEndpoint注解声明的websocket endpoint
     *
     * @return
     */
    @Bean
    public ServerEndpointExporter serverEndpointExporter() {
        return new ServerEndpointExporter();
    }
}
3.添加WebSocket类
package com.llltony.springboot.socket;

import com.alibaba.fastjson.JSONObject;
import lombok.extern.slf4j.Slf4j;
import org.springframework.stereotype.Component;

import javax.websocket.OnClose;
import javax.websocket.OnMessage;
import javax.websocket.OnOpen;
import javax.websocket.Session;
import javax.websocket.server.PathParam;
import javax.websocket.server.ServerEndpoint;
import java.util.concurrent.ConcurrentHashMap;

/**
 * @ServerEndpoint 这个注解有什么作用?
 * <p>
 * 这个注解用于标识作用在类上,它的主要功能是把当前类标识成一个WebSocket的服务端
 * 注解的值用户客户端连接访问的URL地址
 */

@Slf4j
@Component
@ServerEndpoint("/websocket/{name}")
public class WebSocket {

    /**
     * 与某个客户端的连接对话,需要通过它来给客户端发送消息
     */
    private Session session;

    /**
     * 标识当前连接客户端的用户名
     */
    private String name;

    /**
     * 用于存所有的连接服务的客户端,这个对象存储是安全的
     */
    private static ConcurrentHashMap<String, WebSocket> webSocketSet = new ConcurrentHashMap<>();


    @OnOpen
    public void OnOpen(Session session, @PathParam(value = "name") String name) {
        this.session = session;
        this.name = name;
        // name是用来表示唯一客户端,如果需要指定发送,需要指定发送通过name来区分
        webSocketSet.put(name, this);
        log.info(name+"[WebSocket] 连接成功,当前连接人数为:={}", webSocketSet.size());
    }


    @OnClose
    public void OnClose() {
        webSocketSet.remove(this.name);
        log.info(name+"[WebSocket] 退出成功,当前连接人数为:={}", webSocketSet.size());
    }

    @OnMessage
    public void OnMessage(String message) {
        log.info("[WebSocket] 收到消息:{}", message);
        //根据用户名判断知道发送
        JSONObject json = JSONObject.parseObject(message);
        String name=json.get("username").toString();
        String content=json.get("content").toString();
        if (!name.equals("") && name!= null) {
            AppointSending(name, content);
        } else {
            GroupSending(message);
        }
    }

    /**
     * 群发
     *
     * @param message
     */
    public void GroupSending(String message) {
        for (String name : webSocketSet.keySet()) {
            try {
                webSocketSet.get(name).session.getBasicRemote().sendText(message);
            } catch (Exception e) {
                e.printStackTrace();
            }
        }
    }

    /**
     * 指定发送
     *
     * @param name
     * @param message
     */
    public void AppointSending(String name, String message) {
        try {
            webSocketSet.get(name).session.getBasicRemote().sendText(message);
        } catch (Exception e) {
            e.printStackTrace();
        }
    }
}
4.添加pom依赖
<dependency>
            <groupId>org.springframework.boot</groupId>
            <artifactId>spring-boot-starter-websocket</artifactId>
        </dependency>

        <dependency>
            <groupId>org.projectlombok</groupId>
            <artifactId>lombok</artifactId>
        </dependency>

        <!-- fastjson -->
        <dependency>
            <groupId>com.alibaba</groupId>
            <artifactId>fastjson</artifactId>
            <version>1.2.47</version>
        </dependency>
5.添加html页面进行调用测试
<!DOCTYPE html>
<html lang="en">
<head>
    <meta charset="UTF-8">
    <title>websocket_Test</title>
    <script src="https://cdn.bootcss.com/jquery/3.0.0/jquery.min.js"></script>
    <meta content="no-cache" http-equiv="pragma">
    <meta content="no-cache" http-equiv="cache-control">
    <meta content="0" http-equiv="expires">
    <meta content="keyword1,keyword2,keyword3" http-equiv="keywords">
    <meta content="This is my page" http-equiv="description">
</head>
<body>
<div>
    <h3>testing...</h3>
    <div id="msgtext">
    </div>
    <div>
        <input id="username" name="username" type="text" placeholder="请输入用户名"/>
        <button onclick="connectWebSocket();">连接WebSocket</button>
        <br>
        <input id="msg" name="msg" type="text" placeholder="请输入发生信息"/>
        <button onclick="sendmsg();">发送</button>
    </div>
</div>

</body>
<script type="text/javascript">
      var ws;
      function connectWebSocket(){
          if('WebSocket' in window){
              var url="ws://localhost:8080/websocket/";
              var username=$('#username').val();
              if(username=="" || username==null){
                alert("请输入用户名");
                return;
              }else{
                url=url+username;
              }
              ws = new WebSocket(url);
          }else{
              alert("不支持 websocket");
          }
          ws.onopen = function(evt){
              //alert("op");
          }
          ws.onclose =function(evt){
              alert("close");
          }
          ws.onmessage = function(evt){
              var msg = evt.data;
              if("[object Blob]" != msg){
                  var msgdiv = document.getElementById("msgtext");
                  var span = document.createElement("span");
                  span.innerHTML = msg+"<br />";
                  msgdiv.appendChild(span);
              }else{
                  var msgdiv = document.getElementById("msgtext");
                  var span = document.createElement("span");
                  var br = document.createElement("br");
                  var can = document.createElement("canvas");
                  var context = can.getContext("2d");
                  var image = new Image();
                    image.onload = function () {
                //image.height
                context.clearRect(0, 0, can.width, can.height);
                context.drawImage(image, 0, 0, can.width, can.height);
            }
            image.src = URL.createObjectURL(msg);
            span.appendChild(can);
            span.appendChild(br);
            msgdiv.appendChild(span);
              }
          }
          ws.onerror = function(evt){
              alert("error");
          }
      }
      function sendmsg(){
          var message={};
          message.content="("+new Date().toLocaleTimeString()+")<br />"+document.getElementById("msg").value;
          message.username=$('#username').val();
          ws.send(JSON.stringify(message));
      }

</script>
</html>
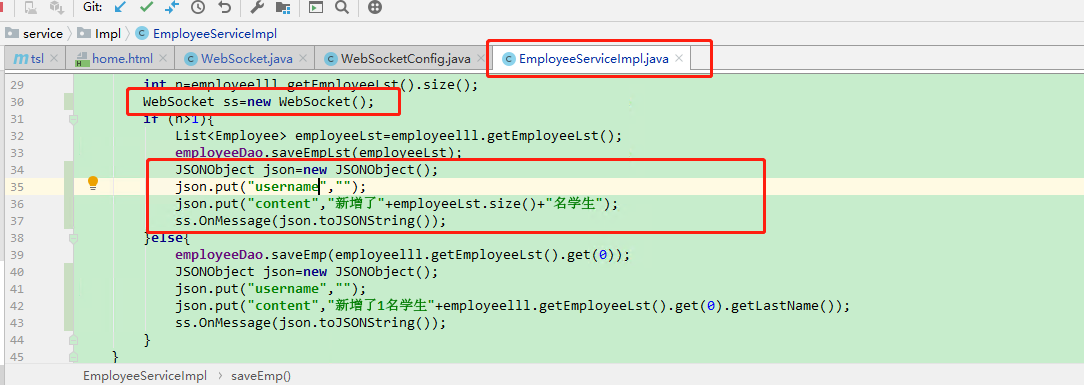
6.后端代码里的调用websocket发送消息

7.源码:https://github.com/CodingPandaLLL/tsl.git(在dev_webSocket分支中)