概览
大部分应用程序都或多或少会牵扯到网络开发,例如说新浪微博、微信等,这些应用本身可能采用iOS开发,但是所有的数据支撑都是基于后台网络服务器的。如今,网络编程越来越普遍,孤立的应用通常是没有生命力的。今天就会给大家介绍这部分内容:
1.NSURLConnection
- 数据请求
- 文件上传
- 文件下载
- 会话
2.Web请求和响应
- 使用代理方法
- 简化请求方法
- 图片缓存
- 扩展--文件分段下载
- 扩展--文件上传
3.NSURLSession
- 数据请求
- 文件上传
- 文件下载
- 会话
4.UIWebView
- 浏览器实现
- UIWebView与页面交互
5.网络状态
--------------------------------------------------------------------------------------------------------------------------------------------------------------
1. iOS开发网络篇—NSURLConnection基本使用

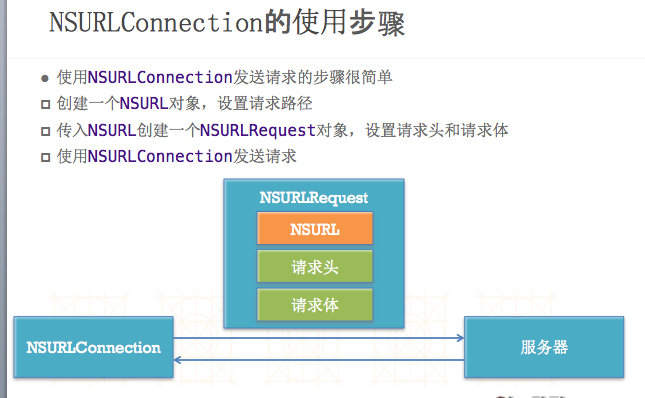


1、NSURLConnection的常用类
(1)NSURL:请求地址
(2)NSURLRequest:封装一个请求,保存发给服务器的全部数据,包括一个NSURL对象,请求方法、请求头、请求体....
(3)NSMutableURLRequest:NSURLRequest的子类
(4)NSURLConnection:负责发送请求,建立客户端和服务器的连接。发送NSURLRequest的数据给服务器,并收集来自服务器的响应数据
使用NSURLConnection发送请求的步骤很简单
(1)创建一个NSURL对象,设置请求路径(设置请求路径)
(2)传入NSURL创建一个NSURLRequest对象,设置请求头和请求体(创建请求对象)
(3)使用NSURLConnection发送NSURLRequest(发送请求)

2.代码示例
(1)发送请求的三个步骤:

 1 //
 2 //  YYViewController.m
 3 //  01-NSURLConnection的使用(GET)
 4 //
 5 //  Created by apple on 14-6-28.
 6 //  Copyright (c) 2014年 itcase. All rights reserved.
 7 //
 8
 9 #import "YYViewController.h"
10 #import "MBProgressHUD+MJ.h"
11
12 @interface YYViewController ()
13 @property (weak, nonatomic) IBOutlet UITextField *username;
14 @property (weak, nonatomic) IBOutlet UITextField *pwd;
15 - (IBAction)login;
16
17 @end
18
19 @implementation YYViewController
20
21 - (IBAction)login {
22 //    1.提前的表单验证
23     if (self.username.text.length==0) {
24         [MBProgressHUD showError:@"请输入用户名"];
25         return;
26     }
27     if (self.pwd.text.length==0) {
28         [MBProgressHUD showError:@"请输入密码"];
29         return;
30     }
31 //    2.发送请求给服务器(带上账号和密码)
32     //添加一个遮罩,禁止用户操作
33 //    [MBProgressHUD showMessage:@"正在努力加载中...."];
34 //    GET请求:请求行请求头请求体
35 //
36 //    1.设置请求路径
37     NSString *urlStr=[NSString stringWithFormat:@"http://192.168.1.53:8080/MJServer/login?username=%@&pwd=%@",self.username.text,self.pwd.text];
38     NSURL *url=[NSURL URLWithString:urlStr];
39 //    2.创建请求对象
40     NSURLRequest *request=[NSURLRequest requestWithURL:url];
41 //    3.发送请求
42     //发送同步请求,在主线程执行
43     NSData *data=[NSURLConnection sendSynchronousRequest:request returningResponse:nil error:nil];
44     //(一直在等待服务器返回数据,这行代码会卡住,如果服务器没有返回数据,那么在主线程UI会卡住不能继续执行操作)
45     NSLog(@"--%d--",data.length);
46 }
47 @end
模拟器情况:

打印服务器返回的信息:
![]()
 1 //
 2 //  YYViewController.m
 3 //  01-NSURLConnection的使用(GET)
 4 //
 5 //  Created by apple on 14-6-28.
 6 //  Copyright (c) 2014年 itcase. All rights reserved.
 7 //
 8
 9 #import "YYViewController.h"
10 #import "MBProgressHUD+MJ.h"
11
12 @interface YYViewController ()
13 @property (weak, nonatomic) IBOutlet UITextField *username;
14 @property (weak, nonatomic) IBOutlet UITextField *pwd;
15 - (IBAction)login;
16
17 @end
18
19 @implementation YYViewController
20
21 - (IBAction)login {
22 //    1.提前的表单验证
23     if (self.username.text.length==0) {
24         [MBProgressHUD showError:@"请输入用户名"];
25         return;
26     }
27     if (self.pwd.text.length==0) {
28         [MBProgressHUD showError:@"请输入密码"];
29         return;
30     }
31 //    2.发送请求给服务器(带上账号和密码)
32     //添加一个遮罩,禁止用户操作
33     [MBProgressHUD showMessage:@"正在努力加载中...."];
34
35 //
36 //    1.设置请求路径
37     NSString *urlStr=[NSString stringWithFormat:@"http://192.168.1.53:8080/MJServer/login?username=%@&pwd=%@",self.username.text,self.pwd.text];
38     NSURL *url=[NSURL URLWithString:urlStr];
39
40 //    2.创建请求对象
41     NSURLRequest *request=[NSURLRequest requestWithURL:url];
42
43 //    3.发送请求
44     //3.1发送同步请求,在主线程执行
45 //    NSData *data=[NSURLConnection sendSynchronousRequest:request returningResponse:nil error:nil];
46     //(一直在等待服务器返回数据,这行代码会卡住,如果服务器没有返回数据,那么在主线程UI会卡住不能继续执行操作)
47
48     //3.1发送异步请求
49     //创建一个队列(默认添加到该队列中的任务异步执行)
50 //    NSOperationQueue *queue=[[NSOperationQueue alloc]init];
51     //获取一个主队列
52     NSOperationQueue *queue=[NSOperationQueue mainQueue];
53     [NSURLConnection sendAsynchronousRequest:request queue:queue completionHandler:^(NSURLResponse *response, NSData *data, NSError *connectionError) {
54         NSLog(@"--block回调数据--%@---%d", [NSThread currentThread],data.length);
55         //隐藏HUD,刷新UI的操作一定要放在主线程执行
56         [MBProgressHUD hideHUD];
57
58         //解析data
59         /*
60         {"success":"登录成功"}
61         {"error":"用户名不存在"}
62         {"error":"密码不正确"}
63          */
64         NSDictionary *dict=[NSJSONSerialization JSONObjectWithData:data options:NSJSONReadingMutableLeaves error:nil];
65         NSLog(@"%@",dict);
66
67         //判断后,在界面提示登录信息
68         NSString *error=dict[@"error"];
69         if (error) {
70             [MBProgressHUD showError:error];
71         }else
72         {
73             NSString *success=dict[@"success"];
74             [MBProgressHUD showSuccess:success];
75         }
76     }];
77     NSLog(@"请求发送完毕");
78 }
79 @end
模拟器情况(注意这里使用了第三方框架):

打印查看:

 1  NSOperationQueue *queue=[NSOperationQueue mainQueue];
 2     [NSURLConnection sendAsynchronousRequest:request queue:queue completionHandler:^(NSURLResponse *response, NSData *data, NSError *connectionError) {
 3         //当请求结束的时候调用(有两种结果,一个是成功拿到数据,也可能没有拿到数据,请求失败)
 4         NSLog(@"--block回调数据--%@---%d", [NSThread currentThread],data.length);
 5         //隐藏HUD,刷新UI的操作一定要放在主线程执行
 6         [MBProgressHUD hideHUD];
 7
 8         //解析data
 9         /*
10         {"success":"登录成功"}
11         {"error":"用户名不存在"}
12         {"error":"密码不正确"}
13          */
14         if (data) {//请求成功
15             NSDictionary *dict=[NSJSONSerialization JSONObjectWithData:data options:NSJSONReadingMutableLeaves error:nil];
16             NSLog(@"%@",dict);
17
18             //判断后,在界面提示登录信息
19             NSString *error=dict[@"error"];
20             if (error) {
21                 [MBProgressHUD showError:error];
22             }else
23             {
24                 NSString *success=dict[@"success"];
25                 [MBProgressHUD showSuccess:success];
26             }
27         }else   //请求失败
28         {
29             [MBProgressHUD showError:@"网络繁忙,请稍后重试!"];
30         }
31
32     }];
   //解析data
        /*
        {"success":"登录成功"}
        {"error":"用户名不存在"}
        {"error":"密码不正确"}
         */
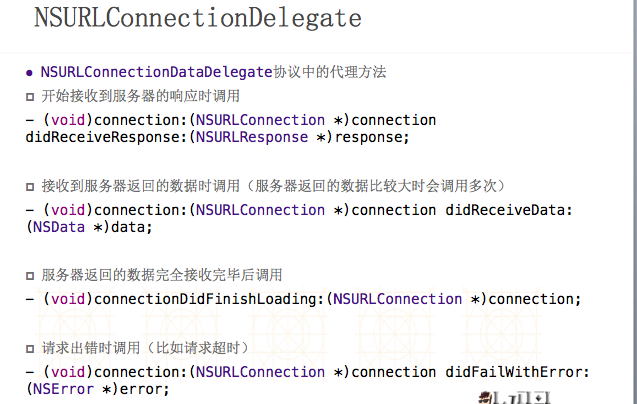
要监听服务器返回的data,所以使用<NSURLConnectionDataDelegate>协议
常见大代理方法如下:
 1 #pragma mark- NSURLConnectionDataDelegate代理方法
 2
 3 //当接收到服务器的响应(连通了服务器)时会调用
 4
 5 -(void)connection:(NSURLConnection *)connection didReceiveResponse:(NSURLResponse *)response
 6
 7 //当接收到服务器的数据时会调用(可能会被调用多次,每次只传递部分数据)
 8
 9 -(void)connection:(NSURLConnection *)connection didReceiveData:(NSData *)data
10
11 //当服务器的数据加载完毕时就会调用
12
13 -(void)connectionDidFinishLoading:(NSURLConnection *)connection
14
15 //请求错误(失败)的时候调用(请求超时断网没有网,一般指客户端错误)
16
17 -(void)connection:(NSURLConnection *)connection didFailWithError:(NSError *)error
使用异步方法发送get请求的代码示例:
  1 //
  2 //  YYViewController.m
  3 //  01-NSURLConnection的使用(GET)
  4 //
  5 //  Created by apple on 14-6-28.
  6 //  Copyright (c) 2014年 itcase. All rights reserved.
  7 //
  8
  9 #import "YYViewController.h"
 10 #import "MBProgressHUD+MJ.h"
 11
 12 @interface YYViewController ()<NSURLConnectionDataDelegate>
 13 @property (weak, nonatomic) IBOutlet UITextField *username;
 14 @property (weak, nonatomic) IBOutlet UITextField *pwd;
 15 @property(nonatomic,strong)NSMutableData *responseData;
 16 - (IBAction)login;
 17
 18 @end
 19
 20 @implementation YYViewController
 21
 22 - (IBAction)login {
 23 //    1.提前的表单验证
 24     if (self.username.text.length==0) {
 25         [MBProgressHUD showError:@"请输入用户名"];
 26         return;
 27     }
 28     if (self.pwd.text.length==0) {
 29         [MBProgressHUD showError:@"请输入密码"];
 30         return;
 31     }
 32 //    2.发送请求给服务器(带上账号和密码)
 33     //添加一个遮罩,禁止用户操作
 34     [MBProgressHUD showMessage:@"正在努力加载中...."];
 35
 36 //
 37 //   2.1设置请求路径
 38     NSString *urlStr=[NSString stringWithFormat:@"http://192.168.1.53:8080/MJServer/login?username=%@&pwd=%@",self.username.text,self.pwd.text];
 39     NSURL *url=[NSURL URLWithString:urlStr];
 40
 41 //   2.2创建请求对象
 42 //    NSURLRequest *request=[NSURLRequest requestWithURL:url];//默认就是GET请求
 43     //设置请求超时
 44     NSMutableURLRequest *request=[NSMutableURLRequest  requestWithURL:url];
 45     request.timeoutInterval=5.0;
 46
 47 //   2.3.发送请求
 48  //使用代理发送异步请求(通常应用于文件下载)
 49     NSURLConnection *conn=[NSURLConnection connectionWithRequest:request delegate:self];
 50     [conn start];
 51     NSLog(@"已经发出请求---");
 52 }
 53
 54 #pragma mark- NSURLConnectionDataDelegate代理方法
 55 /*
 56  *当接收到服务器的响应(连通了服务器)时会调用
 57  */
 58 -(void)connection:(NSURLConnection *)connection didReceiveResponse:(NSURLResponse *)response
 59 {
 60     NSLog(@"接收到服务器的响应");
 61     //初始化数据
 62     self.responseData=[NSMutableData data];
 63 }
 64
 65 /*
 66 *当接收到服务器的数据时会调用(可能会被调用多次,每次只传递部分数据)
 67 */
 68 -(void)connection:(NSURLConnection *)connection didReceiveData:(NSData *)data
 69 {
 70     NSLog(@"接收到服务器的数据");
 71     //拼接数据
 72     [self.responseData appendData:data];
 73         NSLog(@"%d---%@--",self.responseData.length,[NSThread currentThread]);
 74 }
 75
 76 /*
 77  *当服务器的数据加载完毕时就会调用
 78  */
 79 -(void)connectionDidFinishLoading:(NSURLConnection *)connection
 80 {
 81     NSLog(@"服务器的数据加载完毕");
 82     //隐藏HUD
 83     [MBProgressHUD hideHUD];
 84
 85     //处理服务器返回的所有数据
 86     NSDictionary *dict=[NSJSONSerialization JSONObjectWithData:self.responseData options:NSJSONReadingMutableLeaves error:nil];
 87
 88     //判断后,在界面提示登录信息
 89     NSString *error=dict[@"error"];
 90     if (error) {
 91         [MBProgressHUD showError:error];
 92     }else
 93     {
 94         NSString *success=dict[@"success"];
 95         [MBProgressHUD showSuccess:success];
 96     }
 97     NSLog(@"%d---%@--",self.responseData.length,[NSThread currentThread]);
 98 }
 99 /*
100  *请求错误(失败)的时候调用(请求超时断网没有网,一般指客户端错误)
101  */
102 -(void)connection:(NSURLConnection *)connection didFailWithError:(NSError *)error
103 {
104 //     NSLog(@"请求错误");
105     //隐藏HUD
106     [MBProgressHUD hideHUD];
107     [MBProgressHUD showError:@"网络繁忙,请稍后重试!"];
108 }
109 @end
打印查看:

补充:
(1)数据的处理
在didReceiveData:方法中,拼接接收到的所有数据,等所有数据都拿到后,在connectionDidFinishLoading:方法中进行处理
(2)网络延迟
在做网络开发的时候,一定要考虑到网络延迟情况的处理,可以在服务器的代码设置一个断点模拟。
在服务器代码的登录方法中设置断点

设置请求的最大延迟

模拟器情况:

打印查看:

三、NSMutableURLRequest
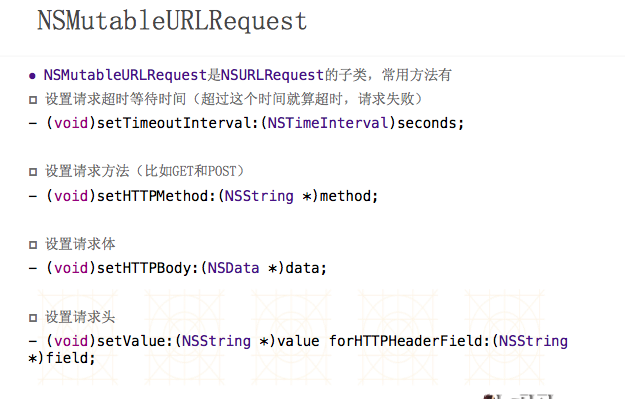
NSMutableURLRequest是NSURLRequest的子类,常用方法有
设置请求超时等待时间(超过这个时间就算超时,请求失败)- (void)setTimeoutInterval:(NSTimeInterval)seconds;
设置请求方法(比如GET和POST)- (void)setHTTPMethod:(NSString *)method;
设置请求体- (void)setHTTPBody:(NSData *)data;
设置请求头- (void)setValue:(NSString *)value forHTTPHeaderField:(NSString *)field;
2.Web请求和响应
使用代理方法
做过Web开发的朋友应该很清楚,Http是无连接的请求。每个请求request服务器都有一个对应的响应response,无论是asp.net、jsp、php都是基于这种机制开发的。

在Web开发中主要的请求方法有如下几种:
- GET请求:get是获取数据的意思,数据以明文在URL中传递,受限于URL长度,所以传输数据量比较小。
- POST请求:post是向服务器提交数据的意思,提交的数据以实际内容形式存放到消息头中进行传递,无法在浏览器url中查看到,大小没有限制。
- HEAD请求:请求头信息,并不返回请求数据体,而只返回请求头信息,常用用于在文件下载中取得文件大小、类型等信息。
在开发中往往数据存储在服务器端,而客户端(iOS应用)往往通过向服务器端发送请求从服务器端获得数据。要模拟这个过程首先当然是建立服务器端应用,应用的形式没有限制,你可以采用任何Web技术进行开发。假设现在有一个文件服务器,用户输入文件名称就可以下载文件。服务器端程序很简单,只要访问http://192.168.1.208/FileDownload.aspx?file=filename,就可以下载指定filename的文件,由于服务器端开发的内容不是今天的重点在此不再赘述。客户端界面设计如下图:

程序的实现需要借助几个对象:
NSURLRequest:建立了一个请求,可以指定缓存策略、超时时间。和NSURLRequest对应的还有一个NSMutableURLRequest,如果请求定义为NSMutableURLRequest则可以指定请求方法(GET或POST)等信息。
NSURLConnection:用于发送请求,可以指定请求和代理。当前调用NSURLConnection的start方法后开始发送异步请求。
程序代码如下:
//
//  KCMainViewController.m
//  UrlConnection
//
//  Created by Kenshin Cui on 14-3-22.
//  Copyright (c) 2014年 Kenshin Cui. All rights reserved.
//

#import "KCMainViewController.h"

@interface KCMainViewController ()<NSURLConnectionDataDelegate>{
    NSMutableData *_data;//响应数据
    UITextField *_textField;
    UIButton *_button;
    UIProgressView *_progressView;
    UILabel *_label;
    long long _totalLength;
}

@end

@implementation KCMainViewController

#pragma mark - UI方法
- (void)viewDidLoad {
    [super viewDidLoad];

    [self layoutUI];

}

#pragma mark - 私有方法
#pragma mark 界面布局
-(void)layoutUI{
    //地址栏
    _textField=[[UITextField alloc]initWithFrame:CGRectMake(10, 50, 300, 25)];
    _textField.borderStyle=UITextBorderStyleRoundedRect;
    _textField.textColor=[UIColor colorWithRed:0 green:146/255.0 blue:1.0 alpha:1.0];
    _textField.text=@"简约至上:交互式设计四策略.epub";
    [self.view addSubview:_textField];
    //进度条
    _progressView=[[UIProgressView alloc]initWithFrame:CGRectMake(10, 100, 300, 25)];
    [self.view addSubview:_progressView];
    //状态显示
    _label=[[UILabel alloc]initWithFrame:CGRectMake(10, 130, 300, 25)];
    _label.textColor=[UIColor colorWithRed:0 green:146/255.0 blue:1.0 alpha:1.0];
    [self.view addSubview:_label];
    //下载按钮
    _button=[[UIButton alloc]initWithFrame:CGRectMake(10, 500, 300, 25)];
    [_button setTitle:@"下载" forState:UIControlStateNormal];
    [_button setTitleColor:[UIColor colorWithRed:0 green:146/255.0 blue:1.0 alpha:1.0] forState:UIControlStateNormal];
    [_button addTarget:self action:@selector(sendRequest) forControlEvents:UIControlEventTouchUpInside];
    [self.view addSubview:_button];


}

#pragma mark 更新进度
-(void)updateProgress{
//    [[NSOperationQueue mainQueue] addOperationWithBlock:^{
    if (_data.length==_totalLength) {
        _label.text=@"下载完成";
    }else{
        _label.text=@"正在下载...";
        [_progressView setProgress:(float)_data.length/_totalLength];
    }
//    }];
}

#pragma mark 发送数据请求
-(void)sendRequest{
    NSString *urlStr=[NSString stringWithFormat:@"http://192.168.1.208/FileDownload.aspx?file=%@",_textField.text];
    //注意对于url中的中文是无法解析的,需要进行url编码(指定编码类型为utf-8)
    //另外注意url解码使用stringByRemovingPercentEncoding方法
    urlStr=[urlStr stringByAddingPercentEscapesUsingEncoding:NSUTF8StringEncoding];
    //创建url链接
    NSURL *url=[NSURL URLWithString:urlStr];
    /*创建请求
     cachePolicy:缓存策略
         a.NSURLRequestUseProtocolCachePolicy 协议缓存,根据response中的Cache-Control字段判断缓存是否有效,如果缓存有效则使用缓存数据否则重新从服务器请求
         b.NSURLRequestReloadIgnoringLocalCacheData 不使用缓存,直接请求新数据
         c.NSURLRequestReloadIgnoringCacheData 等同于 SURLRequestReloadIgnoringLocalCacheData
         d.NSURLRequestReturnCacheDataElseLoad 直接使用缓存数据不管是否有效,没有缓存则重新请求
         eNSURLRequestReturnCacheDataDontLoad 直接使用缓存数据不管是否有效,没有缓存数据则失败
     timeoutInterval:超时时间设置(默认60s)
     */

    NSURLRequest *request=[[NSURLRequest alloc]initWithURL:url cachePolicy:NSURLRequestUseProtocolCachePolicy timeoutInterval:15.0f];
    //创建连接
    NSURLConnection *connection=[[NSURLConnection alloc]initWithRequest:request delegate:self];
    //启动连接
    [connection start];

}

#pragma mark - 连接代理方法
#pragma mark 开始响应
-(void)connection:(NSURLConnection *)connection didReceiveResponse:(NSURLResponse *)response{
    NSLog(@"receive response.");
    _data=[[NSMutableData alloc]init];
    _progressView.progress=0;

    //通过响应头中的Content-Length取得整个响应的总长度
    NSHTTPURLResponse *httpResponse = (NSHTTPURLResponse *)response;
    NSDictionary *httpResponseHeaderFields = [httpResponse allHeaderFields];
    _totalLength = [[httpResponseHeaderFields objectForKey:@"Content-Length"] longLongValue];

}

#pragma mark 接收响应数据(根据响应内容的大小此方法会被重复调用)
-(void)connection:(NSURLConnection *)connection didReceiveData:(NSData *)data{
    NSLog(@"receive data.");
    //连续接收数据
    [_data appendData:data];
    //更新进度
    [self updateProgress];
}

#pragma mark 数据接收完成
-(void)connectionDidFinishLoading:(NSURLConnection *)connection{
    NSLog(@"loading finish.");

    //数据接收完保存文件(注意苹果官方要求:下载数据只能保存在缓存目录)
    NSString *savePath=[NSSearchPathForDirectoriesInDomains(NSCachesDirectory, NSUserDomainMask, YES) lastObject];
    savePath=[savePath stringByAppendingPathComponent:_textField.text];
    [_data writeToFile:savePath atomically:YES];


    NSLog(@"path:%@",savePath);
}

#pragma mark 请求失败
-(void)connection:(NSURLConnection *)connection didFailWithError:(NSError *)error{
    //如果连接超时或者连接地址错误可能就会报错
    NSLog(@"connection error,error detail is:%@",error.localizedDescription);
}
@end
运行效果:

需要注意:
- 根据响应数据大小不同可能会多次执行
- - (void)connection:(NSURLConnection *)connection didReceiveData:(NSData *)data方法。
- URL中不能出现中文(例如上面使用GET传参数时,file参数就可能是中文),需要对URL进行编码,否则会出错。
简化请求方法
当然,对于上面文件下载这种大数据响应的情况使用代理方法处理响应具有一定的优势(可以获得传输进度)。但是如果现响应数据不是文件而是一段字符串(注意web请求的数据可以是字符串或者二进制,上面文件下载示例中响应数据是二进制),那么采用代理方法处理服务器响应就未免有些太麻烦了。其实苹果官方已经提供了下面两种方法处理一般的请求:
+ (void)sendAsynchronousRequest:request: queue:queue:completionHandler:发送一个异步请求
+ (NSData *)sendSynchronousRequest: returningResponse: error:发送一个同步请求
假设在开发一个类似于微博的应用,服务器端返回的是JSON字符串,我们可以使用上面的方法简化整个请求响应的过程。这里会使用
在“iOS开发系列--UITableView全面解析”文章中自定义的UITableViewCell来显示微博数据,不清楚的朋友可以看一下前面的内容。
请求过程中需要传递一个用户名和密码,如果全部正确则服务器端返回此用户可以看到的最新微博数据,响应的json格式大致如下:

整个Json最外层是statuses节点,它是一个数组类型,数组中每个元素都是一条微博数据,每条微博数据中除了包含微博信息还包含了发表用户的信息。
首先需要先定义用户模型KCUser
//
//  KCUser.h
//  UrlConnection
//
//  Created by Kenshin Cui on 14-3-22.
//  Copyright (c) 2014年 Kenshin Cui. All rights reserved.
//

#import <Foundation/Foundation.h>

@interface KCUser : NSObject

#pragma mark 编号
@property (nonatomic,strong) NSNumber *Id;

#pragma mark 用户名
@property (nonatomic,copy) NSString *name;

#pragma mark 城市
@property (nonatomic,copy) NSString *city;

@end
微博模型KCStatus
KCStatus.h
//
//  KCStatus.h
//  UITableView
//
//  Created by Kenshin Cui on 14-3-1.
//  Copyright (c) 2014年 Kenshin Cui. All rights reserved.
//

#import <Foundation/Foundation.h>
#import "KCUser.h"

@interface KCStatus : NSObject

#pragma mark - 属性
@property (nonatomic,strong) NSNumber *Id;//微博id
@property (nonatomic,copy) NSString *profileImageUrl;//头像
@property (nonatomic,strong) KCUser *user;//发送用户
@property (nonatomic,copy) NSString *mbtype;//会员类型
@property (nonatomic,copy) NSString *createdAt;//创建时间
@property (nonatomic,copy) NSString *source;//设备来源
@property (nonatomic,copy) NSString *text;//微博内容

@end
KCStatus.m
//
//  KCStatus.m
//  UITableView
//
//  Created by Kenshin Cui on 14-3-1.
//  Copyright (c) 2014年 Kenshin Cui. All rights reserved.
//

#import "KCStatus.h"

@implementation KCStatus

-(NSString *)source{
    return [NSString stringWithFormat:@"来自 %@",_source];
}
@end
其次需要自定义微博显示的单元格KCStatusTableViewCell,这里需要注意,由于服务器返回数据中头像和会员类型图片已经不在本地,需要从服务器端根据返回JSON的中图片的路径去加载。
KCStatusTableViewCell.h
//
//  KCStatusTableViewCell.h
//  UITableView
//
//  Created by Kenshin Cui on 14-3-1.
//  Copyright (c) 2014年 Kenshin Cui. All rights reserved.
//

#import <UIKit/UIKit.h>
@class KCStatus;

@interface KCStatusTableViewCell : UITableViewCell

#pragma mark 微博对象
@property (nonatomic,strong) KCStatus *status;

#pragma mark 单元格高度
@property (assign,nonatomic) CGFloat height;

@end
KCStatusTableViewCell.m
//
//  KCStatusTableViewCell.m
//  UITableView
//
//  Created by Kenshin Cui on 14-3-1.
//  Copyright (c) 2014年 Kenshin Cui. All rights reserved.
//

#import "KCStatusTableViewCell.h"
#import "KCStatus.h"
#define KCColor(r,g,b) [UIColor colorWithHue:r/255.0 saturation:g/255.0 brightness:b/255.0 alpha:1] //颜色宏定义
#define kStatusTableViewCellControlSpacing 10 //控件间距
#define kStatusTableViewCellBackgroundColor KCColor(251,251,251)
#define kStatusGrayColor KCColor(50,50,50)
#define kStatusLightGrayColor KCColor(120,120,120)

#define kStatusTableViewCellAvatarWidth 40 //头像宽度
#define kStatusTableViewCellAvatarHeight kStatusTableViewCellAvatarWidth
#define kStatusTableViewCellUserNameFontSize 14
#define kStatusTableViewCellMbTypeWidth 13 //会员图标宽度
#define kStatusTableViewCellMbTypeHeight kStatusTableViewCellMbTypeWidth
#define kStatusTableViewCellCreateAtFontSize 12
#define kStatusTableViewCellSourceFontSize 12
#define kStatusTableViewCellTextFontSize 14


@interface KCStatusTableViewCell(){
    UIImageView *_avatar;//头像
    UIImageView *_mbType;//会员类型
    UILabel *_userName;
    UILabel *_createAt;
    UILabel *_source;
    UILabel *_text;
}

@end

@implementation KCStatusTableViewCell

- (instancetype)initWithStyle:(UITableViewCellStyle)style reuseIdentifier:(NSString *)reuseIdentifier {
    self = [super initWithStyle:style reuseIdentifier:reuseIdentifier];
    if (self) {
        [self initSubView];
    }
    return self;
}

#pragma mark 初始化视图
-(void)initSubView{
    //头像控件
    _avatar=[[UIImageView alloc]init];
    [self addSubview:_avatar];
    //用户名
    _userName=[[UILabel alloc]init];
    _userName.textColor=kStatusGrayColor;
    _userName.font=[UIFont systemFontOfSize:kStatusTableViewCellUserNameFontSize];
    [self addSubview:_userName];
    //会员类型
    _mbType=[[UIImageView alloc]init];
    [self addSubview:_mbType];
    //日期
    _createAt=[[UILabel alloc]init];
    _createAt.textColor=kStatusLightGrayColor;
    _createAt.font=[UIFont systemFontOfSize:kStatusTableViewCellCreateAtFontSize];
    [self addSubview:_createAt];
    //设备
    _source=[[UILabel alloc]init];
    _source.textColor=kStatusLightGrayColor;
    _source.font=[UIFont systemFontOfSize:kStatusTableViewCellSourceFontSize];
    [self addSubview:_source];
    //内容
    _text=[[UILabel alloc]init];
    _text.textColor=kStatusGrayColor;
    _text.font=[UIFont systemFontOfSize:kStatusTableViewCellTextFontSize];
    _text.numberOfLines=0;
    _text.lineBreakMode=NSLineBreakByWordWrapping;
    [self addSubview:_text];
}

#pragma mark 设置微博
-(void)setStatus:(KCStatus *)status{
    //设置头像大小和位置
    CGFloat avatarX=10,avatarY=10;
    CGRect avatarRect=CGRectMake(avatarX, avatarY, kStatusTableViewCellAvatarWidth, kStatusTableViewCellAvatarHeight);
//    _avatar.image=[UIImage imageNamed:status.profileImageUrl];
    NSURL *avatarUrl=[NSURL URLWithString:status.profileImageUrl];
    NSData *avatarData=[NSData dataWithContentsOfURL:avatarUrl];
    UIImage *avatarImage= [UIImage imageWithData:avatarData];
    _avatar.image=avatarImage;
    _avatar.frame=avatarRect;


    //设置会员图标大小和位置
    CGFloat userNameX= CGRectGetMaxX(_avatar.frame)+kStatusTableViewCellControlSpacing ;
    CGFloat userNameY=avatarY;
    //根据文本内容取得文本占用空间大小
    CGSize userNameSize=[status.user.name sizeWithAttributes:@{NSFontAttributeName: [UIFont systemFontOfSize:kStatusTableViewCellUserNameFontSize]}];
    CGRect userNameRect=CGRectMake(userNameX, userNameY, userNameSize.width,userNameSize.height);
    _userName.text=status.user.name;
    _userName.frame=userNameRect;


    //设置会员图标大小和位置
    CGFloat mbTypeX=CGRectGetMaxX(_userName.frame)+kStatusTableViewCellControlSpacing;
    CGFloat mbTypeY=avatarY;
    CGRect mbTypeRect=CGRectMake(mbTypeX, mbTypeY, kStatusTableViewCellMbTypeWidth, kStatusTableViewCellMbTypeHeight);
//    _mbType.image=[UIImage imageNamed:status.mbtype];
    NSURL *mbTypeUrl=[NSURL URLWithString:status.mbtype];
    NSData *mbTypeData=[NSData dataWithContentsOfURL:mbTypeUrl];
    UIImage *mbTypeImage= [UIImage imageWithData:mbTypeData];
    _mbType.image=mbTypeImage;
    _mbType.frame=mbTypeRect;


    //设置发布日期大小和位置
    CGSize createAtSize=[status.createdAt sizeWithAttributes:@{NSFontAttributeName:[UIFont systemFontOfSize:kStatusTableViewCellCreateAtFontSize]}];
    CGFloat createAtX=userNameX;
    CGFloat createAtY=CGRectGetMaxY(_avatar.frame)-createAtSize.height;
    CGRect createAtRect=CGRectMake(createAtX, createAtY, createAtSize.width, createAtSize.height);
    _createAt.text=status.createdAt;
    _createAt.frame=createAtRect;


    //设置设备信息大小和位置
    CGSize sourceSize=[status.source sizeWithAttributes:@{NSFontAttributeName:[UIFont systemFontOfSize:kStatusTableViewCellSourceFontSize]}];
    CGFloat sourceX=CGRectGetMaxX(_createAt.frame)+kStatusTableViewCellControlSpacing;
    CGFloat sourceY=createAtY;
    CGRect sourceRect=CGRectMake(sourceX, sourceY, sourceSize.width,sourceSize.height);
    _source.text=status.source;
    _source.frame=sourceRect;


    //设置微博内容大小和位置
    CGFloat textX=avatarX;
    CGFloat textY=CGRectGetMaxY(_avatar.frame)+kStatusTableViewCellControlSpacing;
    CGFloat textWidth=self.frame.size.width-kStatusTableViewCellControlSpacing*2;
    CGSize textSize=[status.text boundingRectWithSize:CGSizeMake(textWidth, MAXFLOAT) options:NSStringDrawingUsesLineFragmentOrigin attributes:@{NSFontAttributeName: [UIFont systemFontOfSize:kStatusTableViewCellTextFontSize]} context:nil].size;
    CGRect textRect=CGRectMake(textX, textY, textSize.width, textSize.height);
    _text.text=status.text;
    _text.frame=textRect;

    _height=CGRectGetMaxY(_text.frame)+kStatusTableViewCellControlSpacing;
}

#pragma mark 重写选择事件,取消选中
-(void)setSelected:(BOOL)selected animated:(BOOL)animated{

}
@end
最后就是KCMainViewController,在这里需要使用NSURLConnection的静态方法发送请求、获得请求数据,然后对请求数据进行JSON序列化,将JSON字符串序列化成微博对象通过UITableView显示到界面中。
//
//  KCMainViewController.m
//  UrlConnection
//
//  Created by Kenshin Cui on 14-3-22.
//  Copyright (c) 2014年 Kenshin Cui. All rights reserved.
//

#import "KCMainViewController.h"
#import "KCStatusTableViewCell.h"
#import "KCStatus.h"
#import "KCUser.h"
#define kURL @"http://192.168.1.208/ViewStatus.aspx"

@interface KCMainViewController ()<UITableViewDataSource,UITableViewDelegate>{
    UITableView *_tableView;
    NSMutableArray *_status;
    NSMutableArray *_statusCells;//存储cell,用于计算高度
    NSString *_userName;
    NSString *_password;
}

@end

@implementation KCMainViewController

#pragma mark - UI方法
- (void)viewDidLoad {
    [super viewDidLoad];

    _userName=@"KenshinCui";
    _password=@"123";

    [self layoutUI];

    [self sendRequest];

}

#pragma mark - 私有方法
#pragma mark 界面布局
-(void)layoutUI{
    _tableView =[[UITableView alloc]initWithFrame:[UIScreen mainScreen].applicationFrame style:UITableViewStylePlain];
    _tableView.dataSource=self;
    _tableView.delegate=self;
    [self.view addSubview:_tableView];
}
#pragma mark 加载数据
-(void)loadData:(NSData *)data{
    _status=[[NSMutableArray alloc]init];
    _statusCells=[[NSMutableArray alloc]init];
    /*json序列化
     options:序列化选项,枚举类型,但是可以指定为枚举以外的类型,例如指定为0则可以返回NSDictionary或者NSArray
         a.NSJSONReadingMutableContainers:返回NSMutableDictionary或NSMutableArray
         b.NSJSONReadingMutableLeaves:返回NSMutableString字符串
         c.NSJSONReadingAllowFragments:可以解析JSON字符串的外层既不是字典类型(NSMutableDictionary、NSDictionary)又不是数组类型(NSMutableArray、NSArray)的数据,但是必须是有效的JSON字符串
     error:错误信息
    */
    NSError *error;
    //将对象序列化为字典
    NSDictionary *dic= [NSJSONSerialization JSONObjectWithData:data options:0 error:&error];
    NSArray *array= (NSArray *)dic[@"statuses"];
    [array enumerateObjectsUsingBlock:^(id obj, NSUInteger idx, BOOL *stop) {
        KCStatus *status=[[KCStatus alloc]init];
        //通过KVC给对象赋值
        [status setValuesForKeysWithDictionary:obj];

        KCUser *user=[[KCUser alloc]init];
        [user setValuesForKeysWithDictionary:obj[@"user"]];
        status.user=user;

        [_status addObject:status];

        //存储tableViewCell
        KCStatusTableViewCell *cell=[[KCStatusTableViewCell alloc]init];
        [_statusCells addObject:cell];

    }];
}


#pragma mark 发送数据请求
-(void)sendRequest{
    NSString *urlStr=[NSString stringWithFormat:@"%@",kURL];
    //注意对于url中的中文是无法解析的,需要进行url编码(指定编码类型位utf-8)
    //另外注意url解码使用stringByRemovingPercentEncoding方法
    urlStr=[urlStr stringByAddingPercentEscapesUsingEncoding:NSUTF8StringEncoding];
    //创建url链接
    NSURL *url=[NSURL URLWithString:urlStr];

    /*创建可变请求*/
    NSMutableURLRequest *requestM=[[NSMutableURLRequest alloc]initWithURL:url cachePolicy:0 timeoutInterval:5.0f];
    [requestM setHTTPMethod:@"POST"];//设置位post请求
    //创建post参数
    NSString *bodyDataStr=[NSString stringWithFormat:@"userName=%@&password=%@",_userName,_password];
    NSData *bodyData=[bodyDataStr dataUsingEncoding:NSUTF8StringEncoding];
    [requestM setHTTPBody:bodyData];

    //发送一个异步请求
    [NSURLConnection sendAsynchronousRequest:requestM queue:[NSOperationQueue mainQueue] completionHandler:^(NSURLResponse *response, NSData *data, NSError *connectionError) {
        if (!connectionError) {
//            NSString *jsonStr=[[NSString alloc]initWithData:data encoding:NSUTF8StringEncoding];
//            NSLog(@"jsonStr:%@",jsonStr);
            //加载数据
            [self loadData:data];

            //刷新表格
            [_tableView reloadData];
        }else{
            [[NSOperationQueue mainQueue] addOperationWithBlock:^{

            }];
        }
    }];

}

#pragma mark - 数据源方法
#pragma mark 返回分组数
-(NSInteger)numberOfSectionsInTableView:(UITableView *)tableView{
    return 1;
}

#pragma mark 返回每组行数
-(NSInteger)tableView:(UITableView *)tableView numberOfRowsInSection:(NSInteger)section{

    return _status.count;
}

#pragma mark返回每行的单元格
-(UITableViewCell *)tableView:(UITableView *)tableView cellForRowAtIndexPath:(NSIndexPath *)indexPath{
    static NSString *cellIdentifier=@"UITableViewCellIdentifierKey1";
    KCStatusTableViewCell *cell;
    cell=[tableView dequeueReusableCellWithIdentifier:cellIdentifier];
    if(!cell){
        cell=[[KCStatusTableViewCell alloc]initWithStyle:UITableViewCellStyleDefault reuseIdentifier:cellIdentifier];
    }
    //在此设置微博,以便重新布局
    KCStatus *status=_status[indexPath.row];
    cell.status=status;
    return cell;
}


#pragma mark - 代理方法
#pragma mark 重新设置单元格高度
-(CGFloat)tableView:(UITableView *)tableView heightForRowAtIndexPath:(NSIndexPath *)indexPath{
    KCStatusTableViewCell *cell= _statusCells[indexPath.row];
    cell.status=_status[indexPath.row];
    return cell.height;
}
@end
运行效果:

可以看到使用NSURLConnection封装的静态方法可以直接获得NSData,不需要使用代理一步步自己组装数据。
这里采用了POST方式发送请求,使用POST发送请求需要组装数据体,不过数据长度不像GET方式存在限制。
从iOS5开始苹果官方提供了JSON序列化和反序列化相关方法(上面程序中仅仅用到了反序列化方法,序列化使用dataWithJSONObject:options:opt error:方法)方便的对数组和字典进行序列化和反序列化。
但是注意反序列化参数设置,程序中设置成了0,直接反序列化为不可变对象以提高性能。
注意:
1.现在多数情况下互联网数据都是以JSON格式进行传输,但是有时候也会面对XML存储。在IOS中可以使用NSXMLParser进行XML解析,由于实际使用并不多,在此不再赘述。
2.使用KVC给对象赋值时(通常是NSDictionary或NSMutalbeDictionary)注意对象的属性最好不要定义为基本类型(如int),否则如果属性值为null则会报错,最后定义为ObjC对象类型(如使用NSNumber代替int等);
图片缓存
开发Web类的应用图片缓存问题不得不提及,因为图片的下载相当耗时。对于前面的微博数据,头像和微博类型图标在数据库中是以链接形式存放的,取得链接后还必须进行对应的图片加载。大家都知道图片往往要比文本内容大得多,在UITableView中上下滚动就会重新加载数据,对于文本由于已经加载到本地自然不存在问题,但是对于图片来说如果每次都必须重新从服务器端加载就不太合适了。
解决图片加载的办法有很多,可以事先存储到内存中,也可以保存到临时文件。在内存中存储虽然简单但是往往不可取,因为程序重新启动之后还面临这重新请求的问题,类似于新浪微博、QQ、微信等应用一般会存储在文件中,这样应用程序即使重启也会从文件中读取。但是使用文件缓存图片可能就要自己做很多事情,例如缓存文件是否过期?缓存数据越来越大如何管理存储空间?
这些问题其实很多第三方框架已经做的很好了,实际开发中往往会采用一些第三方框架来处理图片。例如这里可以选用SDWebImage框架。SDWebImage使用起来相当简单,开发者不必过多关心它的缓存和多线程加载问题,一个方法就可以解决。这里直接修改KCStatusTableViewCell中相关代码即可:
#pragma mark 设置微博
-(void)setStatus:(KCStatus *)status{
    //设置头像大小和位置
    CGFloat avatarX=10,avatarY=10;
    CGRect avatarRect=CGRectMake(avatarX, avatarY, kStatusTableViewCellAvatarWidth, kStatusTableViewCellAvatarHeight);

    NSURL *avatarUrl=[NSURL URLWithString:status.profileImageUrl];
    UIImage *defaultAvatar=[UIImage imageNamed:@"defaultAvatar.jpg"];//默认头像
    [_avatar sd_setImageWithURL:avatarUrl placeholderImage:defaultAvatar];

    _avatar.frame=avatarRect;


    //设置会员图标大小和位置
    CGFloat userNameX= CGRectGetMaxX(_avatar.frame)+kStatusTableViewCellControlSpacing ;
    CGFloat userNameY=avatarY;
    //根据文本内容取得文本占用空间大小
    CGSize userNameSize=[status.user.name sizeWithAttributes:@{NSFontAttributeName: [UIFont systemFontOfSize:kStatusTableViewCellUserNameFontSize]}];
    CGRect userNameRect=CGRectMake(userNameX, userNameY, userNameSize.width,userNameSize.height);
    _userName.text=status.user.name;
    _userName.frame=userNameRect;

    //设置会员图标大小和位置
    CGFloat mbTypeX=CGRectGetMaxX(_userName.frame)+kStatusTableViewCellControlSpacing;
    CGFloat mbTypeY=avatarY;
    CGRect mbTypeRect=CGRectMake(mbTypeX, mbTypeY, kStatusTableViewCellMbTypeWidth, kStatusTableViewCellMbTypeHeight);

    NSURL *mbTypeUrl=[NSURL URLWithString:status.mbtype];
    [_mbType sd_setImageWithURL:mbTypeUrl ];

    _mbType.frame=mbTypeRect;


    //设置发布日期大小和位置
    CGSize createAtSize=[status.createdAt sizeWithAttributes:@{NSFontAttributeName:[UIFont systemFontOfSize:kStatusTableViewCellCreateAtFontSize]}];
    CGFloat createAtX=userNameX;
    CGFloat createAtY=CGRectGetMaxY(_avatar.frame)-createAtSize.height;
    CGRect createAtRect=CGRectMake(createAtX, createAtY, createAtSize.width, createAtSize.height);
    _createAt.text=status.createdAt;
    _createAt.frame=createAtRect;


    //设置设备信息大小和位置
    CGSize sourceSize=[status.source sizeWithAttributes:@{NSFontAttributeName:[UIFont systemFontOfSize:kStatusTableViewCellSourceFontSize]}];
    CGFloat sourceX=CGRectGetMaxX(_createAt.frame)+kStatusTableViewCellControlSpacing;
    CGFloat sourceY=createAtY;
    CGRect sourceRect=CGRectMake(sourceX, sourceY, sourceSize.width,sourceSize.height);
    _source.text=status.source;
    _source.frame=sourceRect;


    //设置微博内容大小和位置
    CGFloat textX=avatarX;
    CGFloat textY=CGRectGetMaxY(_avatar.frame)+kStatusTableViewCellControlSpacing;
    CGFloat textWidth=self.frame.size.width-kStatusTableViewCellControlSpacing*2;
    CGSize textSize=[status.text boundingRectWithSize:CGSizeMake(textWidth, MAXFLOAT) options:NSStringDrawingUsesLineFragmentOrigin attributes:@{NSFontAttributeName: [UIFont systemFontOfSize:kStatusTableViewCellTextFontSize]} context:nil].size;
    CGRect textRect=CGRectMake(textX, textY, textSize.width, textSize.height);
    _text.text=status.text;
    _text.frame=textRect;

    _height=CGRectGetMaxY(_text.frame)+kStatusTableViewCellControlSpacing;
}
运行效果:

在上面的方法中直接调用了SDWebImage的分类缓存方法设置图片,这个方法可以分配另外一个线程去加载图片(同时对于头像还指定了默认图片,网速较慢时不至于显示空白),图片加载后存放在沙箱的缓存文件夹,如下图:

滚动UITableView再次加载同一个图片时SDWebImage就会自动判断缓存文件是否有效,如果有效就加载缓存文件,否则重新加载。SDWebImage有很多使用的方法,感兴趣的朋友可以访问“SDWebImage Reference)”。
扩展--文件分段下载
通过前面的演示大家应该对于iOS的Web请求有了大致的了解,可以通过代理方法接收数据也可以直接通过静态方法接收数据,但是实际开发中更推荐使用静态方法。关于前面的文件下载示例,更多的是希望大家了解代理方法接收响应数据的过程,实际开发中也不可能使用这种方法进行文件下载。这种下载有个致命的问题:不适合进行大文件分段下载。因为代理方法在接收数据时虽然表面看起来是每次读取一部分响应数据,事实上它只有一次请求并且也只接收了一次服务器响应,只是当响应数据较大时系统会重复调用数据接收方法,每次将已读取的数据拿出一部分交给数据接收方法。这样一来对于上G的文件进行下载,如果中途暂停的话再次请求还是从头开始下载,不适合大文件断点续传(另外说明一点,上面NSURLConnection示例中使用了NSMutableData进行数据接收和追加只是为了方便演示,实际开发建议直接写入文件)。
实际开发文件下载的时候不管是通过代理方法还是静态方法执行请求和响应,我们都会分批请求数据,而不是一次性请求数据。假设一个文件有1G,那么只要每次请求1M的数据,请求1024次也就下载完了。那么如何让服务器每次只返回1M的数据呢?
在网络开发中可以在请求的头文件中设置一个range信息,它代表请求数据的大小。通过这个字段配合服务器端可以精确的控制每次服务器响应的数据范围。例如指定bytes=0-1023,然后在服务器端解析Range信息,返回该文件的0到1023之间的数据的数据即可(共1024Byte)。
这样,只要在每次发送请求控制这个头文件信息就可以做到分批请求。
当然,为了让整个数据保持完整,每次请求的数据都需要逐步追加直到整个文件请求完成。但是如何知道整个文件的大小?其实在前面的文件下载演示中大家可以看到,可以通过头文件信息获取整个文件大小。但是这么做的话就必须请求整个数据,这样分段下载就没有任何意义了。所幸在WEB开发中我们还有另一种请求方法“HEAD”,通过这种请求服务器只会响应头信息,其他数据不会返回给客户端,这样一来整个数据的大小也就可以得到了。下面给出完整的程序代码,关键的地方已经给出注释(为了简化代码,这里没有使用代理方法):
KCMainViewController.m
//
//  KCMainViewController.m
//  UrlConnection
//
//  Created by Kenshin Cui on 14-3-22.
//  Copyright (c) 2014年 Kenshin Cui. All rights reserved.
//

#import "KCMainViewController.h"
#define kUrl @"http://192.168.1.208/FileDownload.aspx"
#define kFILE_BLOCK_SIZE (1024) //每次1KB

@interface KCMainViewController ()<NSURLConnectionDataDelegate>{
    UITextField *_textField;
    UIButton *_button;
    UIProgressView *_progressView;
    UILabel *_label;
    long long _totalLength;
    long long _loadedLength;
}

@end

@implementation KCMainViewController

#pragma mark - UI方法
- (void)viewDidLoad {
    [super viewDidLoad];

    [self layoutUI];
}

#pragma mark - 私有方法
#pragma mark 界面布局
-(void)layoutUI{
    //地址栏
    _textField=[[UITextField alloc]initWithFrame:CGRectMake(10, 50, 300, 25)];
    _textField.borderStyle=UITextBorderStyleRoundedRect;
    _textField.textColor=[UIColor colorWithRed:0 green:146/255.0 blue:1.0 alpha:1.0];
    _textField.text=@"1.jpg";
//    _textField.text=@"1.jpg";
    [self.view addSubview:_textField];
    //进度条
    _progressView=[[UIProgressView alloc]initWithFrame:CGRectMake(10, 100, 300, 25)];
    [self.view addSubview:_progressView];
    //状态显示
    _label=[[UILabel alloc]initWithFrame:CGRectMake(10, 130, 300, 25)];
    _label.textColor=[UIColor colorWithRed:0 green:146/255.0 blue:1.0 alpha:1.0];
    [self.view addSubview:_label];
    //下载按钮
    _button=[[UIButton alloc]initWithFrame:CGRectMake(10, 500, 300, 25)];
    [_button setTitle:@"下载" forState:UIControlStateNormal];
    [_button setTitleColor:[UIColor colorWithRed:0 green:146/255.0 blue:1.0 alpha:1.0] forState:UIControlStateNormal];
    [_button addTarget:self action:@selector(downloadFileAsync) forControlEvents:UIControlEventTouchUpInside];
    [self.view addSubview:_button];


}

#pragma mark 更新进度
-(void)updateProgress{
    [[NSOperationQueue mainQueue] addOperationWithBlock:^{
        if (_loadedLength==_totalLength) {
            _label.text=@"下载完成";
        }else{
            _label.text=@"正在下载...";
        }
        [_progressView setProgress:(double)_loadedLength/_totalLength];
    }];
}
#pragma mark 取得请求链接
-(NSURL *)getDownloadUrl:(NSString *)fileName{
    NSString *urlStr=[NSString stringWithFormat:@"%@?file=%@",kUrl,fileName];
    urlStr=[urlStr stringByAddingPercentEscapesUsingEncoding:NSUTF8StringEncoding];
    NSURL *url=[NSURL URLWithString:urlStr];
    return url;
}
#pragma mark 取得保存地址(保存在沙盒缓存目录)
-(NSString *)getSavePath:(NSString *)fileName{
    NSString *path=[NSSearchPathForDirectoriesInDomains(NSCachesDirectory, NSUserDomainMask, YES) lastObject];
    return [path stringByAppendingPathComponent:fileName];
}
#pragma mark 文件追加
-(void)fileAppend:(NSString *)filePath data:(NSData *)data{
    //以可写方式打开文件
    NSFileHandle *fileHandle=[NSFileHandle fileHandleForWritingAtPath:filePath];
    //如果存在文件则追加,否则创建
    if (fileHandle) {
        [fileHandle seekToEndOfFile];
        [fileHandle writeData:data];
        [fileHandle closeFile];//关闭文件
    }else{
        [data writeToFile:filePath atomically:YES];//创建文件
    }
}

#pragma mark  取得文件大小
-(long long)getFileTotlaLength:(NSString *)fileName{
    NSMutableURLRequest *request=[NSMutableURLRequest requestWithURL:[self getDownloadUrl:fileName] cachePolicy:NSURLRequestReloadIgnoringCacheData timeoutInterval:5.0f];
    //设置为头信息请求
    [request setHTTPMethod:@"HEAD"];

    NSURLResponse *response;
    NSError *error;
    //注意这里使用了同步请求,直接将文件大小返回
    [NSURLConnection sendSynchronousRequest:request returningResponse:&response error:&error];
    if (error) {
        NSLog(@"detail error:%@",error.localizedDescription);
    }
    //取得内容长度
    return response.expectedContentLength;
}

#pragma mark 下载指定块大小的数据
-(void)downloadFile:(NSString *)fileName startByte:(long long)start endByte:(long long)end{
    NSString *range=[NSString stringWithFormat:@"Bytes=%lld-%lld",start,end];
    NSLog(@"%@",range);
//    NSMutableURLRequest *request=[NSMutableURLRequest requestWithURL:[self getDownloadUrl:fileName]];
    NSMutableURLRequest *request= [NSMutableURLRequest requestWithURL:[self getDownloadUrl:fileName] cachePolicy:NSURLRequestReloadIgnoringCacheData timeoutInterval:5.0f];
    //通过请求头设置数据请求范围
    [request setValue:range forHTTPHeaderField:@"Range"];

    NSURLResponse *response;
    NSError *error;
    //注意这里使用同步请求,避免文件块追加顺序错误
    NSData *data= [NSURLConnection sendSynchronousRequest:request returningResponse:&response error:&error];
    if(!error){
    NSLog(@"dataLength=%lld",(long long)data.length);
    [self fileAppend:[self getSavePath:fileName] data:data];
    }
    else{
       NSLog(@"detail error:%@",error.localizedDescription);
    }
}

#pragma mark 文件下载
-(void)downloadFile{
    _totalLength=[self getFileTotlaLength:_textField.text];
    _loadedLength=0;
    long long startSize=0;
    long long endSize=0;
    //分段下载
    while(startSize< _totalLength){
        endSize=startSize+kFILE_BLOCK_SIZE-1;
        if (endSize>_totalLength) {
            endSize=_totalLength-1;
        }
        [self downloadFile:_textField.text startByte:startSize endByte:endSize];

        //更新进度
        _loadedLength+=(endSize-startSize)+1;
        [self updateProgress];


        startSize+=kFILE_BLOCK_SIZE;

    }
}

#pragma mark 异步下载文件
-(void)downloadFileAsync{
    dispatch_async(dispatch_get_global_queue(DISPATCH_QUEUE_PRIORITY_DEFAULT, 0), ^{
        [self downloadFile];
    });
}

@end
运行效果:

下载文件的生成过程:

分段下载的过程实现并不复杂,主要是需要配合后台进行响应进行操作。
针对不同的开发技术,服务器端处理方式稍有差别,但是基本原理是一样的,那就是读取Range信息,按需提供相应数据。
扩展--文件上传
在做WEB应用程序开发时,如果要上传一个文件往往会给form设置一个enctype=”multipart/form-data”的属性,不设置这个值在后台无法正常接收文件。在WEB开发过程中,form的这个属性其实本质就是指定请求头中Content-Type类型,当然使用GET方法提交就不用说了,必须使用URL编码。但是如果使用POST方法传递数据其实也是类似的,同样需要进行编码,具体编码方式其实就是通过enctype属性进行设置的。常用的属性值有:
- application/x-www-form-urlencoded:默认值,发送前对所有发送数据进行url编码,支持浏览器访问,通常文本内容提交常用这种方式。
- multipart/form-data:多部分表单数据,支持浏览器访问,不进行任何编码,通常用于文件传输(此时传递的是二进制数据) 。
- text/plain:普通文本数据类型,支持浏览器访问,发送前其中的空格替换为“+”,但是不对特殊字符编码。
- application/json:json数据类型,浏览器访问不支持 。
- text/xml:xml数据类型,浏览器访问不支持。
要实现文件上传,必须采用POST上传,同时请求类型必须是multipart/form-data。在Web开发中,开发人员不必过多的考虑mutiparty/form-data更多的细节,一般使用file控件即可完成文件上传。但是在iOS中如果要实现文件上传,就没有那么简单了,我们必须了解这种数据类型的请求是如何工作的。
下面是在浏览器中上传一个文件时,发送的请求头:

这是发送的请求体内容:

在请求头中,最重要的就是Content-Type,它的值分为两部分:前半部分是内容类型,前面已经解释过了;后面是边界boundary用来分隔表单中不同部分的数据,后面一串数字是浏览器自动生成的,它的格式并不固定,可以是任意字符。和请求体中的源代码部分进行对比不难发现其实boundary的内容和请求体的数据部分前的字符串相比少了两个“--”。请求体中Content-Disposition中指定了表单元素的name属性和文件名称,同时指定了Content-Type表示文件类型。当然,在请求体中最重要的就是后面的数据部分,它其实就是二进制字符串。由此可以得出以下结论,请求体内容由如下几部分按顺序执行组成:
--boundary
Content-Disposition:form-data;name=”表单控件名称”;filename=”上传文件名称”
Content-Type:文件MIME Types

文件二进制数据;

--boundary--
了解这些信息后,只要使用POST方法给服务器端发送请求并且请求内容按照上面的格式设置即可。
下面是实现代码:
//
//  KCMainViewController.m
//  UrlConnection
//
//  Created by Kenshin Cui on 14-3-22.
//  Copyright (c) 2014年 Kenshin Cui. All rights reserved.
//

#import "KCMainViewController.h"
#define kUrl @"http://192.168.1.208/FileUpload.aspx"
#define kBOUNDARY_STRING @"KenshinCui"

@interface KCMainViewController ()<NSURLConnectionDataDelegate>{
    UITextField *_textField;
    UIButton *_button;
}

@end

@implementation KCMainViewController

#pragma mark - UI方法
- (void)viewDidLoad {
    [super viewDidLoad];

    [self layoutUI];


}

#pragma mark - 私有方法
#pragma mark 界面布局
-(void)layoutUI{
    //地址栏
    _textField=[[UITextField alloc]initWithFrame:CGRectMake(10, 50, 300, 25)];
    _textField.borderStyle=UITextBorderStyleRoundedRect;
    _textField.textColor=[UIColor colorWithRed:0 green:146/255.0 blue:1.0 alpha:1.0];
    _textField.text=@"pic.jpg";
    [self.view addSubview:_textField];
    //上传按钮
    _button=[[UIButton alloc]initWithFrame:CGRectMake(10, 500, 300, 25)];
    [_button setTitle:@"上传" forState:UIControlStateNormal];
    [_button setTitleColor:[UIColor colorWithRed:0 green:146/255.0 blue:1.0 alpha:1.0] forState:UIControlStateNormal];
    [_button addTarget:self action:@selector(uploadFile) forControlEvents:UIControlEventTouchUpInside];
    [self.view addSubview:_button];


}

#pragma mark 取得请求链接
-(NSURL *)getUploadUrl:(NSString *)fileName{
    NSString *urlStr=[NSString stringWithFormat:@"%@?file=%@",kUrl,fileName];
    urlStr=[urlStr stringByAddingPercentEscapesUsingEncoding:NSUTF8StringEncoding];
    NSURL *url=[NSURL URLWithString:urlStr];
    return url;
}
#pragma mark 取得mime types
-(NSString *)getMIMETypes:(NSString *)fileName{
    return @"image/jpg";
}
#pragma mark 取得数据体
-(NSData *)getHttpBody:(NSString *)fileName{
    NSMutableData *dataM=[NSMutableData data];
    NSString *strTop=[NSString stringWithFormat:@"--%@
Content-Disposition: form-data; name="file1"; filename="%@"
Content-Type: %@

",kBOUNDARY_STRING,fileName,[self getMIMETypes:fileName]];
    NSString *strBottom=[NSString stringWithFormat:@"
--%@--",kBOUNDARY_STRING];
    NSString *filePath=[[NSBundle mainBundle] pathForResource:fileName ofType:nil];
    NSData *fileData=[NSData dataWithContentsOfFile:filePath];
    [dataM appendData:[strTop dataUsingEncoding:NSUTF8StringEncoding]];
    [dataM appendData:fileData];
    [dataM appendData:[strBottom dataUsingEncoding:NSUTF8StringEncoding]];
    return dataM;
}


#pragma mark 上传文件
-(void)uploadFile{
    NSString *fileName=_textField.text;

    NSMutableURLRequest *request= [NSMutableURLRequest requestWithURL:[self getUploadUrl:fileName] cachePolicy:NSURLRequestReloadIgnoringCacheData timeoutInterval:5.0f];

    request.HTTPMethod=@"POST";

    NSData *data=[self getHttpBody:fileName];

    //通过请求头设置
    [request setValue:[NSString stringWithFormat:@"%lu",(unsigned long)data.length] forHTTPHeaderField:@"Content-Length"];
    [request setValue:[NSString stringWithFormat:@"multipart/form-data; boundary=%@",kBOUNDARY_STRING] forHTTPHeaderField:@"Content-Type"];

    //设置数据体
    request.HTTPBody=data;


    //发送请求
    [NSURLConnection sendAsynchronousRequest:request queue:[[NSOperationQueue alloc]init] completionHandler:^(NSURLResponse *response, NSData *data, NSError *connectionError) {
        if(connectionError){
            NSLog(@"error:%@",connectionError.localizedDescription);
        }
    }];
}
@end
3.NSURLSession
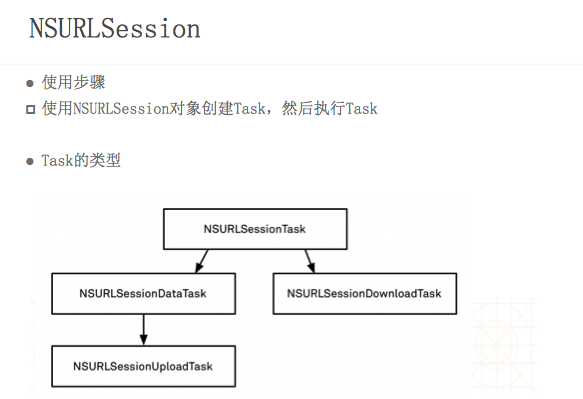


NSURLConnection是2003年伴随着Safari一起发行的网络开发API,距今已经有十一年。当然,在这十一年间它表现的相当优秀,有大量的应用基础,这也是为什么前面花了那么长时间对它进行详细介绍的原因。但是这些年伴随着iPhone、iPad的发展,对于NSURLConnection设计理念也提出了新的挑战。在2013年WWDC上苹果揭开了NSURLSession的面纱,将它作为NSURLConnection的继任者。相比较NSURLConnection,NSURLSession提供了配置会话缓存、协议、cookie和证书能力,这使得网络架构和应用程序可以独立工作、互不干扰。另外,NSURLSession另一个重要的部分是会话任务,它负责加载数据,在客户端和服务器端进行文件的上传下载。

通过前面的介绍大家可以看到,NSURLConnection完成的三个主要任务:获取数据(通常是JSON、XML等)、文件上传、文件下载。其实在NSURLSession时代,他们分别由三个任务来完成:NSURLSessionData、NSURLSessionUploadTask、NSURLSessionDownloadTask,这三个类都是NSURLSessionTask这个抽象类的子类,相比直接使用NSURLConnection,NSURLSessionTask支持任务的暂停、取消和恢复,并且默认任务运行在其他非主线程中,具体关系图如下:

数据请求
前面通过请求一个微博数据进行数据请求演示,现在通过NSURLSessionDataTask实现这个功能,其实现流程与使用NSURLConnection的静态方法类似,下面是主要代码:
-(void)loadJsonData{
    //1.创建url
    NSString *urlStr=[NSString stringWithFormat:@"http://192.168.1.208/ViewStatus.aspx?userName=%@&password=%@",@"KenshinCui",@"123"];
    urlStr =[urlStr stringByAddingPercentEscapesUsingEncoding:NSUTF8StringEncoding];
    NSURL *url=[NSURL URLWithString:urlStr];
    //2.创建请求
    NSURLRequest *request=[NSURLRequest requestWithURL:url];

    //3.创建会话(这里使用了一个全局会话)并且启动任务
    NSURLSession *session=[NSURLSession sharedSession];
    //从会话创建任务
    NSURLSessionDataTask *dataTask=[session dataTaskWithRequest:request completionHandler:^(NSData *data, NSURLResponse *response, NSError *error) {
        if (!error) {
            NSString *dataStr=[[NSString alloc]initWithData:data encoding:NSUTF8StringEncoding];
            NSLog(@"%@",dataStr);
        }else{
            NSLog(@"error is :%@",error.localizedDescription);
        }
    }];

    [dataTask resume];//恢复线程,启动任务
}
文件上传
下面看一下如何使用NSURLSessionUploadTask实现文件上传,这里贴出主要的几个方法:
#pragma mark 取得mime types
-(NSString *)getMIMETypes:(NSString *)fileName{
    return @"image/jpg";
}
#pragma mark 取得数据体
-(NSData *)getHttpBody:(NSString *)fileName{
    NSString *boundary=@"KenshinCui";
    NSMutableData *dataM=[NSMutableData data];
    NSString *strTop=[NSString stringWithFormat:@"--%@
Content-Disposition: form-data; name="file1"; filename="%@"
Content-Type: %@

",boundary,fileName,[self getMIMETypes:fileName]];
    NSString *strBottom=[NSString stringWithFormat:@"
--%@--",boundary];
    NSString *filePath=[[NSBundle mainBundle] pathForResource:fileName ofType:nil];
    NSData *fileData=[NSData dataWithContentsOfFile:filePath];
    [dataM appendData:[strTop dataUsingEncoding:NSUTF8StringEncoding]];
    [dataM appendData:fileData];
    [dataM appendData:[strBottom dataUsingEncoding:NSUTF8StringEncoding]];
    return dataM;
}
#pragma mark 上传文件
-(void)uploadFile{
    NSString *fileName=@"pic.jpg";
    //1.创建url
    NSString *urlStr=@"http://192.168.1.208/FileUpload.aspx";
    urlStr =[urlStr stringByAddingPercentEscapesUsingEncoding:NSUTF8StringEncoding];
    NSURL *url=[NSURL URLWithString:urlStr];
    //2.创建请求
    NSMutableURLRequest *request=[NSMutableURLRequest requestWithURL:url];
    request.HTTPMethod=@"POST";

    //3.构建数据
    NSString *path=[[NSBundle mainBundle] pathForResource:fileName ofType:nil];
    NSData *data=[self getHttpBody:fileName];
    request.HTTPBody=data;

    [request setValue:[NSString stringWithFormat:@"%lu",(unsigned long)data.length] forHTTPHeaderField:@"Content-Length"];
    [request setValue:[NSString stringWithFormat:@"multipart/form-data; boundary=%@",@"KenshinCui"] forHTTPHeaderField:@"Content-Type"];


    //4.创建会话
    NSURLSession *session=[NSURLSession sharedSession];
    NSURLSessionUploadTask *uploadTask=[session uploadTaskWithRequest:request fromData:data completionHandler:^(NSData *data, NSURLResponse *response, NSError *error) {
        if (!error) {
            NSString *dataStr=[[NSString alloc]initWithData:data encoding:NSUTF8StringEncoding];
            NSLog(@"%@",dataStr);
        }else{
            NSLog(@"error is :%@",error.localizedDescription);
        }
    }];

    [uploadTask resume];
}
如果仅仅通过上面的方法或许文件上传还看不出和NSURLConnection之间的区别,因为拼接上传数据的过程和前面是一样的。事实上在NSURLSessionUploadTask中还提供了一个
- (NSURLSessionUploadTask *)uploadTaskWithRequest:(NSURLRequest *)request fromFile:(NSURL *)fileURL completionHandler:(void (^)(NSData *data, NSURLResponse *response, NSError *error))completionHandler
方法用于文件上传。这个方法通常会配合“PUT”请求进行使用,由于PUT方法包含在Web DAV协议中,不同的WEB服务器其配置启用PUT的方法也不同,并且出于安全考虑,各类WEB服务器默认对PUT请求也是拒绝的,所以实际使用时还需做重分考虑,在这里不具体介绍,有兴趣的朋友可以自己试验一下。
文件下载
使用NSURLSessionDownloadTask下载文件的过程与前面差不多,需要注意的是文件下载文件之后会自动保存到一个临时目录,需要开发人员自己将此文件重新放到其他指定的目录中。
-(void)downloadFile{
    //1.创建url
    NSString *fileName=@"1.jpg";
    NSString *urlStr=[NSString stringWithFormat: @"http://192.168.1.208/FileDownload.aspx?file=%@",fileName];
    urlStr =[urlStr stringByAddingPercentEscapesUsingEncoding:NSUTF8StringEncoding];
    NSURL *url=[NSURL URLWithString:urlStr];
    //2.创建请求
    NSMutableURLRequest *request=[NSMutableURLRequest requestWithURL:url];

    //3.创建会话(这里使用了一个全局会话)并且启动任务
    NSURLSession *session=[NSURLSession sharedSession];

    NSURLSessionDownloadTask *downloadTask=[session downloadTaskWithRequest:request completionHandler:^(NSURL *location, NSURLResponse *response, NSError *error) {
        if (!error) {
            //注意location是下载后的临时保存路径,需要将它移动到需要保存的位置

            NSError *saveError;
            NSString *cachePath=[NSSearchPathForDirectoriesInDomains(NSCachesDirectory, NSUserDomainMask, YES) lastObject];
            NSString *savePath=[cachePath stringByAppendingPathComponent:fileName];
            NSLog(@"%@",savePath);
            NSURL *saveUrl=[NSURL fileURLWithPath:savePath];
            [[NSFileManager defaultManager] copyItemAtURL:location toURL:saveUrl error:&saveError];
            if (!saveError) {
                NSLog(@"save sucess.");
            }else{
                NSLog(@"error is :%@",saveError.localizedDescription);
            }

        }else{
            NSLog(@"error is :%@",error.localizedDescription);
        }
    }];

    [downloadTask resume];
}
会话
NSURLConnection通过全局状态来管理cookies、认证信息等公共资源,这样如果遇到两个连接需要使用不同的资源配置情况时就无法解决了,但是这个问题在NSURLSession中得到了解决。NSURLSession同时对应着多个连接,会话通过工厂方法来创建,同一个会话中使用相同的状态信息。NSURLSession支持进程三种会话:
defaultSessionConfiguration:进程内会话(默认会话),用硬盘来缓存数据。ephemeralSessionConfiguration:临时的进程内会话(内存),不会将cookie、缓存储存到本地,只会放到内存中,当应用程序退出后数据也会消失。backgroundSessionConfiguration:后台会话,相比默认会话,该会话会在后台开启一个线程进行网络数据处理。
下面将通过一个文件下载功能对两种会话进行演示,在这个过程中也会用到任务的代理方法对上传操作进行更加细致的控制。下面先看一下使用默认会话下载文件,代码中演示了如何通过NSURLSessionConfiguration进行会话配置,如果通过代理方法进行文件下载进度展示(类似于前面中使用NSURLConnection代理方法,其实下载并未分段,如果需要分段需要配合后台进行),同时在这个过程中可以准确控制任务的取消、挂起和恢复。
//
//  KCMainViewController.m
//  URLSession
//
//  Created by Kenshin Cui on 14-03-23.
//  Copyright (c) 2014年 Kenshin Cui. All rights reserved.
//

#import "KCMainViewController.h"

@interface KCMainViewController ()<NSURLSessionDownloadDelegate>{
    UITextField *_textField;
    UIProgressView *_progressView;
    UILabel *_label;
    UIButton *_btnDownload;
    UIButton *_btnCancel;
    UIButton *_btnSuspend;
    UIButton *_btnResume;
    NSURLSessionDownloadTask *_downloadTask;
}

@end

@implementation KCMainViewController

#pragma mark - UI方法
- (void)viewDidLoad {
    [super viewDidLoad];

    [self layoutUI];
}

#pragma mark 界面布局
-(void)layoutUI{
    //地址栏
    _textField=[[UITextField alloc]initWithFrame:CGRectMake(10, 50, 300, 25)];
    _textField.borderStyle=UITextBorderStyleRoundedRect;
    _textField.textColor=[UIColor colorWithRed:0 green:146/255.0 blue:1.0 alpha:1.0];
    _textField.text=@"[Objective-C.程序设计(第4版)].(斯蒂芬).林冀等.扫描版[电子书www.minxue.net].pdf";
    [self.view addSubview:_textField];
    //进度条
    _progressView=[[UIProgressView alloc]initWithFrame:CGRectMake(10, 100, 300, 25)];
    [self.view addSubview:_progressView];
    //状态显示
    _label=[[UILabel alloc]initWithFrame:CGRectMake(10, 130, 300, 25)];
    _label.textColor=[UIColor colorWithRed:0 green:146/255.0 blue:1.0 alpha:1.0];
    [self.view addSubview:_label];
    //下载按钮
    _btnDownload=[[UIButton alloc]initWithFrame:CGRectMake(20, 500, 50, 25)];
    [_btnDownload setTitle:@"下载" forState:UIControlStateNormal];
    [_btnDownload setTitleColor:[UIColor colorWithRed:0 green:146/255.0 blue:1.0 alpha:1.0] forState:UIControlStateNormal];
    [_btnDownload addTarget:self action:@selector(downloadFile) forControlEvents:UIControlEventTouchUpInside];
    [self.view addSubview:_btnDownload];
    //取消按钮
    _btnCancel=[[UIButton alloc]initWithFrame:CGRectMake(100, 500, 50, 25)];
    [_btnCancel setTitle:@"取消" forState:UIControlStateNormal];
    [_btnCancel setTitleColor:[UIColor colorWithRed:0 green:146/255.0 blue:1.0 alpha:1.0] forState:UIControlStateNormal];
    [_btnCancel addTarget:self action:@selector(cancelDownload) forControlEvents:UIControlEventTouchUpInside];
    [self.view addSubview:_btnCancel];
    //挂起按钮
    _btnSuspend=[[UIButton alloc]initWithFrame:CGRectMake(180, 500, 50, 25)];
    [_btnSuspend setTitle:@"挂起" forState:UIControlStateNormal];
    [_btnSuspend setTitleColor:[UIColor colorWithRed:0 green:146/255.0 blue:1.0 alpha:1.0] forState:UIControlStateNormal];
    [_btnSuspend addTarget:self action:@selector(suspendDownload) forControlEvents:UIControlEventTouchUpInside];
    [self.view addSubview:_btnSuspend];
    //恢复按钮
    _btnResume=[[UIButton alloc]initWithFrame:CGRectMake(260, 500, 50, 25)];
    [_btnResume setTitle:@"恢复" forState:UIControlStateNormal];
    [_btnResume setTitleColor:[UIColor colorWithRed:0 green:146/255.0 blue:1.0 alpha:1.0] forState:UIControlStateNormal];
    [_btnResume addTarget:self action:@selector(resumeDownload) forControlEvents:UIControlEventTouchUpInside];
    [self.view addSubview:_btnResume];
}
#pragma mark 设置界面状态
-(void)setUIStatus:(int64_t)totalBytesWritten expectedToWrite:(int64_t)totalBytesExpectedToWrite{
    dispatch_async(dispatch_get_main_queue(), ^{
        _progressView.progress=(float)totalBytesWritten/totalBytesExpectedToWrite;
        if (totalBytesWritten==totalBytesExpectedToWrite) {
            _label.text=@"下载完成";
            [UIApplication sharedApplication].networkActivityIndicatorVisible=NO;
            _btnDownload.enabled=YES;
        }else{
            _label.text=@"正在下载...";
            [UIApplication sharedApplication].networkActivityIndicatorVisible=YES;
        }
    });
}


#pragma mark 文件下载
-(void)downloadFile{
    //1.创建url
    NSString *fileName=_textField.text;
    NSString *urlStr=[NSString stringWithFormat: @"http://192.168.1.208/FileDownload.aspx?file=%@",fileName];
    urlStr =[urlStr stringByAddingPercentEscapesUsingEncoding:NSUTF8StringEncoding];
    NSURL *url=[NSURL URLWithString:urlStr];
    //2.创建请求
    NSMutableURLRequest *request=[NSMutableURLRequest requestWithURL:url];

    //3.创建会话
    //默认会话
    NSURLSessionConfiguration *sessionConfig=[NSURLSessionConfiguration defaultSessionConfiguration];
    sessionConfig.timeoutIntervalForRequest=5.0f;//请求超时时间
    sessionConfig.allowsCellularAccess=true;//是否允许蜂窝网络下载(2G/3G/4G)
    //创建会话
    NSURLSession *session=[NSURLSession sessionWithConfiguration:sessionConfig delegate:self delegateQueue:nil];//指定配置和代理
    _downloadTask=[session downloadTaskWithRequest:request];

    [_downloadTask resume];
}
#pragma mark 取消下载
-(void)cancelDownload{
    [_downloadTask cancel];

}
#pragma mark 挂起下载
-(void)suspendDownload{
    [_downloadTask suspend];
}
#pragma mark 恢复下载下载
-(void)resumeDownload{
    [_downloadTask resume];
}

#pragma mark - 下载任务代理
#pragma mark 下载中(会多次调用,可以记录下载进度)
-(void)URLSession:(NSURLSession *)session downloadTask:(NSURLSessionDownloadTask *)downloadTask didWriteData:(int64_t)bytesWritten totalBytesWritten:(int64_t)totalBytesWritten totalBytesExpectedToWrite:(int64_t)totalBytesExpectedToWrite{
    [self setUIStatus:totalBytesWritten expectedToWrite:totalBytesExpectedToWrite];
}

#pragma mark 下载完成
-(void)URLSession:(NSURLSession *)session downloadTask:(NSURLSessionDownloadTask *)downloadTask didFinishDownloadingToURL:(NSURL *)location{
    NSError *error;
    NSString *cachePath=[NSSearchPathForDirectoriesInDomains(NSCachesDirectory, NSUserDomainMask, YES) lastObject];
    NSString *savePath=[cachePath stringByAppendingPathComponent:_textField.text];
    NSLog(@"%@",savePath);
    NSURL *saveUrl=[NSURL fileURLWithPath:savePath];
    [[NSFileManager defaultManager] copyItemAtURL:location toURL:saveUrl error:&error];
    if (error) {
        NSLog(@"Error is:%@",error.localizedDescription);
    }
}

#pragma mark 任务完成,不管是否下载成功
-(void)URLSession:(NSURLSession *)session task:(NSURLSessionTask *)task didCompleteWithError:(NSError *)error{
    [self setUIStatus:0 expectedToWrite:0];
    if (error) {
        NSLog(@"Error is:%@",error.localizedDescription);
    }
}
@end
演示效果:

NSURLSession支持程序的后台下载和上传,苹果官方将其称为进程之外的上传和下载,这些任务都是交给后台守护线程完成的,而非应用程序本身。即使文件在下载和上传过程中崩溃了也可以继续运行(注意如果用户强制退关闭应用程序,NSURLSession会断开连接)。下面看一下如何在后台进行文件下载,这在实际开发中往往很有效,例如在手机上缓存一个视频在没有网络的时候观看(为了简化程序这里不再演示任务的取消、挂起等操作)。下面对前面的程序稍作调整使程序能在后台完成下载操作:
//
//  KCMainViewController.m
//  URLSession
//
//  Created by Kenshin Cui on 14-03-23.
//  Copyright (c) 2014年 Kenshin Cui. All rights reserved.
//

#import "KCMainViewController.h"
#import "AppDelegate.h"

@interface KCMainViewController ()<NSURLSessionDownloadDelegate>{
    NSURLSessionDownloadTask *_downloadTask;
    NSString *_fileName;
}

@end

@implementation KCMainViewController

#pragma mark - UI方法
- (void)viewDidLoad {
    [super viewDidLoad];

    [self downloadFile];
}

#pragma mark 取得一个后台会话(保证一个后台会话,这通常很有必要)
-(NSURLSession *)backgroundSession{
    static NSURLSession *session;
    static dispatch_once_t token;
    dispatch_once(&token, ^{
        NSURLSessionConfiguration *sessionConfig=[NSURLSessionConfiguration backgroundSessionConfigurationWithIdentifier:@"com.cmjstudio.URLSession"];
        sessionConfig.timeoutIntervalForRequest=5.0f;//请求超时时间
        sessionConfig.discretionary=YES;//系统自动选择最佳网络下载
        sessionConfig.HTTPMaximumConnectionsPerHost=5;//限制每次最多一个连接
        //创建会话
        session=[NSURLSession sessionWithConfiguration:sessionConfig delegate:self delegateQueue:nil];//指定配置和代理
    });
    return session;
}

#pragma mark 文件下载
-(void)downloadFile{
    _fileName=@"1.mp4";
    NSString *urlStr=[NSString stringWithFormat: @"http://192.168.1.208/FileDownload.aspx?file=%@",_fileName];
    urlStr =[urlStr stringByAddingPercentEscapesUsingEncoding:NSUTF8StringEncoding];
    NSURL *url=[NSURL URLWithString:urlStr];
    NSMutableURLRequest *request=[NSMutableURLRequest requestWithURL:url];

    //后台会话
    _downloadTask=[[self backgroundSession] downloadTaskWithRequest:request];

    [_downloadTask resume];
}
#pragma mark - 下载任务代理
#pragma mark 下载中(会多次调用,可以记录下载进度)
-(void)URLSession:(NSURLSession *)session downloadTask:(NSURLSessionDownloadTask *)downloadTask didWriteData:(int64_t)bytesWritten totalBytesWritten:(int64_t)totalBytesWritten totalBytesExpectedToWrite:(int64_t)totalBytesExpectedToWrite{
//    [NSThread sleepForTimeInterval:0.5];
//    NSLog(@"%.2f",(double)totalBytesWritten/totalBytesExpectedToWrite);
}

#pragma mark 下载完成
-(void)URLSession:(NSURLSession *)session downloadTask:(NSURLSessionDownloadTask *)downloadTask didFinishDownloadingToURL:(NSURL *)location{
    NSError *error;
    NSString *cachePath=[NSSearchPathForDirectoriesInDomains(NSCachesDirectory, NSUserDomainMask, YES) lastObject];
    NSString *savePath=[cachePath stringByAppendingPathComponent:[NSString stringWithFormat:@"%@",[NSDate date]]];
    NSLog(@"%@",savePath);
    NSURL *saveUrl=[NSURL fileURLWithPath:savePath];
    [[NSFileManager defaultManager] copyItemAtURL:location toURL:saveUrl error:&error];
    if (error) {
        NSLog(@"didFinishDownloadingToURL:Error is %@",error.localizedDescription);
    }
}

#pragma mark 任务完成,不管是否下载成功
-(void)URLSession:(NSURLSession *)session task:(NSURLSessionTask *)task didCompleteWithError:(NSError *)error{
    if (error) {
        NSLog(@"DidCompleteWithError:Error is %@",error.localizedDescription);
    }
}
@end
运行上面的程序会发现即使程序退出到后台也能正常完成文件下载。为了提高用户体验,通常会在下载时设置文件下载进度,但是通过前面的介绍可以知道:当程序进入后台后,事实上任务是交给iOS系统来调度的,具体什么时候下载完成就不得而知,例如有个较大的文件经过一个小时下载完了,正常打开应用程序看到的此文件下载进度应该在100%的位置,但是由于程序已经在后台无法更新程序UI,而此时可以通过应用程序代理方法进行UI更新。具体原理如下图所示:
当NSURLSession在后台开启几个任务之后,如果有其中几个任务完成后系统会调用此应用程序的-(void)application:(UIApplication *)application handleEventsForBackgroundURLSession:(NSString *)identifier completionHandler:(void (^)())completionHandler代理方法;此方法会包含一个competionHandler(此操作表示应用完成所有处理工作),通常我们会保存此对象;直到最后一个任务完成,此时会重新通过会话标识(上面sessionConfig中设置的)找到对应的会话并调用NSURLSession的-(void)URLSessionDidFinishEventsForBackgroundURLSession:(NSURLSession *)session代理方法,在这个方法中通常可以进行UI更新,并调用completionHandler通知系统已经完成所有操作。具体两个方法代码示例如下:
-(void)application:(UIApplication *)application handleEventsForBackgroundURLSession:(NSString *)identifier completionHandler:(void (^)())completionHandler{

    //backgroundSessionCompletionHandler是自定义的一个属性
    self.backgroundSessionCompletionHandler=completionHandler;

}

-(void)URLSessionDidFinishEventsForBackgroundURLSession:(NSURLSession *)session{
    AppDelegate *appDelegate = (AppDelegate *)[[UIApplication sharedApplication] delegate];

    //Other Operation....

    if (appDelegate.backgroundSessionCompletionHandler) {

        void (^completionHandler)() = appDelegate.backgroundSessionCompletionHandler;

        appDelegate.backgroundSessionCompletionHandler = nil;

        completionHandler();

    }
}
4.UIWebView
网络开发中还有一个常用的UI控件UIWebView,它是iOS中内置的浏览器控件,功能十分强大。如一些社交软件往往在应用程序内不需要打开其他浏览器就能看一些新闻之类的页面,就是通过这个控件实现的。需要注意的是UIWebView不仅能加载网络资源还可以加载本地资源,目前支持的常用的文档格式如:html、pdf、docx、txt等。
浏览器实现
下面将通过一个UIWebView开发一个简单的浏览器,界面布局大致如下:

在这个浏览器中将实现这样几个功能:
1.如果输入以”file://”开头的地址将加载Bundle中的文件
2.如果输入以“http”开头的地址将加载网络资源
3.如果输入内容不符合上面两种情况将使用bing搜索此内容
//
//  KCMainViewController.m
//  UIWebView
//
//  Created by Kenshin Cui on 14-3-22.
//  Copyright (c) 2014年 Kenshin Cui. All rights reserved.
//

#import "KCMainViewController.h"'
#define kFILEPROTOCOL @"file://"


@interface KCMainViewController ()<UISearchBarDelegate,UIWebViewDelegate>{
    UIWebView *_webView;
    UIToolbar *_toolbar;
    UISearchBar *_searchBar;
    UIBarButtonItem *_barButtonBack;
    UIBarButtonItem *_barButtonForward;
}

@end

@implementation KCMainViewController
#pragma mark - 界面UI事件
- (void)viewDidLoad {
    [super viewDidLoad];

    [self layoutUI];
}

#pragma mark - 私有方法
#pragma mark 界面布局
-(void)layoutUI{
    /*添加地址栏*/
    _searchBar=[[UISearchBar alloc]initWithFrame:CGRectMake(0, 20, 320, 44)];
    _searchBar.delegate=self;
    [self.view addSubview:_searchBar];

    /*添加浏览器控件*/
    _webView=[[UIWebView alloc]initWithFrame:CGRectMake(0, 64, 320, 460)];
    _webView.dataDetectorTypes=UIDataDetectorTypeAll;//数据检测,例如内容中有邮件地址,点击之后可以打开邮件软件编写邮件
    _webView.delegate=self;
    [self.view addSubview:_webView];

    /*添加下方工具栏*/
    _toolbar=[[UIToolbar alloc]initWithFrame:CGRectMake(0, 524, 320, 44)];
    UIButton *btnBack=[UIButton buttonWithType:UIButtonTypeCustom];
    btnBack.bounds=CGRectMake(0, 0, 32, 32);
    [btnBack setImage:[UIImage imageNamed:@"back.png"] forState:UIControlStateNormal];
    [btnBack setImage:[UIImage imageNamed:@"back_disable.png"] forState:UIControlStateDisabled];
    [btnBack addTarget:self action:@selector(webViewBack) forControlEvents:UIControlEventTouchUpInside];
    _barButtonBack=[[UIBarButtonItem alloc]initWithCustomView:btnBack];
    _barButtonBack.enabled=NO;

    UIBarButtonItem *btnSpacing=[[UIBarButtonItem alloc]initWithBarButtonSystemItem:UIBarButtonSystemItemFlexibleSpace target:nil action:nil];

    UIButton *btnForward=[UIButton buttonWithType:UIButtonTypeCustom];
    btnForward.bounds=CGRectMake(0, 0, 32, 32);
    [btnForward setImage:[UIImage imageNamed:@"forward.png"] forState:UIControlStateNormal];
    [btnForward setImage:[UIImage imageNamed:@"forward_disable.png"] forState:UIControlStateDisabled];
    [btnForward addTarget:self action:@selector(webViewForward) forControlEvents:UIControlEventTouchUpInside];
    _barButtonForward=[[UIBarButtonItem alloc]initWithCustomView:btnForward];
    _barButtonForward.enabled=NO;

    _toolbar.items=@[_barButtonBack,btnSpacing,_barButtonForward];
    [self.view addSubview:_toolbar];
}
#pragma mark 设置前进后退按钮状态
-(void)setBarButtonStatus{
    if (_webView.canGoBack) {
        _barButtonBack.enabled=YES;
    }else{
        _barButtonBack.enabled=NO;
    }
    if(_webView.canGoForward){
        _barButtonForward.enabled=YES;
    }else{
        _barButtonForward.enabled=NO;
    }
}
#pragma mark 后退
-(void)webViewBack{
    [_webView goBack];
}
#pragma mark 前进
-(void)webViewForward{
    [_webView goForward];
}
#pragma mark 浏览器请求
-(void)request:(NSString *)urlStr{
    //创建url
    NSURL *url;

    //如果file://开头的字符串则加载bundle中的文件
    if([urlStr hasPrefix:kFILEPROTOCOL]){
        //取得文件名
        NSRange range= [urlStr rangeOfString:kFILEPROTOCOL];
        NSString *fileName=[urlStr substringFromIndex:range.length];
        url=[[NSBundle mainBundle] URLForResource:fileName withExtension:nil];
    }else if(urlStr.length>0){
        //如果是http请求则直接打开网站
        if ([urlStr hasPrefix:@"http"]) {
            url=[NSURL URLWithString:urlStr];
        }else{//如果不符合任何协议则进行搜索
            urlStr=[NSString stringWithFormat:@"http://m.bing.com/search?q=%@",urlStr];
        }
        urlStr=[urlStr stringByAddingPercentEscapesUsingEncoding:NSUTF8StringEncoding];//url编码
        url=[NSURL URLWithString:urlStr];

    }

    //创建请求
    NSURLRequest *request=[NSURLRequest requestWithURL:url];

    //加载请求页面
    [_webView loadRequest:request];
}

#pragma mark - WebView 代理方法
#pragma mark 开始加载
-(void)webViewDidStartLoad:(UIWebView *)webView{
    //显示网络请求加载
    [UIApplication sharedApplication].networkActivityIndicatorVisible=true;
}

#pragma mark 加载完毕
-(void)webViewDidFinishLoad:(UIWebView *)webView{
    //隐藏网络请求加载图标
    [UIApplication sharedApplication].networkActivityIndicatorVisible=false;
    //设置按钮状态
    [self setBarButtonStatus];
}
#pragma mark 加载失败
-(void)webView:(UIWebView *)webView didFailLoadWithError:(NSError *)error{
    NSLog(@"error detail:%@",error.localizedDescription);
    UIAlertView *alert=[[UIAlertView alloc]initWithTitle:@"系统提示" message:@"网络连接发生错误!" delegate:self cancelButtonTitle:nil otherButtonTitles:@"确定", nil];
    [alert show];
}


#pragma mark - SearchBar 代理方法
#pragma mark 点击搜索按钮或回车
-(void)searchBarSearchButtonClicked:(UISearchBar *)searchBar{
    [self request:_searchBar.text];
}
@end
运行效果:

其实UIWebView整个使用相当简单:创建URL->创建请求->加载请求,无论是加载本地文件还是Web内容都是这三个步骤。UIWebView内容加载事件同样是通过代理通知外界,常用的代理方法如开始加载、加载完成、加载出错等,这些方法通常可以帮助开发者更好的控制请求加载过程。
注意:UIWebView打开本地pdf、word文件依靠的并不是UIWebView自身解析,而是依靠MIME Type识别文件类型并调用对应应用打开。
UIWebView与页面交互
UIWebView与页面的交互主要体现在两方面:使用ObjC方法进行页面操作、在页面中调用ObjC方法两部分。和其他移动操作系统不同,iOS中所有的交互都集中于一个stringByEvaluatingJavaScriptFromString:方法中,以此来简化开发过程。
在iOS中操作页面
1.首先在request方法中使用loadHTMLString:加载了html内容,当然你也可以将html放到bundle或沙盒中读取并且加载。
2.然后在webViewDidFinishLoad:代理方法中通过stringByEvaluatingJavaScriptFromString: 方法可以操作页面中的元素,例如在下面的方法中读取了页面标题、修改了其中的内容。
//
//  KCMainViewController.m
//  UIWebView
//
//  Created by Kenshin Cui on 14-3-22.
//  Copyright (c) 2014年 Kenshin Cui. All rights reserved.
//

#import "KCMainViewController.h"'

@interface KCMainViewController ()<UISearchBarDelegate,UIWebViewDelegate>{
    UIWebView *_webView;
}

@end

@implementation KCMainViewController
#pragma mark - 界面UI事件
- (void)viewDidLoad {
    [super viewDidLoad];

    [self layoutUI];

    [self request];
}

#pragma mark - 私有方法
#pragma mark 界面布局
-(void)layoutUI{
    /*添加浏览器控件*/
    _webView=[[UIWebView alloc]initWithFrame:CGRectMake(0, 20, 320, 548)];
    _webView.dataDetectorTypes=UIDataDetectorTypeAll;//数据检测类型,例如内容中有邮件地址,点击之后可以打开邮件软件编写邮件
    _webView.delegate=self;
    [self.view addSubview:_webView];
}
#pragma mark 浏览器请求
-(void)request{
    //加载html内容
    NSString *htmlStr=@"<html>
            <head><title>Kenshin Cui's Blog</title></head>
            <body style="color:#0092FF;">
                <h1 id="header">I am Kenshin Cui</h1>
                <p>iOS 开发系列</p>
            </body></html>";

    //加载请求页面
    [_webView loadHTMLString:htmlStr baseURL:nil];
}

#pragma mark - WebView 代理方法
#pragma mark 开始加载
-(void)webViewDidStartLoad:(UIWebView *)webView{
    //显示网络请求加载
    [UIApplication sharedApplication].networkActivityIndicatorVisible=true;
}

#pragma mark 加载完毕
-(void)webViewDidFinishLoad:(UIWebView *)webView{
    //隐藏网络请求加载图标
    [UIApplication sharedApplication].networkActivityIndicatorVisible=false;

    //取得html内容
    NSLog(@"%@",[_webView stringByEvaluatingJavaScriptFromString:@"document.title"]);
    //修改页面内容
    NSLog(@"%@",[_webView stringByEvaluatingJavaScriptFromString:@"document.getElementById('header').innerHTML='Kenshin Cui\'s Blog'"]);
}
#pragma mark 加载失败
-(void)webView:(UIWebView *)webView didFailLoadWithError:(NSError *)error{
    NSLog(@"error detail:%@",error.localizedDescription);
    UIAlertView *alert=[[UIAlertView alloc]initWithTitle:@"系统提示" message:@"网络连接发生错误!" delegate:self cancelButtonTitle:nil otherButtonTitles:@"确定", nil];
    [alert show];
}

@end
运行效果:

页面中调用ObjC方法
页面中的js是无法直接调用ObjC方法的,但是可以变换一下思路:当需要进行一个js操作时让页面进行一个重定向,并且在重定向过程中传入一系列参数。在UIWebView的代理方法中有一个webView: shouldStartLoadWithRequest:navigationType方法,这个方法会在页面加载前执行,这样可以在这里拦截重定向,并且获取定向URL中的参数,根据这些参数约定一个方法去执行。
当访问百度搜索手机版时会发现,有时候点击页面中的某个元素可以调出iOS操作系统的UIActionSheet,下面不妨模拟一下这个过程。首先需要定义一个js方法,为了方便扩展,这个js保存在MyJs.js文件中存放到Bundle中,同时在页面中加载这个文件内容。MyJs.js内容如下:
function showSheet(title,cancelButtonTitle,destructiveButtonTitle,otherButtonTitle) {
    var url='kcactionsheet://?';
    var paramas=title+'&'+cancelButtonTitle+'&'+destructiveButtonTitle;
    if(otherButtonTitle){
        paramas+='&'+otherButtonTitle;
    }
    window.location.href=url+ encodeURIComponent(paramas);
}
var blog=document.getElementById('blog');
blog.onclick=function(){
    showSheet('系统提示','取消','确定',null);
};
这个js的功能相当单一,调用showSheet方法则会进行一个重定向,调用过程中需要传递一系列参数,当然这些参数都是UIActionSheet中需要使用的,注意这里约定所有调用UIActionSheet的方法参数都以”kcactionsheet”开头。
然后在webView: shouldStartLoadWithRequest:navigationType方法中截获以“kcactionsheet”协议开头的请求,对于这类请求获得对应参数调用UIActionSheet。看一下完整代码:
//
//  KCMainViewController.m
//  UIWebView
//
//  Created by Kenshin Cui on 14-3-22.
//  Copyright (c) 2014年 Kenshin Cui. All rights reserved.
//

#import "KCMainViewController.h"

@interface KCMainViewController ()<UISearchBarDelegate,UIWebViewDelegate>{
    UIWebView *_webView;
}

@end

@implementation KCMainViewController
#pragma mark - 界面UI事件
- (void)viewDidLoad {
    [super viewDidLoad];

    [self layoutUI];

    [self request];
}

#pragma mark - 私有方法
#pragma mark 界面布局
-(void)layoutUI{
    /*添加浏览器控件*/
    _webView=[[UIWebView alloc]initWithFrame:CGRectMake(0, 20, 320, 548)];
    _webView.dataDetectorTypes=UIDataDetectorTypeAll;//数据检测类型,例如内容中有邮件地址,点击之后可以打开邮件软件编写邮件
    _webView.delegate=self;
    [self.view addSubview:_webView];
}
#pragma mark 显示actionsheet
-(void)showSheetWithTitle:(NSString *)title cancelButtonTitle:(NSString *)cancelButtonTitle destructiveButtonTitle:(NSString *)destructiveButtonTitle otherButtonTitles:(NSString *)otherButtonTitle{
    UIActionSheet *actionSheet=[[UIActionSheet alloc]initWithTitle:title delegate:nil cancelButtonTitle:cancelButtonTitle destructiveButtonTitle:destructiveButtonTitle otherButtonTitles:otherButtonTitle, nil];
    [actionSheet showInView:self.view];
}
#pragma mark 浏览器请求
-(void)request{
    //加载html内容
    NSString *htmlStr=@"<html>
            <head><title>Kenshin Cui's Blog</title></head>
            <body style="color:#0092FF;">
                <h1 id="header">I am Kenshin Cui</h1>
                <p id="blog">iOS 开发系列</p>
            </body></html>";

    //加载请求页面
    [_webView loadHTMLString:htmlStr baseURL:nil];

}

#pragma mark - WebView 代理方法
#pragma mark 页面加载前(此方法返回false则页面不再请求)
-(BOOL)webView:(UIWebView *)webView shouldStartLoadWithRequest:(NSURLRequest *)request navigationType:(UIWebViewNavigationType)navigationType{
    if ([request.URL.scheme isEqual:@"kcactionsheet"]) {
        NSString *paramStr=request.URL.query;
        NSArray *params= [[paramStr stringByRemovingPercentEncoding] componentsSeparatedByString:@"&"];
        id otherButton=nil;
        if (params.count>3) {
            otherButton=params[3];
        }
        [self showSheetWithTitle:params[0] cancelButtonTitle:params[1] destructiveButtonTitle:params[2] otherButtonTitles:otherButton];
        return false;
    }
    return true;
}

#pragma mark 开始加载
-(void)webViewDidStartLoad:(UIWebView *)webView{
    //显示网络请求加载
    [UIApplication sharedApplication].networkActivityIndicatorVisible=true;
}

#pragma mark 加载完毕
-(void)webViewDidFinishLoad:(UIWebView *)webView{
    //隐藏网络请求加载图标
    [UIApplication sharedApplication].networkActivityIndicatorVisible=false;

    //加载js文件
    NSString *path=[[NSBundle mainBundle] pathForResource:@"MyJs.js" ofType:nil];
    NSString *jsStr=[NSString stringWithContentsOfFile:path encoding:NSUTF8StringEncoding error:nil];
    //加载js文件到页面
    [_webView stringByEvaluatingJavaScriptFromString:jsStr];
}
#pragma mark 加载失败
-(void)webView:(UIWebView *)webView didFailLoadWithError:(NSError *)error{
    NSLog(@"error detail:%@",error.localizedDescription);
    UIAlertView *alert=[[UIAlertView alloc]initWithTitle:@"系统提示" message:@"网络连接发生错误!" delegate:self cancelButtonTitle:nil otherButtonTitles:@"确定", nil];
    [alert show];
}

@end
运行效果:

5.网络状态
前面无论是下载还是上传都没有考虑网络状态,事实上实际开发过程中这个问题是不得不思考的,试想目前谁会用3G或4G网络下载一个超大的文件啊,因此实际开发过程中如果程序部署到了真机上必须根据不同的网络状态决定用户的操作,例如下图就是在使用QQ音乐播放在线音乐的提示:

网络状态检查在早期都是通过苹果官方的Reachability类进行检查(需要自行下载),但是这个类本身存在一些问题,并且官方后来没有再更新。后期大部分开发者都是通过第三方框架进行检测,在这里就不再使用官方提供的方法,直接使用AFNetworking框架检测。不管使用官方提供的类还是第三方框架,用法都是类似的,通常是发送一个URL然后去检测网络状态变化,网络改变后则调用相应的网络状态改变方法。下面是一个网络监测的简单示例:
//
//  KCMainViewController.m
//  Network status
//
//  Created by Kenshin Cui on 14-3-22.
//  Copyright (c) 2014年 Kenshin Cui. All rights reserved.
//

#import "KCMainViewController.h"
#import "AFNetworking.h"

@interface KCMainViewController ()<NSURLConnectionDataDelegate>

@end

@implementation KCMainViewController

#pragma mark - UI方法
- (void)viewDidLoad {
    [super viewDidLoad];

    [self checkNetworkStatus];

}

#pragma mark - 私有方法
#pragma mark 网络状态变化提示
-(void)alert:(NSString *)message{
    UIAlertView *alertView=[[UIAlertView alloc]initWithTitle:@"System Info" message:message delegate:nil cancelButtonTitle:@"Cancel" otherButtonTitles: nil];
    [alertView show];
}

#pragma mark 网络状态监测
-(void)checkNetworkStatus{
    //创建一个用于测试的url
    NSURL *url=[NSURL URLWithString:@"http://www.apple.com"];
    AFHTTPRequestOperationManager *operationManager=[[AFHTTPRequestOperationManager alloc]initWithBaseURL:url];

    //根据不同的网络状态改变去做相应处理
    [operationManager.reachabilityManager setReachabilityStatusChangeBlock:^(AFNetworkReachabilityStatus status) {
        switch (status) {
            case AFNetworkReachabilityStatusReachableViaWWAN:
                [self alert:@"2G/3G/4G Connection."];
                break;
            case AFNetworkReachabilityStatusReachableViaWiFi:
                [self alert:@"WiFi Connection."];
                break;
            case AFNetworkReachabilityStatusNotReachable:
                [self alert:@"Network not found."];
                break;

            default:
                [self alert:@"Unknown."];
                break;
        }
    }];

    //开始监控
    [operationManager.reachabilityManager startMonitoring];
}
@end
AFNetworking是网络开发中常用的一个第三方框架,常用的网络开发它都能帮助大家更好的实现,例如JSON数据请求、文件下载、文件上传(并且支持断点续传)等,甚至到AFNetworking2.0之后还加入了对NSURLSession的支持。由于本文更多目的在于分析网络操作原理,因此在此不再赘述,更多内容大家可以看官方文档,常用的操作都有示例代码。