一简介
1、凸包
凸包(Convex Hull)是一个计算机几何图形学中的概念, 简单来说, 给定二维平面点集, 凸包就是能够将最外层的点连接起来构成的凸多边形, 它能够包含点集中所有的点。物体的凸包检测场应用在物体识别、手势识别及边界检测等领域。
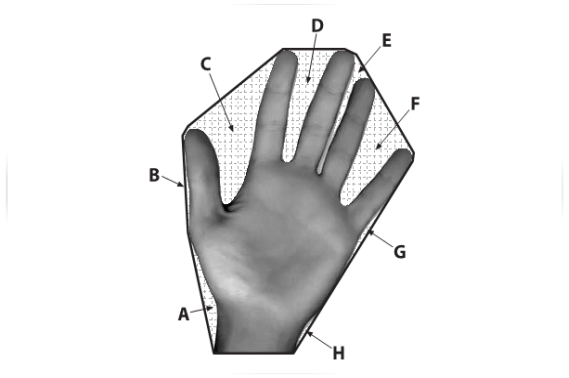
A-H是被标出的凸包缺陷
2、寻找凸包---convexHull()
1 CV_EXPORTS_W void convexHull(InputArray points, OutputArray hull, bool clockwise=false, bool returnPoints = true);
points: 输入的二维点集, 可以填Mat类型或std::vector
hull: 函数调用后找到的凸包
clockwise: 操作方向标志符, 当为true时, 输出的凸包为顺时针方向, false为逆时针方向(假定坐标系x轴指向右,y轴指向上方)
returnPoints: 操作标志符, 默认值true. 当标志符为true时, 函数返回凸包各个点, 否则返回凸包各点的指数, 当输出数组是std::vector时, 此标志被忽略
示例:
1 vector<int> hull;
2 convexHull(Mat(points), hull, true);
1 vector<vector<Point>> hull(contours.size());
2 for(int i = 0; i < contours.size(); i++)
3 {
4     convexHull(Mat(contours[i]), hull[i], true);
5 }
3、凸包缺陷分析---convexityDefects()
1 CV_EXPORTS_W void convexityDefects(InputArray contour, InputArray convexhull, OutputArray convexityDefects);
contour: 表示输入参数检测到的轮廓, 可以用findContours函数获得
convexhull: 输入参数表示检测到的凸包, 可以用convexHull函数获得
convexityDefects: 检测到的最终结果, 应为vector<vector<Vec4i>>类型, Vec4i存储了起始点、结束点、距离及最远点到凸包的距离
二、绘制点集的凸包
 1 //绘制点集的凸包
 2 #include<opencv2/opencv.hpp>
 3
 4 using namespace cv;
 5
 6 int main()
 7 {
 8     //---绘制点集的凸包
 9     Mat img(400, 400, CV_8UC3, Scalar::all(0));  //定义绘制图像
10     RNG rng;  //定义随机数对象
11     while(1)
12     {
13         char key;
14         int count = (unsigned int)rng % 100;  //定义点的个数
15         vector<Point> points;  //定义点集
16         for(int i=0; i<count; i++)
17         {
18             Point pt;
19             pt.x = rng.uniform(img.cols/4, img.cols*3/4);  //设定点的x范围
20             pt.y = rng.uniform(img.rows/4, img.rows*3/4);  //设定点的y范围
21             points.push_back(pt);
22         }
23
24         //检测凸包
25         vector<int> hull;
26         convexHull(Mat(points), hull, true);
27
28         img = Scalar::all(0);
29         for(int i = 0; i < count; i++ )
30             circle(img, points[i], 3, Scalar(rng.uniform(0, 255), rng.uniform(0, 255), rng.uniform(0, 255)), CV_FILLED, CV_AA);
31
32         //准备参数
33         int hullcount = (int)hull.size(); //凸包的边数
34         Point point0 = points[hull[hullcount-1]]; //连接凸包边的坐标点
35
36         //绘制凸包的边
37         for(int  i = 0; i < hullcount; i++ )
38         {
39             Point point = points[hull[i]];
40             circle(img, point, 8, Scalar(0, 255, 0), 2, 8);
41             line(img, point0, point, Scalar(255, 255, 255), 2, CV_AA);
42             point0 = point;
43         }
44
45         //显示效果图
46         imshow("img", img);
47
48         //按下ESC,Q,或者q,程序退出
49         key = (char)waitKey();
50         if( key == 27 || key == 'q' || key == 'Q' )
51             break;
52     }
53     return 0;
54 }
三、绘制轮廓的凸包
 1 //绘制轮廓的凸包
 2 #include<opencv2/opencv.hpp>
 3
 4 using namespace cv;
 5
 6 int main()
 7 {
 8     Mat srcImg = imread("12.jpg");
 9     imshow("src", srcImg);
10     Mat dstImg2 = srcImg.clone();
11     Mat tempImg(srcImg.rows, srcImg.cols, CV_8UC3, Scalar::all(0));  //用于绘制凸包
12     Mat dstImg(srcImg.rows, srcImg.cols, CV_8UC3, Scalar::all(0));  //用于绘制轮廓
13     cvtColor(srcImg, srcImg, CV_BGR2GRAY);
14     threshold(srcImg, srcImg, 100, 255, CV_THRESH_BINARY); //二值化
15
16     vector<vector<Point>> contours;
17     vector<Vec4i> hierarcy;
18     findContours(srcImg, contours, hierarcy, CV_RETR_EXTERNAL, CV_CHAIN_APPROX_NONE);
19     vector<vector<Point>> hull(contours.size());
20     for(int i=0; i<contours.size(); i++)
21     {
22         convexHull(Mat(contours[i]), hull[i], true);     //查找凸包
23         drawContours(dstImg, contours, i, Scalar(255, 255, 255), -1, 8);  //绘制轮廓
24         //drawContours(dstImg, hull, i, Scalar(rand()%255, rand()%255, rand()%255), 2, 8);
25         drawContours(tempImg, hull, i, Scalar(255, 255, 255), -1, 8);
26     }
27     imshow("hull", tempImg);
28     imshow("contours", dstImg);
29
30     Mat diffImg;
31     absdiff(tempImg, dstImg, diffImg);  //图像相减
32     Mat element = getStructuringElement(MORPH_RECT, Size(3, 3), Point(-1, -1));
33     erode(diffImg, diffImg, element);
34     imshow("diff", diffImg);
35
36     vector<vector<Point>> contours2;
37     vector<Vec4i> hierarcy2;
38     cvtColor(diffImg, diffImg, CV_BGR2GRAY); //转为灰度图
39     threshold(diffImg, diffImg, 100, 255, CV_THRESH_BINARY); //二值化
40     findContours(diffImg, contours2, hierarcy2, CV_RETR_EXTERNAL, CV_CHAIN_APPROX_NONE);
41     drawContours(dstImg2, contours2, -1, Scalar(0, 0, 255), 2, 8);  //红色绘制缺陷轮廓
42     imshow("defects", dstImg2);
43     waitKey(0);
44     return 0;
45 }