概述
Vue 是一套用于构建用户界面的一个渐进式 JavaScript 框架。
Vue2.0 中,“渐进式框架”和“自底向上增量开发的设计”这两个概念是什么?
Vue 具有很多特点和 Web 开发中常见的高级功能,如:
- 解耦视图和数据;
- 可复用的组件;
- 前端路由技术;
- 状态管理;
- 虚拟 DOM;
Vue 与其他库 / 框架的区别:与 Vue 的对比
关于 Vue,还有很多扩展的插件,例如:
- Vue CLI - Vue.js 开发的标准工具;
- Vue Router - Vue.js 官方的路由管理器;
- Vuex - Vue.js 应用程序开发的状态管理模式;
- Vue Loader - 是一个 webpack 的 loader,允许你以一种名为单文件组件 (SFCs)的格式撰写 Vue 组件;
- Vue SSR - 服务器端渲染;
- vue-lazyload - Vue.js 插件,用于将图像或组件延迟加载到应用程序中;
- vue-scroller - Vue.js 的滚动器组件;
- Mint UI - 基于 Vue.js 的移动端组件库;
- Element - 为开发者、设计师和产品经理准备的基于 Vue 2.0 的桌面端组件库;
安装
下载与引入
直接利用 <script> 标签引入,Vue 会被注册为一个全局变量。
CDN
// 开发环境版本:包含有帮助的命令行警告。
<script src="https://cdn.jsdelivr.net/npm/vue/dist/vue.js"></script>

// 生产环境版本:优化了大小和速度。
// 对于生产环境,推荐链接到一个明确的版本号和构建文件,以避免新版本造成的不可预期的破坏。
<script src="https://cdn.jsdelivr.net/npm/vue@2.6.0"></script>
npm
// 最新稳定版
npm install vue
Vue CLI
使用 Vue 提供了一个官方的 Vue CLI,为单页面应用 (SPA) 快速搭建繁杂的脚手架。
安装:
npm install -g @vue/cli
# or
yarn global add @vue/cli
通过这个命令来检查其版本是否正确:
vue --version
升级:
npm update -g @vue/cli
# or
yarn global upgrade --latest @vue/cli
生命周期图示
每个 Vue 实例在被创建之前都要经过一系列的初始化过程,这个过程就是 Vue 的生命周期,如下图所示:
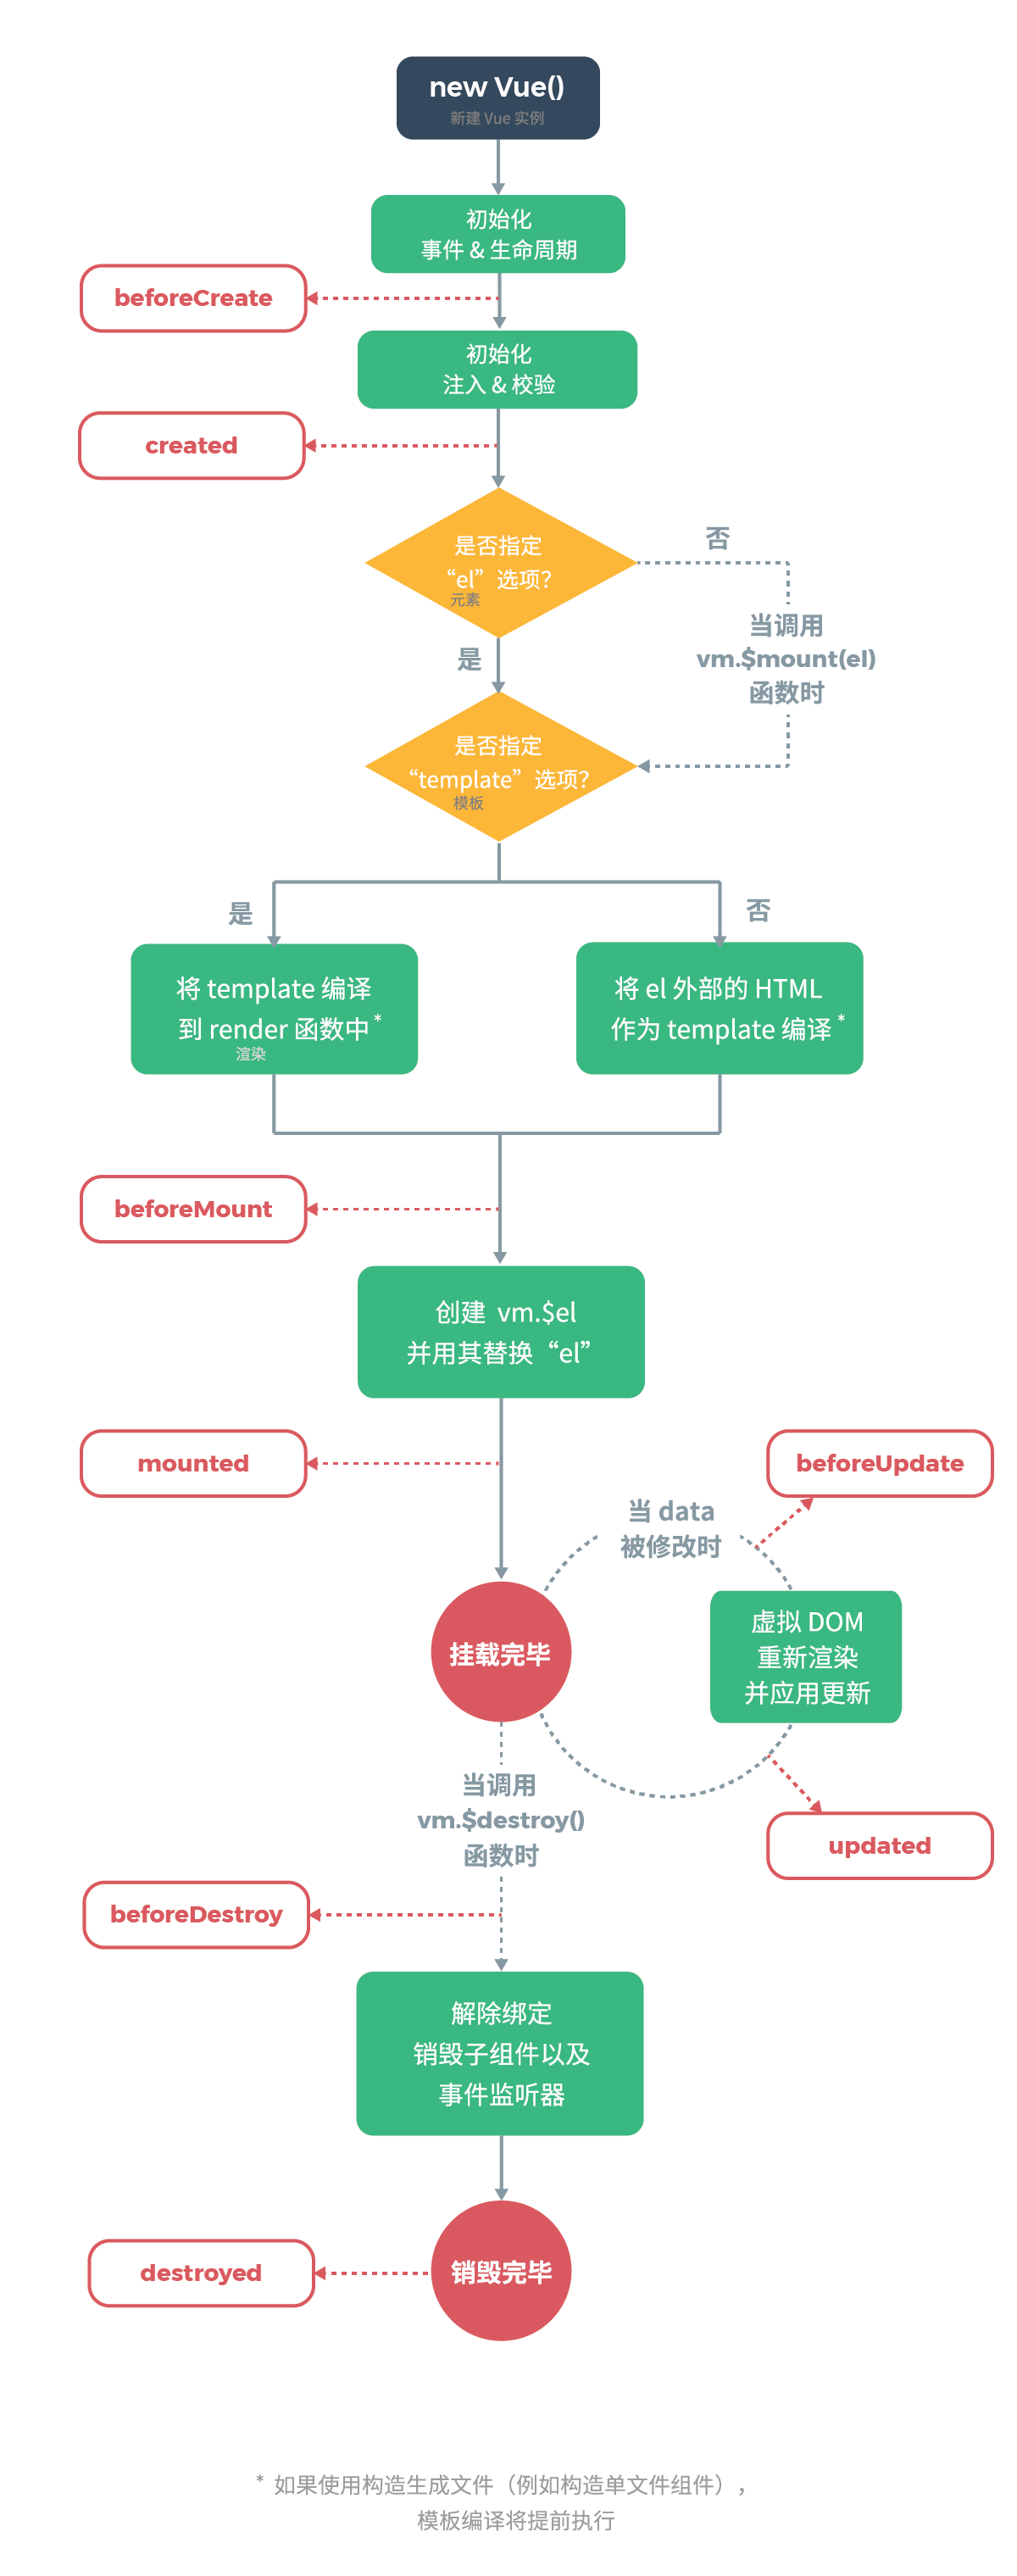
我们可以从上图中看到在整个生命周期中会有如下几个钩子函数:
- 创建:beforeCreate,created;
- 载入:beforeMount,mounted;
- 更新:beforeUpdate,updated;
- 销毁:beforeDestroy,destroyed。
而每一个钩子函数具体适合哪些场景呢,请移步至 前端面试题之Vue 自行搜索查找相关知识点。
初探
<div id="app"> {{message}} </div>
const app = new Vue({
  el: '#app',
  data: {
    message: 'hello world'
  }
})
当我们打开浏览器的控制台,并修改 app.message = 'hello vue' 的值时,页面将会自动发生改变:

插值操作
插值操作也叫 Mustache 语法,也就是 {{ }},双大括号。
插值操作不仅可以写变量,还可以写简单的表达式,例如:
<div id="app">
  <h2>{{message}}</h2>
  <h2>{{name + age}}</h2>
  <h2>{{name + ' ' +age}}</h2>
  <h2>{{name}} {{age}}</h2>
  <h2>{{age * 2}}</h2>
</div>
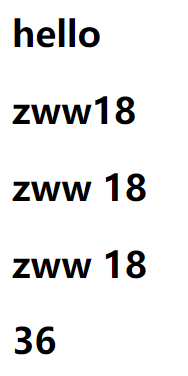
const app = new Vue({
  el: '#app',
  data: {
    message: 'hello',
    age: 18,
    name: 'zww'
  },
})
指令
列表渲染
v-for 指令基于一个数组来渲染一个列表。v-for 指令需要使用 item in items 形式的特殊语法,其中 items 是源数据数组,而 item 则是被迭代的数组元素的别名。
遍历数组
v-for 还支持一个可选的第二个参数,表示当前项的索引。
<div id="app">
  <ul>
    <li v-for="(item,index) in list">
      {{index}} - {{item}}
    </li>
  </ul>
</div>
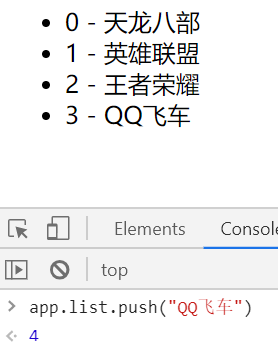
const app = new Vue({
  el: '#app',
  data: {
    list: ['天龙八部', '英雄联盟', '王者荣耀']
  }
})

当我们在浏览器的控制台中,输入 app.list 时,将会输出 list 数组,如图所示:

当我们需要给数组添加一个数据时,使用 push() 方法。数据改变时,页面会自动改变。如图所示:
我们也可以将 of 替代 in 作为分隔符使用,最后效果与使用 in 相同。
<div v-for="(item,index) of list">
  {{index}} - {{item}}
</div>
遍历对象
v-for 可以来遍历一个对象的 property。
可以提供三个参数,分别表示为:键值、键名、索引。
<div id="app">
  <ul>
    <li v-for="(value,key,index) in info">
      {{value}} - {{key}} - {{index}}
    </li>
  </ul>
</div>
const app = new Vue({
  el: '#app',
  data: {
    info: {
      name: 'zww',
      age: 11,
      blog: 'https://www.cnblogs.com/LqZww'
    }
  }
})

在遍历对象时,会按 Object.keys() 的结果遍历,但是不能保证它的结果在不同的 JavaScript 引擎下都一致。
哪些数组方法是响应式的
以下七种数组方法是响应式的,而通过索引值修改数组元素不是响应式的。
- push
- pop
- shift
- unshift
- splice
- sort
- reverse
条件渲染
v-if
v-if 指令用于条件性地渲染一块内容。这块内容只会在指令的表达式返回 truthy 值的时候被渲染。
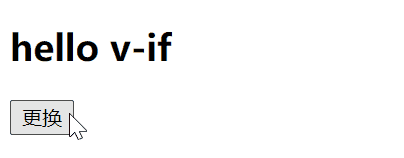
<div id="app">
  <h2 v-if="isShow">{{message}}</h2>
  <h2 v-else>设为false你就看到我了</h2>
</div>
const app = new Vue({
  el: '#app',
  data: {
    message: 'hello v-if',
    isShow: true
  }
})

当我们在控制台输入:app.isShow = false 时,我们将会发现页面内容渲染为 v-else 中的内容。
v-show
v-show 与 v-if 都是控制元素的显示与隐藏,不同的是带有 v-show 的元素始终会被渲染并保留在 DOM 中。v-show 只是简单地切换元素的 CSS property display。
<div id="app">
  <h2 v-show="isShow">{{message}}</h2>
  <h2 v-show="!isShow">设为false你就看到我了</h2>
  <button @click="isShow = !isShow">更换</button>
</div>
v-show与v-if区别
- v-show 的本质是改变 display 的值。
- v-if 是动态向 DOM 树内添加或者删除 DOM 元素。
v-show 就是控制 CSS 的 display,而 v-if 是不停的销毁和创建,因此如果需要频繁切换使用 v-show 性能会更好一点。
v-if与v-for一起使用
不推荐同时使用 v-if 和 v-for。
当 v-if 与 v-for 一起使用时,v-for 具有比 v-if 更高的优先级。
v-once
只渲染元素和组件一次。随后的重新渲染,元素/组件及其所有的子节点将被视为静态内容并跳过。
<div id="app">
  <h2>{{message}}</h2>
  <h2 v-once>{{message}}</h2>
</div>
const app = new Vue({
  el: '#app',
  data: {
    message: 'hello world'
  }
})
当我们在控制台更改 app.message 的值时,v-once 将不会重新渲染,如图:

v-html
v-html 指令会按照 html 格式进行解析,然后渲染在页面上。
具体代码:
<div id="app">
  <h2>{{url}}</h2>
  <h2 v-html="url"></h2>
</div>
const app = new Vue({
  el: '#app',
  data: {
    url: '<a href="https://www.cnblogs.com/LqZww/">个人博客</a>'
  }
})

从上图及代码我们可以看出,使用双大括号语法并不能将 url 里面的标签给解析出来,此时就需要使用 v-html 指令。
注意:在网站上动态渲染任意 HTML 是非常危险的,因为容易导致 XSS 攻击。只在可信内容上使用 v-html,永不用在用户提交的内容上。
v-text
作用与双大括号语法相似,都是用于将数据直接显示在界面中,而不会把标签解析出来。
如果在使用了 v-text 指令的标签内,输入了其他内容,那么标签内的内容将不会被显示出来。
<div id="app">
  <h2>{{url}}</h2>
  <h2 v-text="url">被覆盖了,你看不到我</h2>
</div>
const app = new Vue({
  el: '#app',
  data: {
    url: '<a href="https://www.cnblogs.com/LqZww/">个人博客</a>'
  }
})

v-pre
使用此指令,可以将标签内的内容直接显示出来,而不会做任何的解析。
<div id="app">
  <h2>{{message}}</h2>
  <h2 v-pre>{{message}}</h2>
</div>
const app = new Vue({
  el: '#app',
  data: {
    message: 'hello world'
  }
})

v-bind
作用:动态绑定属性
基本使用及语法糖
<div id="app">
  <a v-bind:href="blog">个人博客</a>
  <a :href="blog">个人博客</a>
</div>
const app = new Vue({
  el: '#app',
  data: {
    blog: 'https://www.cnblogs.com/LqZww/'
  }
})

v-bind:href 的语法糖可直接写为: :href
动态绑定class
字符串语法
<style>
  .active {
    color: red;
  }
  .font {
    font-size: 40px;
  }
</style>
<div id="app">
<h2>{{message}}</h2>
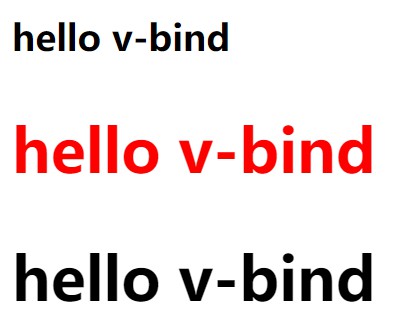
<h2 class="active" :class="'font'">{{message}}</h2>
<h2 :class="isFont">{{message}}</h2>
</div>
const app = new Vue({
  el: '#app',
  data: {
    message: "hello v-bind",
    isFont: 'font'
  }
})
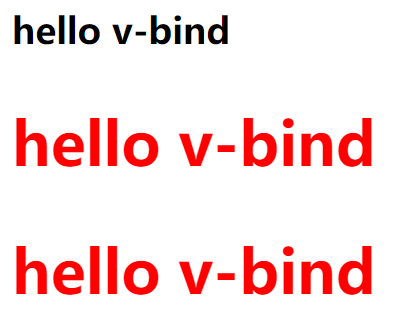
对象语法
语法::class="{类名1:boolean,类名2:boolean}"
<div id="app">
  <h2>{{message}}</h2>
  <h2 :class="{active:true,font:isFont}">{{message}}</h2>
</div>
const app = new Vue({
  el: '#app',
  data: {
    message: "hello v-bind",
    isFont: false
  }
})

数组语法
语法::class="['类名1','类名2']"
<div id="app">
  <h2>{{message}}</h2>
  <h2 :class="['active','font']">{{message}}</h2>
  <h2 :class="[isActive,isFont]">{{message}}</h2>
</div>
const app = new Vue({
  el: '#app',
  data: {
    message: "hello v-bind",
    isActive: 'active',
    isFont: 'font'
  }
})
注意代码中的引号加与不加的使用
动态绑定style
对象语法
语法::style="{属性名1:属性值1,属性名2:属性值2}"
注意:
在写属性名时,可以使用两种方式书写:
- 驼峰式:fontSize
- 短横线分隔:'font-size'(要用单引号括起来)
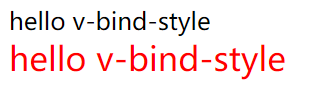
<div id="app">
  <div :style="{color:'red',fontSize:'20px'}">{{message}}</div>
  <div :style="{color:isColor,'font-size':isfont}">{{message}}</div>
</div>
const app = new Vue({
  el: '#app',
  data: {
    message: "hello v-bind-style",
    isColor: 'orange',
    isfont: '22px'
  }
})

数组语法
语法::style="[styleObjectA,styleObjectB]"
<div id="app">
  <div :style="[styleObjectA,styleObjectB]">{{message}}</div>
</div>
const app = new Vue({
  el: '#app',
  data: {
    message: "hello v-bind-style",
    styleObjectA: {
      fontSize: '22px'
    },
    styleObjectB: {
      color: 'red'
    }
  }
})
v-on
作用:绑定事件监听器
基本使用及语法糖
<div id="app">
  <button v-on:click="reduce">-</button>
  {{num}}
  <button @click="add">+</button>
</div>
const app = new Vue({
  el: '#app',
  data: {
    num: 0
  },
  methods: {
    reduce() {
      this.num--
    },
    add() {
      this.num++
    }
  }
})

v-on:click的语法糖可直接写为:@click
参数传递
<div id="app">
  <!-- 不传递参数时 -->
  <!-- 都打印btn1 -->
  <button @click="btn1">btn1</button>
  <button @click="btn1()">btn1</button>

  <!-- 当方法需要接收一个参数时 -->
  <!-- 打印:①event对象;②undefined;③1 -->
  <button @click="btn2">btn2</button>
  <button @click="btn2()">btn2</button>
  <button @click="btn2(1)">btn2</button>

  <!-- 方法定义时需要参数和event对象时 -->
  <!-- 打印:zz,event对象 -->
  <button @click="btn3('zz',$event)">btn3</button>
</div>
const app = new Vue({
  el: '#app',
  data: {
    num: 0
  },
  methods: {
    btn1() {
      console.log("btn1");
    },
    btn2(x) {
      console.log(x);
    },
    btn3(x, event) {
      console.log(x, event);
    }
  }
})
修饰符
- .stop - 调用 event.stopPropagation()。
- .prevent - 调用 event.preventDefault()。
- .capture - 添加事件侦听器时使用 capture 模式。
- .self - 只当事件是从侦听器绑定的元素本身触发时才触发回调。
- .{keyCode | keyAlias} - 只当事件是从特定键触发时才触发回调。
- .native - 监听组件根元素的原生事件。
- .once - 只触发一次回调。
- .left - (2.2.0) 只当点击鼠标左键时触发。
- .right - (2.2.0) 只当点击鼠标右键时触发。
- .middle - (2.2.0) 只当点击鼠标中键时触发。
- .passive - (2.3.0) 以 { passive: true } 模式添加侦听器
v-model
基本使用
<div id="app">
  <input type="text" v-model="message">
  <h2>{{message}}</h2>
</div>
const app = new Vue({
  el: '#app',
  data: {
    message: 'hello v-model'
  }
})
当我们在表单里的数据时,会发现其下面一行的数据也会跟着改变,从而实现数据的双向绑定。
本质
v-model 其实是一个语法糖,其实就是 v-bind 与 v-on 的结合使用。
<div id="app">
  <input type="text" :value="message" @input="setValue">
  <h2>{{message}}</h2>
</div>
const app = new Vue({
  el: '#app',
  data: {
    message: 'hello v-model'
  },
  methods: {
    setValue(event) {
      console.log(event.target.value);
      this.message = event.target.value
    }
  }
})
值绑定
就是动态的给 value 赋值。在开发中,input 的值可能是从网络获取的,可以通过 :value 动态的给 value 绑定值。
<div id="app">
  <label v-for="item in list" :for="item">
    <input type="checkbox" :value="item" :id="item" v-model="game">{{item}}
  </label>
  <h2>{{game}}</h2>
</div>
const app = new Vue({
  el: '#app',
  data: {
    list: ['天龙八部', '英雄联盟', '王者荣耀', 'QQ飞车'],
    game: []
  }
})

修饰符
.lazy
在默认情况下,v-model 在每次 input 事件触发后将输入框的值与数据自动进行同步。
当使用 lazy 修饰符时,可以让数据在失去焦点或者回车时才会更新同步。
<input type="text" v-model.lazy="message">
.number
在默认情况下,在输入框无论我们输入数字还是字母,都会被当作字符串类型进行处理。
如果想自动将用户的输入值转为数值类型,可以给 v-model 添加 number 修饰符。
<input type="number" v-model.number="num">
.trim
在默认情况下,输入的内容首尾有很多空格,将默认不会去除。
如果要自动过滤用户输入的首尾空白字符,可以给 v-model 添加 trim 修饰符。
注意:需要在控制台输入 app.blank 查看。
<input type="text" v-model.trim="blank">
v-slot
可以提供具名插槽或需要接收 prop 的插槽。
语法糖:#。
它只能用于在 <template> 和 组件。
<template v-slot:a>
  <div>demo</div>
</template>

// 等价于

<template #a>
  <div>demo</div>
</template>
ref
ref 被用来给元素或子组件注册引用信息。引用信息将会注册在父组件的 $refs 对象上。如果在普通的 DOM 元素上使用,引用指向的就是 DOM 元素;如果用在子组件上,引用就指向组件实例。
<div id="app">
  <p ref="content">hello ref</p>
  <button @click="getContent">获取</button>
</div>
const app = new Vue({
  el: '#app',
  methods: {
    getContent() {
      console.log(this.$refs.content.textContent);
    }
  }
})

v-cloak
这个指令保持在元素上直到关联实例结束编译。和 CSS 规则如 [v-cloak] { display: none } 一起用时,这个指令可以隐藏未编译的 Mustache 标签直到实例准备完毕。
当我们写如下代码这样时:
<div id="app">
  <p>{{message}}</p>
</div>
alert("1")
const app = new Vue({
  el: '#app',
  data() {
    return {
      message: 'hello v-bloak'
    }
  },
})

我们可以从上图发现页面上显示 {{message}} ,这样是不利的,因此需要使用到 v-cloak 来解决此问题。
[v-bloak] {
  display: none;
}
<div id="app">
  <p v-bloak>{{message}}</p>
</div>
自定义指令
除了核心功能默认内置的指令以外,Vue 也允许注册自定义指令。
自定义指令可以注册全局指令和局部指令:
- 全局指令:
Vue.directive('指令名', function (el, binding) {}) - 局部指令:
directives: {'指令名t': function (el, binding) {}}
下面我们来实现下将文本转为大小写的两个指令:
<div id="app">
  <p v-cap-text="msg1"></p>
  <p v-lower-text="msg2"></p>
</div>
// 全局自定义指令
Vue.directive('cap-text', function (el, binding) {
  el.textContent = binding.value.toUpperCase()
})
const app = new Vue({
  el: '#app',
  data() {
    return {
      msg1: 'hello world',
      msg2: 'HELLO WORLD'
    }
  },
  // 局部自定义指令
  directives: {
    'lower-text': function (el, binding) {
      el.textContent = binding.value.toLowerCase()
    }
  }
})
计算属性
模板内的表达式非常便利,如果在模板中放入太多的逻辑并且多次引用会让模板过重且难以维护,所以在此时应当使用计算属性。
基本使用
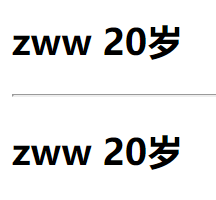
<div id="app">
  <h2>{{name + ' ' + age + '岁'}}</h2>
  <hr>
  <h2>{{info}}</h2>
</div>
<script>
  const app = new Vue({
    el: '#app',
    data: {
      name: 'zww',
      age: 20
    },
    computed: {
      // 初始化或相关属性的数据发生变化时就会触发。
      info() {
        return this.name + ' ' + this.age + '岁'
      }
    }
  })
</script>
setter与getter
计算属性默认只有 getter,不过在需要时也可以提供一个 setter。
<div id="app">
  <h2>{{info}}</h2>
</div>
<script>
  const app = new Vue({
    el: '#app',
    data: {
      name: 'zww',
      age: 20
    },
    computed: {
      info: {
        set(newValue) {
          const finallyNames = newValue.split(' ')
          this.name = finallyNames[0]
          this.age = finallyNames[1]
        },
        get() {
          return this.name + ' ' + this.age
        }
      }
    }
  })
</script>
当我们运行app.info = 'lq 10'时,setter 会被调用,页面将会做出相应的更新。
与methods的对比
<div id="app">
  <h2>methods:{{getInfo()}}</h2>
  <h2>methods:{{getInfo()}}</h2>
  <h2>computed:{{info}}</h2>
  <h2>computed:{{info}}</h2>
</div>
<script>
  const app = new Vue({
    el: '#app',
    data: {
      name: 'zww',
      age: 20
    },
    methods: {
      getInfo() {
        console.log('getInfo');
        return this.name + ' ' + this.age
      }
    },
    computed: {
      info() {
        console.log('info');
        return this.name + ' ' + this.age
      }
    }
  })
</script>
我们可以在控制台发现:getInfo 打印了两次,而 info 只打印了一次。因此可以看出,如果需要多次使用,使用计算属性将比使用 methods 的性能更高。
注意:计算属性存在缓存,多次读取只会执行一次 getter。
侦听器
虽然计算属性在大多数情况下更合适,但有时也需要一个自定义的侦听器。这就是为什么 Vue 通过 watch 选项提供了一个更通用的方法,来响应数据的变化。当需要在数据变化时执行异步或开销较大的操作时,这个方式是最有用的。
<div id="app">
  firstName:<input type="text" v-model="firstName"><br>
  lastName:<input type="text" v-model="lastName"><br>
  fullName1(computed):<input type="text" v-model="fullName1"><br>
  fullName2(watch):<input type="text" v-model="fullName2"><br>
  fullName3(get、set): <input type="text" v-model="fullName3">
</div>
<script>
let app = new Vue({
  el: '#app',
  data() {
    return {
      firstName: '',
      lastName: '',
      fullName2: ''
    }
  },
  computed: {
    fullName1() {
      return this.firstName + ' ' + this.lastName
    },
    fullName3: {
      get() {
        return this.firstName + ' ' + this.lastName
      },
      set(value) {
        let newValue = value.split(" ")
        this.firstName = newValue[0]
        this.lastName = newValue[1]
      }
    }
  },
  watch: {
    firstName(newValue, oldValue) {
      this.fullName2 = newValue + ' ' + this.lastName
    },
    lastName(newValue, oldValue) {
      this.fullName2 = this.firstName + ' ' + newValue
    }
  }
})
</script>

过滤器
Vue 允许自定义过滤器,可被用于一些常见的文本格式化。过滤器可以用在两个地方:双花括号插值和 v-bind 表达式。
下面我们对时间进行格式化,这里将用到 Moment.js 库。
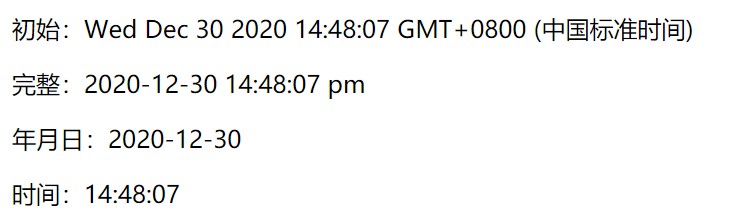
<div id="app">
  <p>初始:{{date}}</p>
  <p>完整:{{date | dateStr}}</p>
  <p>年月日:{{date | dateStr('YYYY-MM-DD')}}</p>
  <p>时间:{{date | dateStr('HH:mm:ss')}}</p>
</div>
<script src="https://cdn.bootcdn.net/ajax/libs/moment.js/2.29.1/moment.min.js"></script>
<script>
Vue.filter("dateStr", function (value, format) {
  return moment(value).format(format || 'YYYY-MM-DD HH:mm:ss a');
})
const app = new Vue({
  el: '#app',
  data: {
    date: new Date()
  },
})
</script>
组件
基本使用
大概步骤:
- 创建组件构造器对象
- 注册组件
- 使用组件
<div id="app">
  <cpn></cpn>
  <cpn></cpn>
</div>
const cpn1 = Vue.extend({
  template: `
    <div>
      <h2>hello</h2>
      <h2>组件</h2>
    </div>
  `
})
Vue.component('cpn', cpn1)
const app = new Vue({
  el: '#app'
})

全局组件
全局组件:在注册之后可以用在任何新创建的 Vue 根实例(new Vue)的模板中。
<div id="app">
  <cpn></cpn>
  <cpn></cpn>
</div>
<div id="app2">
  <cpn></cpn>
</div>
const cpn1 = Vue.extend({
  template: `
    <div>
      <h2>我是全局组件</h2>
    </div>
  `
})
// 全局组件:可以在多个vue实例使用
Vue.component('cpn', cpn1)
const app = new Vue({
  el: '#app'
})
const app2 = new Vue({
  el: '#app2'
})
以上代码在浏览器中会显示三行内容。
局部组件
const cpn1 = Vue.extend({
  template: `
    <div>
      <h2>我是局部组件</h2>
    </div>
  `
})
const app = new Vue({
  el: '#app',
  // 注册局部组件
  components: {
    cpn: cpn1
  }
})
const app2 = new Vue({
  el: '#app2'
})
以上代码在浏览器中只会显示两行内容!
语法糖
全局组件
Vue.component('cpn1', {
  template: `
    <div>
      <h2>header1</h2>
      <h2>content1</h2>
    </div>
  `
})
局部组件
const app = new Vue({
  el: '#app',
  components: {
    'cpn2': {
      template: `
        <div>
          <h2>header2</h2>
          <h2>content2</h2>
        </div>
      `
    }
  }
})
提取template内容
- 使用 script 标签,注意类型为text/x-template
<script type="text/x-template" id="cpn1">
  <div>
    <h2>header1</h2>
    <h2>content1</h2>
  </div>
</script>
<script>
  Vue.component('cpn1', {
    template: '#cpn1'
  })
</script>
- 使用template标签
<template id="cpn1">
  <div>
    <h2>header1</h2>
    <h2>content1</h2>
  </div>
</template>
组件之间的通信
- 父组件向子组件通过 props 传递数据
- 子组件向父组件通过自定义事件 $emit 传递数据
在以下代码中,将用 Vue 实例作为父组件!
父传子
父组件向子组件通信使用 props!
props 有两种写法,一种是数组写法,一种是对象写法。当使用对象写法时,还可以进行类型验证等操作。
数组写法
<div id="app">
  <cpn :cpn-game='game'></cpn>
</div>
<template id="cpn">
  <div>{{cpnGame}}</div>
</template>
const cpn = {
  template: '#cpn',
  props: ['cpnGame']
}
const app = new Vue({
  el: '#app',
  data: {
    game: ['天龙八部', '英雄联盟']
  },
  components: {
    cpn
  }
})
对象写法
在对象写法中,可以进行数据类型验证,支持以下数据类型:
- String
- Number
- Boolean
- Array
- Object
- Date
- Function
- Symbol
除此之外,还可以添加 default 进行设置默认值,required 进行是否必填项。
const cpn = {
  template: '#cpn',
  // 对象写法
  props: {
    // 1、单个类型检查
    // cpnGame: Array

    // 2、可能多个类型检查
    // cpnGame: [Array, Number]

    // 3、default代表默认值,required表示是否必填
    cpnGame: {
      type: Array,
      default() {
        return ['hhh', 'qqqq', 'aaa']
      },
      required: true
    }
  }
}
子传父
子组件向父组件通信使用 $emit 自定义事件!
就是在子组件通过 $emit() 发出一个事件。然后在父组件中,通过 v-on 来监听子组件发出的事件。
<div id="app">
  <cpn @item-click="cpnClick"></cpn>
</div>
<template id="cpn">
  <div>
    <button v-for="item in list" @click="listClick(item)">
      {{item.name}}
    </button>
  </div>
</template>
const cpn = {
  template: '#cpn',
  data() {
    return {
      list: [
        {
          id: 1,
          name: 'lq'
        },
        {
          id: 2,
          name: 'zww'
        }
      ]
    }
  },
  methods: {
    listClick(item) {
      this.$emit('item-click', item)
    }
  }
}
const app = new Vue({
  el: '#app',
  components: {
    cpn
  },
  methods: {
    cpnClick(item) {
      console.log(item);
    }
  }
})
插槽-slot
插槽可以让我们的封装的组件更具有扩展性。
基本使用
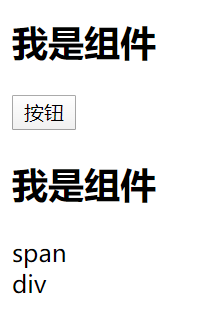
<div id="app">
  <cpn>
    <button>按钮</button>
  </cpn>
  <cpn>
    <span>span</span>
    <div>div</div>
  </cpn>
</div>
<template id="cpn">
  <div>
    <h2>我是组件</h2>
    <slot></slot>
  </div>
</template>
const app = new Vue({
  el: '#app',
  components: {
    cpn: {
      template: '#cpn'
    }
  }
})
插槽可以有默认值,即:
<slot>
  需要插入的标签
</slot>
当有默认值时,如果在<cpn></cpn>中加入一个新的标签,将会把插槽的默认值给替换掉;如果新增加 n 个标签,这 n 个标签将一并替换掉默认值。
具名插槽
<div id="app">
  <cpn>
    <button slot="center">按钮</button>
  </cpn>
</div>
<template id="cpn">
  <div>
    <slot name="left"><span>左</span></slot>
    <slot name="center"><span>中</span></slot>
    <slot name="right"><span>右</span></slot>
  </div>
</template>
const app = new Vue({
  el: '#app',
  components: {
    cpn: {
      template: '#cpn'
    }
  }
})

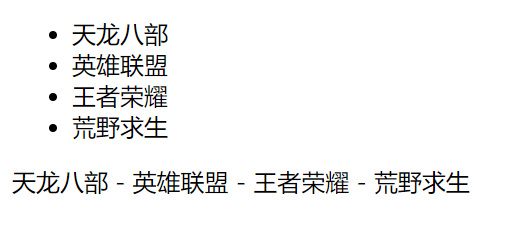
作用域插槽
<div id="app">
  <cpn></cpn>
  <cpn>
    <template slot-scope="slot">
      <span>{{slot.data.join(' - ')}}</span>
    </template>
  </cpn>
</div>
<template id="cpn">
  <div>
    <slot :data="game">
      <ul>
        <li v-for="item in game">{{item}}</li>
      </ul>
    </slot>
  </div>
</template>
const app = new Vue({
  el: '#app',
  components: {
    cpn: {
      template: '#cpn',
      data() {
        return {
          game: ['天龙八部', '英雄联盟', '王者荣耀', '荒野求生']
        }
      }
    }
  }
})
动画
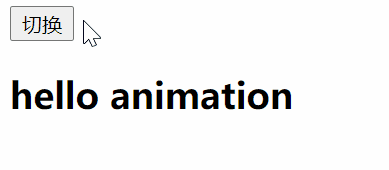
我们先来看看过渡的类名,在进入 / 离开的过渡中,会有 6 个 class 切换。如下:
- v-enter:定义进入过渡的开始状态。在元素被插入之前生效,在元素被插入之后的下一帧移除。
- v-enter-active:定义进入过渡生效时的状态。在整个进入过渡的阶段中应用,在元素被插入之前生效,在过渡 / 动画完成之后移除。这个类可以被用来定义进入过渡的过程时间,延迟和曲线函数。
- v-enter-to:2.1.8 版及以上定义进入过渡的结束状态。在元素被插入之后下一帧生效 (与此同时 v-enter 被移除),在过渡 / 动画完成之后移除。
- v-leave:定义离开过渡的开始状态。在离开过渡被触发时立刻生效,下一帧被移除。
- v-leave-active:定义离开过渡生效时的状态。在整个离开过渡的阶段中应用,在离开过渡被触发时立刻生效,在过渡 / 动画完成之后移除。这个类可以被用来定义离开过渡的过程时间,延迟和曲线函数。
- v-leave-to:2.1.8 版及以上定义离开过渡的结束状态。在离开过渡被触发之后下一帧生效 (与此同时 v-leave 被删除),在过渡 / 动画完成之后移除。

下面我们来看看简单的例子:
<div id="app">
  <button @click="isShow = !isShow">切换</button>
  <transition name="fade">
    <h2 v-show="isShow">hello animation</h2>
  </transition>
</div>
.fade-enter-active,
.fade-leave-active {
  transition: opacity 1s;
}
.fade-enter,
.fade-leave-to {
  opacity: 0;
}
const app = new Vue({
  el: '#app',
  data: {
    isShow: true
  },
})

再来一个例子:
<div id="app">
  <button @click="isShow = !isShow">切换</button>
  <transition name="fade">
    <h2 v-show="isShow">hello animation</h2>
  </transition>
</div>
.fade-enter-active {
  transition: all 1s;
}
.fade-leave-active {
  transition: all 2s;
}
.fade-enter,
.fade-leave-to {
  opacity: 0;
  transform: translateX(20px);
}
Vue Cli
安装
使用下列任一个命令安装:
npm install -g @vue/cli
# OR
yarn global add @vue/cli
检查版本:
vue --version
拉取2.x模板(旧版本)
Vue CLI >= 3 和旧版使用了相同的 vue 命令,所以 Vue CLI 2 (vue-cli) 被覆盖了。如果你仍然需要使用旧版本的 vue init 功能,你可以全局安装一个桥接工具:
npm install -g @vue/cli-init
# `vue init` 的运行效果将会跟 `vue-cli@2.x` 相同
vue init webpack my-project
初始化项目
vue-cli2 使用如下命令(需安装桥接工具):
vue init webpack hello-world
vue-cli>=3使用如下命令:
vue create hello-world
详细初始化项目过程请移步至:Vue环境搭建及部署
注意
在 windows 上通过 minTTY 使用 Git bash,交互提示符并不工作,需要用以下命令创建项目:
winpty vue.cmd init webpack hello-world  //vue-cli2
winpty vue.cmd create hello-world  //vue-cli>=3
Vuex
概述
Vuex 是实现组件全局状态(数据)管理的一种机制,可以方便的实现组件之间数据的共享。
使用 Vuex 统一管理状态的好处如下:
- 能够再 Vuex 中集中管理共享的数据,易于开发和后期维护;
- 能够高效地实现组件之间的数据共享,提高开发效率;
- 存储在 Vuex 中的数据都是响应式的,能够实时保持数据与页面的同步;
那么什么样的数据适合存储到 Vuex 中呢?
一般情况下,只有组件之间共享的数据,才有必要存储到 Vuex 中。对于组件中的私有数据,依旧存储在组件自身的 data 中即可。
基本使用
- 安装 Vuex 依赖包
npm install vuex --save
- 导入
import Vuex from 'vuex'
Vue.use(Vuex)
- 创建 store 对象
const store = new Vuex.Store({
  // state中存放的就是全局共享的数据
  state:{ count:0 }
})
- 将 store 对象挂载到 Vue 实例中
new Vue({
  el:"#app",
  render:h => h(app),
  router,
  store
})
核心概念
Vuex 中的主要核心概念如下:
• State
• Getter
• Mutation
• Action
• Modules
State
State 提供唯一的公共数据源,所有共享的数据都要统一放到 Store 的 State 中进行存储。
export default new Vuex.Store({
  state: {},
})
组件访问 State 中数据的方式:
- 第一种方式:
this.$store.state.全局数据名称
- 第二种方式:
// 从vuex中按需导入mapState函数
import { mapState } from 'vuex'
通过刚才导入的 mapState 函数,将当前组件需要的全局数据,映射为当前组件的 computed 计算属性:
computed:{
  ...mapState(['count'])
}
Getter
Getter 用于对 Store 中的数据进行加工处理形成新的数据。
- Getter 可以对 Store 中已有的数据加工处理之后形成新的数据,类似 Vue 的计算属性;
- Store 中数据发生变化,Getter 的数据也会跟着变化;
// 定义
getters:{
  showNum: state=>{
    return '当前最新值为' + state.count
  }
},
使用 getters 的第一种方式:
this.$store.getters.名称
第二种方式:
import { mapGetters } from 'vuex'

computed:{
  ...mapGetters(['showNum'])
}
Mutation
Mutation 用于变更 Store 中的数据:
- 只能通过 mutation 变更 Store 数据,不可以直接操作 Store 中的数据;
- 通过这种方式虽然操作起来稍微繁琐一些,但是可以集中监控所有数据的变化;
// 定义
mutations: {
  add(state){
  //变更状态
  }
}

// 触发
methods:{
  handle(){
  this.$store.commit('add')
  }
}
可以在触发 mutations 时传递参数:
// 定义
mutations: {
  add(state,step){
    //变更状态
    state.count += step
  }
}

// 触发
methods:{
  handle(){
    this.$store.commit('add',5)
  }
}
this.$store.commit() 是触发 mutations 的第一种方式,而第二种方式是:
import { mapMutations } from 'vuex'
通过刚才导入的 mapMutations 函数,将需要的 mutations 函数,映射为当前组件的 methods 方法:
methods:{
  ...mapMutations('add')
}
注意:不要在mutations中执行异步操作!
Action
Action 用于处理异步任务。
如果通过异步操作变更数据,必须通过 Action,而不能使用 Mutation,但是在 Action 中还是要通过触发 Mutation 的方式间接变更数据。
//定义
actions: {
  addAsync(context){
    setTimeout(()=>{
      context.commit('add')
    },1000)
  }
},

//触发
methods:{
  handle(){
    this.$store.dispatch('addAsync')
  }
}
触发 action 异步任务时携带参数:
//定义
actions: {
  addAsync(context,step){
    setTimeout(()=>{
      context.commit('add',step)
    },1000)
  }
},

//触发
methods:{
  handle(){
    this.$store.dispatch('addAsync',10)
  }
}
this.$store.dispatch() 是触发 action 的第一种方式,而第二种方式是:
import { mapActions } from 'vuex'
通过刚才导入的 mapActions 函数,将需要的 action 函数,映射为当前组件的 methods 方法:
methods:{
  ...mapActions(['addAsync'])
}
Module
它可以将 store 分割成模块(module)。每个模块拥有自己的 state、mutation、action、getter、甚至是嵌套子模块——从上至下进行同样方式的分割。
首先在 store 文件夹下新建 module 文件夹,并在该文件夹下新建 moduleA.js:
const moduleA = {
  namespaced: true,  // 开起命名空间
  state: {
    id: 99
  },
  getters: {},
  mutations: {
    setId(state, id) {
      state.id = id
    }
  },
  actions: {
    getId(store, myId) {
      http(`xxxxxx?id=${myId}`).then(res => {
        store.commit('setId', res.data.id)
      })
    }
  }
}

export default moduleA
然后在 index.js 中引入:
import Vue from 'vue'
import Vuex from 'vuex'

import moduleA from './module/moduleA'

Vue.use(Vuex)

export default new Vuex.Store({
  modules: {
    moduleA
  }
})
下面在我们在 .vue 文件中使用:
<template>
  <div>
    {{id}}
    <button @click="setId(10000)">setid</button>
  </div>
</template>

<script>
import { mapActions, mapMutations, mapState } from 'vuex'

export default {
  mounted() {
    this.getId(9999999)
  },
  computed: {
    ...mapState('moduleA', ['id'])
  },
  methods: {
    ...mapMutations('moduleA', ['setId']),
    ...mapActions('moduleA', ['getId'])
  }
}
</script>