CATransformLayer与CALayer有着细微的差别,但这些差别会影响到3D变换的动画效果.
动画都有坐标系,如下所示(注意,这个不是iOS中的坐标系,请勿对号入座):
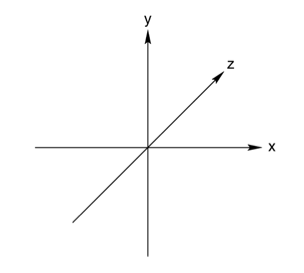
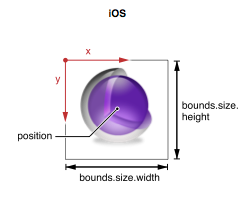
iOS中layer的锚点就在坐标系的正中间.
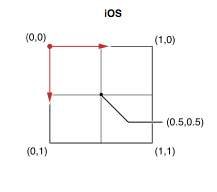
layer的position可以理解为View的center.
实现带有3d景深效果动画:

//
// RootViewController.m
// CATransformLayer
//
// Copyright (c) 2014年 Y.X. All rights reserved.
//
#import "RootViewController.h"
#import "YXGCD.h"
@interface RootViewController ()
@property (nonatomic, strong) GCDTimer *timer;
@end
@implementation RootViewController
#define V_CENTER_X self.view.center.x
#define V_CENTER_Y self.view.center.y
#define CG_COLOR(R, G, B, A) [UIColor colorWithRed:(R) green:(G) blue:(B) alpha:(A)].CGColor
#define DEGREE(d) ((d) * M_PI / 180.0f)
- (void)viewDidLoad
{
[super viewDidLoad];
// 普通的一个layer
CALayer *plane = [CALayer layer];
plane.anchorPoint = CGPointMake(0.5, 0.5); // 锚点
plane.frame = (CGRect){CGPointZero, CGSizeMake(100, 100)}; // 尺寸
plane.position = CGPointMake(V_CENTER_X, V_CENTER_Y); // 位置
plane.opacity = 0.6; // 背景透明度
plane.backgroundColor = CG_COLOR(1, 0, 0, 1); // 背景色
plane.borderWidth = 3; // 边框宽度
plane.borderColor = CG_COLOR(1, 1, 1, 0.5); // 边框颜色(设置了透明度)
plane.cornerRadius = 10; // 圆角值
// 创建容器layer
CALayer *container = [CALayer layer];
container.frame = self.view.bounds;
[self.view.layer addSublayer:container];
[container addSublayer:plane];
// 启动定时器
_timer = [[GCDTimer alloc] initInQueue:[GCDQueue mainQueue]];
[_timer event:^{
static float degree = 0.f;
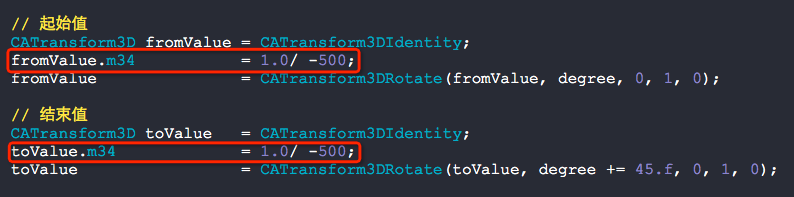
// 起始值
CATransform3D fromValue = CATransform3DIdentity;
fromValue.m34 = 1.0/ -500;
fromValue = CATransform3DRotate(fromValue, degree, 0, 1, 0);
// 结束值
CATransform3D toValue = CATransform3DIdentity;
toValue.m34 = 1.0/ -500;
toValue = CATransform3DRotate(toValue, degree += 45.f, 0, 1, 0);
// 添加3d动画
CABasicAnimation *transform3D = [CABasicAnimation animationWithKeyPath:@"transform"];
transform3D.duration = 1.f;
transform3D.fromValue = [NSValue valueWithCATransform3D:fromValue];
transform3D.toValue = [NSValue valueWithCATransform3D:toValue];
plane.transform = toValue;
[plane addAnimation:transform3D forKey:@"transform3D"];
} timeInterval:NSEC_PER_SEC];
[_timer start];
}
@end
下图中的m34值代表着景深效果,非常关键,其值越接近0,景深效果就越发强烈
如果写成这样子:

那么显示就会变成:
毫无3d感可言.
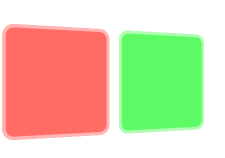
将景深效果添加到容器上面去我们就能得到如下的效果:
- (void)viewDidLoad
{
    [super viewDidLoad];

    // 普通的一个layer
    CALayer *plane1        = [CALayer layer];
    plane1.anchorPoint = CGPointMake(0.5, 0.5);                         // 锚点
    plane1.frame       = (CGRect){CGPointZero, CGSizeMake(100, 100)};   // 尺寸
    plane1.position    = CGPointMake(60, V_CENTER_Y);                   // 位置
    plane1.opacity         = 0.6;                                       // 背景透明度
    plane1.backgroundColor = CG_COLOR(1, 0, 0, 1);                      // 背景色
    plane1.borderWidth     = 3;                                         // 边框宽度
    plane1.borderColor     = CG_COLOR(1, 1, 1, 0.5);                    // 边框颜色(设置了透明度)
    plane1.cornerRadius    = 10;                                        // 圆角值


    // 普通的一个layer
    CALayer *plane2        = [CALayer layer];
    plane2.anchorPoint = CGPointMake(0.5, 0.5);                         // 锚点
    plane2.frame       = (CGRect){CGPointZero, CGSizeMake(100, 100)};   // 尺寸
    plane2.position    = CGPointMake(60 + 110, V_CENTER_Y);             // 位置
    plane2.opacity         = 0.6;                                       // 背景透明度
    plane2.backgroundColor = CG_COLOR(0, 1, 0, 1);                      // 背景色
    plane2.borderWidth     = 3;                                         // 边框宽度
    plane2.borderColor     = CG_COLOR(1, 1, 1, 0.5);                    // 边框颜色(设置了透明度)
    plane2.cornerRadius    = 10;                                        // 圆角值

    // 创建容器layer
    CALayer *container = [CALayer layer];
    container.frame    = self.view.bounds;
    [self.view.layer addSublayer:container];

    CATransform3D plane_3D = CATransform3DIdentity;
    plane_3D.m34           = 1.0/ -500;
    plane_3D               = CATransform3DRotate(plane_3D, DEGREE(30), 0, 1, 0);
    container.transform    = plane_3D;

    [container addSublayer:plane1];
    [container addSublayer:plane2];
}
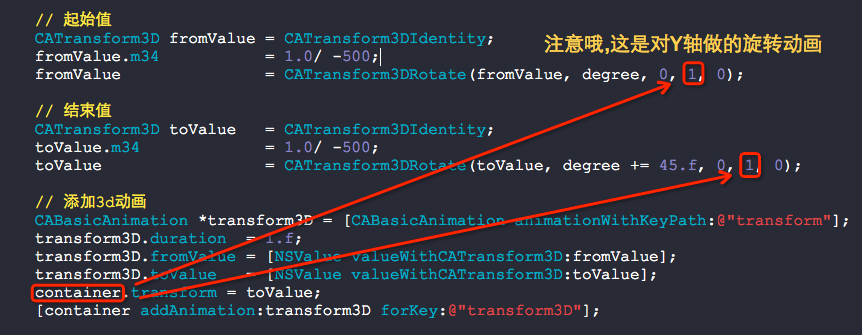
注意,下图红框中的值是非常关键的哦:

到这里还没讲CATransformLayer呢,先看个例子:
效果如下:
- (void)viewDidLoad
{
    [super viewDidLoad];

    // 普通的一个layer
    CALayer *plane1        = [CALayer layer];
    plane1.anchorPoint = CGPointMake(0.5, 0.5);                         // 锚点
    plane1.frame       = (CGRect){CGPointZero, CGSizeMake(100, 100)};   // 尺寸
    plane1.position    = CGPointMake(200, V_CENTER_Y);                  // 位置
    plane1.opacity         = 0.6;                                       // 背景透明度
    plane1.backgroundColor = CG_COLOR(1, 0, 0, 1);                      // 背景色
    plane1.borderWidth     = 3;                                         // 边框宽度
    plane1.borderColor     = CG_COLOR(1, 1, 1, 0.5);                    // 边框颜色(设置了透明度)
    plane1.cornerRadius    = 10;                                        // 圆角值

    // Z轴平移
    CATransform3D plane1_3D = CATransform3DIdentity;
    plane1_3D               = CATransform3DTranslate(plane1_3D, 0, 0, -10);
    plane1.transform        = plane1_3D;

    // 普通的一个layer
    CALayer *plane2        = [CALayer layer];
    plane2.anchorPoint = CGPointMake(0.5, 0.5);                         // 锚点
    plane2.frame       = (CGRect){CGPointZero, CGSizeMake(100, 100)};   // 尺寸
    plane2.position    = CGPointMake(200, V_CENTER_Y);                  // 位置
    plane2.opacity         = 0.6;                                       // 背景透明度
    plane2.backgroundColor = CG_COLOR(0, 1, 0, 1);                      // 背景色
    plane2.borderWidth     = 3;                                         // 边框宽度
    plane2.borderColor     = CG_COLOR(1, 1, 1, 0.5);                    // 边框颜色(设置了透明度)
    plane2.cornerRadius    = 10;                                        // 圆角值

    // Z轴平移
    CATransform3D plane2_3D = CATransform3DIdentity;
    plane2_3D               = CATransform3DTranslate(plane2_3D, 0, 0, -30);
    plane2.transform        = plane2_3D;

    // 创建容器layer
    CALayer *container = [CALayer layer];
    container.frame    = self.view.bounds;
    [self.view.layer addSublayer:container];

    // 以Y轴为坐标系,旋转45度
    CATransform3D t = CATransform3DIdentity;
    t.m34 = 1.0/-500;
    t = CATransform3DRotate(t, DEGREE(45), 0, 1, 0);
    container.transform = t;

    [container addSublayer:plane1];
    [container addSublayer:plane2];
}
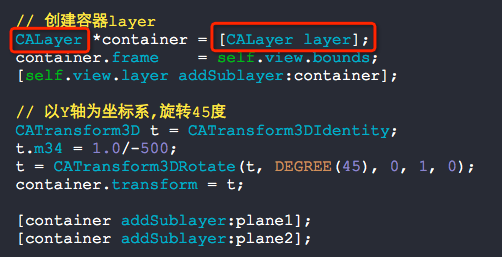
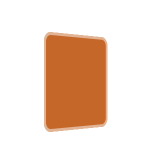
如果把上图的CALayer替换成下图的CATransformLayer
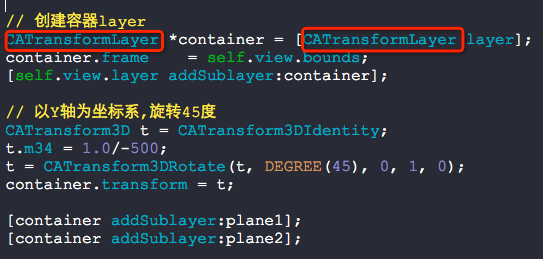
则会产生如下的效果:
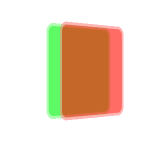
看到上面的图,你应该就明白了CATransformLayer当做容器是为了给里面的Layer提供景深效果用的.
再来做成动画看看效果吧:
- (void)viewDidLoad
{
    [super viewDidLoad];

    // 普通的一个layer
    CALayer *plane1        = [CALayer layer];
    plane1.anchorPoint = CGPointMake(0.5, 0.5);                         // 锚点
    plane1.frame       = (CGRect){CGPointZero, CGSizeMake(100, 100)};   // 尺寸
    plane1.position    = CGPointMake(200, V_CENTER_Y);                  // 位置
    plane1.opacity         = 0.6;                                       // 背景透明度
    plane1.backgroundColor = CG_COLOR(1, 0, 0, 1);                      // 背景色
    plane1.borderWidth     = 3;                                         // 边框宽度
    plane1.borderColor     = CG_COLOR(1, 1, 1, 0.5);                    // 边框颜色(设置了透明度)
    plane1.cornerRadius    = 10;                                        // 圆角值

    // Z轴平移
    CATransform3D plane1_3D = CATransform3DIdentity;
    plane1_3D               = CATransform3DTranslate(plane1_3D, 0, 0, -10);
    plane1.transform        = plane1_3D;

    // 普通的一个layer
    CALayer *plane2        = [CALayer layer];
    plane2.anchorPoint = CGPointMake(0.5, 0.5);                         // 锚点
    plane2.frame       = (CGRect){CGPointZero, CGSizeMake(100, 100)};   // 尺寸
    plane2.position    = CGPointMake(200, V_CENTER_Y);                  // 位置
    plane2.opacity         = 0.6;                                       // 背景透明度
    plane2.backgroundColor = CG_COLOR(0, 1, 0, 1);                      // 背景色
    plane2.borderWidth     = 3;                                         // 边框宽度
    plane2.borderColor     = CG_COLOR(1, 1, 1, 0.5);                    // 边框颜色(设置了透明度)
    plane2.cornerRadius    = 10;                                        // 圆角值

    // Z轴平移
    CATransform3D plane2_3D = CATransform3DIdentity;
    plane2_3D               = CATransform3DTranslate(plane2_3D, 0, 0, -30);
    plane2.transform        = plane2_3D;

    // 创建容器layer
    CATransformLayer *container = [CATransformLayer layer];
    container.frame    = self.view.bounds;
    [self.view.layer addSublayer:container];
    [container addSublayer:plane1];
    [container addSublayer:plane2];

    // 启动定时器
    _timer = [[GCDTimer alloc] initInQueue:[GCDQueue mainQueue]];
    [_timer event:^{
        static float degree = 0.f;

        // 起始值
        CATransform3D fromValue = CATransform3DIdentity;
        fromValue.m34           = 1.0/ -500;
        fromValue               = CATransform3DRotate(fromValue, degree, 0, 1, 0);

        // 结束值
        CATransform3D toValue   = CATransform3DIdentity;
        toValue.m34             = 1.0/ -500;
        toValue                 = CATransform3DRotate(toValue, degree += 45.f, 0, 1, 0);

        // 添加3d动画
        CABasicAnimation *transform3D = [CABasicAnimation animationWithKeyPath:@"transform"];
        transform3D.duration  = 1.f;
        transform3D.fromValue = [NSValue valueWithCATransform3D:fromValue];
        transform3D.toValue   = [NSValue valueWithCATransform3D:toValue];
        container.transform = toValue;
        [container addAnimation:transform3D forKey:@"transform3D"];

    } timeInterval:NSEC_PER_SEC];
    [_timer start];
}
转自:http://www.cnblogs.com/YouXianMing/p/3777778.html yaoxianming博客