苹果在iOS8之后有了全新的通知机制,当我们收到推送的消息时,或者锁屏的时候,让用户快捷的对通知进行操作,实现的效果图如下:
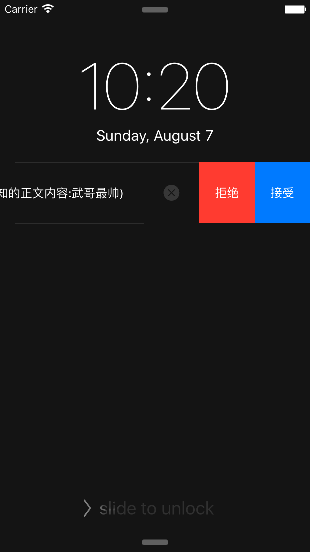
下面我们就来实现这个效果:
首先在页面上添加一个按钮,点击按钮发送本地通知,
UIButton *btn = [UIButton buttonWithType:UIButtonTypeCustom];
    btn.frame = CGRectMake(100, 100, 100, 100);
    btn.backgroundColor = [UIColor yellowColor];
    [self.view addSubview:btn];

    [btn addTarget:self action:@selector(btnAct:) forControlEvents:UIControlEventTouchUpInside];
按钮实现方法:
- (void)btnAct:(UIButton *)btn{


    // 1. 创建消息上要添加的动作,以按钮的形式显示
    // 1.1 接受按钮
    UIMutableUserNotificationAction *acceptAction = [UIMutableUserNotificationAction new];
    acceptAction.identifier = @"acceptAction"; // 添加标识
    acceptAction.title = @"接受"; // 设置按钮上显示的文字
    acceptAction.activationMode = UIUserNotificationActivationModeForeground; // 当点击的时候启动程序

    // 1.2 拒绝按钮
    UIMutableUserNotificationAction *rejectAction = [UIMutableUserNotificationAction new];
    rejectAction.identifier = @"rejectAction";
    rejectAction.title = @"拒绝";
    rejectAction.activationMode = UIUserNotificationActivationModeBackground; // 当点击的时候不启动程序
    rejectAction.authenticationRequired = YES; // 需要解锁才能处理,如果 rejectAction.activationMode = UIUserNotificationActivationModeForeground; 那么这个属性将被忽略
    rejectAction.destructive = YES; // 按钮事件是否是不可逆转的


    // 2. 创建动作的类别集合
    UIMutableUserNotificationCategory *categorys = [UIMutableUserNotificationCategory new];
    categorys.identifier = @"alert"; // 动作集合的标识
    [categorys setActions:@[acceptAction, rejectAction]
               forContext:UIUserNotificationActionContextMinimal]; // 把两个按钮添加到动作的集合中,并设置上下文样式

    // 3. 创建UIUserNotificationSettings,并设置消息的显示类型
    UIUserNotificationSettings *settings = [UIUserNotificationSettings settingsForTypes:(UIUserNotificationTypeAlert | UIUserNotificationTypeBadge | UIUserNotificationTypeSound) categories:[NSSet setWithObjects:categorys, nil]];

    // 4. 注册通知
    [[UIApplication sharedApplication] registerForRemoteNotifications];
    [[UIApplication sharedApplication] registerUserNotificationSettings:settings];


    // 我们使用本地通知为例,介绍如何显示出通知栏
    UILocalNotification *notification = [UILocalNotification new];

    if (notification != nil) {
        notification.fireDate = [NSDate dateWithTimeIntervalSinceNow:2]; // 触发时间
        notification.alertAction = @"alertAction"; // 定义查看通知的操作名
        notification.hasAction = YES;
        notification.alertBody = @"测试推送的快捷回复(通知的正文内容:武哥最帅)";
        notification.soundName = UILocalNotificationDefaultSoundName; // 通知的背景声
        notification.applicationIconBadgeNumber = 1; // 强迫症们最讨厌的图标左上角那个小数字
        notification.category = @"alert";
        notification.userInfo = @{@"key1": @"value1", @"key2": @"value2"}; // 给通知绑定一些处理通知时需要的额外的信息

        // 根据触发事件的配置展示通知消息
        [[UIApplication sharedApplication] scheduleLocalNotification:notification];
        // 立即发送通知到手机
        // [[UIApplication sharedApplication] presentLocalNotificationNow:notification];
    }


}
然后我们需要在AppleDelegate协议方法里面做其他的事情:
// 成功注册通知后,会有回调方法,方法写在AppDelegate里
#pragma mark - 成功注册通知后会调用此方法
- (void)application:(UIApplication *)application didRegisterUserNotificationSettings:(UIUserNotificationSettings *)notificationSettings
{
    // 成功注册registerUserNotificationSetting: 后,回调方法
    NSLog(@"成功注册%@", notificationSettings);
}

#pragma mark - 收到本地推送后调用的方法
- (void)application:(UIApplication *)application didReceiveLocalNotification:(UILocalNotification *)notification
{
    // 收到本地消息后调用的方法
    NSLog(@"收到本地消息后调用的方法%@", notification);

    // 图标上的数字减1
    application.applicationIconBadgeNumber -= 1;
}

#pragma mark - 通知事件处理的回调方法
- (void)application:(UIApplication *)application handleActionWithIdentifier:(NSString *)identifier forLocalNotification:(UILocalNotification *)notification completionHandler:(void (^)())completionHandler
{
    // 在非App页面收到本地消息,下拉消息会有快捷回复的按钮,点击后调用的方法,根据identifier来判断点击的是哪个按钮,notification为消息内容
    NSLog(@"%@ --- %@", identifier, notification);

    if ([identifier isEqualToString:@"acceptAction"]) {

        NSLog(@"点击了接收按钮");
        FirstViewController *firstVc = [[FirstViewController alloc]init];

        UINavigationController *naVc = [[UINavigationController alloc]initWithRootViewController:firstVc];

        self.window.rootViewController = naVc;

    }else{


        NSLog(@"点击拒绝的按钮");
    }


    // 处理完消息后,最后一定要调用这个代码块
    completionHandler();
}
这样就实现了...