centos linux 系统日常管理4 scp,rsync,md5sum,sha1sum,strace ,find Rsync 常见错误及解决方法 第十七节课
rsync可以增量同步,scp不行
注意:修改sshd_config文件时候,port字段,sshd不支持监听小于1024 ,1~1023不允许自定义(保留端口)
注意:scp和rsync都可以用密钥登录,避免输入密码,关闭selinux
注意:当目标文件存在的情况下,scp跟rsync都会支持覆盖目标文件,不会询问,而第一次scp或rsync的时候都会询问你是否保存scp或rsync密码
注意:rsync不能自己创建目录,需要预先创建好目录,否则报错
rsync顺序和scp顺序如果觉得难记可以这样,右边永远都是目标,只是远程目标还是本地目标,左边用于都是源,只是远程源还是本地源
scp   源     目标
rsync    源     目标
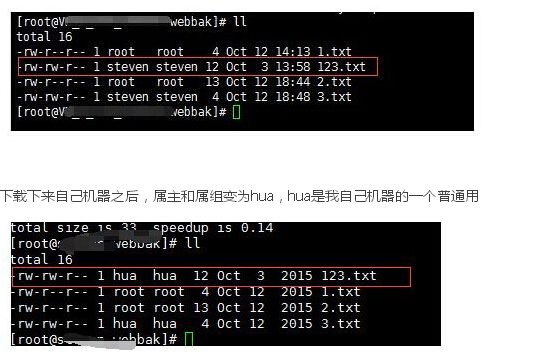
可以保留属主 属组权限:rsync -a ,cp -p
不可以保留属主 属组权限:scp -p
上半节课
scp
下半节课
rsync
md5sum
sha1sum
strace
find
scp (有流量控制、有传输加密、有传输压缩)
1、不加任何用户名,则默认以root用户连接
2、两边都需要安装openssh-clients包,ssh,scp,rsync都要安装这个包: yum install -y openssh-clients
3、两边都尽量写绝对路径
scp a/a.txt a/b.txt a/c.txt B: 会把a.txt b.txt c.txt 也拷贝过去,而不是只拷贝c.txt这个文件 ,要加a/目录才能拷贝多个文件,不加a/目录只能拷a.txt这个文件: scp a.txt b.txt c.txt B:
选项
-p 和cp一样,保留原文件的修改时间,访问时间和访问权限,不会保留属主和属组,scp没有rsync的-g 所属组,-o 所属主选项
-p Preserves modification times, access times, and
modes from the original file.
-r 和cp一样,递归复制整个目录
-1 强制scp命令使用协议ssh1
-2 强制scp命令使用协议ssh2
-4 强制scp命令只使用IPv4寻址
-6 强制scp命令只使用IPv6寻址
-B 使用批处理模式(传输过程中不询问传输口令或短语)
-C 允许压缩。(compression 将-C标志传递给ssh,从而打开压缩功能)
-q 不显示传输进度条。
-v 详细方式显示输出。scp和ssh(1)会显示出整个过程的调试信息。这些信息用于调试连接,验证和配置问题。
-c cipher 以cipher将数据传输进行加密,这个选项将直接传递给ssh。
-F ssh_config 指定一个替代的ssh配置文件,此参数直接传递给ssh。
-i identity_file 从指定文件中读取传输时使用的密钥文件,此参数直接传递给ssh。
-l limit 限定用户所能使用的带宽,以Kbit/s为单位。
-o ssh_option 如果习惯于使用ssh_config(5)中的参数传递方式,
-P port 注意是大写的P, port是指定数据传输用到的端口号
-S program 指定加密传输时所使用的程序。此程序必须能够理解ssh(1)的选项。
a目录下的文件拷到b目录下: scp -r a/ 192.168.1.12:/tmp/b/
拷贝目录包括a: scp -r a 192.168.1.12:/tmp/b
远程到本地 : scp -p -P 22 root@127.0.0.1:/tmp/123.txt /root/123/2.txt
示例
目录到目录
/root/123/目录下的文件复制到/tmp/123/目录并保留权限 ,/tmp/123/目录不需要预先创建: scp -r -p /root/123/ root@127.0.0.1:/tmp/123
目录到目录下
/root/123/目录下的文件复制到/tmp/123/目录并保留权限并压缩: scp -C -r -p /root/123/ root@127.0.0.1:/tmp/123/
文件到文件
/root/123/目录下的2.txt文件复制到/tmp/目录下并保留权限,并指定端口22: scp -p -P 22 /root/123/2.txt root@127.0.0.1:/tmp/123.txt
/root/123/2.txt root@127.0.0.1:/tmp/123/ :这样会报错, 123/不是一个文件
注意两点:
1.如果远程服务器防火墙有特殊限制,scp便要走特殊端口,具体用什么端口视情况而定
2.使用scp要注意所使用的用户是否具有可读取远程服务器相应文件的权限。
下半节课
rsync(有加密传输,有流量控制,有断点续传,有传输压缩)
当前登录用户:root
远端和本地都必须要安装rsync: yum install -y rsync
上传#模块名test
rsync /tmp/1.txt username@ip:/tmp/1.txt
rsync /tmp/1.txt username@ip::test/1.txt
下载
rsync username@ip:/tmp/1.txt /tmp/1.txt
rsync username@ip::test/1.txt /tmp/1.txt
rsync -a (-r 递归 -l 保留软链接 拷贝过去也是软链接不是真正的文件 -p 保留权限,比如755,过去也是755,-t 保留三个time ,-g 所属组 -o 所属主 -D 设备)
-r 递归 recursive
-l 保留软链接 拷贝过去也是软链接不是真正的文件
-p preserve保留权限,比如755,过去也是755
-t 保留三个time
-g 所属组
-o 所属主
-D 设备
-v 可视化
-L 软链接所指向的源文件也拷贝过去
-z 压缩 zip
-u 远端文件有更新 ,如果源比目标还要旧,防止源覆盖目标,加上u不覆盖目标文件
--partial 保留那些因故没有完全传输的文件,以是加快随后的再次传输 ,断点续传
--delete 删除源没有,而目标有的文件
--exclude 过滤文件或目录
--progess 传输进度
--bwlimit 限速 ,单位KB/s
--delete-before 在传输之前删除源端文件实际不传输 receiver deletes before transfer (default)
-d 不传输子目录 --dirs transfer directories without recursing
-H 保留硬链接 --hard-links preserve hard links
--stats 显示状态 give some file-transfer stats
--copy-unsafe-links 复制不安全链接 only "unsafe" symlinks are transformed
--safe-links 忽略符号链接 ignore symlinks that point outside the tree
d -a -H -v --progress --stats /空目录/ /目标路径/
--files-from
--exclude-from
rsync -av --files-from=/root/syncto.txt --exclude-from=/root/excludefile.txt / /tmp/
注意:源路径要从根开始,会在目标目录下创建完整路径目录,比如/usr/2.usr,会在tmp目录下创建usr目录并复制2.usr过去
vi /root/syncto.txt
/root/pgsql2.txt
/root/pgsql3.txt
/usr/2.usr
vi /root/excludefile.txt
/root/excludefile.txt
/root/pgsql3.txt
The --relative (-R) 递归是隐式默认选项把/root/syncto.txt里的目录里面的文件都复制option is implied, which preserves the path information that is
specified for each item in the file (use --no-relative or --no-R if you want to turn
that off).
o The --dirs (-d) 目录是隐式默认选项 会自动创建完整路径 option is implied, which will create directories specified in the list
on the destination rather than noisily skipping them (use --no-dirs or --no-d if you
want to turn that off).
o The --archive (-a) 非隐式默认选项 option’s behavior does not imply --recursive (-r), so specify it
explicitly, if you want it.
tmp]# ll
total 5444
dr-xr-x--- 2 root root 4096 Jan 26 19:55 root
drwxr-xr-x 2 root root 4096 Jan 26 19:51 usr
http://bbs.chinaunix.net/forum.php?mod=viewthread&tid=4189580&extra=page%3D1%26filter%3Dauthor%26orderby%3Ddateline%26orderby%3Ddateline
rsync 同步判断标准:
文件信息 类似于inode ,文件信息不一样,则只同步文件信息 而不会同步文件内容
文件内容 文件内容不一样,则只同步文件内容 ,而不会同步文件信息
文件名相同不相同,不作为判断标准,他只判断文件信息和文件内容
只拷贝软链接: rsync -avl usr/ /tmp/123/
拷贝实际文件: rsync -avL usr/ /tmp/123/
不拷贝软链接,排除a选项里面的l选项: rsync -a --no-l -v usr/ /tmp/123/
压缩: rsync -avLz usr/ /tmp/123/
删除源没有,而目标有的文件: rsync -av --delete usr/ /tmp/123/
过滤
rsync -av --exclude="*.txt" --exclude="*.ipt" usr/    /tmp/123/
rsync -av --exclude="bin" usr/    /tmp/123/    //排除bin目录
或者
rsync -av --exclude="*bin" usr/ /tmp/123/
显示速度和进度: rsync -av --progess usr/ /tmp/123/
限制速度为100KB: rsync -av --bwlimit=100 usr/ /tmp/123/
上传: rsync -avzL /root/usr/ root@192.168.21.112:/tmp/usr/
下载: rsync -avzL root@192.168.21.112:/tmp/usr/ ./usr/
指定端口: rsync -avzL -e "ssh -p 2220" 192.168.21.112:/tmp/usr/ /usr/
示例 服务器1Mbps带宽,速度非常慢
rsync -avzL -e "ssh -p 12322"  /usr/  steven@162.189.86.58:/tmp/usr/

# du -sh /tmp/usr
39M    /tmp/usr
-c:Ciphers 指定传输加密算法: rsync -apur --stats --progress -e "ssh -c arcfour" bigfile.dat root@192.168.27.142:/tmp/
http://blog.chinaunix.net/uid-16728139-id-3265394.html
http://www.cnblogs.com/MYSQLZOUQI/p/4883519.html
注意:使用rsync要注意所使用的用户是否具有可读取远程服务器相应文件的权限。
CS的连接模式
只需三步
1、写一个/etc/rsyncd.conf 配置文件
2、rsync --daemon 启动服务
3、是否监听873端口 netstat -lnp |grep 873
默认去使用/etc/rsyncd.conf这个配置文件,也可以指定配置文件 rsync --daemon --config=/etc/rsyncd2.conf
/etc/rsyncd.conf 里可以做注释,但是要写成单独的一行,不能和配置内容写在同一行里
修改了rsyncd.conf文件 马上生效,不需要重启服务,这么多服务rsync是不需要重启服务马上生效的
rsync应用实例 - 后台服务方式
配置文件 /etc/rsyncd.conf ,内容如下:
#port=873 #监听端口默认为873,也可以是别的端口
log file=/var/log/rsync.log #指定日志
pid file=/var/run/rsyncd.pid #指定pid
#address=192.168.0.10 #可以定义绑定的ip
----------------------------------------------------------
以上部分为全局配置部分,以下为模块内的设置
[test] #为模块名,自定义
path=/root/rsync # 指定该模块对应在哪个目录下
use chroot=true #是否限定在该目录下,默认为true,当有软连接并且rsync同步的时候指定了L选项,需要改为fasle
max connections=4 # 指定最大可以连接的客户端数
read only=no #是否为只读
list=true #是否可以列出模块名 最好设置为false 更安全
uid=root #以哪个用户的身份来传输 传过去之后,文件的uid就为root ,可以去掉保留源权限
gid=root #以哪个组的身份来传输 传过去之后,文件的gid就为root,可以去掉保留源权限
#auth users=test #指定验证用户名,可以不设置 用hosts allow来限制来访的主机就可以保证足够安全,这个用户跟系统用户无关,可以随便输入一个用户名
#secrets file=/etc/rsyncd.passwd #指定密码文件,如果设定验证用户,这一项必须设置,使用密码文件就不需要输入密码了,可以写在脚本里定时调用
hosts allow=192.168.0.101 #设置可以允许访问的主机,可以是网段,白名单
/etc/rsyncd.conf 文件示例
#port=873
log file=/var/log/rsync.log
pid file=/var/run/rsyncd.pid
#address=192.168.0.10
[test]
path=/root/rsync/
use chroot=true
max connections=4
read only=no
list=false
uid=root   #一定不能注释掉
gid=root   #一定不能注释掉
exclude = install.log  install.log.syslog anaconda-ks.cfg
auth users=test
secrets file=/etc/rsyncd.passwd
hosts allow=192.168.0.101
指定模块名: rsync -av 1.txt 192.168.31.112::test/2.txt
列出模块名: rsync 192.168.31.112::
rsync服务是否已经启动
$ ps aux |grep rsync |grep -v grep
root     25786  0.0  0.0  10756   704 ?        Ss   14:24   0:00 rsync --daemon
密码文件/etc/rsyncd.passwd的内容格式为:username:password
在服务器端创建一个文件:/etc/rsyncd.passwd,
vi /etc/rsyncd.passwd
test:123456 //密码只能明文
chmod 600 /etc/rsyncd.passwd
客户端
rsync -av --password-file=/etc/rsyncd.passwd 3.txt test@192.168.1.12::test/6.txt //注意test用户
在/etc/rsyncd.passwd 里直接写密码,密码只能明文
chmod 600 /etc/rsyncd.passwd
杀死rsync服务: killall rsync
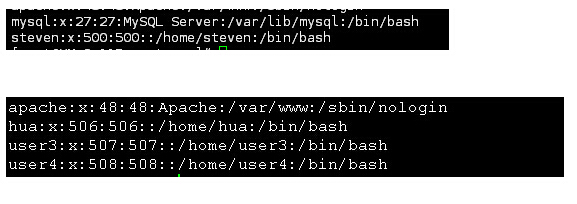
rsync同步的时候注意服务器和客户端上的UID,客户端不一定有服务器上的用户
md5sum
sha1sum
md5sum与sha1sum命令用于对文件进行校验和
安装了Linux后,就会有md5sum这个工具,直接在命令行终端直接运行
1、使用md5sum来产生指纹(报文摘要)命令如下:
md5sum filename > filename.md5
或者
md5sum filename >>filename.md5
2、使用md5报文摘要验证文件
把下载的文件file和该文件的file.md5报文摘要文件放在同一个目录下,然后用如下命令进行验证:
md5sum -c filename.md5
md5sum filename > filename.md5
然后如果验证成功,则会输出:正确
md5sum与sha1sum命令用于对文件进行校验和,如:
$ md5sum a.txt
f377aaac2f5d73e805212e5d6249cf5b4b4d8ce2 a.txt
md5sum命令也可以接受多个文件或通配符,如:
$ md5sum file1 file2 file3 … 或md5sum /tmp/*
[checksum1] file1
[checksum2] file2
[checksum3] file3
…
$ md5sum *.txt
[checksum1] a.txt
[checksum2] b.txt
[checksum3] c.txt
…
-c选项可以用生成的md5文件核实数据的完整性,把源文件file和该文件的file.md5报文摘要文件放在同一个目录下,如:
$ md5sum a.txt > a.md5
$ md5sum –c a.md5
a.txt: OK
SHA1与md5类似,是另一种常用的校验和算法。它从给定的输入文件中生成一个长度为40个字符的十六进制串。命令为sha1sum,使用方法与md5sum类似。
# cd /root/123
# md5sum 2.txt >2.txt.md5
# ll
总用量 12
-rw-r--r-- 1 root root  0 10月  7 02:21 1.txt
-rw-r--r-- 1 root root  3 10月  7 06:27 2.txt
-rw-r--r-- 1 root root 40 10月  7 07:04 2.txt.md5
-rw-r--r-- 1 root root  0 10月  7 02:21 3.txt
-rw-r--r-- 1 root root  0 10月  7 06:16 4.txt
-rw-r--r-- 1 root root  1 2月   8 2015 test
# cat 2.txt.md5
7ed0097d7e9ee73cf0952a1f0a07c07e  2.txt
# md5sum -c 2.txt.md5
2.txt: 确定
strace
http://www.apelearn.com/bbs/thread-585-1-1.html
如果某些服务没有记录日志的,例如sshd,可以安装strace来跟踪一下
strace常用来跟踪进程执行时的系统调用和所接收的信号。 在Linux世界,进程不能直接访问硬件设备,当进程需要访问硬件设备(比如读取磁盘文件,接收网络数据等等)时,必须由用户态模式切换至内核态模式,通过系统调用访问硬件设备。strace可以跟踪到一个进程产生的系统调用,包括参数,返回值,执行消耗的时间。
strace 命令是一种强大的工具, 能够显示任何由用户空间程式发出的系统调用. strace 显示这些调用的参数并返回符号形式的值. strace 从内核接收信息, 而且无需以任何特别的方式来构建内核. strace 的每一行输出包括系统调用名称, 然后是参数和返回值.
strace使用参数
-p 跟踪指定的进程
-f 跟踪由fork子进程系统调用
-F 尝试跟踪vfork子进程系统调吸入,与-f同时出现时, vfork不被跟踪
-o filename 默认strace将结果输出到stdout。通过-o可以将输出写入到filename文件中
-ff 常与-o选项一起使用,不同进程(子进程)产生的系统调用输出到filename.PID文件
-r 打印每一个系统调用的相对时间
-t 在输出中的每一行前加上时间信息。 -tt 时间精确到微秒级。还可以使用-ttt打印相对时间
-v 输出所有系统调用。默认情况下,一些频繁调用的系统调用不会输出
-s 指定每一行输出字符串的长度,默认是32。文件名一直全部输出
-c 统计每种系统调用所执行的时间,调用次数,出错次数。
-e expr 输出过滤器,通过表达式,可以过滤掉你不想要的输出
安装: yum install -y strace
跟踪sshd服务重启过程: strace /etc/init.d/sshd restart
跟踪某个进程
#netstat -nltp|grep nginx
tcp 0 0 0.0.0.0:80 0.0.0.0:* LISTEN 23681/nginx
# strace -p 23681
Process 23681 attached - interrupt to quit
rt_sigsuspend([]
^C <unfinished ...>
Process 23681 detached
find
根据inode号删除文件
$ ls -li
11883412-rw-r--r-- 1 oracle dba  254 Jan 31 19:21
find ./  -inum 11883412 |xargs  rm -f
在log文件里看到错误信息:log file=/var/log/rsync.log
后来发现是因为/etc/rsyncd.conf文件里模块名没有加右] ,不知道为什么,都是复制粘贴过去的
[webbak
path=/mydata/bak/webbak/
use chroot=true
Badly formed line in configuration file: webbak
tail /var/log/rsync.log
015/10/12 18:22:57 [4927] params.c:pm_process() - Failed.  Error returned from params.c:parse().
2015/10/12 18:22:57 [4927] rsync error: syntax or usage error (code 1) at clientserver.c(923) [receiver=3.0.6]
2015/10/12 18:23:06 [4970] params.c:Section() - Badly formed line in configuration file: webbak
2015/10/12 18:23:06 [4970] params.c:pm_process() - Failed.  Error returned from params.c:parse().
2015/10/12 18:23:06 [4970] rsync error: syntax or usage error (code 1) at clientserver.c(923) [receiver=3.0.6]
2015/10/12 18:24:03 [5019] params.c:Section() - Badly formed line in configuration file: webbak
2015/10/12 18:24:03 [5019] params.c:pm_process() - Failed.  Error returned from params.c:parse().
2015/10/12 18:24:03 [5019] rsync error: syntax or usage error (code 1) at clientserver.c(923) [receiver=3.0.6]
/etc/rsyncd.conf配置域名白名单
可以写个脚本,每分钟(添加任务计划)ping那个域名,把得到的ip和你的配置文件比较,如果相同不理他,不同了,就改一下
适合家里没有固定IP,用花生壳做域名的情况
Rsync 常见错误及解决方法
http://www.tuicool.com/articles/me2IFjf
由于阿里云SLB不提供ECS间的数据同步服务,如果部署在SLB后端ECS上的应用服务是无状态的,那么可以通过独立的ECS或RDS服务来存储数据;如果部署在SLB后端ECS上的应用服务是有状态的,那么需要确保这些ECS上的数据是同步的。
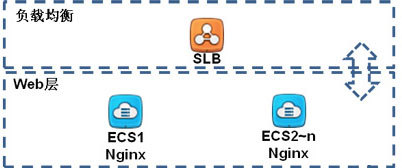
我们通过Rsync来实现多个ECS之间的数据同步。
通过Rsync来实现多个ECS之间的数据同步
通过Rsync来实现多个ECS之间的数据同步,请查看此文。
问题 @ERROR: chroot failed
@ERROR: chroot failed rsync error: error starting client-server protocol (code 5) at main.c(1503) [receiver=3.0.6]
原因:
服务器端的目录不存在或无权限。
解决办法:
创建目录并修正权限可解决问题。
问题 skipping non-regular file
receiving incremental file list
skipping non-regular file “vendor/bin/doctrine”
skipping non-regular file “vendor/bin/doctrine.php”
sent 1990 bytes received 489209 bytes 327466.00 bytes/sec total size is 182515746 speedup is 371.57
原因:
source源文件有软链接。
解决方法:
修改为 rsync -va,其中 -a == -rlptgoD (no -H,-A,-X) 或者 rsync -rvltOD 也可以。
解决后:
receiving incremental file list
vendor/bin/doctrine -> ../doctrine/orm/bin/doctrine
vendor/bin/doctrine.php -> ../doctrine/orm/bin/doctrine.php
sent 1998 bytes received 489279 bytes 327518.00 bytes/sec total size is 182515746 speedup is 371.51
问题@ERROR: module is read only
sending incremental file list
ERROR: module is read only
rsync error: syntax or usage error (code 1) at main.c(866) [receiver=3.0.6]
rsync: read error: Connection reset by peer (104)
rsync error: error in rsync protocol data stream (code 12) at io.c(759) [sender=3.0.6]
原因:
source源服务器端权限设置read为only只读权限。
解决方法:
read only = false
问题@ERROR: auth failed on module tee
@ERROR: auth failed on module tee rsync error: error starting client-server protocol (code 5) at main.c(1522) [receiver=3.0.6]
原因:
服务器端该模块(tee)需要验证用户名密码,但客户端没有提供正确的用户名密码,认证失败。
解决方法:
提供正确的用户名密码解决此问题。
问题 @ERROR: Unknown module ‘tee_nonexists’
@ERROR: Unknown module ‘tee_nonexists’ rsync error: error starting client-server protocol (code 5) at main.c(1522) [receiver=3.0.6]
原因:
服务器不存在指定模块。
解决方法:
提供正确的模块名或在服务器端修改成你要的模块以解决问题。
问题 password file must not be other-accessible
password file must not be other-accessible
continuing without password file
Password:
原因:
这是因为rsyncd.pwd rsyncd.secrets的权限不对,应该设置为600。
解决方法:
chmod 600 rsyncd.pwd
问题 rsync: failed to connect No route to host
rsync: failed to connect to 192.168.1.10: No route to host (113) rsync error: error in socket IO (code 10) at clientserver.c(104) [receiver=3.0.6]
原因:
对方没开机、防火墙阻挡、通过的网络上有防火墙阻挡,都有可能。
解决方法:
在iptables 中开放该端口,语句如下:
iptables -I INPUT -p tcp –dport 873 -j ACCEPT
rsync默认端口873,其实就是把tcp udp的873端口打开。
问题 rsync error: error starting client-server protocol
rsync error: error starting client-server protocol (code 5) at main.c(1524) [Receiver=3.0.6]
原因:
/etc/rsyncd.conf配置文件内容有错误。请正确核对配置文件。
问题 rsync: chown “” failed: Invalid argument (22)
rsync: chown “” failed: Invalid argument (22)
原因:
权限无法复制。去掉同步权限的参数即可。(这种情况多见于Linux向Windows的时候)
问题 @ERROR: daemon security issue — contact admin
@ERROR: daemon security issue — contact admin rsync error: error starting client-server protocol (code 5) at main.c(1530) [sender=3.0.6]
原因:
同步的目录里面有权限不足的软连接文件,需要服务器端的/etc/rsyncd.conf打开use chroot = yes。
问题 rsync: read error: Connection reset by peer (104)
rsync: read error: Connection reset by peer (104) rsync error: error in rsync protocol data stream (code 12) at io.c(794) [receiver=3.0.6]
解决:很大可能是服务器端没有开启 rsync 服务,开启服务。
问题 @ERROR: failed to open lock file
@ERROR: failed to open lock file rsync error: error starting client-server protocol (code 5) at main.c(1495) [receiver=3.0.6]
解决:配置文件 rsync.conf 中添加 lock file = rsyncd.lock 即可解决。
问题 /root/.bashrc: line 1: x: command not found
protocol version mismatch -- is your shell clean?
(see the rsync man page for an explanation)
rsync error: protocol incompatibility (code 2) at compat.c(171) [sender=3.0.6]
解决:检查一下 用户目录下的 .bashrc 文件
scp、rsync、ftp的功能总结
客户端:scp ,rsync,lftp
服务端:vsftp,sshd,rsync
断点续传:winscp、lftp、rsync
加密传输:rsync、scp、FTP(需要服务器端支持)
压缩传输:scp、rsync
流量控制:scp、rsync、lftp
通过比较,Linux下能取代FTP协议的服务器端和客户端软件只有rsync
http://www.cnblogs.com/MYSQLZOUQI/articles/4911707.html
f