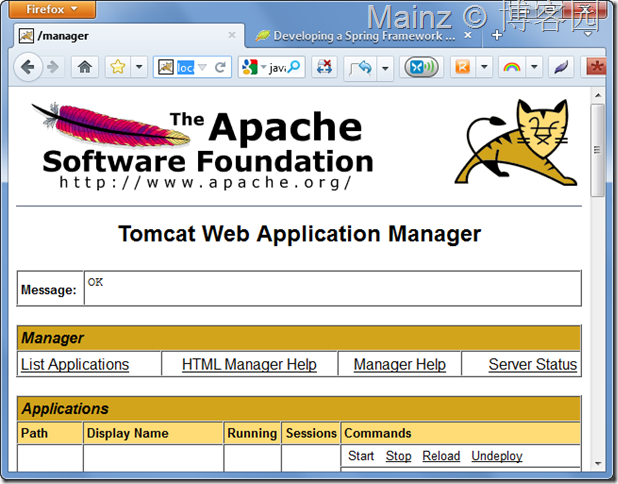
第一步是Java的Web环境搭建,下载Eclipse(或者更好的但收费的IDE-IntelliJ Idea,和Resharper一家公司出的),下载Tomcat,下载JDK,下载Spring,注意安装Tomcat的时候配置一下管理员账号和密码(如Tomcat/s3cret),安装好了Tomcat以后应该可以在浏览器访问这个地址:http://localhost:8080/(或者其它端口如9090你可以自己制定),点击里面的manager链接可以进入Tomcat管理manager页面 http://localhost:8080/manager/html:
Eclilpse相关设置
首先是环境变量设置,然后要把tools.jar添加到Eclipse的Ant运行时里面去:window->preferences->ant-> runtime, Global entries, add: external jars: jdk7的安装路径/lib/tools.jar。
建立一个Spring MVC的程序+Ant+Tomcat
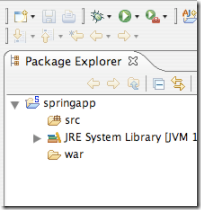
在Eclipse的java环境下(非JavaEE下)建立一个空的java项目(无需选择dynamic web project),名字叫springapp,然后加个目录叫war(便于部署),建立了就是这样的:
然后在整个项目下添加build.xml(自动用Ant编译和部署用的,类似makefile,这玩意爽),build.xml内容如下:
1: <?xml version="1.0"?>
2:
3: <project name="springapp" basedir="." default="usage">
4: <property file="build.properties"/>
5:
6: <property name="src.dir" value="src"/>
7: <property name="web.dir" value="war"/>
8: <property name="build.dir" value="${web.dir}/WEB-INF/classes"/>
9: <property name="name" value="springapp"/>
10:
11: <path id="master-classpath">
12: <fileset dir="${web.dir}/WEB-INF/lib">
13: <include name="*.jar"/>
14: </fileset>
15: <!-- We need the servlet API classes: -->
16: <!-- * for Tomcat 5/6 use servlet-api.jar -->
17: <!-- * for other app servers - check the docs -->
18: <fileset dir="${appserver.lib}">
19: <include name="servlet*.jar"/>
20: </fileset>
21: <pathelement path="${build.dir}"/>
22: </path>
23:
24: <target name="usage">
25: <echo message=""/>
26: <echo message="${name} build file"/>
27: <echo message="-----------------------------------"/>
28: <echo message=""/>
29: <echo message="Available targets are:"/>
30: <echo message=""/>
31: <echo message="build --> Build the application"/>
32: <echo message="deploy --> Deploy application as directory"/>
33: <echo message="deploywar --> Deploy application as a WAR file"/>
34: <echo message="install --> Install application in Tomcat"/>
35: <echo message="reload --> Reload application in Tomcat"/>
36: <echo message="start --> Start Tomcat application"/>
37: <echo message="stop --> Stop Tomcat application"/>
38: <echo message="list --> List Tomcat applications"/>
39: <echo message=""/>
40: </target>
41:
42: <!-- Create folder in tomcat
43: <target name="init">
44: <mkdir dir="${deploy.path}/springapp"/>
45: </target> -->
46:
47: <target name="build" description="Compile main source tree java files">
48: <mkdir dir="${build.dir}"/>
49: <javac destdir="${build.dir}" source="1.5" target="1.5" debug="true"
50: deprecation="false" optimize="false" failonerror="true">
51: <src path="${src.dir}"/>
52: <classpath refid="master-classpath"/>
53: </javac>
54: </target>
55:
56: <target name="deploy" depends="build" description="Deploy application">
57: <copy todir="${deploy.path}/${name}" preservelastmodified="true">
58: <fileset dir="${web.dir}">
59: <include name="**/*.*"/>
60: </fileset>
61: </copy>
62: </target>
63:
64: <target name="deploywar" depends="build" description="Deploy application as a WAR file">
65: <war destfile="${name}.war"
66: webxml="${web.dir}/WEB-INF/web.xml">
67: <fileset dir="${web.dir}">
68: <include name="**/*.*"/>
69: </fileset>
70: </war>
71: <copy todir="${deploy.path}" preservelastmodified="true">
72: <fileset dir=".">
73: <include name="*.war"/>
74: </fileset>
75: </copy>
76: </target>
77:
78: <!-- ============================================================== -->
79: <!-- Tomcat tasks - remove these if you don't have Tomcat installed -->
80: <!-- ============================================================== -->
81:
82: <path id="catalina-ant-classpath">
83: <!-- We need the Catalina jars for Tomcat -->
84: <!-- * for other app servers - check the docs -->
85: <fileset dir="${appserver.lib}">
86: <include name="catalina-ant.jar"/>
87: </fileset>
88: </path>
89:
90: <taskdef name="install" classname="org.apache.catalina.ant.InstallTask">
91: <classpath refid="catalina-ant-classpath"/>
92: </taskdef>
93: <taskdef name="reload" classname="org.apache.catalina.ant.ReloadTask">
94: <classpath refid="catalina-ant-classpath"/>
95: </taskdef>
96: <taskdef name="list" classname="org.apache.catalina.ant.ListTask">
97: <classpath refid="catalina-ant-classpath"/>
98: </taskdef>
99: <taskdef name="start" classname="org.apache.catalina.ant.StartTask">
100: <classpath refid="catalina-ant-classpath"/>
101: </taskdef>
102: <taskdef name="stop" classname="org.apache.catalina.ant.StopTask">
103: <classpath refid="catalina-ant-classpath"/>
104: </taskdef>
105:
106: <target name="install" description="Install application in Tomcat">
107: <install url="${tomcat.manager.url}"
108: username="${tomcat.manager.username}"
109: password="${tomcat.manager.password}"
110: path="/${name}"
111: war="${name}"/>
112: </target>
113:
114: <target name="reload" description="Reload application in Tomcat">
115: <reload url="${tomcat.manager.url}"
116: username="${tomcat.manager.username}"
117: password="${tomcat.manager.password}"
118: path="/${name}"/>
119: </target>
120:
121: <target name="start" description="Start Tomcat application">
122: <start url="${tomcat.manager.url}"
123: username="${tomcat.manager.username}"
124: password="${tomcat.manager.password}"
125: path="/${name}"/>
126: </target>
127:
128: <target name="stop" description="Stop Tomcat application">
129: <stop url="${tomcat.manager.url}"
130: username="${tomcat.manager.username}"
131: password="${tomcat.manager.password}"
132: path="/${name}"/>
133: </target>
134:
135: <target name="list" description="List Tomcat applications">
136: <list url="${tomcat.manager.url}"
137: username="${tomcat.manager.username}"
138: password="${tomcat.manager.password}"/>
139: </target>
140:
141: <!-- End Tomcat tasks -->
142:
143: </project>
在整个项目下添加build.properties(这个是给build.xml配置环境变量的。直接拿过来运行的朋友,这里面的内容记得需要修改为你本地的路径哦!!)
1: # Ant properties for building the springapp
2:
3: appserver.home=C:/Program Files/Apache Software Foundation/Tomcat 6.0
4: # for Tomcat 5 use $appserver.home}/server/lib
5: # for Tomcat 6 use $appserver.home}/lib
6: appserver.lib=${appserver.home}/lib
7:
8: deploy.path=${appserver.home}/webapps
9:
10: tomcat.manager.url=http://localhost:8080/manager/html
11: tomcat.manager.username=tomcat
12: tomcat.manager.password=s3cret
然后添加一个controller,在src下添加一个java文件,输入package为:net.spring.controller。这个controller的意思我想懂得mvc的人懂的。
1: package net.spring.controller;
2:
3: import org.springframework.stereotype.Controller;
4: import org.springframework.web.bind.annotation.RequestMapping;
5: import org.springframework.web.servlet.ModelAndView;
6:
7: @Controller
8: public class HelloWorldController {
9:
10: @RequestMapping("/hello")
11: public ModelAndView helloWorld() {
12:
13: String message = "Hello World, Spring 3.1.1 Release!";
14: System.out.println(message);
15: return new ModelAndView("hello", "message", message);
16: }
17:
18: }
接着工作在war目录下。首先加个index.jsp
1: <html>
2: <head><title>Example :: Spring Application</title></head>
3: <body>
4: <h1>Example - Spring Application</h1>
5: <p>This is my test.</p>
6: <p><a href="hello.html">Say Hello</a></p>
7: </body>
8: </html>
然后加个目录WEB-INF。里面加一个文件web.xml(这个文件很重要,是web项目最重要的配置文件)(有关Servlet,这个是java web的核心概念。)
1: <?xml version="1.0" encoding="UTF-8"?>
2:
3: <web-app version="2.4"
4: xmlns="http://java.sun.com/xml/ns/j2ee"
5: xmlns:xsi="http://www.w3.org/2001/XMLSchema-instance"
6: xsi:schemaLocation="http://java.sun.com/xml/ns/j2ee
7: http://java.sun.com/xml/ns/j2ee/web-app_2_4.xsd" >
8:
9: <display-name>Spring3MVC</display-name>
10: <servlet>
11: <servlet-name>springapp</servlet-name>
12: <servlet-class>org.springframework.web.servlet.DispatcherServlet</servlet-class>
13: <load-on-startup>1</load-on-startup>
14: </servlet>
15:
16: <servlet-mapping>
17: <servlet-name>springapp</servlet-name>
18: <url-pattern>*.html</url-pattern>
19: </servlet-mapping>
20:
21: <welcome-file-list>
22: <welcome-file>
23: index.jsp
24: </welcome-file>
25: </welcome-file-list>
26:
27: </web-app>
加一个文件srpingapp-servlet.xml
1: <?xml version="1.0" encoding="UTF-8"?>
2: <beans xmlns="http://www.springframework.org/schema/beans"
3: xmlns:xsi="http://www.w3.org/2001/XMLSchema-instance"
4: xmlns:p="http://www.springframework.org/schema/p"
5: xmlns:context="http://www.springframework.org/schema/context"
6: xsi:schemaLocation="http://www.springframework.org/schema/beans
7: http://www.springframework.org/schema/beans/spring-beans-3.0.xsd
8: http://www.springframework.org/schema/context
9: http://www.springframework.org/schema/context/spring-context-3.0.xsd">
10:
11: <context:component-scan base-package="net.spring.controller" />
12:
13: <!-- the application context definition for the springapp DispatcherServlet -->
14: <!-- <bean name="/hello.html" class="net.spring.controller.HelloWorldController"/> -->
15:
16: <bean id="viewResolver"
17: class="org.springframework.web.servlet.view.UrlBasedViewResolver">
18: <property name="viewClass"
19: value="org.springframework.web.servlet.view.JstlView" />
20: <property name="prefix" value="/WEB-INF/jsp/" />
21: <property name="suffix" value=".jsp" />
22: </bean>
23: </beans>
在WEB-INF加两个目录:jsp和lib。首先复制引用的jar包,例如Spring的jar,然后在lib目录上粘贴,要引用这些jar:
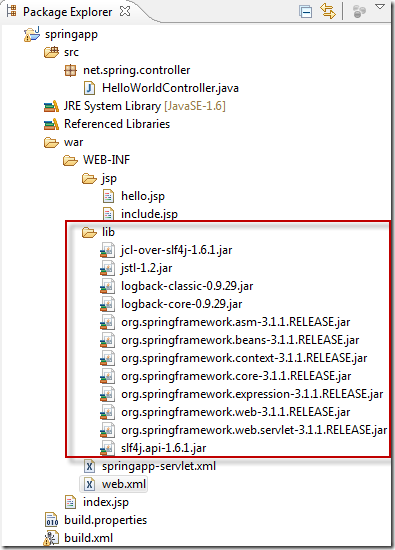
然后右键选择项目属性,Build path… Configure build path. Libraries – > add jars…把这些lib下面的jar加入引用。
说一下目录结构:通常,src存放Java源文件,classes存放编译后的class文件,lib存放编译和运行用到的所有jar文件,web存放JSP等web文件,dist存放打包后的jar文件,doc存放API文档。
在jsp目录下添加include.jsp:
1: <%@ page session="false"%>
2: <%@ taglib prefix="c" uri="http://java.sun.com/jsp/jstl/core" %>
3: <%@ taglib prefix="fmt" uri="http://java.sun.com/jsp/jstl/fmt" %>
添加hello.jsp,注意里面用了Model里面的:message
1: <%@ include file="/WEB-INF/jsp/include.jsp" %>
2:
3: <html>
4: <head><title>Hello :: Spring Application</title></head>
5: <body>
6: <h1>Hello - Spring Application</h1>
7: <p>Greetings.</p>
8: <p>Message: <c:out value="${message}"/></p>
9: </body>
10: </html>
Ant编译和自动部署到Tomcat
为了让Eclipse用我们的Ant编译和build.xml文件,需要设置一下Eclipse:项目属性,Builders,把java builder去掉勾,然后New…一个,选择Ant builder….,然后选择build.xml,如图:
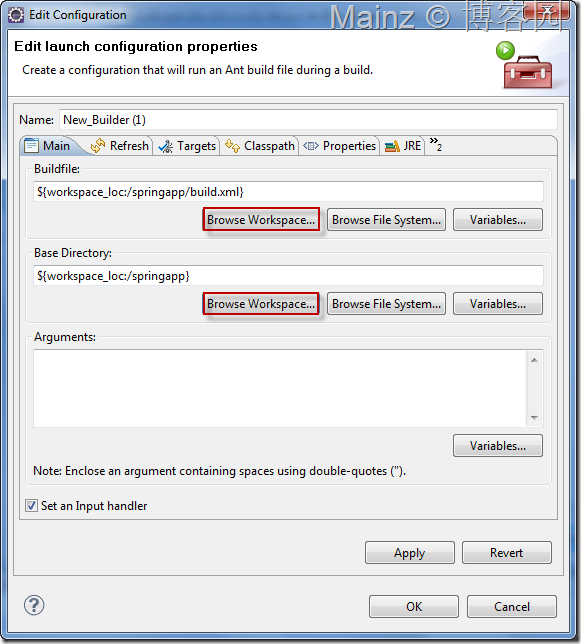
确定了以后,点击菜单 project –> Build all … 自动Ant编译:
1: Buildfile: C:\Users\GatesBill\workspace\springapp\build.xml
2:
3: usage:
4: [echo] springapp build file
5: [echo] -----------------------------------
6: [echo] Available targets are:
7: [echo] build --> Build the application
8: [echo] deploy --> Deploy application as directory
9: [echo] deploywar --> Deploy application as a WAR file
10: [echo] install --> Install application in Tomcat
11: [echo] reload --> Reload application in Tomcat
12: [echo] start --> Start Tomcat application
13: [echo] stop --> Stop Tomcat application
14: [echo] list --> List Tomcat applications
15: BUILD SUCCESSFUL
16: Total time: 989 milliseconds
看了一下源码,果然已经编译好了:
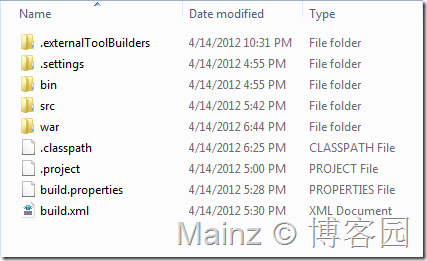
但是没有自动部署到Tomcat的webapps里面,我们需要运行Ant deploy:在项目属性,Builders,选择刚才我们新建的那个Ant编译,选择edit,然后里面Argument的地方输入deploy,然后Apply,OK。再次编译,就自动部署Tomcat了:
1: Buildfile: C:\Users\GatesBill\workspace\springapp\build.xml
2:
3: build:
4: [javac] Compiling 1 source file to C:\Users\GatesBill\workspace\springapp\war\WEB-INF\classes
5: [javac] warning: [options] bootstrap class path not set in conjunction with -source 1.5
6: [javac] 1 warning
7:
8: deploy:
9: [copy] Copying 11 files to C:\Program Files\Apache Software Foundation\Tomcat 6.0\webapps\springapp
10: BUILD SUCCESSFUL
11: Total time: 4 seconds
也可以用命令行的方式执行Ant编译(这样我们可以另外写一个deploy的bat脚本,非常方便),不过要首先到computer – properties – advanced - 环境变量,添加下列环境变量:
ANT_HOME=<Ant解压目录,通常在Eclipse的plugin目录下>,Path=…;%ANT_HOME%\bin
然后打开command(如果在win7下,可能需要提升administration 权限),转到springapp目录为当前目录,然后执行ant deploy 即可,如下图:
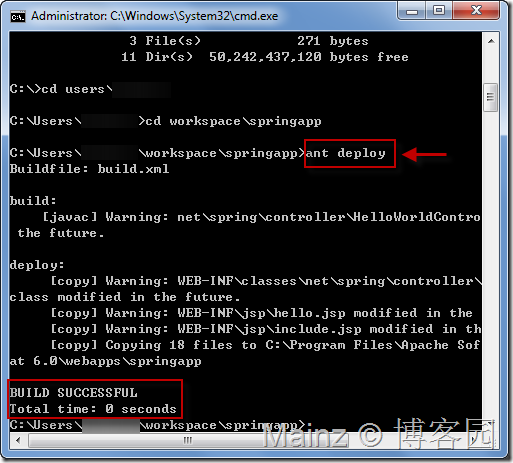
到Tomcat的目录下webapps一看,果然有了springapp,然后在浏览器打开Tomcat的manager:http://localhost:8080/manager/html,点击我们的网站springapp,有了:
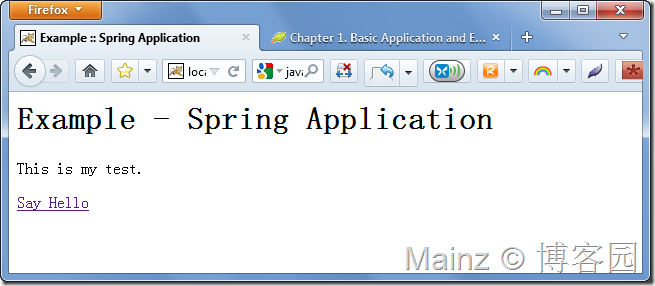
点击say hello,链接到:http://localhost:8080/springapp/hello.html
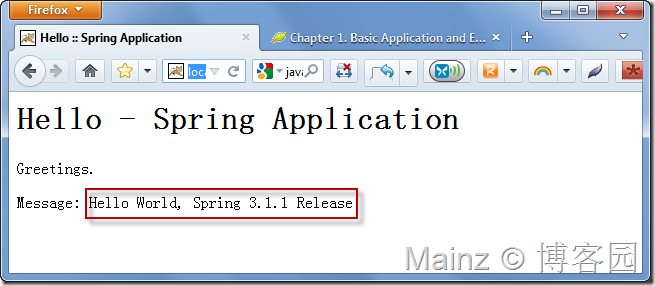
上面这个message是从controller传给model的。
Build Error: taskdef class org.apache.catalina.ant.InstallTask cannot be found
如果得到这个错误,一般是因为安装的Tomcat 7而不是Tomcat 6.0,因为在Tomcat 7.0下面要修改下build.xml:
2 <classpath refid="catalina-ant-classpath"/>
3 </taskdef>
要改成:
2 <classpath refid="catalina-ant-classpath"/>
3 </taskdef>
总结
用Ant编译和部署到Tomcat还是非常爽的,过程很流畅。喜欢这种感觉。