在实际的应用开发中,经常需要对某个窗体或某个控件的颜色外观,如背景色、前景色等进行设置,已达到界面美化的效果。
Qt中的窗体或控件都是Widget类,Qt中提供的调色板QPalette类就是专门用于管理控件的外观显示。
QPalette类相当于对话框或控件的调色板,管理着控件和窗体的所有颜色。
QWidget中有个属性palette(Qpalette)。
此属性描述Widget的调色板。呈现标准组件时,该Widget的样式使用该调色板,并且可以用作确保自定义Widget可以与本机平台的外观保持一致的一种方式。通常,不同的平台或不同的样式具有不同的调色板。
当您为窗口Widget分配新的调色板时,该调色板的颜色Role将与窗口Widget的默认调色板组合在一起,以形成窗口Widget的最终调色板。Widget的背景角色的调色板条目用于填充Widget的背景(请参阅QWidget :: autoFillBackground),而前景角色则初始化QPainter的笔。
默认值取决于系统环境。 QApplication维护一个系统/主题面板,它是所有Widget的默认选项。对于某些类型的Widget,可能还会有特殊的调色板默认设置(例如,在Windows Vista上,从QMenuBar派生的所有类都具有特殊的默认调色板)。您还可以通过将自定义调色板和Widget名称传递给QApplication::setPalette()来自己为Widget定义默认调色板。最后,样式始终可以选择在分配调色板时对其进行抛光(请参见QStyle::polish())。
QWidget将显式将调色板角色从父级传播到子级。如果将画笔或颜色分配给调色板上的特定角色,然后将该调色板分配给Widget,则该角色将传播到所有Widget的子级,从而覆盖该角色的所有系统默认值。请注意,除非启用了Qt::WA_WindowPropagation属性,否则默认情况下,调色板不会传播到窗口(请参见isWindow())。
QWidget的调色板传播类似于其字体传播。
当前样式用于呈现所有标准QtWidget的内容,可以自由地从Widget调色板中选择颜色和画笔,或者在某些情况下可以忽略(部分或全部)调色板。特别是,某些样式(例如GTK样式,Mac样式和Windows Vista样式)依赖于第三方API来呈现窗口Widget的内容,并且这些样式通常不遵循调色板。因此,不能保证将角色分配给窗口Widget的调色板会更改窗口Widget的外观。相反,您可以选择应用styleSheet。
警告:请勿将此功能与Qt样式表一起使用。使用样式表时,可以使用“颜色”,“背景颜色”,“选择颜色”,“选择背景颜色”和“替代背景颜色”来自定义窗口小部件的调色板。
涉及的访问函数:
const QPalette &palette() const
void setPalette(const QPalette &)
QPalette有两个基本的概念:一个是ColorGroup;一个是ColorRole。
ColorGroup有三种不同的状态: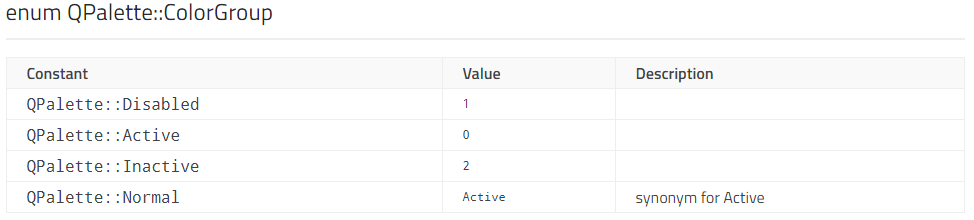
Active:激活状态(获得焦点状态)
Disabled:禁用状态(未获得焦点状态)
Inactive:未激活状态(不可用状态)
通常情况下:在大多数风格,活跃的和不活跃的看起来一样。
ColorRole枚举定义了当前GUI中使用的不同符号颜色角色。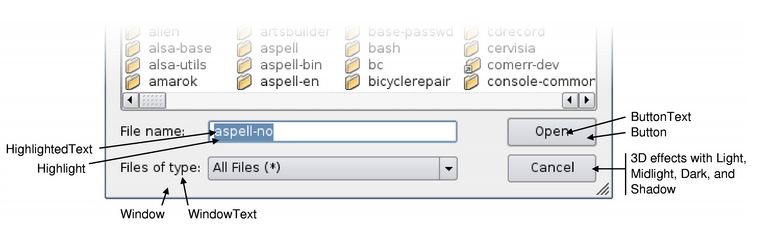
核心Role包括: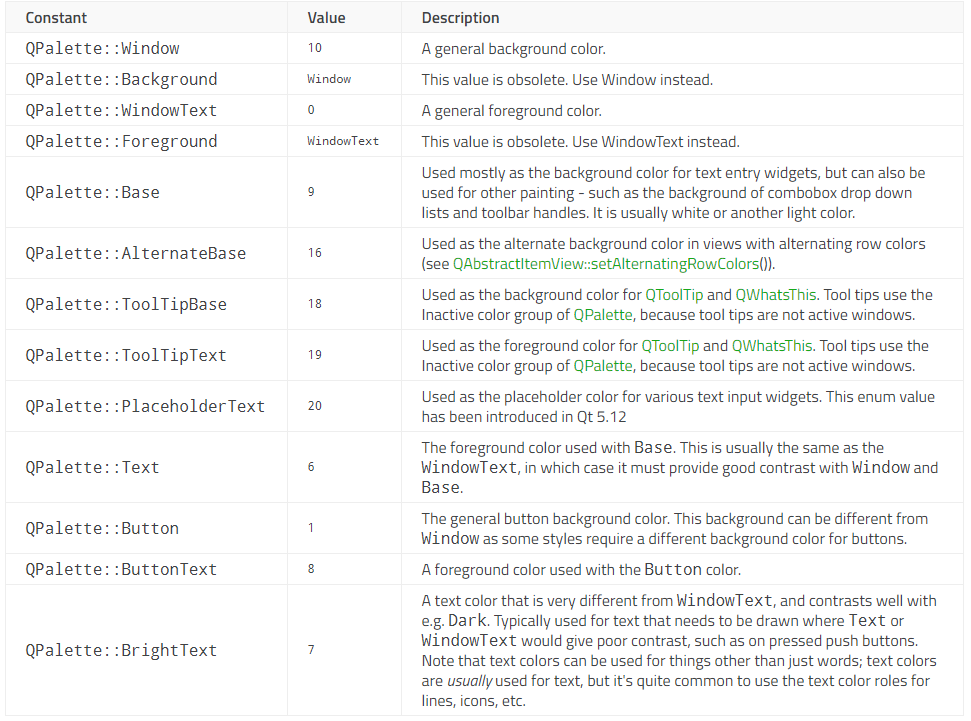
以下是一些主要用于3D斜角和阴影效果的颜色Role:
高亮Role:
超链接Role:
请注意,在Qt中渲染富文本时,我们不使用Link和LinkVisited角色,建议您使用CSS和QTextDocument::setDefaultStyleSheet()函数来更改链接的外观。例如:
常用的设置颜色方法如下:
(1) void QPalette::setBrush ( ColorRole role, const QBrush & brush )
改变所有组下指定角色role的画刷颜色值。
(2) void QPalette::setBrush ( ColorGroup group, ColorRole role, const QBrush & brush )
改变指定组group下的指定角色role的画刷颜色值。
(3) void QPalette::setColor ( ColorRole role, const QColor & color )
改变所有组下指定角色role的颜色值。
(4) void QPalette::setColor ( ColorGroup group, ColorRole role, const QColor & color )
改变指定组group下指定角色role的颜色值。
注意:在以上代码之前,必须先调用函数 setAutoFillBackground(true),设置窗体运行自动填充。
注意:在设置控件背景色填充时,一定要先调用setAutoFillBackground(true)函数,来运行自动填充背景。不然,程序中填充背景的代码不会起作用的。
总之,通过调色板已经可以进行一定程度的窗体和控件美化。
实战:应用换肤
新建基于Widget的应用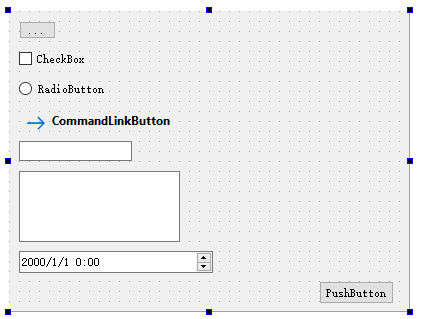
<?xml version="1.0" encoding="UTF-8"?>
<ui version="4.0">
 <class>Widget</class>
 <widget class="QWidget" name="Widget">
  <property name="geometry">
   <rect>
    <x>0</x>
    <y>0</y>
    <width>400</width>
    <height>300</height>
   </rect>
  </property>
  <property name="windowTitle">
   <string>Widget</string>
  </property>
  <widget class="QPushButton" name="pushButton">
   <property name="geometry">
    <rect>
     <x>310</x>
     <y>270</y>
     <width>75</width>
     <height>23</height>
    </rect>
   </property>
   <property name="text">
    <string>PushButton</string>
   </property>
  </widget>
  <widget class="QToolButton" name="toolButton">
   <property name="geometry">
    <rect>
     <x>10</x>
     <y>10</y>
     <width>37</width>
     <height>18</height>
    </rect>
   </property>
   <property name="text">
    <string>...</string>
   </property>
  </widget>
  <widget class="QCheckBox" name="checkBox">
   <property name="geometry">
    <rect>
     <x>10</x>
     <y>40</y>
     <width>71</width>
     <height>16</height>
    </rect>
   </property>
   <property name="text">
    <string>CheckBox</string>
   </property>
  </widget>
  <widget class="QRadioButton" name="radioButton">
   <property name="geometry">
    <rect>
     <x>10</x>
     <y>70</y>
     <width>89</width>
     <height>16</height>
    </rect>
   </property>
   <property name="text">
    <string>RadioButton</string>
   </property>
  </widget>
  <widget class="QCommandLinkButton" name="commandLinkButton">
   <property name="geometry">
    <rect>
     <x>10</x>
     <y>90</y>
     <width>172</width>
     <height>41</height>
    </rect>
   </property>
   <property name="text">
    <string>CommandLinkButton</string>
   </property>
  </widget>
  <widget class="QLineEdit" name="lineEdit">
   <property name="geometry">
    <rect>
     <x>10</x>
     <y>130</y>
     <width>113</width>
     <height>20</height>
    </rect>
   </property>
  </widget>
  <widget class="QTextEdit" name="textEdit">
   <property name="geometry">
    <rect>
     <x>10</x>
     <y>160</y>
     <width>161</width>
     <height>71</height>
    </rect>
   </property>
  </widget>
  <widget class="QDateTimeEdit" name="dateTimeEdit">
   <property name="geometry">
    <rect>
     <x>10</x>
     <y>240</y>
     <width>194</width>
     <height>22</height>
    </rect>
   </property>
  </widget>
 </widget>
 <layoutdefault spacing="6" margin="11"/>
 <resources/>
 <connections/>
</ui>
#ifndef WIDGET_H
#define WIDGET_H

#include <QWidget>

namespace Ui {
class Widget;
}

class Widget : public QWidget
{
    Q_OBJECT

public:
    explicit Widget(QWidget *parent = nullptr);
    ~Widget();

private slots:
    void on_pushButton_clicked();

private:
    Ui::Widget *ui;

    bool        defaultSkin;
    QPalette    defaultPal;
    QPalette    darkPal;
};

#endif // WIDGET_H


#include "widget.h"
#include "ui_widget.h"

Widget::Widget(QWidget *parent) :
    QWidget(parent),
    ui(new Ui::Widget),
    defaultSkin(true)
{
    ui->setupUi(this);
    defaultPal = qApp->palette();
    darkPal.setColor(QPalette::Window, QColor(53,53,53));
    darkPal.setColor(QPalette::WindowText, Qt::white);
    darkPal.setColor(QPalette::Base, QColor(15,15,15));
    darkPal.setColor(QPalette::AlternateBase, QColor(53,53,53));
    darkPal.setColor(QPalette::ToolTipBase, Qt::white);
    darkPal.setColor(QPalette::ToolTipText, Qt::white);
    darkPal.setColor(QPalette::Text, Qt::white);
    darkPal.setColor(QPalette::Button, QColor(53,53,53));
    darkPal.setColor(QPalette::ButtonText, Qt::white);
    darkPal.setColor(QPalette::BrightText, Qt::red);
    darkPal.setColor(QPalette::Highlight, QColor(142,45,197).lighter());
    darkPal.setColor(QPalette::HighlightedText, Qt::black);
}

Widget::~Widget()
{
    delete ui;
}

void Widget::on_pushButton_clicked()
{
    if (defaultSkin)
    {
        defaultSkin = false;
        qApp->setPalette(darkPal);
    }
    else {
        defaultSkin = true;
        qApp->setPalette(defaultPal);
    }
}
 1 #include "widget.h"
 2 #include <QApplication>
 3 #include <QStyleFactory>
 4
 5 int main(int argc, char *argv[])
 6 {
 7     QApplication a(argc, argv);
 8     qApp->setStyle(QStyleFactory::create("Fusion"));
 9
10     Widget w;
11     w.show();
12
13     return a.exec();
14 }
构建运行: