APIServer安全控制

-
Authentication:身份认证
- 这个环节它面对的输入是整个
http request,负责对来自client的请求进行身份校验,支持的方法包括:
basic auth- client证书验证(https双向验证)
jwt token(用于serviceaccount)
-
APIServer启动时,可以指定一种Authentication方法,也可以指定多种方法。如果指定了多种方法,那么APIServer将会逐个使用这些方法对客户端请求进行验证, 只要请求数据通过其中一种方法的验证,APIServer就会认为Authentication成功;
-
使用kubeadm引导启动的k8s集群,apiserver的初始配置中,默认支持
client证书验证和serviceaccount两种身份验证方式。 证书认证通过设置--client-ca-file根证书以及--tls-cert-file和--tls-private-key-file来开启。 -
在这个环节,apiserver会通过client证书或
http header中的字段(比如serviceaccount的jwt token)来识别出请求的用户身份,包括”user”、”group”等,这些信息将在后面的authorization环节用到。
- 这个环节它面对的输入是整个
-
Authorization:鉴权,你可以访问哪些资源
-
这个环节面对的输入是
http request context中的各种属性,包括:user、group、request path(比如:/api/v1、/healthz、/version等)、request verb(比如:get、list、create等)。 -
APIServer会将这些属性值与事先配置好的访问策略(
access policy)相比较。APIServer支持多种authorization mode,包括Node、RBAC、Webhook等。 -
APIServer启动时,可以指定一种
authorization mode,也可以指定多种authorization mode,如果是后者,只要Request通过了其中一种mode的授权, 那么该环节的最终结果就是授权成功。在较新版本kubeadm引导启动的k8s集群的apiserver初始配置中,authorization-mode的默认配置是”Node,RBAC”。
-
-
Admission Control:准入控制,一个控制链(层层关卡),用于拦截请求的一种方式。偏集群安全控制、管理方面。
-
为什么需要?
认证与授权获取 http 请求 header 以及证书,无法通过body内容做校验。
Admission 运行在 API Server 的增删改查 handler 中,可以自然地操作 API resource
-
举个栗子
-
以NamespaceLifecycle为例, 该插件确保处于Termination状态的Namespace不再接收新的对象创建请求,并拒绝请求不存在的Namespace。该插件还可以防止删除系统保留的Namespace:default,kube-system,kube-public。
-
LimitRanger,若集群的命名空间设置了LimitRange对象,若Pod声明时未设置资源值,则按照LimitRange的定义来未Pod添加默认值
apiVersion: v1 kind: LimitRange metadata: name: mem-limit-range namespace: luffy spec: limits: - default: memory: 512Mi defaultRequest: memory: 256Mi type: Container --- apiVersion: v1 kind: Pod metadata: name: default-mem-demo-2 spec: containers: - name: default-mem-demo-2-ctr image: nginx:alpine -
NodeRestriction, 此插件限制kubelet修改Node和Pod对象,这样的kubelets只允许修改绑定到Node的Pod API对象,以后版本可能会增加额外的限制 。开启Node授权策略后,默认会打开该项
-
-
怎么用?
APIServer启动时通过
--enable-admission-plugins --disable-admission-plugins指定需要打开或者关闭的 Admission Controller -
场景
- 自动注入sidecar容器或者initContainer容器
- webhook admission,实现业务自定义的控制需求
-
kubectl的认证授权
kubectl的日志调试级别:
| 信息 | 描述 |
|---|---|
| v=0 | 通常,这对操作者来说总是可见的。 |
| v=1 | 当您不想要很详细的输出时,这个是一个合理的默认日志级别。 |
| v=2 | 有关服务和重要日志消息的有用稳定状态信息,这些信息可能与系统中的重大更改相关。这是大多数系统推荐的默认日志级别。 |
| v=3 | 关于更改的扩展信息。 |
| v=4 | 调试级别信息。 |
| v=6 | 显示请求资源。 |
| v=7 | 显示 HTTP 请求头。 |
| v=8 | 显示 HTTP 请求内容。 |
| v=9 | 显示 HTTP 请求内容,并且不截断内容。 |
$ kubectl get nodes -v=7
I0329 20:20:08.633065    3979 loader.go:359] Config loaded from file /root/.kube/config
I0329 20:20:08.633797    3979 round_trippers.go:416] GET https://192.168.136.10:6443/api/v1/nodes?limit=500
kubeadm init启动完master节点后,会默认输出类似下面的提示内容:
... ...
Your Kubernetes master has initialized successfully!

To start using your cluster, you need to run the following as a regular user:
  mkdir -p $HOME/.kube
  sudo cp -i /etc/kubernetes/admin.conf $HOME/.kube/config
  sudo chown $(id -u):$(id -g) $HOME/.kube/config
... ...
这些信息是在告知我们如何配置kubeconfig文件。按照上述命令配置后,master节点上的kubectl就可以直接使用$HOME/.kube/config的信息访问k8s cluster了。 并且,通过这种配置方式,kubectl也拥有了整个集群的管理员(root)权限。
- 当
kubectl使用这种kubeconfig方式访问集群时,Kubernetes的kube-apiserver是如何对来自kubectl的访问进行身份验证(authentication)和授权(authorization)的呢? - 为什么来自
kubectl的请求拥有最高的管理员权限呢?
查看/root/.kube/config文件:
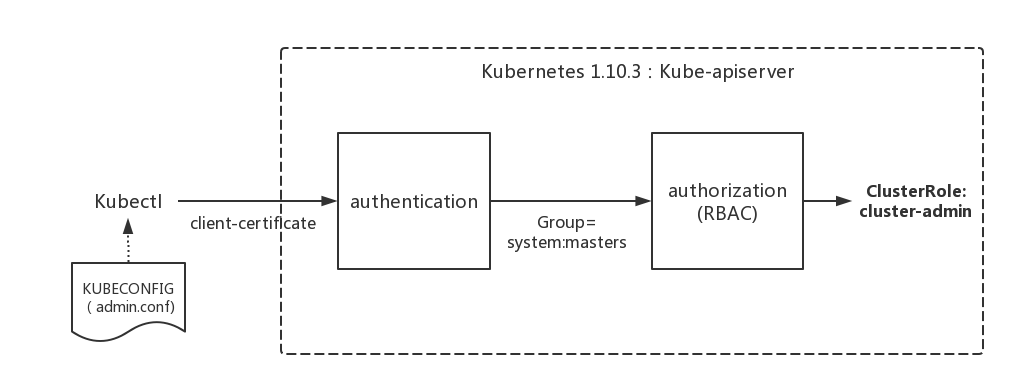
前面提到过apiserver的authentication支持通过tls client certificate、basic auth、token等方式对客户端发起的请求进行身份校验, 从kubeconfig信息来看,kubectl显然在请求中使用了tls client certificate的方式,即客户端的证书。
证书base64解码:
$ echo xxxxxxxxxxxxxx |base64 -d > kubectl.crt
说明在认证阶段,apiserver会首先使用--client-ca-file配置的CA证书去验证kubectl提供的证书的有效性,基本的方式 :
$  openssl verify -CAfile /etc/kubernetes/pki/ca.crt kubectl.crt
kubectl.crt: OK
除了认证身份,还会取出必要的信息供授权阶段使用,文本形式查看证书内容:
$ openssl x509 -in kubectl.crt -text
Certificate:
    Data:
        Version: 3 (0x2)
        Serial Number: 4736260165981664452 (0x41ba9386f52b74c4)
    Signature Algorithm: sha256WithRSAEncryption
        Issuer: CN=kubernetes
        Validity
            Not Before: Feb 10 07:33:39 2020 GMT
            Not After : Feb  9 07:33:40 2021 GMT
        Subject: O=system:masters, CN=kubernetes-admin
        ...
认证通过后,提取出签发证书时指定的CN(Common Name),kubernetes-admin,作为请求的用户名 (User Name), 从证书中提取O(Organization)字段作为请求用户所属的组 (Group),group = system:masters,然后传递给后面的授权模块。
kubeadm在init初始引导集群启动过程中,创建了许多默认的RBAC规则, 在k8s有关RBAC的官方文档中,我们看到下面一些default clusterrole列表:
其中第一个cluster-admin这个cluster role binding绑定了system:masters group,这和authentication环节传递过来的身份信息不谋而合。 沿着system:masters group对应的cluster-admin clusterrolebinding“追查”下去,真相就会浮出水面。
我们查看一下这一binding:
$ kubectl describe clusterrolebinding cluster-admin
Name:         cluster-admin
Labels:       kubernetes.io/bootstrapping=rbac-defaults
Annotations:  rbac.authorization.kubernetes.io/autoupdate: true
Role:
  Kind:  ClusterRole
  Name:  cluster-admin
Subjects:
  Kind   Name            Namespace
  ----   ----            ---------
  Group  system:masters
我们看到在kube-system名字空间中,一个名为cluster-admin的clusterrolebinding将cluster-admin cluster role与system:masters Group绑定到了一起, 赋予了所有归属于system:masters Group中用户cluster-admin角色所拥有的权限。
我们再来查看一下cluster-admin这个role的具体权限信息:
$ kubectl describe clusterrole cluster-admin
Name:         cluster-admin
Labels:       kubernetes.io/bootstrapping=rbac-defaults
Annotations:  rbac.authorization.kubernetes.io/autoupdate: true
PolicyRule:
  Resources  Non-Resource URLs  Resource Names  Verbs
  ---------  -----------------  --------------  -----
  *.*        []                 []              [*]
             [*]                []              [*]
非资源类,如查看集群健康状态。
RBAC
Role-Based Access Control,基于角色的访问控制, apiserver启动参数添加--authorization-mode=RBAC 来启用RBAC认证模式,kubeadm安装的集群默认已开启。官方介绍
查看开启:
# master节点查看apiserver进程
$ ps aux |grep apiserver
RBAC模式引入了4个资源类型:
-
Role,角色
一个Role只能授权访问单个namespace
## 示例定义一个名为pod-reader的角色,该角色具有读取default这个命名空间下的pods的权限 kind: Role apiVersion: rbac.authorization.k8s.io/v1 metadata: namespace: default name: pod-reader rules: - apiGroups: [""] # "" indicates the core API group resources: ["pods"] verbs: ["get", "watch", "list"] ## apiGroups: "","apps", "autoscaling", "batch", kubectl api-versions ## resources: "services", "pods","deployments"... kubectl api-resources ## verbs: "get", "list", "watch", "create", "update", "patch", "delete", "exec" ## https://kubernetes.io/docs/reference/generated/kubernetes-api/v1.18/ -
ClusterRole
一个ClusterRole能够授予和Role一样的权限,但是它是集群范围内的。
## 定义一个集群角色,名为secret-reader,该角色可以读取所有的namespace中的secret资源 kind: ClusterRole apiVersion: rbac.authorization.k8s.io/v1 metadata: # "namespace" omitted since ClusterRoles are not namespaced name: secret-reader rules: - apiGroups: [""] resources: ["secrets"] verbs: ["get", "watch", "list"] -
Rolebinding
将role中定义的权限分配给用户和用户组。RoleBinding包含主题(users,groups,或service accounts)和授予角色的引用。对于namespace内的授权使用RoleBinding,集群范围内使用ClusterRoleBinding。
## 定义一个角色绑定,将pod-reader这个role的权限授予给jane这个User,使得jane可以在读取default这个命名空间下的所有的pod数据
kind: RoleBinding
apiVersion: rbac.authorization.k8s.io/v1
metadata:
  name: read-pods
  namespace: default
subjects:
- kind: User   #这里可以是User,Group,ServiceAccount
  name: jane
  apiGroup: rbac.authorization.k8s.io
roleRef:
  kind: Role #这里可以是Role或者ClusterRole,若是ClusterRole,则权限也仅限于rolebinding的内部
  name: pod-reader # match the name of the Role or ClusterRole you wish to bind to
  apiGroup: rbac.authorization.k8s.io
注意:rolebinding既可以绑定role,也可以绑定clusterrole,当绑定clusterrole的时候,subject的权限也会被限定于rolebinding定义的namespace内部,若想跨namespace,需要使用clusterrolebinding
## 定义一个角色绑定,将dave这个用户和secret-reader这个集群角色绑定,虽然secret-reader是集群角色,但是因为是使用rolebinding绑定的,因此dave的权限也会被限制在development这个命名空间内
apiVersion: rbac.authorization.k8s.io/v1
# This role binding allows "dave" to read secrets in the "development" namespace.
# You need to already have a ClusterRole named "secret-reader".
kind: RoleBinding
metadata:
  name: read-secrets
  #
  # The namespace of the RoleBinding determines where the permissions are granted.
  # This only grants permissions within the "development" namespace.
  namespace: development
subjects:
- kind: User
  name: dave # Name is case sensitive
  apiGroup: rbac.authorization.k8s.io
- kind: ServiceAccount
  name: dave # Name is case sensitive
  namespace: luffy
roleRef:
  kind: ClusterRole
  name: secret-reader
  apiGroup: rbac.authorization.k8s.io
考虑一个场景: 如果集群中有多个namespace分配给不同的管理员,每个namespace的权限是一样的,就可以只定义一个clusterrole,然后通过rolebinding将不同的namespace绑定到管理员身上,否则就需要每个namespace定义一个Role,然后做一次rolebinding。
-
ClusterRolebingding
允许跨namespace进行授权
apiVersion: rbac.authorization.k8s.io/v1
# This cluster role binding allows anyone in the "manager" group to read secrets in any namespace.
kind: ClusterRoleBinding
metadata:
  name: read-secrets-global
subjects:
- kind: Group
  name: manager # Name is case sensitive
  apiGroup: rbac.authorization.k8s.io
roleRef:
  kind: ClusterRole
  name: secret-reader
  apiGroup: rbac.authorization.k8s.io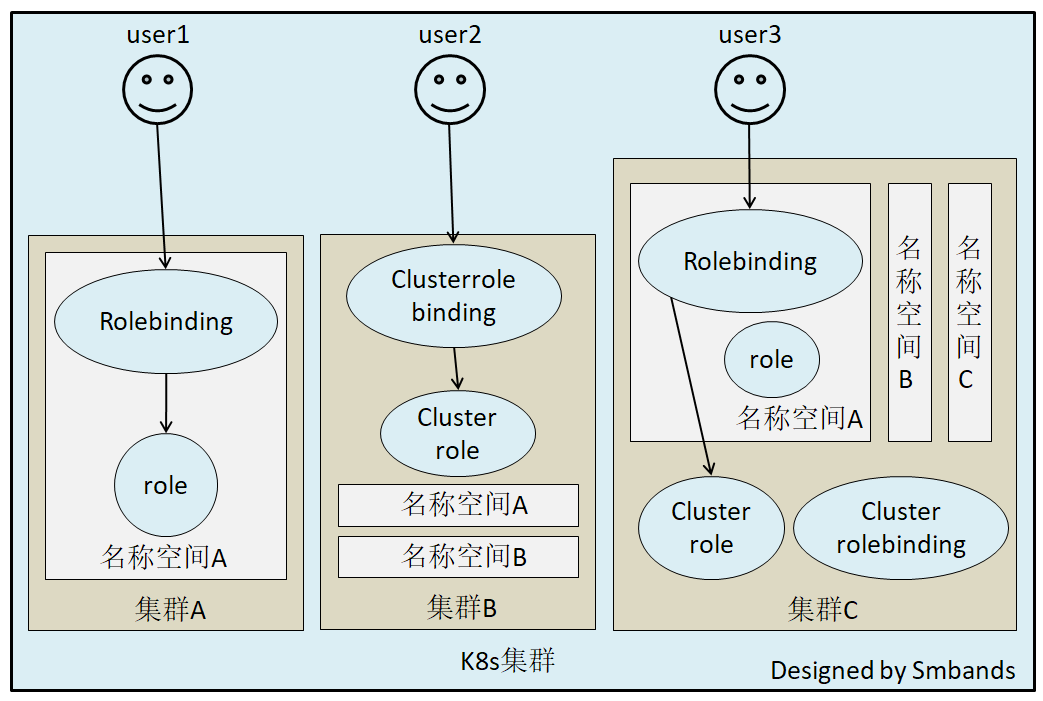
kubelet的认证授权
查看kubelet进程
$ systemctl status kubelet
● kubelet.service - kubelet: The Kubernetes Node Agent
   Loaded: loaded (/usr/lib/systemd/system/kubelet.service; enabled; vendor preset: disabled)
  Drop-In: /usr/lib/systemd/system/kubelet.service.d
           └─10-kubeadm.conf
   Active: active (running) since Sun 2020-07-05 19:33:36 EDT; 1 day 12h ago
     Docs: https://kubernetes.io/docs/
 Main PID: 10622 (kubelet)
    Tasks: 24
   Memory: 60.5M
   CGroup: /system.slice/kubelet.service
           └─851 /usr/bin/kubelet --bootstrap-kubeconfig=/etc/kubernetes/bootstrap-kubelet.conf --kubeconfig=/etc/kubernetes/kubelet.conf
查看/etc/kubernetes/kubelet.conf,解析证书:
$ echo xxxxx |base64 -d >kubelet.crt
$ openssl x509 -in kubelet.crt -text
Certificate:
    Data:
        Version: 3 (0x2)
        Serial Number: 9059794385454520113 (0x7dbadafe23185731)
    Signature Algorithm: sha256WithRSAEncryption
        Issuer: CN=kubernetes
        Validity
            Not Before: Feb 10 07:33:39 2020 GMT
            Not After : Feb  9 07:33:40 2021 GMT
        Subject: O=system:nodes, CN=system:node:master-1
得到我们期望的内容:
Subject: O=system:nodes, CN=system:node:k8s-master
我们知道,k8s会把O作为Group来进行请求,因此如果有权限绑定给这个组,肯定在clusterrolebinding的定义中可以找得到。因此尝试去找一下绑定了system:nodes组的clusterrolebinding
$ kubectl get clusterrolebinding|awk 'NR>1{print $1}'|xargs kubectl get clusterrolebinding -oyaml|grep -n10 system:nodes
98-  roleRef:
99-    apiGroup: rbac.authorization.k8s.io
100-    kind: ClusterRole
101-    name: system:certificates.k8s.io:certificatesigningrequests:selfnodeclient
102-  subjects:
103-  - apiGroup: rbac.authorization.k8s.io
104-    kind: Group
105:    name: system:nodes
106-- apiVersion: rbac.authorization.k8s.io/v1
107-  kind: ClusterRoleBinding
108-  metadata:
109-    creationTimestamp: "2020-02-10T07:34:02Z"
110-    name: kubeadm:node-proxier
111-    resourceVersion: "213"
112-    selfLink: /apis/rbac.authorization.k8s.io/v1/clusterrolebindings/kubeadm%3Anode-proxier

$ kubectl describe clusterrole system:certificates.k8s.io:certificatesigningrequests:selfnodeclient
Name:         system:certificates.k8s.io:certificatesigningrequests:selfnodeclient
Labels:       kubernetes.io/bootstrapping=rbac-defaults
Annotations:  rbac.authorization.kubernetes.io/autoupdate: true
PolicyRule:
  Resources                                                      Non-Resource URLs  Resource Names  Verbs
  ---------                                                      -----------------  --------------  -----
  certificatesigningrequests.certificates.k8s.io/selfnodeclient  []                 []              [create]
结局有点意外,除了system:certificates.k8s.io:certificatesigningrequests:selfnodeclient外,没有找到system相关的rolebindings,显然和我们的理解不一样。 尝试去找资料,发现了这么一段 :
| Default ClusterRole | Default ClusterRoleBinding | Description |
|---|---|---|
| system:kube-scheduler | system:kube-scheduler user | Allows access to the resources required by the schedulercomponent. |
| system:volume-scheduler | system:kube-scheduler user | Allows access to the volume resources required by the kube-scheduler component. |
| system:kube-controller-manager | system:kube-controller-manager user | Allows access to the resources required by the controller manager component. The permissions required by individual controllers are detailed in the controller roles. |
| system:node | None | Allows access to resources required by the kubelet, including read access to all secrets, and write access to all pod status objects. You should use the Node authorizer and NodeRestriction admission plugin instead of the system:node role, and allow granting API access to kubelets based on the Pods scheduled to run on them. The system:node role only exists for compatibility with Kubernetes clusters upgraded from versions prior to v1.8. |
| system:node-proxier | system:kube-proxy user | Allows access to the resources required by the kube-proxycomponent. |
大致意思是说:之前会定义system:node这个角色,目的是为了kubelet可以访问到必要的资源,包括所有secret的读权限及更新pod状态的写权限。如果1.8版本后,是建议使用 Node authorizer and NodeRestriction admission plugin 来代替这个角色的。
我们目前使用1.16,查看一下授权策略:
$ ps axu|grep apiserver
kube-apiserver --authorization-mode=Node,RBAC  --enable-admission-plugins=NodeRestriction
查看一下官网对Node authorizer的介绍:
Node authorization is a special-purpose authorization mode that specifically authorizes API requests made by kubelets.
In future releases, the node authorizer may add or remove permissions to ensure kubelets have the minimal set of permissions required to operate correctly.
In order to be authorized by the Node authorizer, kubelets must use a credential that identifies them as being in the system:nodes group, with a username of system:node:<nodeName>
Service Account及K8S Api调用
前面说,认证可以通过证书,也可以通过使用ServiceAccount(服务账户)的方式来做认证。大多数时候,我们在基于k8s做二次开发时都是选择通过ServiceAccount + RBAC 的方式。我们之前访问dashboard的时候,是如何做的?
## 新建一个名为admin的serviceaccount,并且把名为cluster-admin的这个集群角色的权限授予新建的
serviceaccount
apiVersion: v1
kind: ServiceAccount
metadata:
  name: admin
  namespace: kubernetes-dashboard
---
kind: ClusterRoleBinding
apiVersion: rbac.authorization.k8s.io/v1beta1
metadata:
  name: admin
  annotations:
    rbac.authorization.kubernetes.io/autoupdate: "true"
roleRef:
  kind: ClusterRole
  name: cluster-admin
  apiGroup: rbac.authorization.k8s.io
subjects:
- kind: ServiceAccount
  name: admin
  namespace: kubernetes-dashboard
我们查看一下:
$ kubectl -n kubernetes-dashboard get sa admin -o yaml
apiVersion: v1
kind: ServiceAccount
metadata:
  creationTimestamp: "2020-04-01T11:59:21Z"
  name: admin
  namespace: kubernetes-dashboard
  resourceVersion: "1988878"
  selfLink: /api/v1/namespaces/kubernetes-dashboard/serviceaccounts/admin
  uid: 639ecc3e-74d9-11ea-a59b-000c29dfd73f
secrets:
- name: admin-token-lfsrf
注意到serviceaccount上默认绑定了一个名为admin-token-lfsrf的secret,我们查看一下secret
$ kubectl -n kubernetes-dashboard describe secret admin-token-lfsrf
Name:         admin-token-lfsrf
Namespace:    kubernetes-dashboard
Labels:       <none>
Annotations:  kubernetes.io/service-account.name: admin
              kubernetes.io/service-account.uid: 639ecc3e-74d9-11ea-a59b-000c29dfd73f

Type:  kubernetes.io/service-account-token
Data
====
ca.crt:     1025 bytes
namespace:  4 bytes
token:      eyJhbGciOiJSUzI1NiIsImtpZCI6IiJ9.eyJpc3MiOiJrdWJlcm5ldGVzL3NlcnZpY2VhY2NvdW50Iiwia3ViZXJuZXRlcy5pby9zZXJ2aWNlYWNjb3VudC9uYW1lc3BhY2UiOiJkZW1vIiwia3ViZXJuZXRlcy5pby9zZXJ2aWNlYWNjb3VudC9zZWNyZXQubmFtZSI6ImFkbWluLXRva2VuLWxmc3JmIiwia3ViZXJuZXRlcy5pby9zZXJ2aWNlYWNjb3VudC9zZXJ2aWNlLWFjY291bnQubmFtZSI6ImFkbWluIiwia3ViZXJuZXRlcy5pby9zZXJ2aWNlYWNjb3VudC9zZXJ2aWNlLWFjY291bnQudWlkIjoiNjM5ZWNjM2UtNzRkOS0xMWVhLWE1OWItMDAwYzI5ZGZkNzNmIiwic3ViIjoic3lzdGVtOnNlcnZpY2VhY2NvdW50OmRlbW86YWRtaW4ifQ.ffGCU4L5LxTsMx3NcNixpjT6nLBi-pmstb4I-W61nLOzNaMmYSEIwAaugKMzNR-2VwM14WbuG04dOeO67niJeP6n8-ALkl-vineoYCsUjrzJ09qpM3TNUPatHFqyjcqJ87h4VKZEqk2qCCmLxB6AGbEHpVFkoge40vHs56cIymFGZLe53JZkhu3pwYuS4jpXytV30Ad-HwmQDUu_Xqcifni6tDYPCfKz2CZlcOfwqHeGIHJjDGVBKqhEeo8PhStoofBU6Y4OjObP7HGuTY-Foo4QindNnpp0QU6vSb7kiOiQ4twpayybH8PTf73dtdFt46UF6mGjskWgevgolvmO8A
演示role的权限:
$ cat test-sa.yaml
serviceaccount
apiVersion: v1
kind: ServiceAccount
metadata:
  name: test
  namespace: kubernetes-dashboard

---
kind: ClusterRoleBinding
apiVersion: rbac.authorization.k8s.io/v1beta1
metadata:
  name: test
  annotations:
    rbac.authorization.kubernetes.io/autoupdate: "true"
roleRef:
  kind: ClusterRole
  name: cluster-admin
  apiGroup: rbac.authorization.k8s.io
subjects:
- kind: ServiceAccount
  name: test
  namespace: kubernetes-dashboard
curl演示
$ curl -k -H "Authorization: Bearer eyJhbGciOiJSUzI1NiIsImtpZCI6InhXcmtaSG5ZODF1TVJ6dUcycnRLT2c4U3ZncVdoVjlLaVRxNG1wZ0pqVmcifQ.eyJpc3MiOiJrdWJlcm5ldGVzL3NlcnZpY2VhY2NvdW50Iiwia3ViZXJuZXRlcy5pby9zZXJ2aWNlYWNjb3VudC9uYW1lc3BhY2UiOiJrdWJlcm5ldGVzLWRhc2hib2FyZCIsImt1YmVybmV0ZXMuaW8vc2VydmljZWFjY291bnQvc2VjcmV0Lm5hbWUiOiJhZG1pbi10b2tlbi1xNXBueiIsImt1YmVybmV0ZXMuaW8vc2VydmljZWFjY291bnQvc2VydmljZS1hY2NvdW50Lm5hbWUiOiJhZG1pbiIsImt1YmVybmV0ZXMuaW8vc2VydmljZWFjY291bnQvc2VydmljZS1hY2NvdW50LnVpZCI6ImViZDg2ODZjLWZkYzAtNDRlZC04NmZlLTY5ZmE0ZTE1YjBmMCIsInN1YiI6InN5c3RlbTpzZXJ2aWNlYWNjb3VudDprdWJlcm5ldGVzLWRhc2hib2FyZDphZG1pbiJ9.iEIVMWg2mHPD88GQ2i4uc_60K4o17e39tN0VI_Q_s3TrRS8hmpi0pkEaN88igEKZm95Qf1qcN9J5W5eqOmcK2SN83Dd9dyGAGxuNAdEwi0i73weFHHsjDqokl9_4RGbHT5lRY46BbIGADIphcTeVbCggI6T_V9zBbtl8dcmsd-lD_6c6uC2INtPyIfz1FplynkjEVLapp_45aXZ9IMy76ljNSA8Uc061Uys6PD3IXsUD5JJfdm7lAt0F7rn9SdX1q10F2lIHYCMcCcfEpLr4Vkymxb4IU4RCR8BsMOPIO_yfRVeYZkG4gU2C47KwxpLsJRrTUcUXJktSEPdeYYXf9w" https://192.168.136.10:6443/api/v1/namespaces/luffy/pods?limit=500
可以添加