一. 概述
本篇开始进入IS4实战学习,从第一个示例开始,该示例是 “使用客户端凭据保护API”,这是使用IdentityServer保护api的最基本场景。该示例涉及到三个项目包括:IdentityServer项目、API项目、Client项目,都有自己的宿主,为了方便开发,放在了一个解决方案下(Quickstart.sln),三个项目的分工如下:
(1) IdentityServer项目是包含基本的IdentityServer设置的ASP.NET Core应用程序,是令牌端点。
(2) API项目是Web Api,是要保护的资源。
(3) Client项目是客户端用户,用来访问Web Api。
最后客户端Client项目请求获取IdentityServer上的访问令牌。作为客户端Client和IdentityServer都知道secret密钥,Client将使用令牌访问Web API。开源地址Github
二. 创建IdentityServer项目
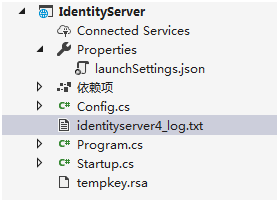
创建一个ASP.NET Core Web(或空)模板。项目名为IdentityServer,解决方案为Quickstart。是一个包含基本IdentityServer设置的ASP.NET Core应用程序。该项目使用的协议是http,当在Kestrel上运行时,端口设置为5000或在IISExpress上的随机端口。
首次启动时,IdentityServer将为您创建一个开发人员签名密钥,它是一个名为的文件tempkey.rsa。您不必将该文件检入源代码管理中,如果该文件不存在,将重新创建该文件。项目最终目录结构如下所示:
下面进行说明,以及用序号来表示开发实现步骤:
2.1 安装:Install-Package IdentityServer4
2.2 新增Config.cs文件, 该文件是IdentityServer资源和客户端配置文件。在该文件中定义API资源,以及定义客户端(可以访问此API的客户端)
        /// <summary>
        /// 定义API资源,要保护的资源
        /// </summary>
        /// <returns></returns>
        public static IEnumerable<ApiResource> GetApis()
        {
            return new List<ApiResource>
            {
                new ApiResource("api1", "My API")
            };
        }
        /// <summary>
        /// 定义客户端,可以访问此API的客户端
        /// </summary>
        /// <returns></returns>
        public static IEnumerable<Client> GetClients()
        {
            return new List<Client>
            {
                new Client
                {
                    ClientId = "client",

                    // no interactive user, use the clientid/secret for authentication
                    AllowedGrantTypes = GrantTypes.ClientCredentials,

                    //使用密钥进行身份认证  secret for authentication
                    ClientSecrets =
                    {
                        new Secret("secret".Sha256())
                    },

                    //客户端允许访问的范围
                    AllowedScopes = { "api1" }
                }
            };
        }
2.3 Startup配置
        /// <summary>
        /// 配置IdentityServer,加载API资源和客户端
        /// </summary>
        /// <param name="services"></param>
        public void ConfigureServices(IServiceCollection services)
        {
            // uncomment, if you wan to add an MVC-based UI
            //services.AddMvc().SetCompatibilityVersion(Microsoft.AspNetCore.Mvc.CompatibilityVersion.Version_2_1);
             //添加AddIdentityServer
            var builder = services.AddIdentityServer()
                //添加内存的Identity资源
                .AddInMemoryIdentityResources(Config.GetIdentityResources())
                //添加api资源
                .AddInMemoryApiResources(Config.GetApis())
                 //添加clinet
                .AddInMemoryClients(Config.GetClients());

            if (Environment.IsDevelopment())
            {
          //开发环境下使用临时签名凭据
                builder.AddDeveloperSigningCredential();
            }
            else
            {
                throw new Exception("need to configure key material");
            }
        }
        public void Configure(IApplicationBuilder app)
        {
            if (Environment.IsDevelopment())
            {
                app.UseDeveloperExceptionPage();
            }

            // uncomment if you want to support static files
            //app.UseStaticFiles();

            app.UseIdentityServer();

            // uncomment, if you wan to add an MVC-based UI
            //app.UseMvcWithDefaultRoute();
        }
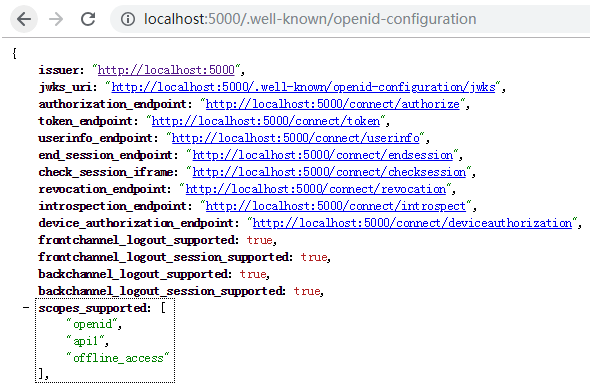
运行服务器并浏览浏览器 http://localhost:5000/.well-known/openid-configuration, 客户端和API将使用它来下载必要的配置数据。下面是截取的部分配置数据:
三. 创建API项目
在解决方案下继续添加API项目,添加ASP.NET Core Web API(或空)模板。将API应用程序配置为http://localhost:5001运行。项目最终目录结构如下所示:

(1) 在API项目中添加一个新文件夹Controllers和一个新控制器IdentityController
   //定义路由
    [Route("identity")]
    //需要授权
    [Authorize]
    public class IdentityController : ControllerBase
    {
        /// <summary>
        /// 测试授权,获取该用户下声明集合Claims
        /// </summary>
        /// <returns></returns>
        public IActionResult Get()
        {
            return new JsonResult(from c in User.Claims select new { c.Type, c.Value });
        }
    }
(2) Startup配置
    public void ConfigureServices(IServiceCollection services)
        {
            //将最基本的MVC服务添加到服务集合中
            services.AddMvcCore()
                //向基本的MVC服务中添加授权
                .AddAuthorization()
                //向基本的MVC服务中添加格式化
                .AddJsonFormatters();

            //将身份验证服务添加到DI服务集合中,并配置"Bearer"为默认方案
            services.AddAuthentication("Bearer")
                //验证令牌是否有效用于此API
                .AddJwtBearer("Bearer", options =>
                {
                    options.Authority = "http://localhost:5000";
                    //在开发环境禁用,默认true
                    options.RequireHttpsMetadata = false;
            //订阅者资源范围
                    options.Audience = "api1";
                });
        }
        public void Configure(IApplicationBuilder app)
        {
            //添加身份验证中间件
            app.UseAuthentication();
            app.UseMvc();
        }
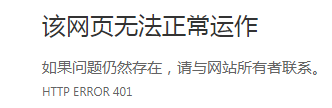
启动程序运行http://localhost:5001/identity时返回401状态码,未授权。意味着API需要凭证,现在受IdentityServer保护。如下所示:
四.创建Client项目
我们通过上面知道,直接用浏览器来访问API是返回401状态码未授权,下面在Client项目中使用凭证,来获得api授权访问。下面是Client项目目录结构,这里Client是一个控制台应用程序。对于客户端可以是任意应用程序,比如手机端,web端,win服务等等。
在IdentityServer的令牌端点实现了OAuth 2.0协议,客户端可以使用原始HTTP来访问它。但是,我们有一个名为IdentityModel的客户端库,它将协议交互封装在易于使用的API中。
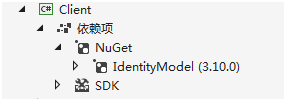
3.1 安装:Install-Package IdentityModel
3.2 发现IdentityServer端点
IdentityModel包括用于发现端点的客户端库。只需要知道IdentityServer的基地址 - 可以从元数据中读取实际的端点地址:
        private static async Task Main()
        {
            // discover endpoints from metadata
            var client = new HttpClient();
            var disco = await client.GetDiscoveryDocumentAsync("http://localhost:5000");
            if (disco.IsError)
            {
                //当停掉IdentityServer服务时
                //Error connecting to http://localhost:5000/.well-known/openid-configuration: 由于目标计算机积极拒绝,无法连接。
                Console.WriteLine(disco.Error);
                return;
            }
            //...
其中GetDiscoveryDocumentAsync是属于IdentityModel库的,是对HttpClient扩展方法。http://localhost:5000是IdentityServer的基地址。
3.3 请求令牌Token
在Mian方法中继续向IdentityServer请求令牌,访问api1资源。这里的RequestClientCredentialsTokenAsync方法也是HttpClient扩展方法。
            // request token,带入需要的4个参数,请求令牌,返回TokenResponse
            var tokenResponse = await client.RequestClientCredentialsTokenAsync(new ClientCredentialsTokenRequest
            {
                //IdentityServer基地址 http://localhost:5000/connect/token
                Address = disco.TokenEndpoint,
                //设置客户端标识
                ClientId = "client",
                //设置密钥
                ClientSecret = "secret",
                //访问的资源范围
                Scope = "api1"
            });

            if (tokenResponse.IsError)
            {
                Console.WriteLine(tokenResponse.Error);
                return;
            }
            //打印 token 信息
            Console.WriteLine(tokenResponse.Json);
            Console.WriteLine("

");
3.4 调用API
在Mian方法中继续向下,当访问令牌取得后,开始调用Web API。 下面将访问令牌发送到Web API,通常使用HTTP Authorization标头。这是使用SetBearerToken扩展方法完成的,该方法是IdentityModel库的HttpClient扩展方法。
            // call api
            var apiClient = new HttpClient();
            //发送访问令牌
            apiClient.SetBearerToken(tokenResponse.AccessToken);

            //访问API,获取该用户下声明集合Claims
            var response = await apiClient.GetAsync("http://localhost:5001/identity");
            if (!response.IsSuccessStatusCode)
            {
                Console.WriteLine(response.StatusCode);
            }
            else
            {
                //输出 claims 名称值 对
                var content = await response.Content.ReadAsStringAsync();
                Console.WriteLine(JArray.Parse(content));
            }
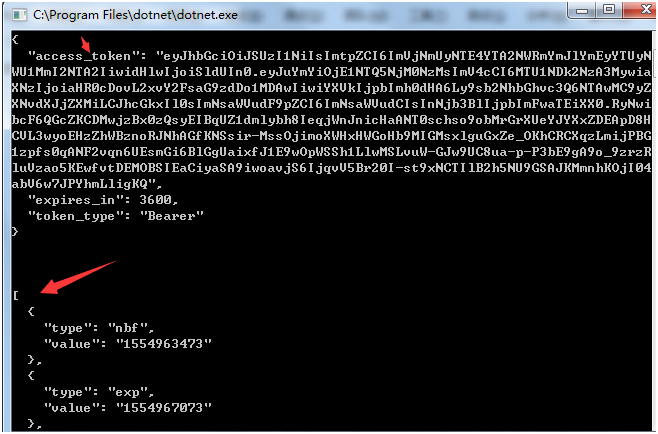
下面开始测试,先启动IdentityServer程序,再启动API程序,最后启动Client客户端来访问API,通过下图可以了解到:(1)客户端请求令牌成功,(2) 客户端使用令牌来访问API成功。
如果想进一步尝试激发错误,来了解系统的行为,可以错误的去配置如下:
(1) 尝试停掉IdentityServer服务程序,这个已经测试了。
(2) 尝试使用无效的客户端ID标识 ClientId = "client",
(3) 尝试在令牌请求期间请求无效范围 Scope = "api1"
(4) 尝试在API程序未运行时调用API
(5) 尝试不要将令牌发送到API
总结:通过本篇了解到了IS4保护api的最基本场景。流程是首先创建一个IdentityServer 令牌程序。 接着创建API项目,使用IdentityServer令牌程序来保护API。 最后创建要访问的Client项目,获取访问令牌后再调用API方法。
IdentityServer令牌端对要保护API资源做了配置 new ApiResource("api1", "My API")
限制了访问Api的客户端标识和访问资源范围ClientId = "client", AllowedScopes = { "api1" }还有客户端需要的秘钥。
参考文献