关于使用SoadHeader验证Robin已经有一篇十分精彩的文章: WCF进阶:为每个操作附加身份信息, 不过我的思维方式总是跟别人有点不太一样, 还是把类似的内容用我的方式重新组织一下.
使用Header验证最直接的想法就是不要使用证书, 证书在很多场合都显得太过于复杂了, 而我们对安全性的要求并没有那么高, 毕竟我们周围的环境中有能力截取网络中的通信数据并筛选中敏感信息, 而且有动机加以利用破坏的人怎么看都像是还没出生.
下面开始演练:
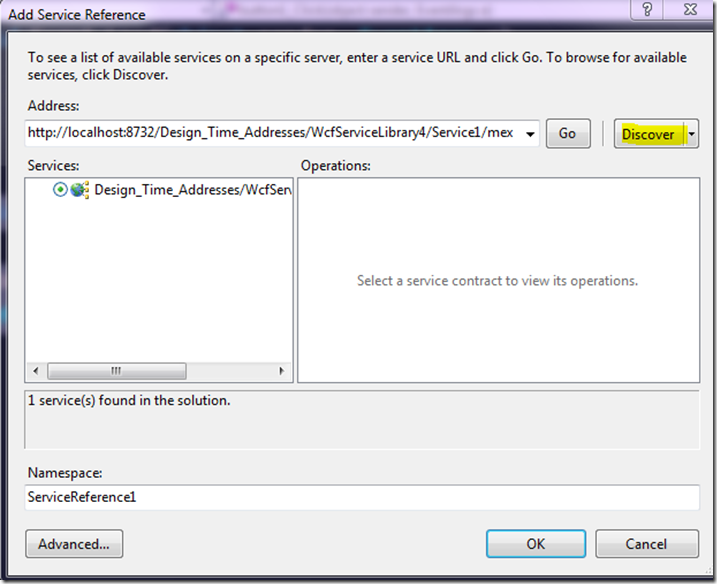
打开vs, 创建一个新的WCF Service Library, 我保持了它的默认名字WcfServiceLibrary4, 然后向解决方案添加一个windows forms application, 名字为WindowsFormsApplication1, 作为我们的客户端, 在客户端添加服务引用, 直接点discover, 即可引用我们刚创建的WcfServiceLibrary4, 如图所示:
然后在客户端窗体上拖一个按钮, 给它的点击事件写两行代码以调用服务:
        private void button1_Click(object sender, EventArgs e)
        {
            var proxy = new ServiceReference1.Service1Client();
            MessageBox.Show(proxy.GetData(3));
        }
运行一下, 会看到服务被正确执行了.
现在开始添加身份验证的逻辑. 首先, 对客户端来说, 基本思想是每发出一个服务请求之前, 添加一个header, 所以就有了如下这个类:
    public class MyInspector : IClientMessageInspector
    {
        public void AfterReceiveReply(ref System.ServiceModel.Channels.Message reply, object correlationState)
        {
        }

        public object BeforeSendRequest(ref System.ServiceModel.Channels.Message request, System.ServiceModel.IClientChannel channel)
        {
            request.Headers.Add(MessageHeader.CreateHeader("Password", "gb", "123"));
            return null;
        }
    }
这个类只是简单继承了IClientMessageInspector接口, 并添加了一个MessageHeader, 明显它不可能直接就起作用, 需要另一个机制把它与服务请求绑定起来, 于是就有了下面这个类:
    public class MyEndPointBehavior : IEndpointBehavior
    {

        public void AddBindingParameters(ServiceEndpoint endpoint, BindingParameterCollection bindingParameters)
        {
        }

        public void ApplyClientBehavior(ServiceEndpoint endpoint, ClientRuntime clientRuntime)
        {
            clientRuntime.MessageInspectors.Add(new MyInspector());
        }

        public void ApplyDispatchBehavior(ServiceEndpoint endpoint, EndpointDispatcher endpointDispatcher)
        {
        }

        public void Validate(ServiceEndpoint endpoint)
        {
        }
    }
这个类负责将刚创建的Inspector添加到EndPoint的behavior当中, 但是这个类自身仍然是悬空的, 所以继续(这个类需要引用System.Configuration):
    public class MyBehaviorExtension : BehaviorExtensionElement
    {

        public override Type BehaviorType
        {
            get { return typeof(MyEndPointBehavior); }
        }

        protected override object CreateBehavior()
        {
            return new MyEndPointBehavior();
        }
    }
再创建一个Extension类, 负责把MyEndPointBehavior类与当前的服务实例关联起来, 但是同样的问题, 这个类自身还没有被调用, ----不用再创建下一个类了, 这个类将通过app.config与服务进行绑定:
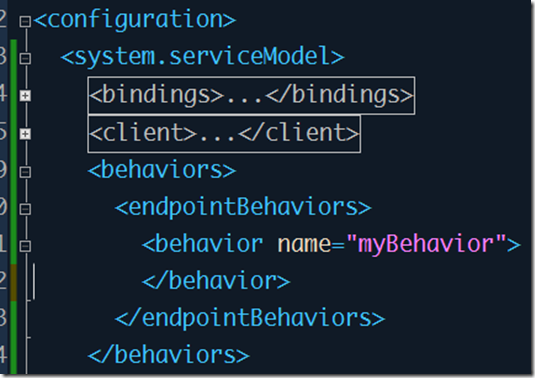
在app.config的system.serviceModel下, 添加一个自定义的behavior:
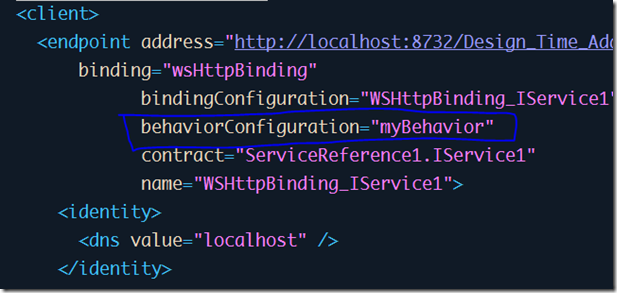
然后将已有的endPoint与此behavior关联起来:
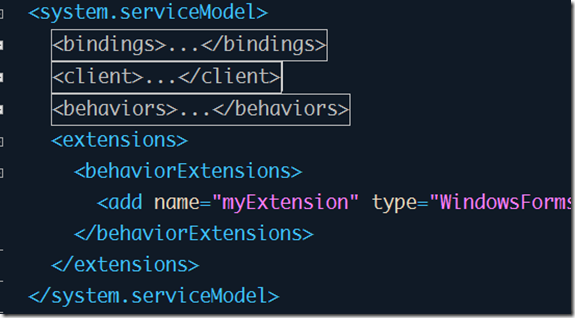
此EndPoint的配置中只有蓝框里面是手动新增的, 其它都是自动生成. 现在这个空的behavior已经被应用到了具体的endpoint, 接下来需要把这个behavior具体化, 先来增加一个extension:
    <extensions>
      <behaviorExtensions>
        <add name="myExtension" type="WindowsFormsApplication1.MyBehaviorExtension, WindowsFormsApplication1, Version=1.0.0.0, Culture=neutral, PublicKeyToken=null"/>
      </behaviorExtensions>
    </extensions>
需要注意的是, 这个extension的type必须是我们刚才最后添加的那个MyBehaviorExtension类的AssemblyQualifiedName, 并且中间不允许有任何的空格, 回车等.
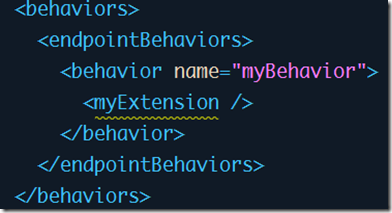
接下来, 将这个extension与空的behavior关联起来:
关联的方法很简单, 就是增加一个节点, 名字就是新增加的extension的Name.
现在, 我们终于全线贯通了, 出发点是endpoint, 为默认的endpoint增加一个behavior, 这个behavior有一个我们自定义的extension, 这个extension会创建一个自定义的endpointbehavior, 在这里最终添加了inspector. 来测试一下吧: 在inspector中下一个断点, 执行程序, 会发现断点确实被执行了, 至此, 客户端的配置就结束了, 每一次调用服务时, 都会附加一个名为Password的header, 这就是我们的目的.
然后是服务端, 服务端需要检测是否传递了password, password的值是否正确, 如果正确才会继续提供服务. 总的流程与客户端基本一致, 唯一的区别是将IClientMessageInspector换成了IDispatchMessageInspector, 具体的几个类的代码如下:
using System;
using System.Collections.Generic;
using System.Linq;
using System.Text;
using System.ServiceModel.Dispatcher;
using System.ServiceModel.Description;
using System.ServiceModel.Channels;
using System.ServiceModel.Configuration;

namespace WcfServiceLibrary4
{
    class MyInspector : IDispatchMessageInspector
    {

        public object AfterReceiveRequest(ref System.ServiceModel.Channels.Message request, System.ServiceModel.IClientChannel channel, System.ServiceModel.InstanceContext instanceContext)
        {
            if (request.Headers.FindHeader("Password", "gb") < 0 ||
                request.Headers.GetHeader<string>("Password", "gb") != "123")
                throw new UnauthorizedAccessException();
            return null;
        }

        public void BeforeSendReply(ref System.ServiceModel.Channels.Message reply, object correlationState)
        {
        }
    }

    public class MyEndPointBehavior : IEndpointBehavior
    {

        public void AddBindingParameters(ServiceEndpoint endpoint, BindingParameterCollection bindingParameters)
        {
        }

        public void ApplyClientBehavior(ServiceEndpoint endpoint, ClientRuntime clientRuntime)
        {
        }

        public void ApplyDispatchBehavior(ServiceEndpoint endpoint, EndpointDispatcher endpointDispatcher)
        {
            endpointDispatcher.DispatchRuntime.MessageInspectors.Add(new MyInspector());
        }

        public void Validate(ServiceEndpoint endpoint)
        {
        }
    }

    public class MyBehaviorExtension : BehaviorExtensionElement
    {

        public override Type BehaviorType
        {
            get { return typeof(MyEndPointBehavior); }
        }

        protected override object CreateBehavior()
        {
            return new MyEndPointBehavior();
        }
    }

}
App.config 的配置和客户端基本上完全相同, 只有最终的extension的type换成服务端的类型全名即可.
然后重新运行项目, 在服务端的检查口令的地方下个断点, 可以确定这里被运行到了, 这就全部完工了.
当然, 也可以把这服务端和客户端总共用到的三个接口, 一个基类全部合在一个类中实现, (比如Robin的实现) 这样可以在客户端和服务端之间共享代码, 以及类名就只剩一个了, 不过我觉得还是按它本来的面目拆开来写比较容易理解, 至于理解了之后如何优化, 那就完全自由发挥了.
