Spring 的控制反转:把对象的创建、初始化、销毁等工作交给Spring 容器来做,有spring容器控制对象的生命周期
applicationContext.xml
beans --->spring 容器中的类
alias—>取别名
不管有继承关系(不管有几层)先把当前类加载到虚拟机中才能创建对象,而在加载过程中,静态代码块(static )就一块执行了。所以
现在子类静态代码快赋值,在父类中(@before)接受并使用该值
无论两个类之间有什么继承关系,今天代码块比方法先执行。
--------------------------------------------------------------------------------------------------------------------------------------------------------
在默认情况下,Spring创建bean是单例模式,属性是共享的(线程安全问题)
bean scope属性--->singleton(单例,共享,默认)一般情况下,把数据存放在方法中的变量中,尽量别放在类的属性中prototype(多例) 当一个bean是多例模式下,lazy-init为false或者default无效
init-method
* 该方法是由spring容器执行
* 在构造函数之后执行
* 如果在构造函数之后,在调用方法之前要做一些工作,可以在init方法中完成
destroy-method
* 如果该bean是单例,则在spring容器关闭或者销毁的时候,执行该方法
* 如果该bean是多例,则spring容器不负责销毁
说明:要想让spring容器控制bean的生命周期,那么该bean必须是单例
如果该bean是多例,该bean中还有资源,关闭资源的操作由程序员完成
在启动spring容器的时候,spring容器配置文件中的类就已经创建完成对象了
lazy-init
default false
true 在context.getBean的时候才要创建对象
* 优点
如果该bean中有大数据存在,则什么时候context.getBean,什么时候创建对象
可以防止数据过早的停留在内存中,做到了懒加载
* 缺点
如果spring配置文件中,该bean的配置有错误,那么在tomcat容器启动的时候,发现不了
false 在启动spring容器的时候创建对象
* 优点
如果在启动tomcat时要启动spring容器,
那么如果spring容器会错误,这个时候tomcat容器不会正常启动
* 缺点
如果存在大量的数据,会过早的停留在内存中
DI(依赖注入):给属性赋值 person类中name;
eg、
<?xml version="1.0" encoding="UTF-8"?>
<beans xmlns="http://www.springframework.org/schema/beans"
xmlns:xsi="http://www.w3.org/2001/XMLSchema-instance"
xsi:schemaLocation="http://www.springframework.org/schema/beans
http://www.springframework.org/schema/beans/spring-beans-2.5.xsd">
<bean id="person" class="cn.itcast.spring0909.di.xml.set.Person">
<!--
property就是代表属性
在spring中基本类型(包装类型和String)都可以用value来赋值
引用类型用ref赋值
-->
<property name="pid" value="5"></property>
<property name="pname" value="王二麻子"></property>
<property name="student">
<ref bean="student"/>
</property>
<property name="lists">
<list>
<value>list1</value>
<value>list2</value>
<ref bean="student"/>
</list>
</property>
<property name="sets">
<set>
<value>set1</value>
<value>set2</value>
<ref bean="student"/>
</set>
</property>
<property name="map">
<map>
<entry key="map1">
<value>map1</value>
</entry>
<entry key="map2">
<value>map2</value>
</entry>
<entry key="map3">
<ref bean="student"/>
</entry>
</map>
</property>
<property name="properties">
<props>
<prop key="prop1">
prop1
</prop>
</props>
</property>
</bean>
<bean id="student" class="cn.itcast.spring0909.di.xml.set.Student"></bean>
</beans>
构造函数:
<bean id="person" class="cn.itcast.spring0909.di.xml.constructor.Person">
<!--
构造函数的参数
index 第几个参数,下标从0开始
type 参数的类型
ref 如果类型是引用类型,赋值
value 如果类型是基本类型,赋值
说明:
只能指定一个构造函数
-->
<constructor-arg index="0" type="java.lang.String" value="干露露"></constructor-arg>
<constructor-arg index="1" ref="student"></constructor-arg>
</bean>
IOC和DI做了什么事情:
1、创建对象
2、为对象的属性赋值
意义在于:可以在一个类引用一个接口,而给接口赋值的工作交给spring容器来做,程序员只需在配置文件作相应的配置就好了,这样客户端就可以完全的面向接口的编程。
----------------------------------------------------------------------------------------------------------------------------------------------
annotation
@Resource注解
原理
* * 启动spring容器,并且加载配置文件
* * 会为student和person两个类创建对象
* * 当解析到<context:annotation-config></context:annotation-config>
* 会启动依赖注入的注解解析器
* * 会在纳入spring管理的bean的范围内查找看哪些bean的属性上有@Resource注解
* * 如果@Resource注解的name属性的值为"",则会把注解所在的属性的名称和spring容器中bean的id进行匹配
* 如果匹配成功,则把id对应的对象赋值给该属性,如果匹配不成功,则按照类型进行匹配,如果再匹配不成功,则报错
* * 如果@Resource注解的name属性的值不为"",会把name属性的值和spring容器中bean的id做匹配,如果匹配
* 成功,则赋值,如果匹配不成功 ,则直接报错
* 说明:
* 注解只能用于引用类型,如果一个类中有基本数据类型(long int String),并且基本类型使用Spring的形式赋值的,这个时候,该类必须用xml进行赋值(在javaweb中很少直接赋值,大多数都是从服务器获取值)
@component注解
原理
* * 启动spring容器,加载配置文件
* * spring容器解析到
* <context:component-scan base-package="cn.itcast.spring0909.scan"></context:component-scan>
* * spring容器会在指定的包及子包中查找类上是否有@Component
* * 如果@Component注解没有写任何属性
* @Component
* public class Person{
*
* }
* ==
* <bean id="person" class="..Person">
* 如果@Component("aa")
* @Component
* public class Person{
*
* }
* ==
* <bean id="aa" class="..Person">
* * 在纳入spring管理的bean的范围内查找@Resource注解
* * 执行@Resource注解的过程
* 说明:
* xml效率比较高,但是书写比较麻烦
* 注解效率比较低,书写比较简单
-------------------------------------------------------------------------------------------------------------------------------------
<!--
abstract
spring容器不会为该类创建对象
-->
<bean id="person" class="cn.itcast.spring0909.extend.Person" abstract="true">
<property name="name" value="王二麻子的哥"></property>
</bean>
--------------------------------------------------
<bean id="person" class="cn.itcast.spring0909.extend.Person" abstract="true">
<property name="name" value="王二麻子的哥"></property>
</bean>
<!--
parent
让子类拥有父类的属性的值
-->
<bean id="student" class="cn.itcast.spring0909.extend.Student" parent="person">
</bean>
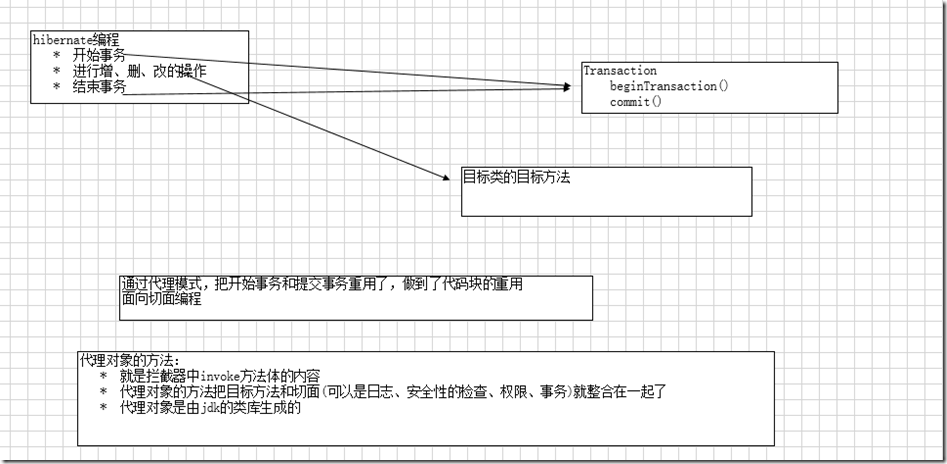
代理模式、动态代理 (invoke)
package cn.itcast.salary.jdkproxy;

import java.lang.reflect.InvocationHandler;
import java.lang.reflect.Method;
/**
 * 1、把日志、安全性框架、权限导入进去
 * 2、把目标类导入进去
 * 3、上述两类通过构造函数赋值
 * @author Administrator
 *
 */
public class SalaryInterceptor implements InvocationHandler{

    private Logger logger;
    private Security security;
    private Privilege privilege;

    private Object target;

    public SalaryInterceptor(Logger logger,Security security,Privilege privilege,Object target){
        this.logger = logger;
        this.security = security;
        this.privilege = privilege;
        this.target = target;
    }

    @Override
    public Object invoke(Object proxy, Method method, Object[] args)
            throws Throwable {
        // TODO Auto-generated method stub
        System.out.println("aaaaaa");
        this.logger.logging();
        this.security.security();
        if("admin".equals(this.privilege.getAccess())){
            //调用目标类的目标方法
            method.invoke(this.target, args);
        }else{
            System.out.println("您没有该权限");
        }
        System.out.println("bbbbbb");
        return null;
    }

}
public void test(){
        Logger logger = new Logger();
        Privilege privilege = new Privilege();
        privilege.setAccess("admin");
        Security security = new Security();
        SalaryManager target = new SalaryManagerImpl();
        SalaryInterceptor interceptor = new SalaryInterceptor(logger, security, privilege, target);
        /**
         * 1、目标类的类加载器
         * 2、目标类的所有的接口
         * 3、拦截器
         */
         SalaryManager proxy = (SalaryManager) Proxy.newProxyInstance(target.getClass().getClassLoader(), target.getClass().getInterfaces(), interceptor);
         proxy.showSalary();//代理对象的代理方法
    }
---------------------------------------------------------------------------------------------------------------
---------------------------------------------------------------------------------------------------------------------
AOP
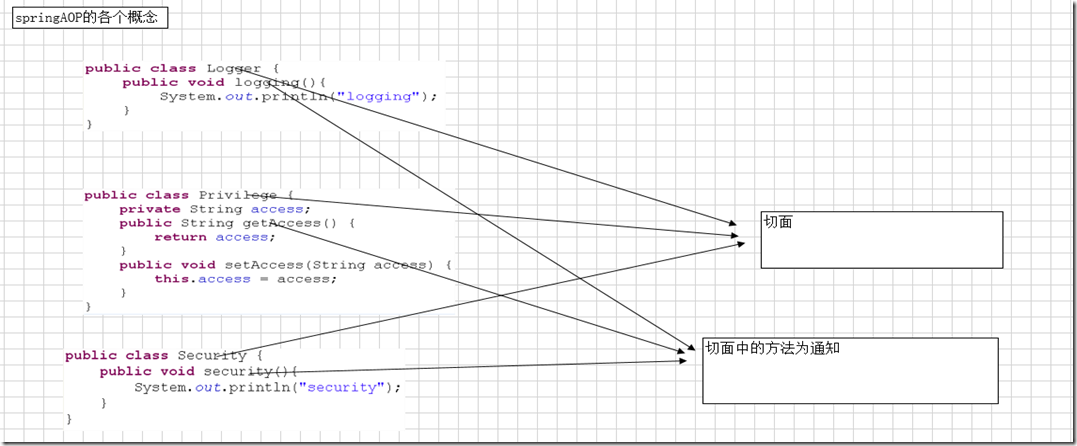
说明:
* 切面
日志、安全性的框架、权限的检查等,总之和业务逻辑没有关系的都可以看做切面
* 通知
切面中的方法
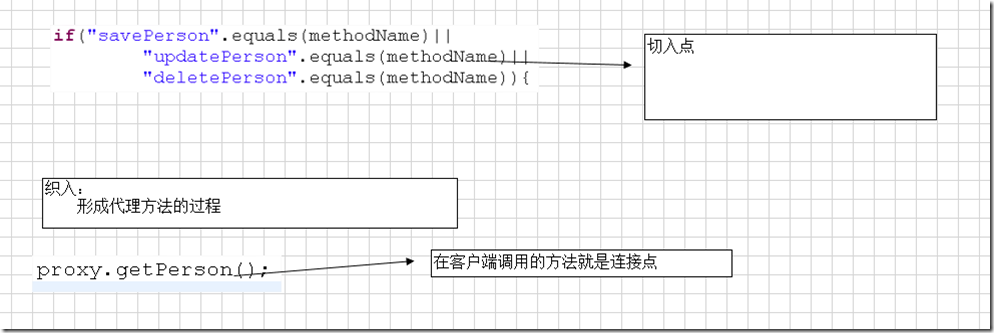
* 切入点
只有符合切入点,才能把通知和目标方法结合在一起
* 连接点
客户端调用的方法
* 代理对象的方法=通知+目标方法
* aop:做到了代码块的重用
<?xml version="1.0" encoding="UTF-8"?>
<beans xmlns="http://www.springframework.org/schema/beans"
    xmlns:aop="http://www.springframework.org/schema/aop"
    xmlns:xsi="http://www.w3.org/2001/XMLSchema-instance"
    xsi:schemaLocation="http://www.springframework.org/schema/beans
           http://www.springframework.org/schema/beans/spring-beans-2.5.xsd
           http://www.springframework.org/schema/aop
           http://www.springframework.org/schema/aop/spring-aop-2.5.xsd">
    <!--
        1、引入AOP的命名空间
        2、目标类
        3、切面
        4、拦截器  由spring内部实现
        5、aop的配置
     -->
    <bean id="personDao" class="cn.itcast.spring0909.aop.xml.PersonDaoImpl"></bean>
    <bean id="transaction" class="cn.itcast.spring0909.aop.xml.Transaction"></bean>
    <!--
        aop的配置
     -->
    <aop:config>
        <!--
            切入点表达式
              expression
                     确定哪个类可以生成代理对象
              id  唯一标识
         -->
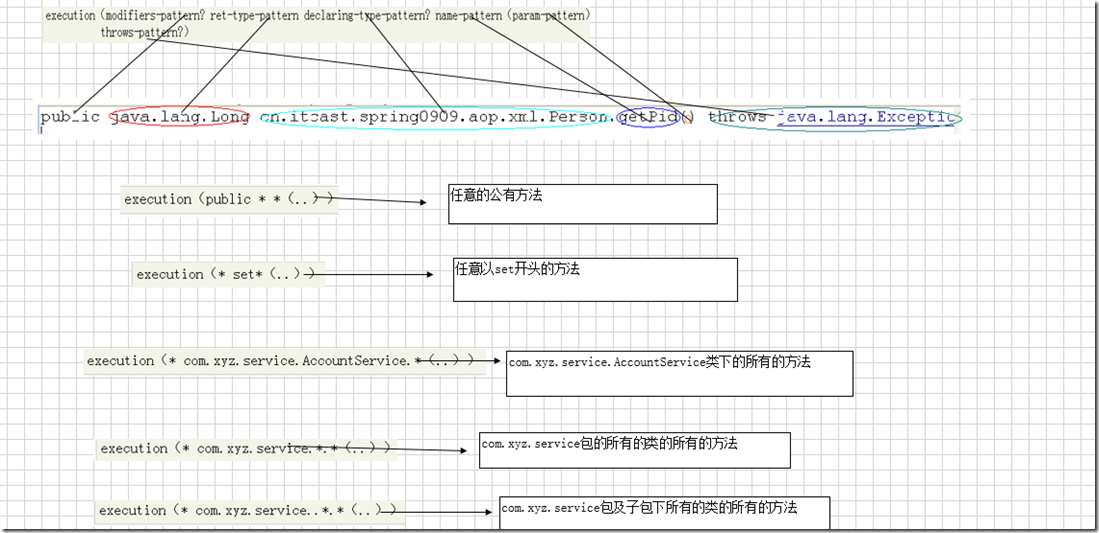
        <aop:pointcut expression="execution(* cn.itcast.spring0909.aop.xml.PersonDaoImpl.*(..))" id="perform"/>
        <!--
            切面
         -->
         <aop:aspect ref="transaction">
             <!--
                 前置通知
              -->
             <aop:before method="beginTransaction" pointcut-ref="perform"/>
             <aop:after-returning method="commit" pointcut-ref="perform"/>
         </aop:aspect>
    </aop:config>
</beans>
------------------------------------------------------------------------------------------------------
<aop:config>
        <!--
            切入点表达式
              expression
                     确定哪个类可以生成代理对象
              id  唯一标识
         -->
        <aop:pointcut expression="execution(* cn.itcast.spring0909.aop.xml.PersonDaoImpl.*(..))" id="perform"/>
        <!--
            切面
         -->
         <aop:aspect ref="transaction">
             <!--
                 前置通知
                   *  在目标方法执行之前
                   *
              -->
              <!--
             <aop:before method="beginTransaction" pointcut-ref="perform"/>
              -->
             <!--
                 后置通知
                   *  在目标方法执行之后
                   *  可以根据returning获取目标方法的返回值
                   *  如果目标方法遇到异常,该通知不执行
              -->
              <!--
             <aop:after-returning method="commit" pointcut-ref="perform" returning="val"/>
              -->
            <!--
                前置通知和后置通知只能在目标方法文中添加内容,但是控制不了目标方法的执行
             -->
             <!--
                 最终通知
                    *  在目标方法执行之后
                    *  无论目标方法是否遇到异常,都执行
                    *  经常做一些关闭资源
              -->
              <!--
             <aop:after method="finallyMethod" pointcut-ref="perform"/>
              -->
             <!--
                 异常通知
                    目的就是为了获取目标方法抛出的异常
              -->
              <aop:after-throwing method="exceptionMethod" throwing="ex" pointcut-ref="perform"/>
              <!--
                  环绕通知
                     能控制目标方法的执行
               -->
              <aop:around method="aroundMethod" pointcut-ref="perform"/>
         </aop:aspect>
    </aop:config>
AOP总结:
* 原理
* * 加载配置文件,启动spring容器
* * spring容器为bean创建对象
* * 解析aop的配置,会解析切入点表达式
* * 看纳入spring管理的那个类和切入点表达式匹配,如果匹配则会为该类创建代理对象
* * 代理对象的方法体的形成就是目标方法+通知
* * 客户端在context.getBean时,如果该bean有代理对象,则返回代理对象,如果没有代理对象则返回原来的对象
* 说明:
* 如果目标类实现了接口,则spring容器会采用jdkproxy,如果目标类没有实现接口,则spring容器会采用
* cglibproxy
---------------------------------------------------------------------------------------------------------------------------------------------
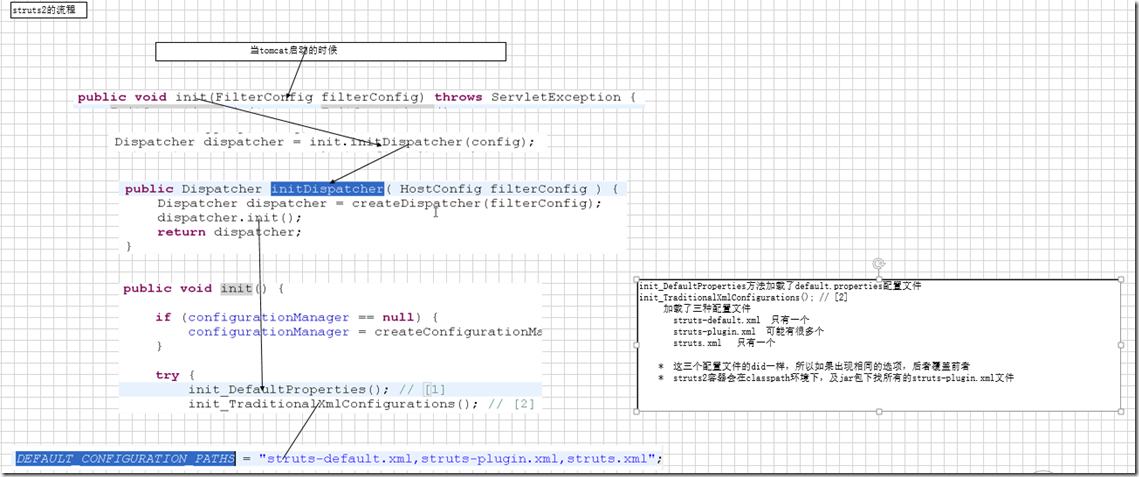
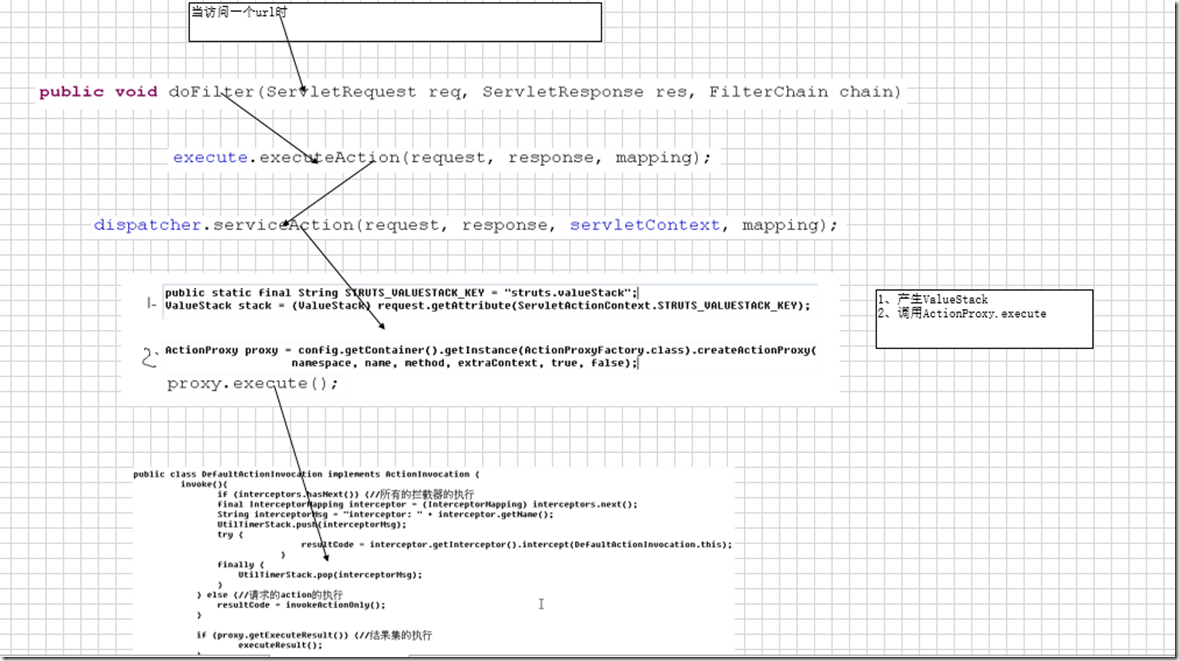
Struts2
问题:
* action是单例还是多例?怎么样证明?
Action是多例的,在构造函数中输出一句话,如果请求好几次,只输出一次,单例
如果请求很多次,输出很多次,多例
* struts2有三个类
ActionContext
ServletActionContext 建立struts2与servlet的通信的桥梁
ActionInvocation struts2总的上下文
* struts2的数据都在值栈中,怎么样保证数据的安全性?值栈的生命周期是什么?
因为ValueStack在ActionContext中,而ActionContext在ThreadLoad中,所以可以保证数据的安全性
值栈的生命周期是一次请求,当前的action,actioncontext,valuestack的生命周期是一致的
--------------------------------------------------------------------------------------------------------
